


SpringBoot是基于Spring的轻量级框架,它通过消除Spring的复杂例行配置,降低了新建项目的难度。本文将详细介绍如何快速搭建一个SpringBoot项目,涵盖项目创建、配置、启动及测试的全过程。
一、SpringBoot项目概述
SpringBoot提供了以下关键特性:
- 独立的Spring应用程序:可以创建可执行的JARs和WARs。
- 内嵌Servlet容器:如Tomcat或Jetty。
- 自动配置:通过“starter”项目对象模型(POMs)简化Maven配置。
- 无代码生成和XML配置:完全基于Java配置。
二、快速搭建SpringBoot项目
1. 前期准备
在开始搭建SpringBoot项目之前,确保你已经安装了以下工具:
- JDK:Java开发工具包。
- Maven:项目管理和构建工具。
- IDE:集成开发环境,如IntelliJ IDEA或Eclipse。
2. 创建项目
有三种常见的创建SpringBoot项目的方法:
方法一:使用Spring Initializr
- 打开浏览器,访问Spring Initializr。
- 填写项目信息,包括GroupId、ArtifactId、项目名称、打包方式等。
- 选择依赖项,如Spring Web、Spring Data JPA等。
- 点击“Generate”按钮,下载生成的zip包。
- 解压zip包,并将项目导入到你的IDE中。
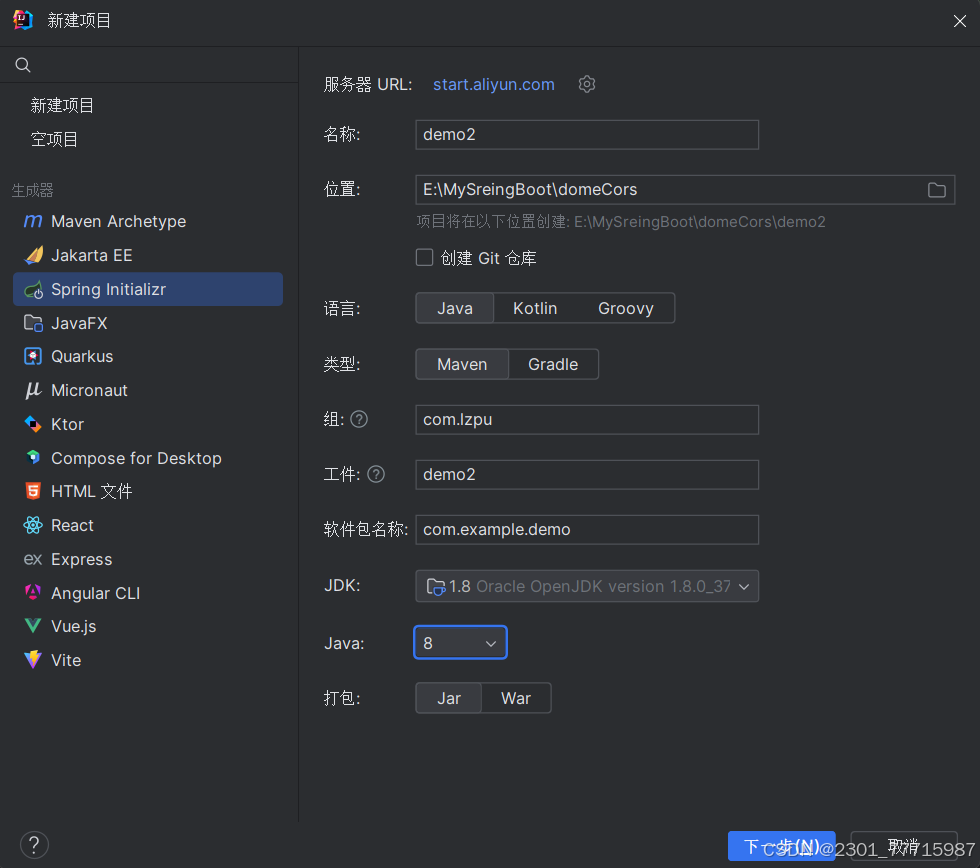
方法二:使用IDE创建
以IntelliJ IDEA为例:
- 打开IntelliJ IDEA,点击“New Project”。
- 选择“Spring Initializr”,填写项目信息。
- 选择依赖项,点击“Next”。
- 点击“Finish”,完成项目创建。
- 下面是参考图
方法三:使用Maven手工构建
- 创建一个普通的Maven项目。
- 在
pom.xml文件中添加Spring Boot的依赖和插件。
例如:
<project xmlns="http://maven.apache.org/POM/4.0.0"
         xmlns:xsi="http://www.w3.org/2001/XMLSchema-instance"
         xsi:schemaLocation="http://maven.apache.org/POM/4.0.0 http://maven.apache.org/xsd/maven-4.0.0.xsd">
    <modelVersion>4.0.0</modelVersion>
    <groupId>com.springboot</groupId>
    <artifactId>springsecuritydemo</artifactId>
    <version>1.0-SNAPSHOT</version>
    <parent>
        <groupId>org.springframework.boot</groupId>
        <artifactId>spring-boot-starter-parent</artifactId>
        <version>2.7.8</version>
    </parent>
    <dependencies>
        <dependency>
            <groupId>org.springframework.boot</groupId>
            <artifactId>spring-boot-starter-web</artifactId>
        </dependency>
        <dependency>
            <groupId>org.springframework.boot</groupId>
            <artifactId>spring-boot-starter-test</artifactId>
            <scope>test</scope>
        </dependency>
    </dependencies>
    <build>
        <plugins>
            <plugin>
                <groupId>org.springframework.boot</groupId>
                <artifactId>spring-boot-maven-plugin</artifactId>
            </plugin>
        </plugins>
    </build>
</project>
3. 项目结构
创建完成后,项目结构通常如下:
src/main/java:编写业务代码的目录。src/main/resources:放置配置文件的目录。src/test/java:编写测试用例的目录。pom.xml:Maven项目的配置文件。
4. 创建启动类
在src/main/java目录下创建一个启动类,例如SpringBootStartApplication:
package com.springboot.start;

import org.springframework.boot.SpringApplication;
import org.springframework.boot.autoconfigure.SpringBootApplication;

@SpringBootApplication(scanBasePackages = "com.springboot")
public class SpringBootStartApplication {
    public static void main(String[] args) {
        SpringApplication.run(SpringBootStartApplication.class, args);
    }
}@SpringBootApplication注解是一个元注解,包括@SpringBootConfiguration(等价于@Configuration)、@EnableAutoConfiguration和@ComponentScan。
5. 配置文件
在src/main/resources目录下创建一个application.properties文件,用于配置应用程序的属性。
例如:
# 端口号
server.port=8099
6. 创建Controller
在src/main/java目录下创建一个Controller类,例如DemoController:
package com.springboot.controller;

import org.springframework.web.bind.annotation.RequestMapping;
import org.springframework.web.bind.annotation.RequestMethod;
import org.springframework.web.bind.annotation.RestController;

@RestController
public class DemoController {
    @RequestMapping(value = "/hello", method = RequestMethod.GET)
    public String say() {
        return "Hello World";
    }
}
7. 运行项目
在IDE中运行SpringBootStartApplication类的main方法,或者在命令行中执行以下命令:
mvn spring-boot:run项目启动后,打开浏览器访问http://localhost:8099/hello,应该能够看到“Hello World”的响应。
三、项目完善
一个完整的SpringBoot项目通常还会包括数据库访问、服务层、数据访问层等组件。以下是一个简单的示例:
1. 添加数据库依赖
在pom.xml文件中添加Spring Data JPA和数据库驱动的依赖:
<dependency>
    <groupId>org.springframework.boot</groupId>
    <artifactId>spring-boot-starter-data-jpa</artifactId>
</dependency>
<dependency>
    <groupId>com.h2database</groupId>
    <artifactId>h2</artifactId>
    <scope>runtime</scope>
</dependency>
2. 配置数据库连接
在application.properties文件中配置数据库连接信息:
# 数据库连接
spring.datasource.url=jdbc:h2:mem:testdb
spring.datasource.driverClassName=org.h2.Driver
spring.datasource.username=sa
spring.datasource.password=password
spring.jpa.database-platform=org.hibernate.dialect.H2Dialect
3. 创建实体类
在src/main/java目录下创建一个实体类,例如User:
package com.springboot.model;

import javax.persistence.Entity;
import javax.persistence.GeneratedValue;
import javax.persistence.GenerationType;
import javax.persistence.Id;

@Entity
public class User {
    @Id
    @GeneratedValue(strategy = GenerationType.IDENTITY)
    private Long id;
    private String name;
    private String email;

    // Getters and Setters
}
4. 创建Repository接口
在src/main/java目录下创建一个Repository接口,例如UserRepository:
package com.springboot.repository;

import com.springboot.model.User;
import org.springframework.data.jpa.repository.JpaRepository;

public interface UserRepository extends JpaRepository<User, Long> {
}
5. 创建Service类
在src/main/java目录下创建一个Service类,例如UserService:
package com.springboot.service;

import com.springboot.model.User;
import com.springboot.repository.UserRepository;
import org.springframework.beans.factory.annotation.Autowired;
import org.springframework.stereotype.Service;

import java.util.List;

@Service
public class UserService {
    @Autowired
    private UserRepository userRepository;

    public List<User> getAllUsers() {
        return userRepository.findAll();
    }

    public User saveUser(User user) {
        return userRepository.save(user);
    }
}
6. 修改Controller类
修改DemoController类,添加对UserService的依赖,并创建新的API接口:
package com.springboot.controller;

import com.springboot.model.User;
import com.springboot.service.UserService;
import org.springframework.beans.factory.annotation.Autowired;
import org.springframework.web.bind.annotation.*;

import java.util.List;

@RestController
public class DemoController


 2006
2006

 被折叠的 条评论
为什么被折叠?
被折叠的 条评论
为什么被折叠?
 到【灌水乐园】发言


