


java基本注解
注解
注解与注释的区别
- 注释 :增强代码的可阅读性,并不会对程序的执行产生任何影响。
- 注解 :给编译器或运行时环境提供额外的信息,能够影响程序的编译或运行行为。
常见注解
@Override
明确标记一个方法是覆盖(重写)了父类中的方法。
class Animal {
    void makeSound() {
        System.out.println("Animal makes a sound");
    }
}

class Dog extends Animal {
    @Override
    void makeSound() {
        System.out.println("Dog barks");
    }
}
@Deprecated
标记一个类、方法或字段已过时,不推荐使用。
@Deprecated
public void oldMethod() {
    // 过时的方法
}
@SuppressWarnings
作用:抑制编译器警告。
- @SuppressWarnings(“unchecked”) [^ 抑制单类型的警告]
- @SuppressWarnings(“unchecked”,“rawtypes”) [^ 抑制多类型的警告]
- @SuppressWarnings(“all”) [^ 抑制所有类型的警告]
@Retention
RetentionPolicy.SOURCE:注解只保留在源文件,当Java文件编译成class文件的时候,注解被遗弃;也就是编译时有效。
RetentionPolicy.CLASS:注解被保留到class文件,但jvm加载class文件时候被遗弃,这是默认的生命周期;加载时被抛弃。
RetentionPolicy.RUNTIME:注解不仅被保存到class文件中,jvm加载class文件之后,仍然存在;一直有效!
@Target
@Target:@Target只能用在注解上,指定修饰的注解的使用范围
@Inherited
如果一个类用上了@Inherited修饰的注解,那么其子类也会继承这个注解。
@Repeatable
需要以下两个步骤:
-
定义一个可重复的注解,并使用
@Repeatable指定其容器注解。 -
定义一个容器注解,用于存储多个可重复的注解。
import java.lang.annotation.Repeatable;
import java.lang.annotation.Retention;
import java.lang.annotation.RetentionPolicy;

// 定义可重复的注解
@Repeatable(MyAnnotations.class) // 指定容器注解
@Retention(RetentionPolicy.RUNTIME)
public @interface MyAnnotation {
    String value();
}

// 定义容器注解
@Retention(RetentionPolicy.RUNTIME)
public @interface MyAnnotations {
    MyAnnotation[] value(); // 存储多个 MyAnnotation 注解
}

// 使用可重复的注解
@MyAnnotation("First")
@MyAnnotation("Second")
public class MyClass {
    // 类逻辑
}
注意事项:
@Repeatable 所声明的注解,其元注解@Target的使用范围要比@Repeatable的值声明的注解中的@Target的范围要大或相同,否则编译器错误,显示@Repeatable值所声明的注解的元注解@Target不是@Repeatable声明的注解的@Target的子集
@Repeatable注解声明的注解的元注解@Retention的周期要比@Repeatable的值指向的注解的@Retention得周期要小或相同。
自定义注解
- 修饰符: 访问修饰符必须为public,不写默认为pubic;
- 关键字: 关键字为@interface;
- 注解名称: 注解名称为自定义注解的名称,使用时还会用到;
- 注解内容: 注解中内容,对注解的描述。
public @interface MyAnnotation {
    String value(); // 注解属性
    int priority() default 0; // 带默认值的注解属性
}
反射
概念
在运行状态中,对于任意一个类,都能够知道这个类的所有属性和方法;对于任意一个对象,都能够调用它的任意一个方法和属性;
常用API
1.只能拿到public方法(包括继承的类或接口的方法)
public Method[] getMethods()2.getDeclaredMethods返回 Method 对象的一个数组,这些对象反映此 Class 对象表示的类或接口声明的所有方法,包括公共、保护、默认(包)访问和私有方法,但不包括继承的方法。
public Method[] getDeclaredMethods()3.在Class对象和Method对象是都存在isAnnotationPresent这个方法的,作用是判断它是否应用了某个注解
public boolean isAnnotationPresent(Class<? extends Annotation> annotationClass) {}4.通过 getAnnotation() 方法来获取 Annotation 对象。
public <A extends Annotation> A getAnnotation(Class<A> annotationClass) {}5.或者是 getAnnotations() 方法,获取所有的注解
如果获取到的 Annotation 如果不为 null,则就可以调用它们的属性方法了。
public Annotation[] getAnnotations() {}6.获取到Annotation之后,就可以通过annotationType获取注解的class结构信息,有了class信息就可以获取注解的变量名,等等
Class<? extends Annotation> annotationType();7.getParameterAnnotations :返回表示按照声明顺序对此 Method 对象所表示方法的形参进行注释的那个数组的数组
public Annotation[][] getParameterAnnotations();反射与注解
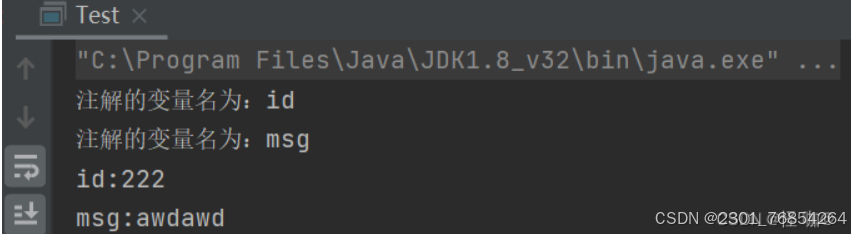
读取类上的注解
@Target(ElementType.TYPE)
@Retention(RetentionPolicy.RUNTIME)
public @interface TestAnnotation {
    public int id() default -1;

    public String msg() default "Hi";
}
import java.lang.reflect.Method;

@TestAnnotation(id = 222,msg = "awdawd")
public class Test {
    public static void main(String[] args) {
        Method[] declaredMethods1 = TestAnnotation.class.getDeclaredMethods();
        for (Method meth : declaredMethods1) {
            System.out.println("注解的变量名为:" + meth.getName());
        }

        // 首先判断Test类上是否使用了TestAnnotation注解
        boolean hasAnnotation = Test.class.isAnnotationPresent(TestAnnotation.class);
        if (hasAnnotation) {
            // 获取注解,这个相当于是真正的拿到注解了,只有获取到这个才能获取到注解当中设置的值
            TestAnnotation testAnnotation = Test.class.getAnnotation(TestAnnotation.class);
            System.out.println("id:" + testAnnotation.id());
            System.out.println("msg:" + testAnnotation.msg());
        }
    }
}
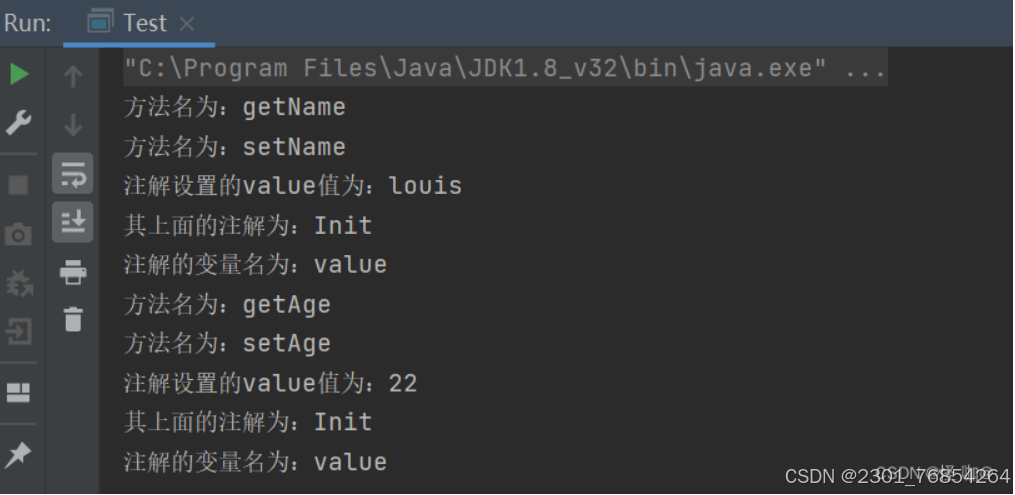
读取方法上的注解
public class User {
    private String name;
    private String age;

    public String getName() {
        return name;
    }

    @Init("louis")
    public User setName(String name) {
        this.name = name;
        return this;
    }

    public String getAge() {
        return age;
    }

    @Init("22")
    public User setAge(String age) {
        this.age = age;
        return this;
    }
}
//读取注解信息
public class ReadAnnotationInfoTest {
    public static void main(String[] args) throws Exception {
        // 测试AnnotationTest类,得到此类的类对象
        Class c = Class.forName("com.gzl.cn.springbootnacos.my.User");
        // 获取该类所有声明的方法
        Method[] methods = c.getDeclaredMethods();
        // 声明注解集合
        Annotation[] annotations;
        // 遍历所有的方法得到各方法上面的注解信息
        for (Method method : methods) {
            // 获取每个方法上面所声明的所有注解信息
            annotations = method.getDeclaredAnnotations();
            System.out.println("方法名为:" + method.getName());

            if (method.isAnnotationPresent(Init.class)){
                Init annotation = method.getAnnotation(Init.class);
                System.out.println("注解设置的value值为:" + annotation.value());
            }

            for (Annotation an : annotations) {
                System.out.println("其上面的注解为:" + an.annotationType().getSimpleName());
                // 获取注解class对象
                Class<? extends Annotation> aClass = an.annotationType();
                // 通过class对象获取他的所有属性方法
                Method[] meths = aClass.getDeclaredMethods();
                // 遍历每个注解的所有变量
                for (Method meth : meths) {
                    System.out.println("注解的变量名为:" + meth.getName());
                }
            }
        }
    }
}
读取字段上的注解
读取方法参数注解
注解配合枚举使用
Spring基本注解
1.@Controller、@Service、 @Repository、 @Configuration
用于标注各个层级的注解,注入到spring容器管理:
@Controller 标注于控制层
@Service 标注于业务层
@Repository 标注于dao持久层
@Configuration 标注于配置层
@Controller
@RequestMapping(value = "/api/user")
public class UserController {
}
2. @Bean
@Bean是一个方法级别上的注解,主要用在@Configuration注解的类里,也可以用在@Component注解的类里。Spring的@Bean注解用于告诉方法,产生一个Bean对象,然后这个Bean对象交给Spring管理。
示例:
在src根目录下创建一个AppConfig的配置类,这个配置类也就是管理一个或多个bean 的配置类,并在其内部声明一个userService的bean
@Configuration
public class AppConfig {
    @Bean
    public UserService userService(AccountRepository accountRepository) {
        return new UserServiceImpl(accountRepository);
    }
}
这个配置就等同于之前在xml里的配置:
@Configuration可理解为用spring的时候xml里面的< beans >标签
@Bean可理解为用spring的时候xml里面的< bean >标签
<beans>
    <bean id="userService" class="com.test.UserServiceImpl"  depends-on="accountRepository"/>
</beans>
3. @ResponseBody、@RequestMapping、@RequestBody
@ResponseBody:
该方法的返回的结果直接写入 HTTP 响应正文(ResponseBody)中。
@RequestMapping:
该方法用来处理请求地址映射的注解。
@RequestBody:
用于接收前端请求的Json参数,并且封装到对应的JavaBean。
示例:
@Controller
public class UserContorller{
	@Autowired
	private UserService userService;

	@ResponseBody
	@RequestMapping(value = "userLogin", method = RequestMethod.POST)
	// 将前端ajax发出的请求写入User对象中
	public String login(@RequestBody User user) {
	    return userService.getLogin(user);
	}
}
SpringBoot基本注解
@Component、@ConfigurationProperties、@Value
@Component:
实现bean的注入,当类不属于各种归类的时候(不属于@Controller、@Services等的时候),就可以使用@Component来标注这个类。
@ConfigurationProperties:
批量注入.properties配置文件中的属性,prefix的值是properties文件中属性的前缀。
@Value:
单个注入.properties配置文件中的属性。
配置文件内容:
spring.datasource.url=jdbc:mysql://127.0.0.1:8888/test?useUnicode=false&autoReconnect=true&characterEncoding=utf-8
spring.datasource.username=root
spring.datasource.password=root
spring.datasource.driver-class-name=com.mysql.jdbc.Driver
spring.datasource.type=com.alibaba.druid.pool.DruidDataSource
Java类-@ConfigurationProperties写法:
@Component
@Data
@ConfigurationProperties(prefix = "spring.datasource")
public class DataBaseConfig {

    public String url;
    public String username;
    public String password;
    // 配置文件中是driver-class-name, 转驼峰命名便可以绑定成
    public String driverClassName;
    public String type;
}
Java类-@Value写法:
@Component
@Data
public class DataBaseConfig {

	@Value("${spring.datasource.url}")
    public String url;
    @Value("${spring.datasource.username}")
    public String username;
    @Value("${spring.datasource.password}")
    public String password;
    // 配置文件中是driver-class-name, 转驼峰命名便可以绑定成
    @Value("${spring.datasource.driver-class-name}")
    public String driverClassName;
    @Value("${spring.datasource.type}")
    public String type;
}
用法:
@Controller
@RequestMapping(value = "/config")
public class ConfigurationPropertiesController {

    @Autowired
    private DataBaseConfig dataBaseConfig ;

    @RequestMapping("/test")
    @ResponseBody
    public Map<String, Object> test(){

        Map<String, Object> map = new HashMap<>();
        map.put("url", dataBaseConfig.url);
        map.put("userName", dataBaseConfig.username);
        map.put("password", dataBaseConfig.password);
        map.put("className", dataBaseConfig.driverClassName);
        map.put("type", dataBaseConfig.type);

        return map;
    }
}
@Mapper和@MapperScan(Mybatis注解)
在使用Mybatis持久层框架来操作数据库时,使用@Mapper注解和@MapperScan注解来将Mapper接口类交给Sprinig进行管理,能够让其他类进行引用。
@Mapper:
在dao接口类中,添加此注解。麻烦点在于每个dao接口类都必须添加此注解;
示例:
@Repository
@Mapper
public interface UserDao {
}
@MapperScan:
可以指定要扫描的dao接口类的包路径,可以在启动类中添加此注解,可替代@Mapper注解(此包下的dao接口类不用再添加@Mapper注解)
示例:
@SpringBootApplication
@MapperScan("com.test.dao")
public class TestDemoApplication{
    public static void main(String[] args) {
       SpringApplication.run(TestDemoApplication.class, args);
    }
}
@SpringBootApplication
@SpringBootApplication的作用等价于同时组合使用@EnableAutoConfiguration,@ComponentScan,@SpringBootConfiguration,是这三个注解的复合注解。每次写三个会显得极其麻烦,将其整合。
Springboot是通过注解@EnableAutoConfiguration的方式,去查找、过滤、加载所需的配置文件,@ComponentScan扫描我们自定义的bean,@SpringBootConfiguration使得被@SpringBootApplication注解的类声明为注解类。
@SpringBootApplication默认扫描主程序所在的包以及所有子包内的组件。如果需要改变扫描路径,带上参数scanBasePackages则会扫描指定路径。
@SpringBootApplication(scanBasePackages={"com.test"})
public class TestDemoApplication{
    public static void main(String[] args) {
       SpringApplication.run(TestDemoApplication.class, args);
    }
}
@Autowired、@Resource
注入bean的两个注解,其中:
@Autowired是Spring自带的
@Resource是JSR250规范的实现,需要导入javax.annotation实现注入
在Spring框架中,如果在Service层中需要注入其他依赖的对象,通常我们都会使用@Autowired或者@Resource注解,两者使用上没有太大区别。
只是@Autowired跟Spring框架强耦合了, 如果换成其他框架,@Autowired就没作用了。而@Resource是JSR-250提供的,它是Java标准,绝大部分框架都支持。
    @Autowired
    private UserDao userDao;
	//默认需要配置与变量名一致,一般会指定一个name属性
    @Resource(name = "userDao")
    private UserDao userDao;


 27万+
27万+

 被折叠的 条评论
为什么被折叠?
被折叠的 条评论
为什么被折叠?
 到【灌水乐园】发言


