


1.创建路由
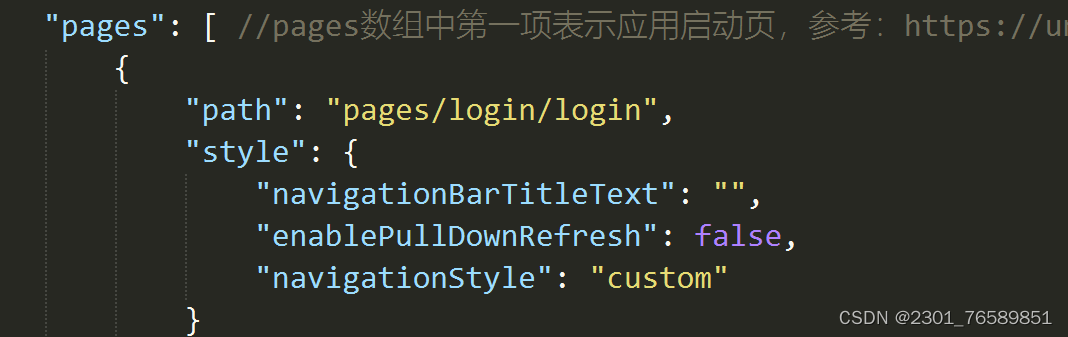 2.页面搭建
点击登录/注册切换页面
效果:
QQ2024620-1810
代码:
<template>
<view class="login">
<view class="title">
<view>
<span>hello</span>
</view>
<view>
<span>欢迎登录请假管理系统</span>
</view>
</view>
<view class="form">
<input class="uni-input" v-model="username" type="text" placeholder="请输入账号" />
<input class="uni-input" v-model="password" password type="text" placeholder="请输入密码" />
</view>
<view class="btn">
<button @tap="login">立即登录</button>
<view class="tip" >
<text type="primary" @click="addnew">没有账号,请先注册</text>
</view>
</view>
</view>
</template>
<script>
export default {
data() {
return {
username: "",
password: ""
}
},
methods: {
login() {
uniCloud.callFunction({
name: "login",
data: {
username: this.username,
password: this.password
},
success: (res) => {
console.log(res);
if (res.result.code == 200) {
uni.showToast({
title: "登录成功"
})
setTimeout(() => {
uni.navigateTo({
url: "/pages/index/index"
})
//把用户名存储到本地存储中
uni.setStorageSync("name", res.result.user.name)
}, 2000)
} else {
//1.如果用户不存在,或者密码错误弹出提示框
//2.进入请假页面,如何只显示当前登录的用户请假列表
uni.showToast({
title: res.result.msg,
icon: "none"
})
}
}
})
},
addnew() {
uni.navigateTo({
url: "/pages/login/new"
})
},
}
}
</script>
<style lang="scss">
.login {
padding: 100rpx 40rpx;
background: url("../../static/login-bg.png");
background-size: 100% 100%;
height: 100vh;
.title {
font-weight: bolder;
font-size: 40rpx;
}
.form {
margin-top: 100rpx;
input {
border-bottom: 1px solid #d6d6d6;
margin-bottom: 40rpx;
}
}
.btn {
margin-top: 100rpx;
button {
background-color: #11d77e;
color: white;
}
.tip {
text-align: right;
color: gray;
margin-top: 20rpx;
}
}
}
</style>
注册页
<template>
<view class="new">
<view class="title">
<view>
<span>hello</span>
</view>
<view>
<span>欢迎登录请假管理系统</span>
</view>
</view>
<view class="form">
<view class="form">
<input class="uni-input" v-model="name" type="text" placeholder="请输入姓名" />
<input class="uni-input" v-model="username" type="text" placeholder="请输入账号" />
<input class="uni-input" v-model="stuNo" type="text" placeholder="请输入学号" />
<input class="uni-input" v-model="stuClass" type="text" placeholder="请输入班级" />
<input class="uni-input" v-model="password" password type="text" placeholder="请输入密码" />
</view>
</view>
<view class="btn">
<button @tap="addnew">立即注册</button>
<view class="tip">
<text type="primary" @click="addlogin">已有账号,前往登录</text>
</view>
</view>
</view>
</template>
<script>
export default {
data() {
return {
name: "",
username: "",
stuNo: "",
stuClass: "",
password: ""
}
},
methods: {
addnew() {
/* 后端需要一个新增假条的接口方法
1. 先拿到页面数据、 附件、 理由、 开始时间、 结束时间、 请假人、 班级、 假条生成时间
2. 调用后端的接口, 去实现新增假条的功能 */
uniCloud.callFunction({
//函数名(接口名)
name: "new",
data: {
username: this.username,
password: this.password,
name: this.name,
stuNo: this.stuNo,
stuClass: this.stuClass
},
success: (res) => {
console.log(res);
if (res.result.code == 200) {
uni.showToast({
title: "注册成功",
icon: "none",
duration: 2000
})
setTimeout(() => {
uni.navigateTo({
url: "/pages/login/login"
})
}, 2000)
//跳转到请假列表 思考如何刷新数据
}
}
})
},
addlogin(){
uni.navigateTo({
url: "/pages/login/login"
})
}
}
}
</script>
<style lang="scss">
.new {
padding: 100rpx 40rpx;
background: url("../../static/login-bg.png");
background-size: 100% 100%;
height: 100vh;
.title {
font-weight: bolder;
font-size: 40rpx;
}
.form {
margin-top: 100rpx;
input {
border-bottom: 1px solid #d6d6d6;
margin-bottom: 40rpx;
}
}
.btn {
margin-top: 100rpx;
button {
background-color: #11d77e;
color: white;
}
.tip {
text-align: right;
color: gray;
margin-top: 20rpx;
}
}
}
</style>
uni-app有自己的内置组件,内置组件基本适配了手机的风格。但有时候内置组件只能满足基础需求,当需要更多场景时,就要使用到扩展组件。从性能上面来说,扩展组件的性能略低于内置组件,因此开发者切勿抛弃内置组件,直接使用全套的第三方UI组件库。
uni-app官方对组件的使用建议如下:
1、优先使用内置组件
2、然后使用uni-ui扩展组件
3、其他需求依靠插件市场的其他组件灵活补充。
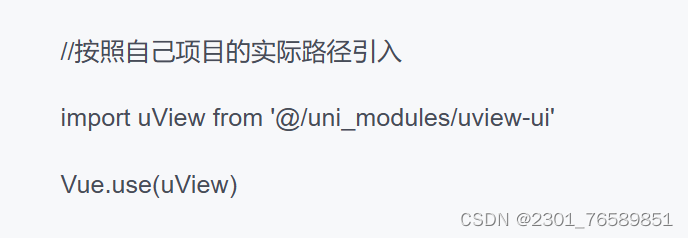
以下介绍其中一款第三方插件的使用流程,以uView为例:
1、前往uView插件市场,下载相关插件到项目中,下载网址为:网址 https://ext.dcloud.net.cn/plugin?id=1593
2、进行项目的基础配置
2.1 main.js中添加如下配置:


 851
851

 被折叠的 条评论
为什么被折叠?
被折叠的 条评论
为什么被折叠?
 到【灌水乐园】发言


