


第一章:
实现第一个微信小程序:
json:
{}wxss:
/**index.scss**/
page {
  height: 100vh;
  display: flex;
  flex-direction: column;
}
.scrollarea {
  flex: 1;
  overflow-y: hidden;
}

.userinfo {
  display: flex;
  flex-direction: column;
  align-items: center;
  color: #aaa;
  width: 80%;
}

.userinfo-avatar {
  overflow: hidden;
  width: 128rpx;
  height: 128rpx;
  margin: 20rpx;
  border-radius: 50%;
}

.usermotto {
  margin-top: 200px;
}

.avatar-wrapper {
  padding: 0;
  width: 56px !important;
  border-radius: 8px;
  margin-top: 40px;
  margin-bottom: 40px;
}

.avatar {
  display: block;
  width: 56px;
  height: 56px;
}

.nickname-wrapper {
  display: flex;
  width: 100%;
  padding: 16px;
  box-sizing: border-box;
  border-top: .5px solid rgba(0, 0, 0, 0.1);
  border-bottom: .5px solid rgba(0, 0, 0, 0.1);
  color: black;
}

.nickname-label {
  width: 105px;
}

.nickname-input {
  flex: 1;
}
js:
// index.ts
// 获取应用实例
const app = getApp<IAppOption>()
const defaultAvatarUrl = 'https://mmbiz.qpic.cn/mmbiz/icTdbqWNOwNRna42FI242Lcia07jQodd2FJGIYQfG0LAJGFxM4FbnQP6yfMxBgJ0F3YRqJCJ1aPAK2dQagdusBZg/0'
Component({
data: {
motto: 'Hello World',
userInfo: {
avatarUrl: defaultAvatarUrl,
nickName: '',
},
hasUserInfo: false,
canIUseGetUserProfile: wx.canIUse('getUserProfile'),
canIUseNicknameComp: wx.canIUse('input.type.nickname'),
},
methods: {
// 事件处理函数
bindViewTap() {
wx.navigateTo({
url: '../logs/logs',
})
},
onChooseAvatar(e: any) {
const { avatarUrl } = e.detail
const { nickName } = this.data.userInfo
this.setData({
"userInfo.avatarUrl": avatarUrl,
hasUserInfo: nickName && avatarUrl && avatarUrl !== defaultAvatarUrl,
})
},
onInputChange(e: any) {
const nickName = e.detail.value
const { avatarUrl } = this.data.userInfo
this.setData({
"userInfo.nickName": nickName,
hasUserInfo: nickName && avatarUrl && avatarUrl !== defaultAvatarUrl,
})
},
getUserProfile() {
// 推荐使用wx.getUserProfile获取用户信息,开发者每次通过该接口获取用户个人信息均需用户确认,开发者妥善保管用户快速填写的头像昵称,避免重复弹窗
wx.getUserProfile({
desc: '展示用户信息', // 声明获取用户个人信息后的用途,后续会展示在弹窗中,请谨慎填写
success: (res) => {
console.log(res)
this.setData({
userInfo: res.userInfo,
hasUserInfo: true
})
}
})
},
},
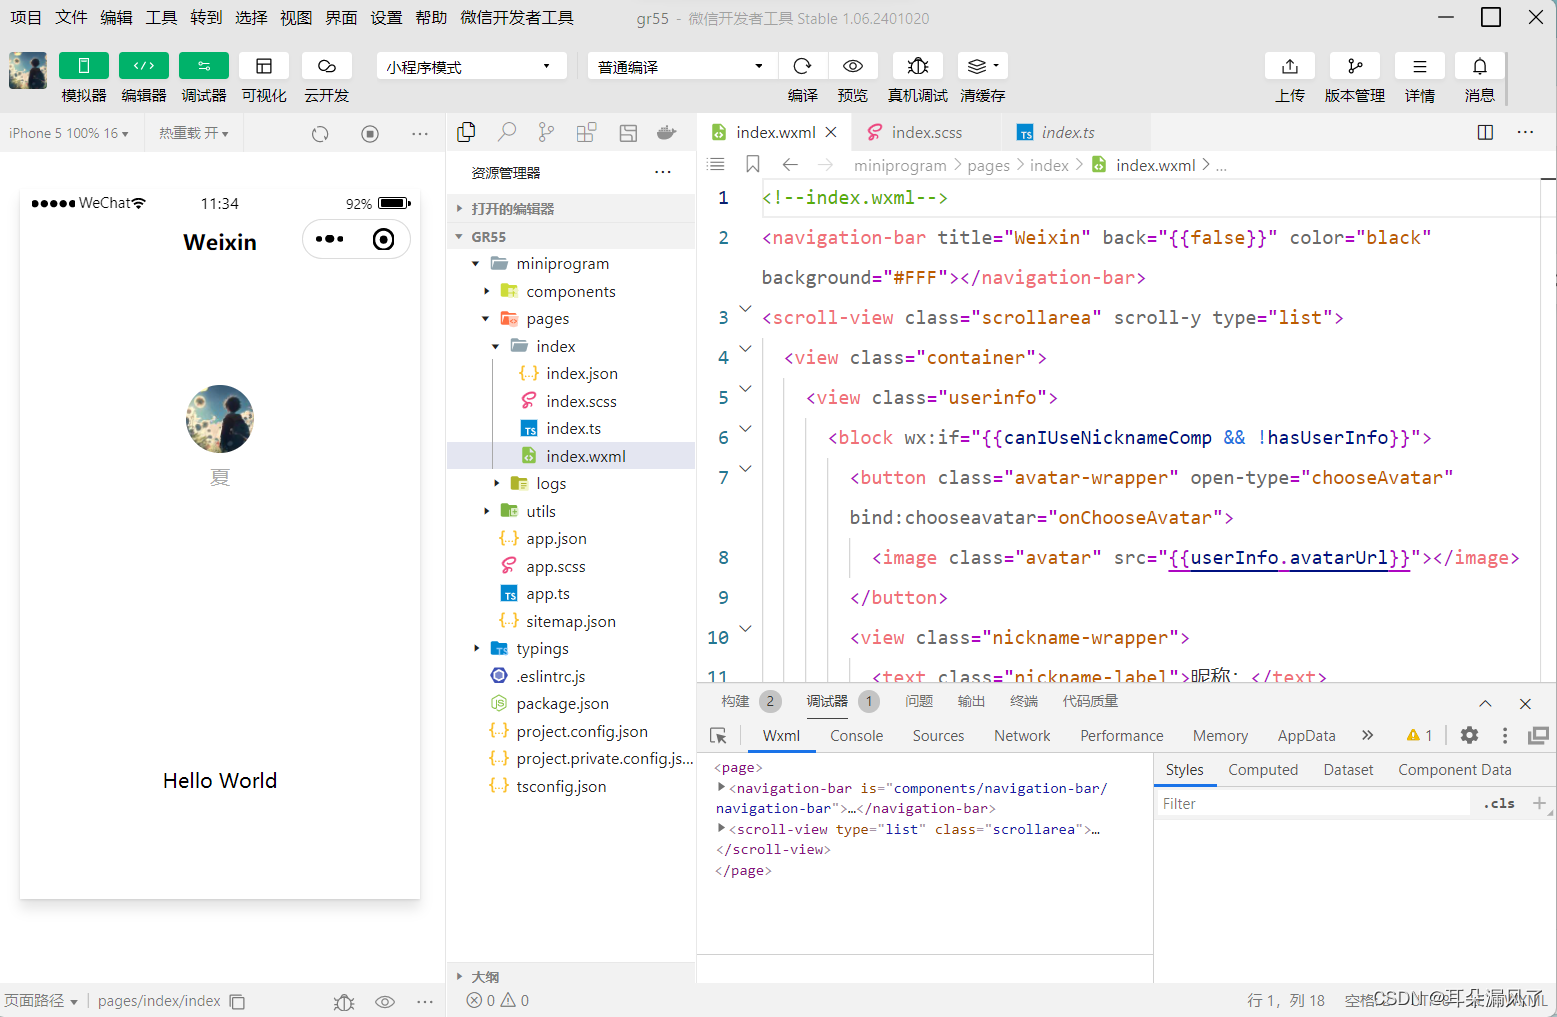
})wxml:
<!--index.wxml-->
<navigation-bar title="Weixin" back="{{false}}" color="black" background="#FFF"></navigation-bar>
<scroll-view class="scrollarea" scroll-y type="list">
  <view class="container">
    <view class="userinfo">
      <block wx:if="{{canIUseNicknameComp && !hasUserInfo}}">
        <button class="avatar-wrapper" open-type="chooseAvatar" bind:chooseavatar="onChooseAvatar">
          <image class="avatar" src="{{userInfo.avatarUrl}}"></image>
        </button>
        <view class="nickname-wrapper">
          <text class="nickname-label">昵称:</text>
          <input type="nickname" class="nickname-input" placeholder="请输入昵称" bind:change="onInputChange" />
        </view>
      </block>
      <block wx:elif="{{!hasUserInfo}}">
        <button wx:if="{{canIUseGetUserProfile}}" bindtap="getUserProfile"> 获取头像昵称 </button>
        <view wx:else> 请使用2.10.4及以上版本基础库 </view>
      </block>
      <block wx:else>
        <image bindtap="bindViewTap" class="userinfo-avatar" src="{{userInfo.avatarUrl}}" mode="cover"></image>
        <text class="userinfo-nickname">{{userInfo.nickName}}</text>
      </block>
    </view>
    <view class="usermotto">
      <text class="user-motto">{{motto}}</text>
    </view>
  </view>
</scroll-view>
效果图:
第二章:
window配置项
window配置项负责设置小程序状态栏、导航条、标题、窗口背景色等系统样式。
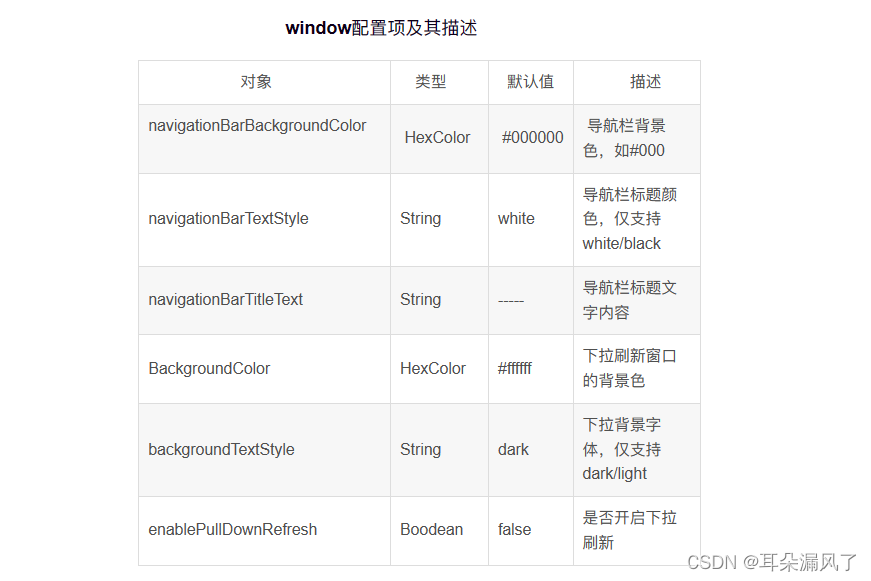
代码:
"window":{
"navigationBarBackgroundColor": "#fff",
"navigationBarTextStyle": "black",
"navigationBarTitleText":"小程序window功能演示",
"backgroundColor":"#ccc",
"backgroundTextstyle": "light"
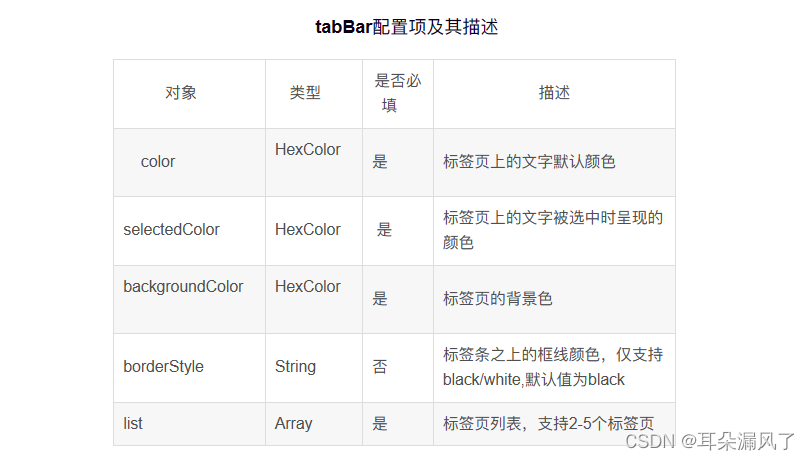
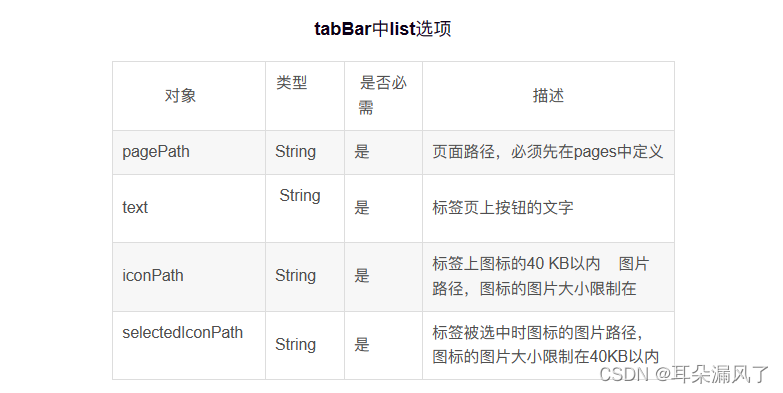
}tabBar 配置项
当需要在程序顶部或底部设置菜单栏时,可以通过配置tabBar配置项来实现。
第三章:
块级元素与行内元素
1、块级元素
(1)一个块级元素占一行。
(2)块级元素的默认高度由内容决定,除非自定义高度。
(3)块级元素的默认宽度是父级元素的内容区宽度,除非自定义宽度。 (4)块级元素的宽度、高、外边距及内边距都可以自定义设置。 (5)块级元素可以容纳块级元素和行内元素。
代码:
<!-- 每个块级元素占一行 -->
<view style="border: 1px solid #f00;text-align: center;">块级元素1</view> -->

<!-- 块级元素的宽度等于父级元素的宽度减去内边距的宽度 -->
<view style="border: 1px solid #0f0;margin: 15px;padding: 20px;text-align: center;">块级元素2</view>

<!-- 块级元素的宽度、高度自定义设置 -->
<view style="border: 1px solid #00f;width: 200px;height: 80px;text-align: center">块级元素3</view>

<!-- 块级元素的高度随内容决定,内容为块级元素 -->
<view style="border: 1px solid #ccc;text-align: center"><view style="height: 60px;">块级元素4</view></view>

<!-- 块级元素的高度随内容决定,内容为文本元素,块级元素的宽度为100px -->
<view style="border: 1px solid #f00;width: 100px;background-color: #ccc;text-align: center">父级元素高度随着内容决定,内容为文本</view>
2、行内元素
(1)行内元素不能被设置高度宽度,其高度宽度有内容决 (2)行内元素内不能放置块级元素,只级容纳文本或其他行内元素 (3)同一块内,行内元素和其他行内元素显示在同一行。<text/>组件默认为行内元素
代码:
<view style="padding: 20px;">
<text style="border: 1px solid #f00;">文本1</text>
<text style="border: 1px solid #00f;margin: 10px;padding: 5px;">文本2</text>
<view style="border: 1px solid #00f;display: inline;">块级元素设置为行内元素</view>
一行显示不全,自动换行显示
</view>
3、行内块元素
1.当元素的display属性被设置为inline-block时,元素被设置为行内块元素
代码:
<!-- 行内块元素 -->
<view>
元素显示方式的
<view style="display: inline-block;border: 1px solid #f00;margin: 10px;padding: 10px;width: 200px;">块级元素、行内元素、行内块元素
</view>三种类型
</view>
4、元素的定位
浮动布局虽然灵活,但无法对元素的位置进行精确的控制。但在css中,可以通过position属性来进行页面元素的精确定位
定位属性值:
1、static--默认值,该元素按照标准流进行布局
2、relative--相对定位,相对于它在原文档流的位置进行定位,它后面的盒子仍以标准流对待它
3、absolute--绝对定位,相对于其上一个已经定位的父元素进行定位,绝对定位的盒子从标准流中脱离,它对其后的兄弟盒子的定位没有影响
4、fixed--固定定位,相对于浏览器窗口进行对位
代码:
未定位的
<view style="border: 1px solid #0f0; width: 100px;height: 100px;">box1</view>
<view style="border: 1px solid #0f0; width: 100px;height: 100px;">box2</view>
<view style="border: 1px solid #0f0; width: 100px;height: 100px;">box3</view>

相对定位
<view style="border: 1px solid #0f0; width: 100px;height: 100px;">box1</view>
<view style="border: 1px solid #0f0; width: 100px;height: 100px;position: relative;left: 30px;top: 30px;">box2</view>
<view style="border: 1px solid #0f0; width: 100px;height: 100px;">box3</view>

绝对定位
<view style="border: 1px solid #0f0; width: 100px;height: 100px;">box1</view>
<view style="border: 1px solid #0f0; width: 100px;height: 100px;position: absolute;left: 30px;top: 30px;">box2</view>
<view style="border: 1px solid #0f0; width: 100px;height: 100px;">box3</view>

 固定定位
<view style="border: 1px solid #0f0; width: 100px;height: 100px;">box1</view>
<view style="border: 1px solid #0f0; width: 100px;height: 100px;position: fixed;left: 30px;top: 30px;">box2</view>
<view style="border: 1px solid #0f0; width: 100px;height: 100px;">box3</view>
5、flex布局
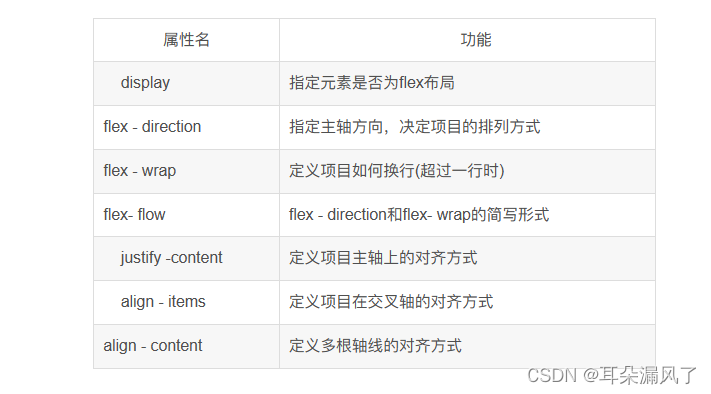
简介:flex布局主要由容器和项目组成,采用flex布局的元素成为flex容器(flex container),flex布局的所有直接子元素自动成为容器的成员,成为flex项目
第四章:
1、容器视图组件
view
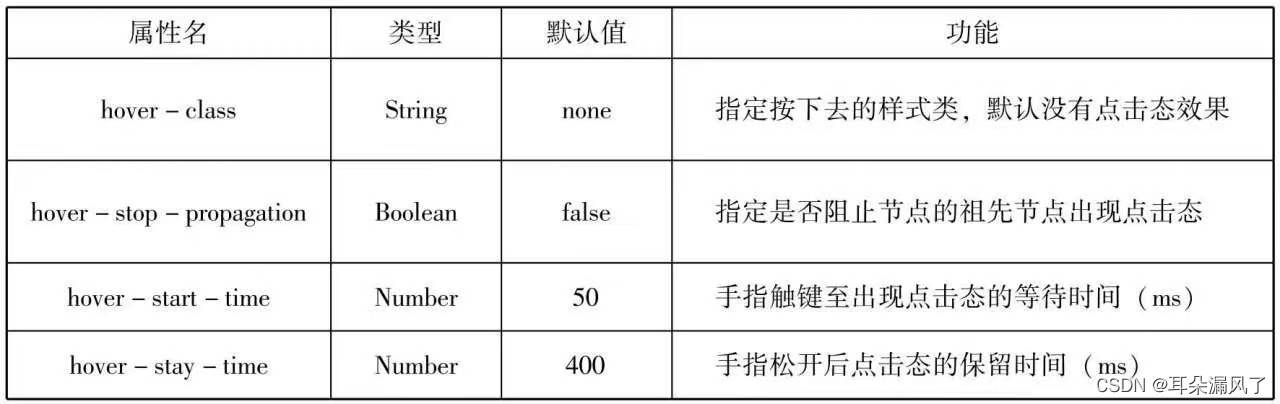
view组件的特有属性
代码:
<view style="text-align: center;">默认fiex布局</view>
<view style="display: flex;">
<view style="border: 1px solid #f00;flex-grow: 1;">1</view>
<view style="border: 1px solid #f00;flex-grow: 1;">2</view>
<view style="border: 1px solid #f00;flex-grow: 1;">3</view>
</view>
<view style="text-align: center;">上下混合布局</view>
<view style="display: flex;flex-direction: column;">
<view style="border: 1px solid #f00;">1</view>
<view style="display: flex;">
<view style="border: 1px solid #f00;flex-grow: 1;">2</view>
<view style="border: 1px solid #f00;flex-grow: 2;">3</view>
</view>
</view>
<view style="text-align: center;">左右混合布局</view>
<view style="display: flex;">
<view style="border: 1px solid #f00;flex-grow: 1;">1</view>
<view style="display: flex;flex-direction: column;flex-grow: 1;">
  <view style="border: 1px solid #f00;flex-grow: 1;">2</view>
  <view style="border: 1px solid #f00;flex-grow: 2;">3</view>
</view>
</view>
2、scroll-view
通过设置scroll-view组件的相关属性可以实现滚动视图的功能
scroll-view组件属性

注意:
(1)在使用竖向滚动时,如果需要给scroll-view组件设置一个固定高度,可以通过 SS设置 height 来完成。
(2)请勿在scroll-view组件中使用textarea、map、canvas、video组件。
(3) scroll - into - view属性的优先级高于scroll-top。
(4)由于在使用scroll-view组件时会阻止页面回弹,所以在scroll -view组件滚动时无法触发onPullDownRefresh。
(5)如果要实现页面下拉刷新,请使用页面的滚动,而不是设置scroll -view组件。这样做,能通过单击顶部状态栏回到页面顶部。
wxml:
scroll-view
<view class="container" style="padding: 0rpx;">
<scroll-view scroll-top="{{scrollTop}}" scroll-y="true"
style="height: {{scrollHeight}}px;" class="list" bind-scrolltolower="bindDownLoad"
bindscrolltoupper="topLoad" bindscroll="scroll">
<view class="item" wx:for="{{list}}">
<image class="img" src="{{item.pic_url}}"></image>
<view class="text">
<text class="title">{{item.name}}</text>
<text class="description">{{item.short_description}}</text>
</view>
</view>
</scroll-view>
<view class="body-view">
<loading hidden="{{hidden}}"bindchange="loadingChange">
加载中....</loading>
</view>
</view>
js:
// var url ="http://www.imooc.com/course/ajaxlist";
// var page=0;
// var page_size=5;
// var sort="last";
// var is_easy=0;
// var lange_id=0;
// var pos_id=0;
// var unlearn=0;
// var loadMore=function(that){
//   that.setData({
//     hidden:false
//   });
//   wx:request({
//     url:url,
//     data:{
//       page:page,
//       page_size:page_size,
//       sort:sort,
//       is_easy:is_easy,
//       lange_id:lange_id,
//       pos_id:pos_id,
//       unlearn:unlearn
//     },
//     success:function(res){
//       var list=that.data.list;
//       for(var i=0; i<res.data.list.length;i++){
//         list.push(res.data.list[i]);
//       }
//       that.setData({
//         list:list
//       });
//       page++;
//       that.setData({
//         hidden:true
//       });
//     }
//   });
// }
Page({
data:{
    hidden:true,
    list:[],
    scrollTop:0,
    scrollHeight:0
  },
  onLoad:function(){
    var that=this;
    wx.getSystemInfo({
      success:function(res){
        that.setData({
          scrollHeight:res.windowHeight
        });
      }
    });
    loadMore(that);
  },
  bindDownLoad:function(){
    var that=this;
    loadMore(that);
    console.log("lower")
  },
  scroll:function(event){
    this.setData({
      scrollTop:event.detail.scrollTop
    });
  },
  topLoad:function(event){
    page=0;
    this.setData({
      list:[],
      scrollTop:0
    });
    loadMore(this);
    console.log("lower")
  }
})
wxss:
.userinfo{
  display: flex;
  flex-direction: column;
  align-items: center;
}
.userinfo-avatar{
  width: 128rpx;
  height: 128rpx;
  margin: 20rpx;
  border-radius: 50%;
}
.userinfo-nickname{
  colro:#aaa;
}
.usermotto{
  margin-top: 200px;
}
scroll-view{
  width: 100%;
}
.item{
  width: 90%;
  height: 300rpx;
  margin: 20rpxauto;
  background: brown;
  overflow: hidden;
}
.item.img{
  width: 430rpx;
  margin-right: 20rpx;
  float: left;
}
.title{
  font-size: 30rpx;
  display: block;
  margin: 30rpxauto;
}
.description{
  font-size: 26rpx;
  line-height: 15rpx;
}
3、swiper
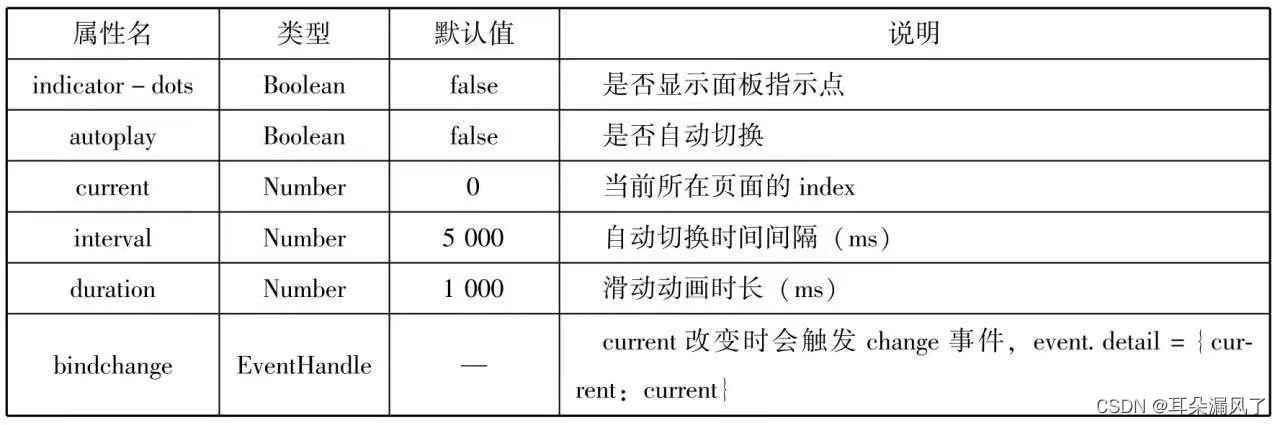
swiper组件可以实现轮播图、图片预览、滑动页面等效果
swiper组件属性
代码:
轮播图
<swiper indicator-dots='true' autoplay='true' interval='5000'duration='1000'>
<swiper-item>
<image src="/miniprogram/images/bb.jpg" style="width: 100%;"></image>
</swiper-item>
<swiper-item>
<image src="/miniprogram/images/cc.jpg" style="width: 100%;"></image>
</swiper-item>
<swiper-item>
<image src="/miniprogram/images/bb.jpg" style="width: 100%;"></image>
</swiper-item>
</swiper>
4、progress
progress组件用于显示进度状态。
progress组件属性
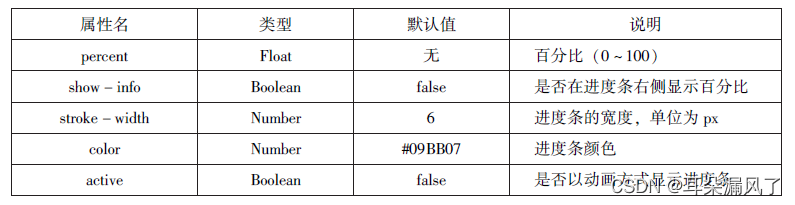
代码:
<view>显示百分比</view>
<progress percent='80' show-info='80'></progress>
<view>改变宽度</view>
<progress percent='50' stroke-width='2'></progress>
<view>自动显示进度</view>
<progress percent='80' active></progress>
4、表单组件
button
button组件用来实现用户和应用之间的交互,同时按钮的颜色起引导作用。
button组件属性
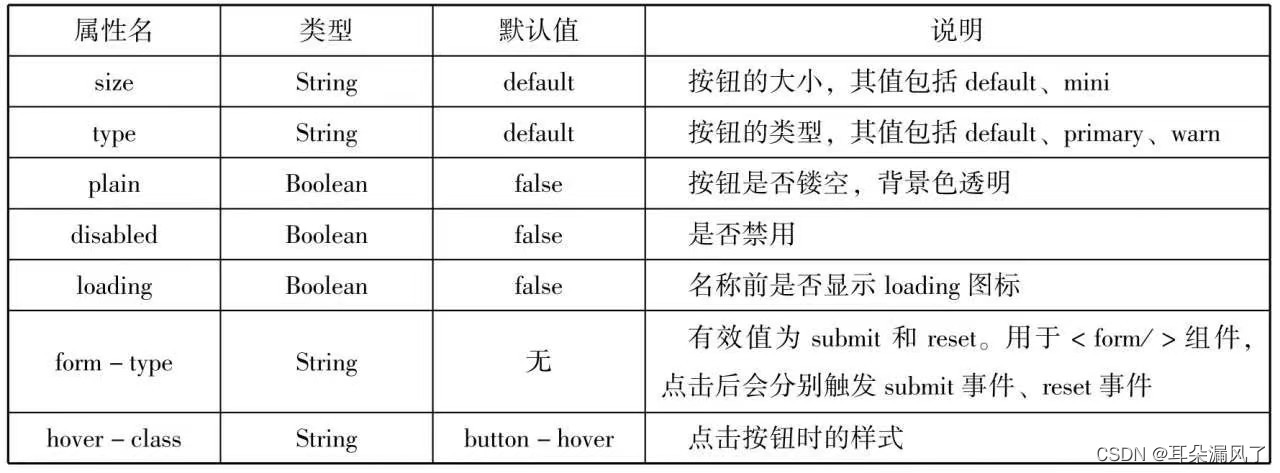
wxml:
button按钮
<button type="default">type:default</button>
<button type="primary">type:primary</button>
<button type="warn">type:warm</button>
<button type="default" bindtap='buttonSize' size="{{size}}">改变size</button>
<button type="default" bindtap='buttonPlain'plain='{{plain}}'>改变plain</button>
<button type="default" bindtap='buttonLoading'loading="{{loading}}">改变loading显示</button>
js:
Page({
  data:{
    size:'default',
    plain:'false',
    loading:'false'
  },
  buttonSize:function(){
    if(this.data.size=="default")
    this.setData({
      size:'mini'
    })
    else
    this.setData({size:'default'})
  },
  buttonPlain:function(){
    this.setData({plain:!this.data.plain})
  },
  buttonLoading:function(){
    this.setData({loading:!this.data.loading})
  }
})
checkbox
复选框用于从一组选项中选取多个选项。
checkbox-group及checkbox组件属性
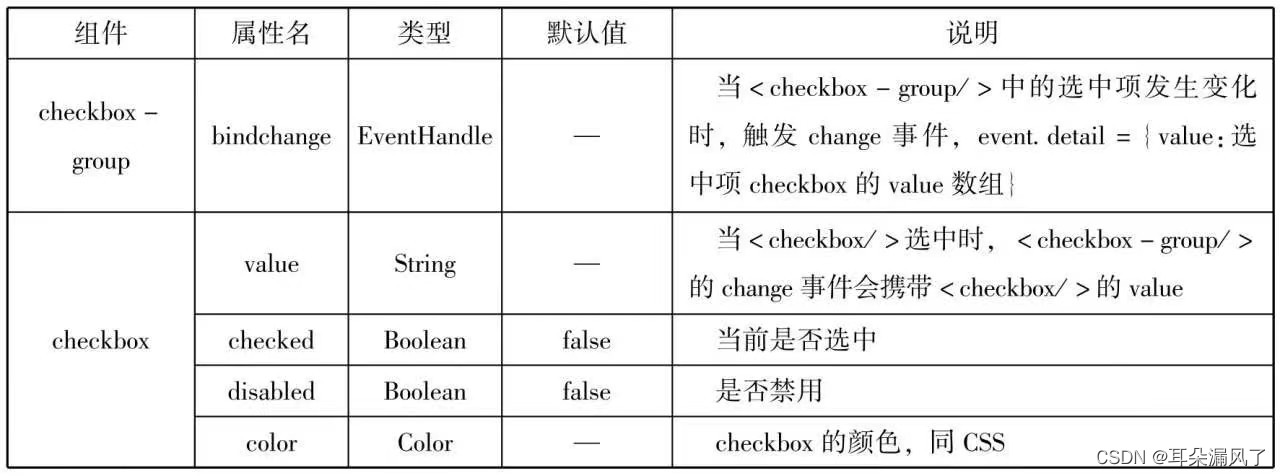
wxml:
<!-- checkbox复选框
<view>选择您想去的城市</view>
<checkbox-group bindchange="cityChange">
<label wx:for="{{citys}}">
<checkbox value="{{item.value}}"checked='{{item.checked}}'>
  {{item.value}}
</checkbox>
</label>
</checkbox-group>
<view>您的选择是:{{city}}</view> -->
js:
Page({
  data:{
    citys:[
      {name:'km',value:'昆明'},
      {name:'sy',value:'三亚'},
      {name:'zh',value:'珠海',checked:'true'},
      {name:'d1',value:'大连'}
    ]
  },
  cityChange:function(e){
    console.log(e.detail.value);
    var city =e.detail.value;
    this.setData({city:city})
  }})
picker
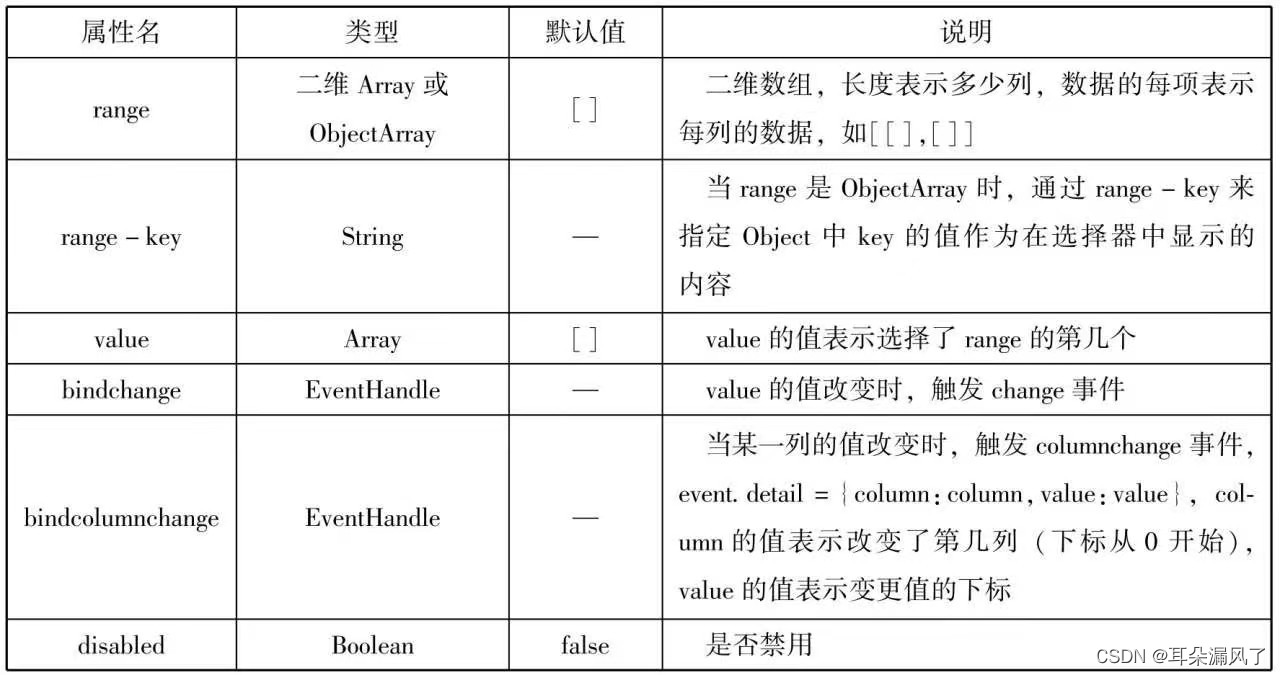
picker组件为滚动选择器,当用户点击picker组件时,系统从底部弹出选择器供用户选择。
picker组件中selector选择器属性
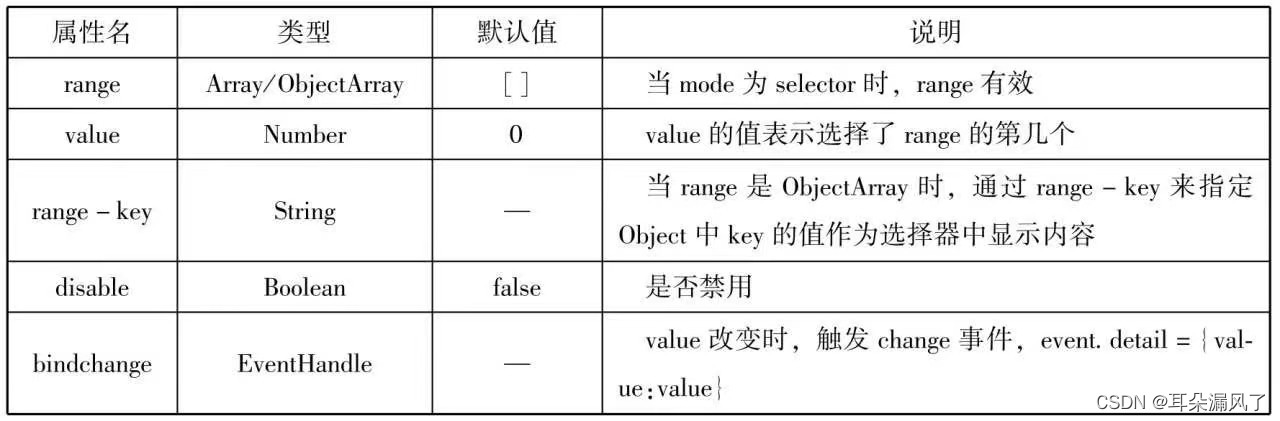
多列选择器
多列选择器(mode=multiSelector)允许用户从不同列中选择不同的选择项,其选项是二维数组对象。
picker组件multiSelector选择器属性
wxml:
<view>多列选择器</view>
<picker mode="multiSelector" bindchange="bindMultiPickerChange" bindcolumnchange="binMultiPickerColumnChange"
value="{{multiIndex}}"
range="{{multiArray}}"
>
<view>
当前选择:{{multiArray[0][multiIndex]}},{{multiArray[1][multiIndex[1]]}},{{multiArray[2][multiIndex[2]]}}
</view>
</picker>
js:
Page({
  data:{
    multiArray:[['陕西省','广东省'],['西安市','汉中市','延安市'],['雁塔区','长安区']],
    multiIndex:[0,0,0]
  },
  bindMultiPickerChange:function(e){
    console.log('picker发送选择改变。携带值为',e.detail.value)
    this.setData({
      multiIndex:e.detail.value
    })
  },
  bindMultiPickerColumnChange:function(e){
    console.log('修改的列为',e.detail.column,',值为',e.detail.value)
    var data={
      multiArray:this.data.multiArray,
      multiIndex:this.data.multiIndex
    };
    data.multiIndex[e.detail.column]=e.detail.value;
    switch(e.detail.column){
     case 0:
      switch(data.multiIndex[0]){
        case 0:
        data.multiArray[1]=['西安市','汉中市','延安市'];
        data.multiArray[2]=['雁塔区','长安区'];
        break;
        case 1:
        data.multiArray[1]=['深圳市','珠海市'];
        data.multiArray[2]=['南山区','罗湖区'];
        break;
      }
      data.multiIndex[1]=0;
      data.multiIndex[2]=0;
      break;
      case 1:
        switch(data.multiIndex[0]){
          case 0:
            switch(data.multiIndex[1]){
              case 0:
                data.multiArray[2]=['雁塔区','长安区'];
                break;
                case 1:
                  data.multiArray[2]=['汉台区','南郑区'];
                  break;
                  case 2:
                    data.multiArray[2]=['宝塔区','子长区','延川县'];
                    break;
            }
            break;
            case 1:
              switch(data.multiIndex[1]){
                case 0:
                  data.multiArray[2]=['南山区','罗湖区'];
                  break;
                  case 1:
                    data.multiArray[2]=['香洲区','斗门区'];
                    break;
              }
              break;
        }
        data.multiIndex[2]=0;
        console.log(data.multiIndex);
        break;
    }
    this.setData(data);
  },
})
input
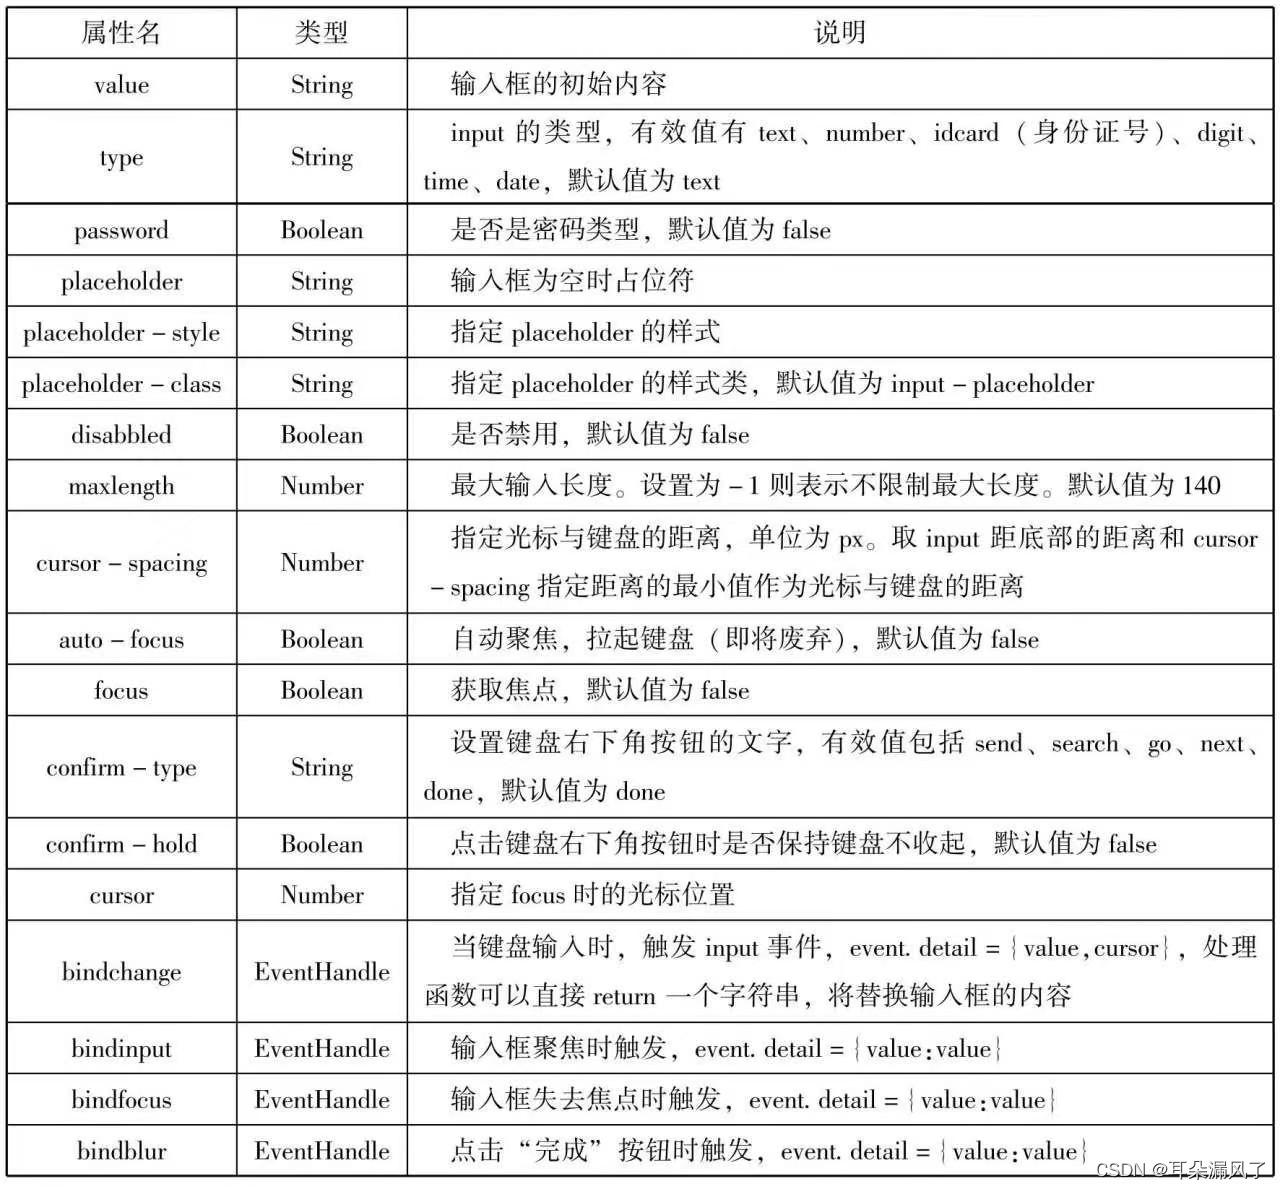
input组件为输入框,用户可以输入相应信息。
input组件属性
wxml:
<input placeholder="这是一个可以自动聚焦的input" auto-focus/>
<input placeholder="这个只有在按钮点击的时候才聚焦"focus="{{focus}}"/>
<button bindtap="bindButtonTop">使得输入框获取焦点</button>
<input maxlength="10" placeholder="最大输入长度10"/>
<view class="section_title">你输入的是:{{inputValue}}</view>
<input bindinput="bind/keyInput" placeholder="输入同步到view中"/>
<input bindinput="bindReplaceInput" placeholder="连续的两个1会变2"/>
<input password type="number"/>
<input password type="text"/>
<input type="digit" placehoder="带小数点的数字键盘"/>
<input type="idcard" placeholder="身份证输入键盘"/>
<input placeholder-style="color:red" placeholder="占位符字体是红色的"/>
js:
Page({
  data:{
    focus:false,
    inputValue:''
  },
  bindButtoTop:function(){
    this.setData({
      focus:true
    })
  },
  bindKeyInput:function(e){
    this.setData({
      inputValue:e.detail.value
    })
  },
  bindReplaceInput:function(e){
    var value=e.detail.value
    var pos=e.detail.cursor
    if(pos!=-1){
      var left=e.detail.value.slice(0,pos)
      pos=left.replace(/l1/g,'2').length
    }
    return{
      value:value.replace(/l1/g,'2'),
      cursor:pos
    }

  }})
video
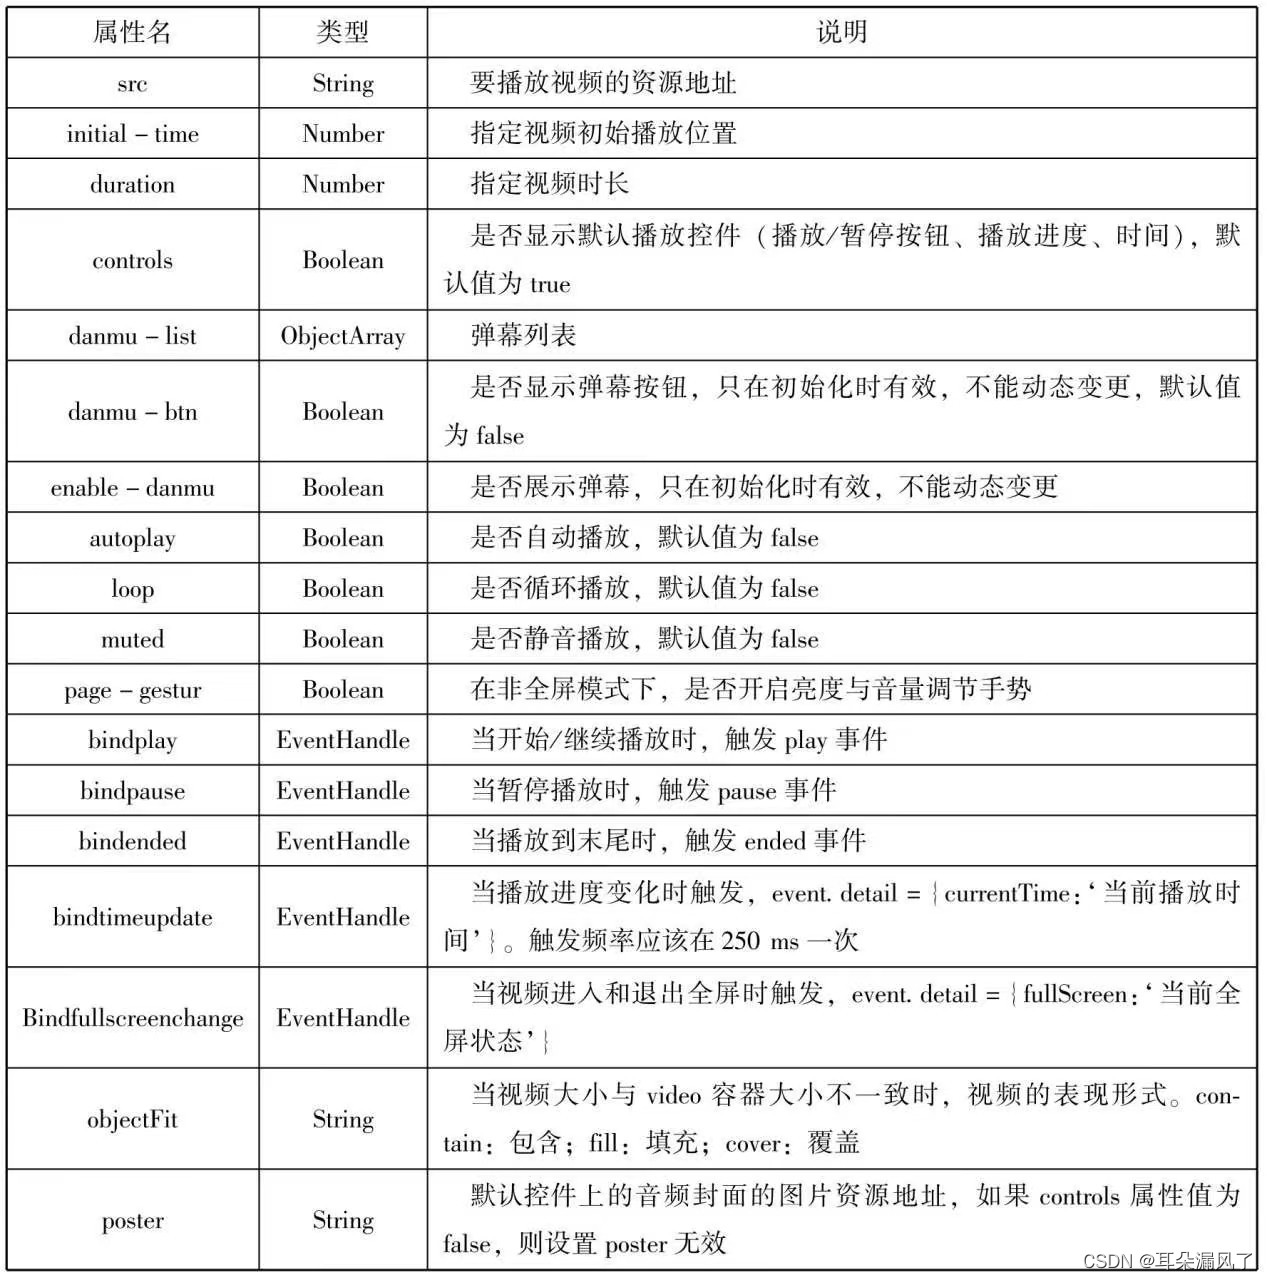
video组件用来实现视频的播放、音频等。
video组件属性
wxml:
<video src="{{src}}" controls></video>
<view class="bttn-area">
<button bindtap="bindButtonTop">获取视频</button>
</view>
js:
Page({
  data:{
    src:'',
  },
  bindButtonTap:function(){
    var that=this
    wx.chooseVideo({
      sourceType:['album','camera'],
      maxDuration:60,
      camera:['front','black'],
      success:function(res){
        that.setData({
          src:res.tempFilePath
        })
      }
    })
  }})
camera
camera组件为系统相机组件,可以实现拍照或录像功能。
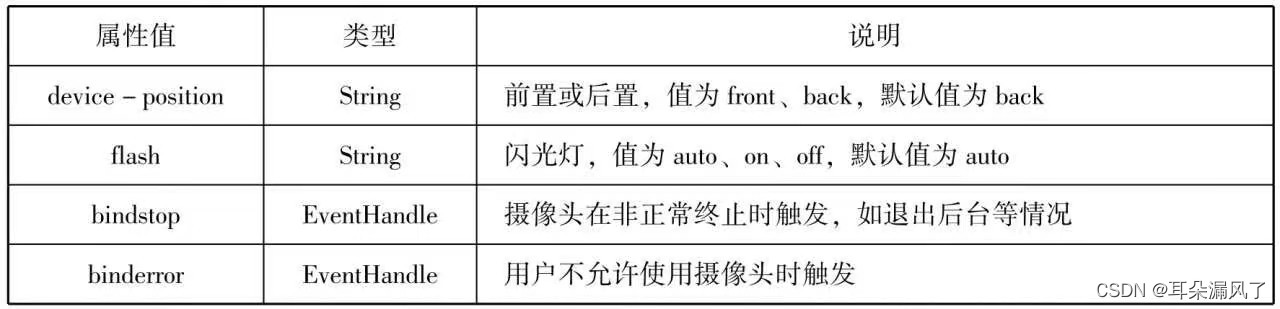
wxml:
<camera device-position="back" flash="off" binderror="error" style="width: 100%;height: 350px;"></camera>
<button type="primary" bindtap="takePhoto">拍照</button>
<view>预览</view>
<image mode="widthFix" src="{{src}}"></image>
js:
Page({
  takePhoto(){
    const ctx=wx.createCameraContext()
    ctx.takePhoto({
      quality:'high',
      success:(res)=>{
        this.setData({
          src:res.tempImagePath
        })
      }
    })
  },
  error(e){
    console.log(e.detail)
  }})
map
map组件用于页面中显示地图或路径,常用于LBS或路径指引
map组件属性
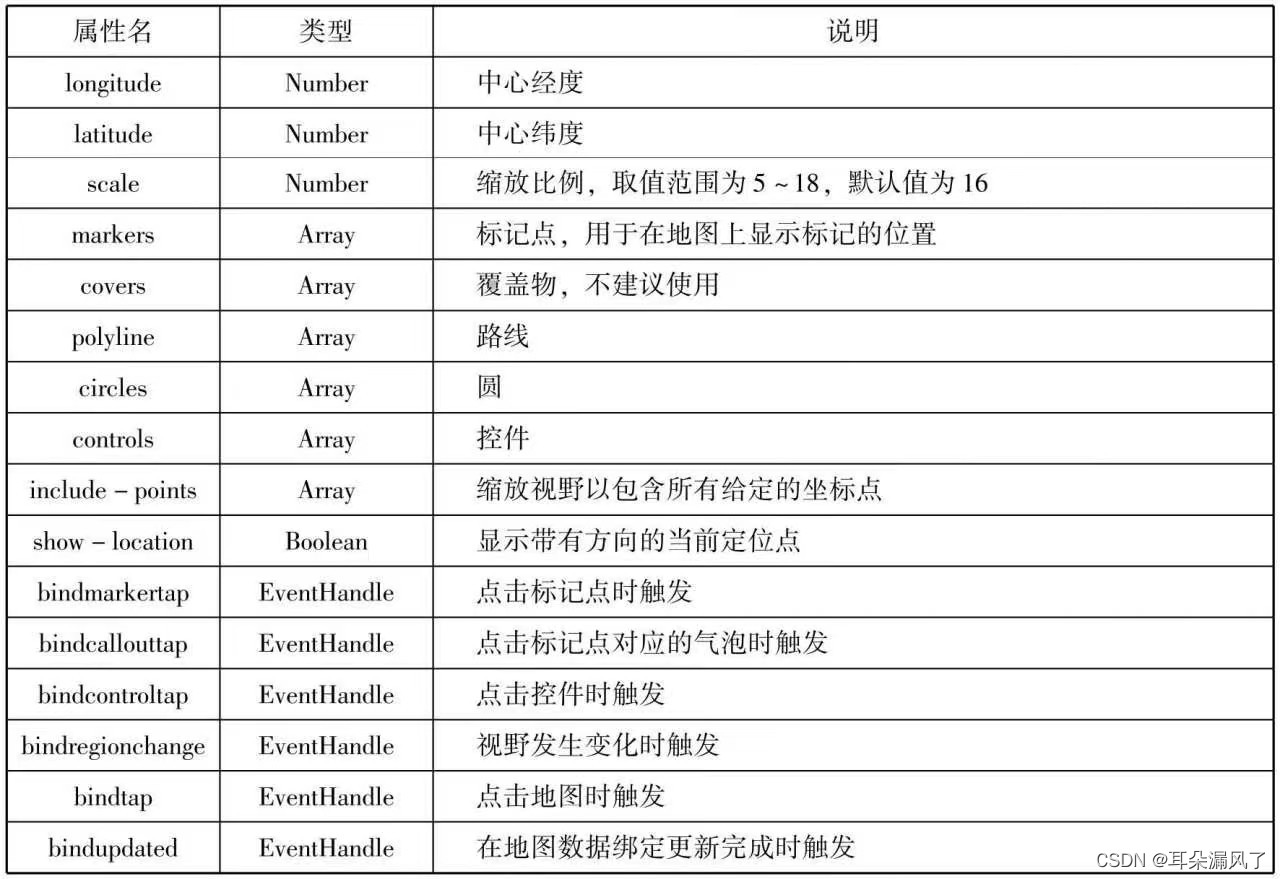
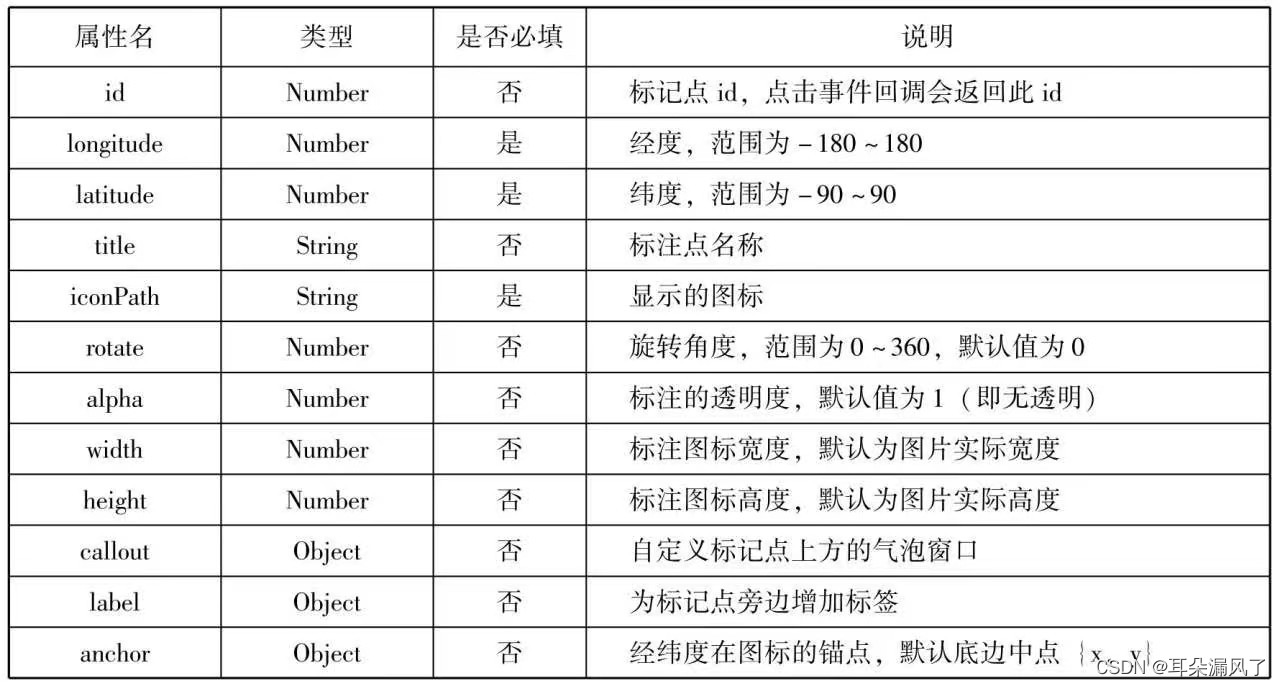
map组件markers属性的相关属性
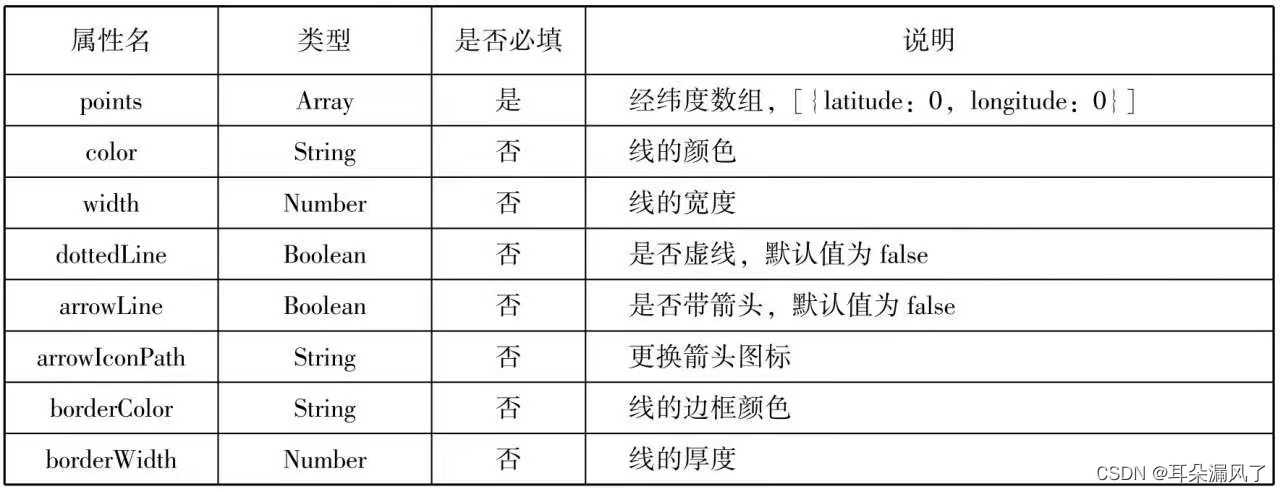
map组件polylinne属性的相关属性
代码:
<map id="map"
longitude="108.9200"
latitude="34.1550"
scale="14"
controls="{{controls}}"
bindcontroltap="controltap"
markers="{{markers}}"
bindmarkertap="markertap"
polyline="{{polyline}}"
bindregionchange="regionchange"
show-location
style="width: 100%;height: 300px;">
</map>
js:
Page({
  data:{
    markers:[{
      iconPath:"/pages/dw.png",
      id:0,
    longitude:"108.9290",
    latitude:"34.1480",
    width:50,
    height:50
    }],
    polyline:[{
points:[
  {
    longitude:"108.9200",
    latitude:"34.1400",
  },
  {
    longitude:"108.9200",
    latitude:"34.1700"
  }
],
color:"#00ff00",
width:2,
dottedLine:true
    }],
    controls:[{
      id:1,
      iconPath:'/pages/dw.png',
      position:{
        left:0,
        top:300,
        width:30,
        height:30
      },
      clickable:true
    }]
  },
  regionchange(e){
    console.log(e.type)
  },
  markertap(e){
    console.log(e.markerId)
  },
  controltap(e){
    console.log(e.controlId)
  }})
第六章:
1、发起网络请求
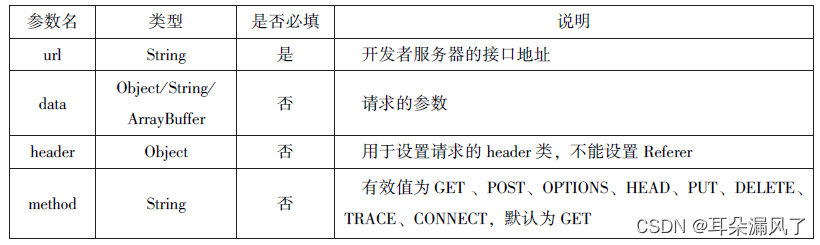
wx.request(Object)实现向服务器发送请求、获取数据等各种网络交互操作。
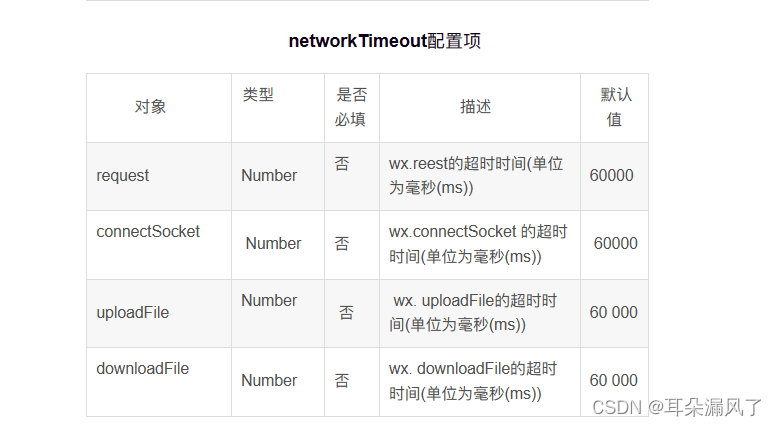
wx.request(Object)相关参数
wxml:
<button type="primary" bindtap="getbaidutap">获取HTML数据</button>
<textarea value='{{html}}' auto-height maxlength='0'></textarea>
js:
Page({
  data:{
    html:''
    },
    getbaidutap:function(){
      var that=this;
      wx.request({
        url: 'https://www.baidu.com',
        data:{},
        header:{'Content-Type':'application/json'},
        success:function(res){
          console.log(res);
          that.setData({
            html:res.data
          })
        }
      })
    }
})
代码2:
wxml:
<view>邮政编码:</view>
<input type="text" bindinput="input" placeholder='6位邮政编码'/>
<button type="primary"bindtap="find">查询</button>
<block wx:for="{{address}}">
<block wx:for="{{item}}">
<text>{{item}}</text>
</block>
</block>
js:
Page({
  data:{
    postcode:'',
    address:[],
    errMsg:'',
    error_code:-1
  },
  input:function(e) {
    this.setData({
      postcode:e.detail.value,
    })
    console.log(e.detail.value)
  },
  find:function() {
    var postcode=this.data.postcode;
    if(postcode !=null&&postcode !=""){
      var self=this;
      wx:showToast({
        title:'正在查询,请稍后.....',
        icon:'loading',
        duration:10000
      });
      wx.request({
        url: 'https://v.juhe.cn/postcode/query',
        data:{
          'postcode':postcode,
          'key':'0ff9bfccdf147476e067de994eb5496e'
        },
        header:{
          'Content-Type':'application/json',
        },
        method:'GET',
        success:function(res){
          wx:hideToast();
          if(res.data.error_code==0){
            console.log(res);
            self.setData({
              errMsg:'',
              error_code:res.data.error_code,
              address:res.data.resultwx.list
            })
          }
          else{
            self.setData({
              errMsg:res.data.reason ||res.data.reason,
              error_code:res.data.error_code
            })
          }
        }
      })
    }
  }})
2、上传文件
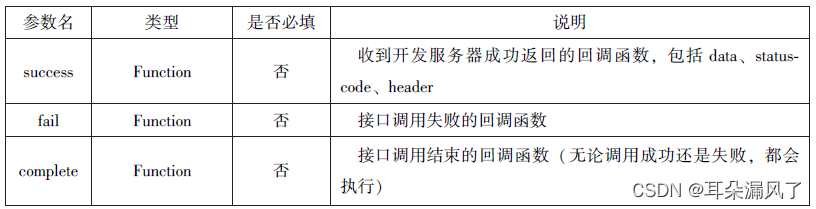
wx.uploadFile(Object)接口用于将本地资源上传到开发者服务器,并在客户端发起一个HTTPS POST请求。
wx.unloadFile(Object)相关参数

wxml:
<button type="primary"bindtap="uploadimage">上传图片</button>
<image src="{{img}}" mode="widthFix"/>
js:
Page({
  data:{
    img:null,
  },
  uploadimage:function(){
    var that=this;
    wx.chooseImage({
      success:function(res){
        var tempFilePaths=res.tempFilePaths
        upload(that,tempFilePaths);
      }
    })
    function upload(page,path){
      wx.showToast({
        icon:"loading",
        title: '正在上传',
      }),
      wx.uploadFile({
        filePath: 'path[0]',
        name: 'file',
        url: 'http://localhost',
        success:function(res){
          console.log(res);
          if(res.statusCode!=200){
            wx.showModal({
              title: '提示',
              content: '上传失败',
           showCancel:false
            })
            return;
          }
          var data=res.data
          page.setData({
            img:path[0]
          })
        },
        fail:function(e){
          console.log(e);
          wx.showModal({
            title: '提示',
            content: '上传失败',
           showCancel:false
          })
        },
        complete:function(){
          wx.hideToast();
        }
      })
    }
  }})
3、下载文件
wx.downloadFile(Object)接口用于实现从开发者服务器下载文件资源到本地,在客户端直接发起一个HTTP GET请求,返回文件的本地临时路径。
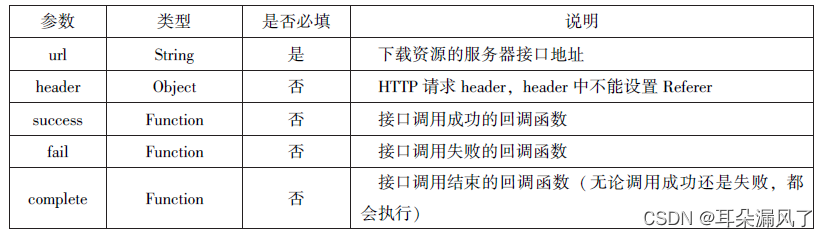
wxml:
<button type="primary"bindtap='downloadimage'>下载图像</button>
<image src="{{img}}" mode="widthFix" style="width: 90%;height: 500px;"></image>
js:
Page({
    data:{
    postcode:'',
    address:[],
    errMsg:'',
    error_code:-1
  },
  input:function(e) {
    this.setData({
      postcode:e.detail.value,
    })
    console.log(e.detail.value)
  },
  find:function() {
    var postcode=this.data.postcode;
    if(postcode !=null&&postcode !=""){
      var self=this;
      wx:showToast({
        title:'正在查询,请稍后.....',
        icon:'loading',
        duration:10000
      });
      wx.request({
        url: 'https://v.juhe.cn/postcode/query',
        data:{
          'postcode':postcode,
          'key':'0ff9bfccdf147476e067de994eb5496e'
        },
        header:{
          'Content-Type':'application/json',
        },
        method:'GET',
        success:function(res){
          wx:hideToast();
          if(res.data.error_code==0){
            console.log(res);
            self.setData({
              errMsg:'',
              error_code:res.data.error_code,
              address:res.data.resultwx.list
            })
          }
          else{
            self.setData({
              errMsg:res.data.reason ||res.data.reason,
              error_code:res.data.error_code
            })
          }
        }
      })
    }
  }
})
3、多媒体API
图片API:
图片API实现对相机拍照图片或本地相册图片进行处理,主要包括以下4个API接口:
wx.chooseImage(Object)接口用于从本地相册选择图片或使用相机拍照。
wx.previewImage(Object)接口 用于预览图片。
wx.getImageInfo(Object)接口用于获取图片信息。
wx.saveImageToPhotosAlbum(Object)接口 用于保存图片到系统相册
1.选择图片或拍照
wx. chooseImage(Object)接口用于从本地相册选择图片或使用相机拍照。拍照时产生的临时路径在小程序本次启动期间可以正常使用,若要持久保存,则需要调用wx. saveFile保存图片到本地。
wx. chooseImage(Object)相关参数


js:
wx.chooseImage({
  count:2,//默认值为2
  sizeType:['original','compressed'],  //可以指定原图还是压缩图,默认二者都有
  sourcrType:['album','camera'],//可以指定来源是相机还是相册,默认二者都有
  success:function(res){
    //返回选定的照片的本地路径列表,tempFilePath可以作为img标签的src属性来显示图片、
    var tempFilePath=res.tempFilePath
    var temFiles=tempFiles;
    console.log(tempFilePath)
    console.log(tempFiles)
  }
}
预览图片
wx. previewImage(Object)接口主要用于预览图片。
wx. previewImage(Object)相关参数
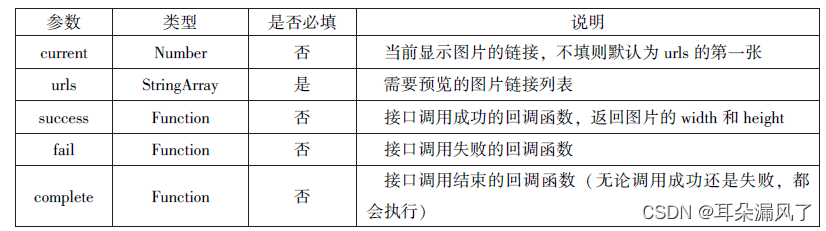
js:
wx.previewImage({
current:"http://bmobb-cdn-16488.b0.upaiyun.com/2018/02/05/2.png",
urls: ["http://bmobb-cdn-16488.b0.upaiyun.com/2018/02/05/1.png"],
"http://bmobb-cdn-16488.b0.upaiyun.com/2018/02/05/2.png",
"http://bmobb-cdn-16488.b0.upaiyun.com/2018/02/05/3.png"
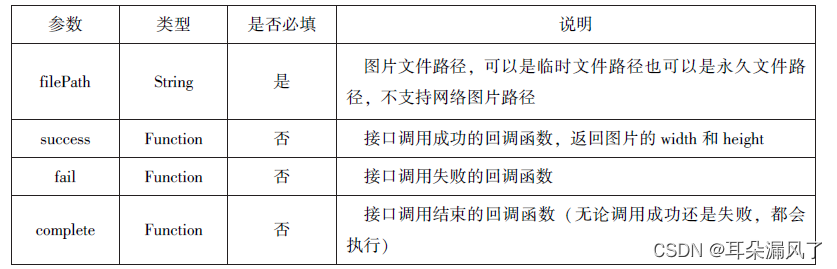
})获取图片信息
wx. getImageInfo(Object)接口用于获取图片信息,其相关参数如表6-6所示。
表6-6 wx. getImageInfo(Object)相关

js:
wx.chooseImage({
success:function(res){
wx.getImageInfo({
src:res.tempFilePaths[0],
success:function(e){
console.log(e.width)
console.log(e.height)
}
})
},
})
保存图片到系统相册
wx. saveImageToPhotosAlbum(Object)接口用于保存图片到系统相册,需要得到用户授权scope.writePhotosAlbum。
wx. saveImageToPhotosAlbum
js:
wx.chooseImage({
success:function(res){
wx.saveImageToPhotosAlbum({
filePath: res.tempFilePaths[0],
success:function(e){
console.log(e)
}
})
},
})4、位置信息API
小程序可以通过位置信息API来获取或显示本地位置信息,小程序支持WGS84和GCj02标准,WGS84标准为地球坐标系,是国际上通用的坐标系;GCj02标准是中国国家测绘局制定的地理信息系统的坐标系统,是由WGS84坐标系经加密后的坐标系,又称为火星坐标系。默认为WGS84标准,若要查看位置需要使用GCj02标准。主要包括以下3个API接口:
wx.getLocation(Object)接口用于获取位置信息。
wx.chooseLocation(Object)接口用于选择位置信息。
wx.openLocation(Object)接口用于通过地图显示位置。
获取位置信息
wx. getLocation(Object)接口用于获取当前用户的地理位置、速度,需要用户开启定位功能,当用户离开小程序后,无法获取当前的地理位置及速度,当用户点击“显示在聊天顶部”时,可以获取到定位信息。
wx. getLocation(Object)相关参数
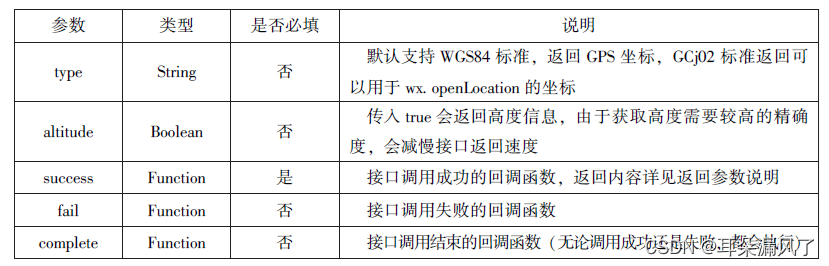
wx. getLocation(Object)调用成功后,返回的参数如表6-23所示。
wx. getLocation(Object)成功返回相关信息
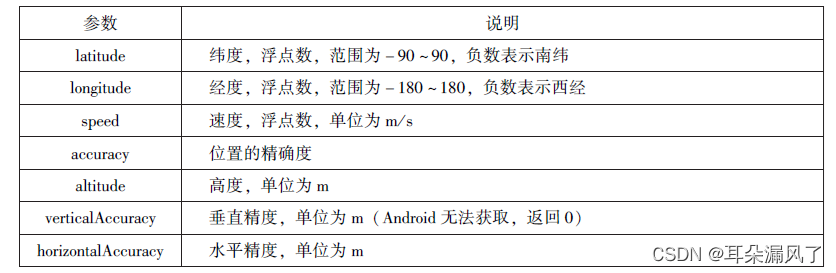
js:
wx.getLocation({
  type:'wgs84',
  success:function (res) {
    console.log("经度:"+res.longitude);
    console.log("纬度:"+res.longitude);
    console.log("速度:"+res.longitude);
    console.log("位置的精确度:"+res.accuracy);
    console.log("水平精确度:"+res.horizontalAccuracy)
    console.log("垂直精确度:"+res.verticalAccuracy)
  },
})
选择位置信息
wx. chooseLocation(Object)接口用于在打开的地图中选择位置,用户选择位置后可返回当前位置的名称、地址、经纬度信息。
wx. chooseLocation(Object)相关参数

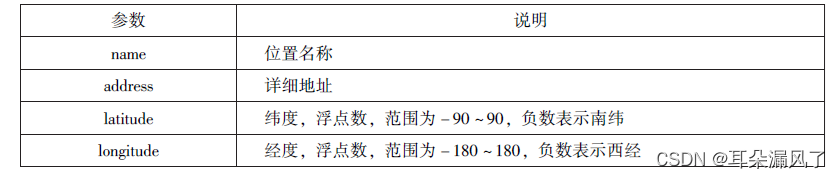
js:
wx.chooseLocation({
  success:function (res) {
    console.log("位置的名称:"+res.name)
    console.log("位置的地址:"+res.address)
    console.log("位置的经度:"+res.longitude)
    console.log("位置的纬度:"+res.latitude)
  }
})
显示位置信息
wx. openLocation(Object)接口用于在微信内置地图中显示位置信息。
wx. openLocation(Object)相关参数
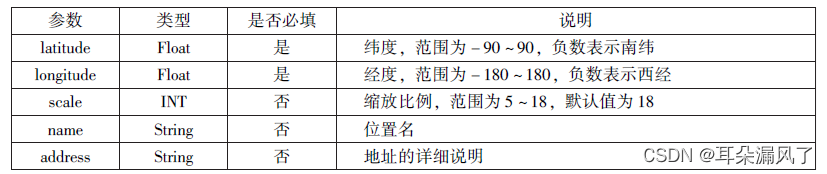

js:
wx.getLocation({
  type:'gcjo2',
  success:function (res) {
    var latitude=res.latitude
    var longitude=res.longitude
    wx.openLocation({
      latitude: latitude,
      longitude: longitude,
      scale:10,
      name:10,
      address:'西安市长安区西长安区300号'
    })
  }
})
5、设备相关API
设备相关的接口用于获取设备相关信息,主要包括系统信息、网络状态、拨打电话及扫码等。主要包括以下5个接口API:
■ wx.getSystemInfo(Object)接口、wx.getSystemInfoSync()接口 用于获取系统信息。
■ wx.getNetworkType(Object)接口 用于获取网络类型。
■ wx.onNetworkStatusChange(CallBack)接口 用于监测网络状态改变。
■ wx.makePhoneCall(Object)接口用于拨打电话。■ wx.scanCode(Object)接口 用于扫描二维码
获取系统信息
wx. getSystemInfo(Object)接口、wx. getSystemInfoSync()接口分别用于异步和同步获取系统信息。
wx. getSystemInfo(Object)接口、wx. getSystemInfoSync()相关参数
 wx. getSystemInfo()接口或wx.getSystemInfoSync()接口调用成功后,返回系统相关信息,如表6-28所示。
wx. getSystemInfo()接口或wx.getSystemInfoSync()成功返回相关信息
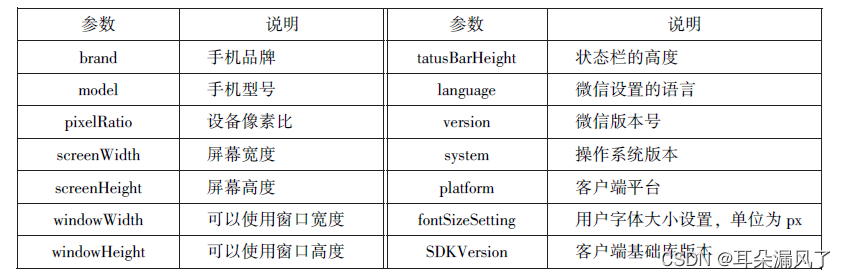
js:
wx.getSystemInfo({
  success:function (res) {
    console.log("手机型号:")
    console.log("设备像素比:")
    console.log("窗口的宽度:")
    console.log("窗口的高度:")
    console.log("微信的版本号:")
    console.log("操作系统版本:")
    console.log("客户端平台:")
  },
})
获取网络状态
wx. getNetworkType(Object)用于获取网络类型。
wx. getNetworkType(Object)相关参数

如果wx. getNetworkType()接口被成功调用,则返回网络类型包,有wifi、2G、3G、4G、unknown(Android下不常见的网络类型)、none(无网络)。
示例代码如下:
js代码:
wx.getNetworkType({
  success:function (res) {
    console.log(res.networkType)
  },
})
拨打电话
wx. makePhoneCall(Object)接口用于实现调用手机拨打电话。
wx.makePhoneCall()相关参数
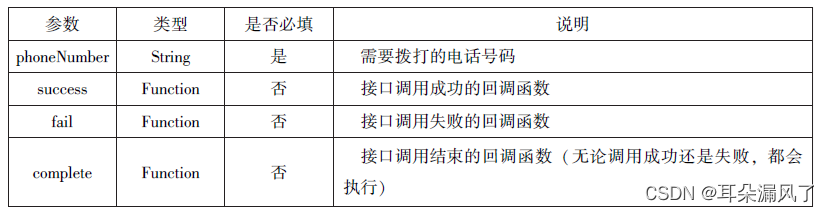
wx.makePhoneCall({
  phoneNumber: '18092585093'
})
扫描二维码
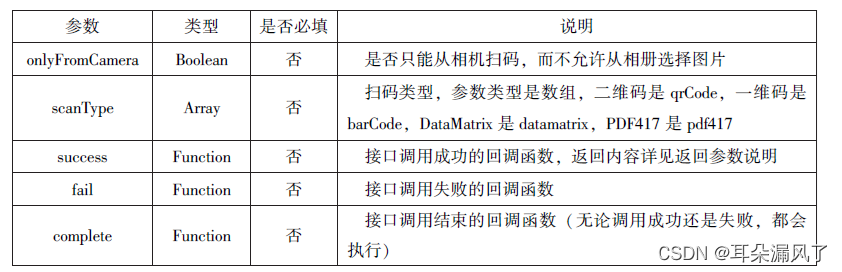
wx. scanCode(Object)接口用于调起客户端扫码界面,扫码成功后返回相应的内容。 wx. scanCode(Object)相关参数
扫码成功后,返回的数据如表6-32所示。
wx. scanCode(Object)成功返回相关信息
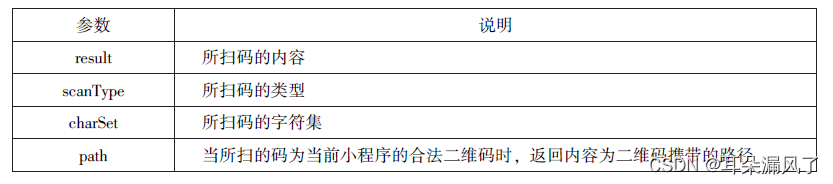
wx.scanCode({
  success:(res)=>{
    console.log(res.result)
    console.log(res.scanType)
    console.log(res.charSet)
    console.log(res.path)
  }
})
wx.scanCode({
  onlyFromCamera:true,
  success:(res)=>{
    console.log(res)
  }
})wx.scanCode({
  success:(res)=>{
    console.log(res.result)
    console.log(res.scanType)
    console.log(res.charSet)
    console.log(res.path)
  }
})
wx.scanCode({
  onlyFromCamera:true,
  success:(res)=>{
    console.log(res)
  }
})


 被折叠的 条评论
为什么被折叠?
被折叠的 条评论
为什么被折叠?
 到【灌水乐园】发言


