


先自我介绍一下,小编浙江大学毕业,去过华为、字节跳动等大厂,目前阿里P7
深知大多数程序员,想要提升技能,往往是自己摸索成长,但自己不成体系的自学效果低效又漫长,而且极易碰到天花板技术停滞不前!
因此收集整理了一份《2024年最新Java开发全套学习资料》,初衷也很简单,就是希望能够帮助到想自学提升又不知道该从何学起的朋友。
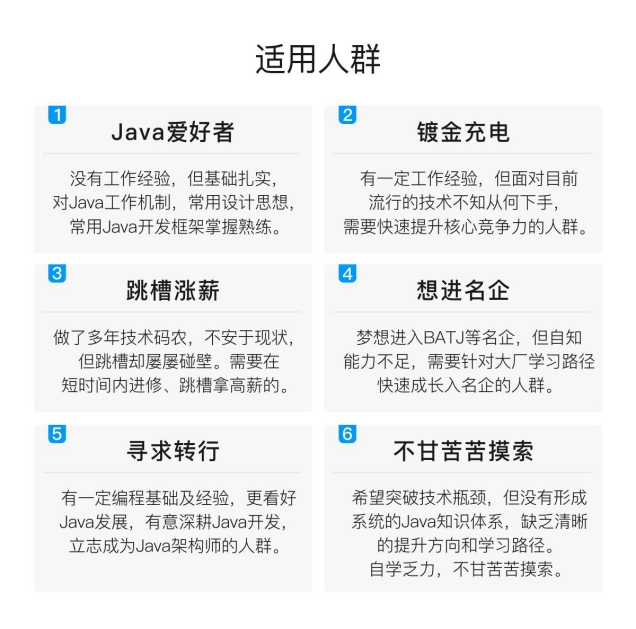

既有适合小白学习的零基础资料,也有适合3年以上经验的小伙伴深入学习提升的进阶课程,涵盖了95%以上Java开发知识点,真正体系化!
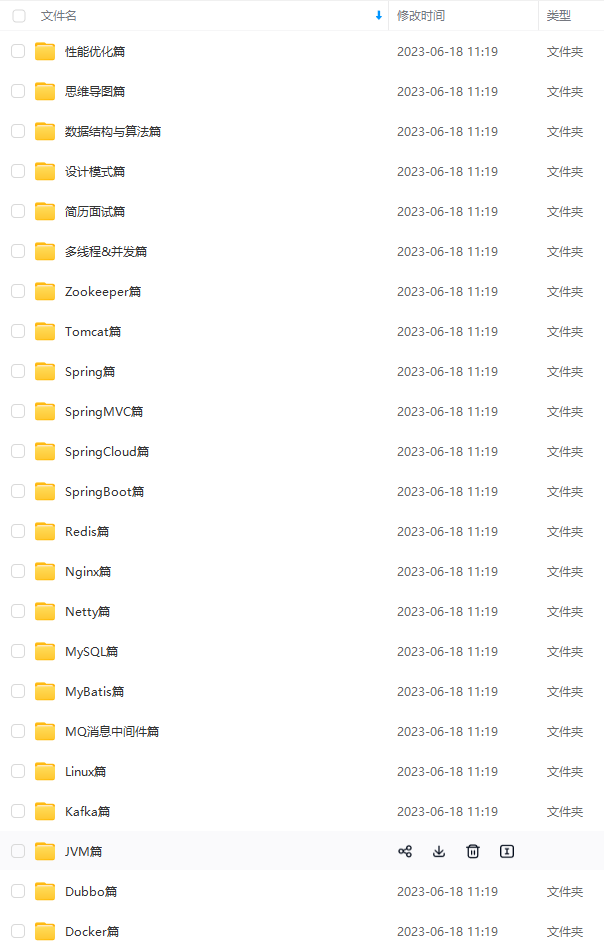
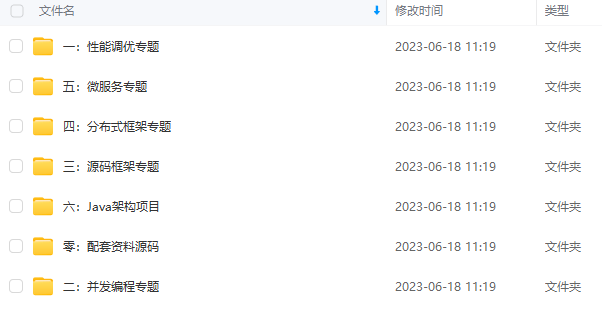
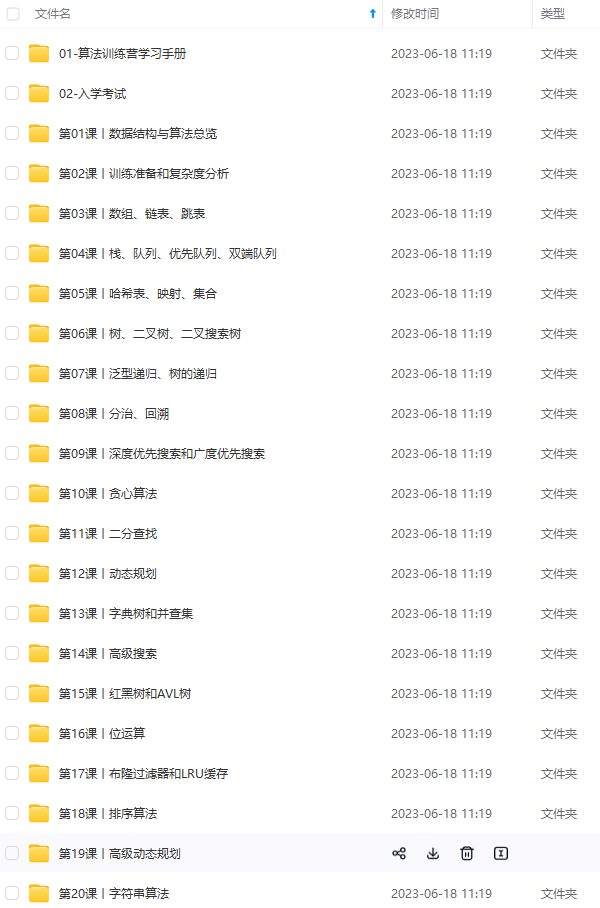
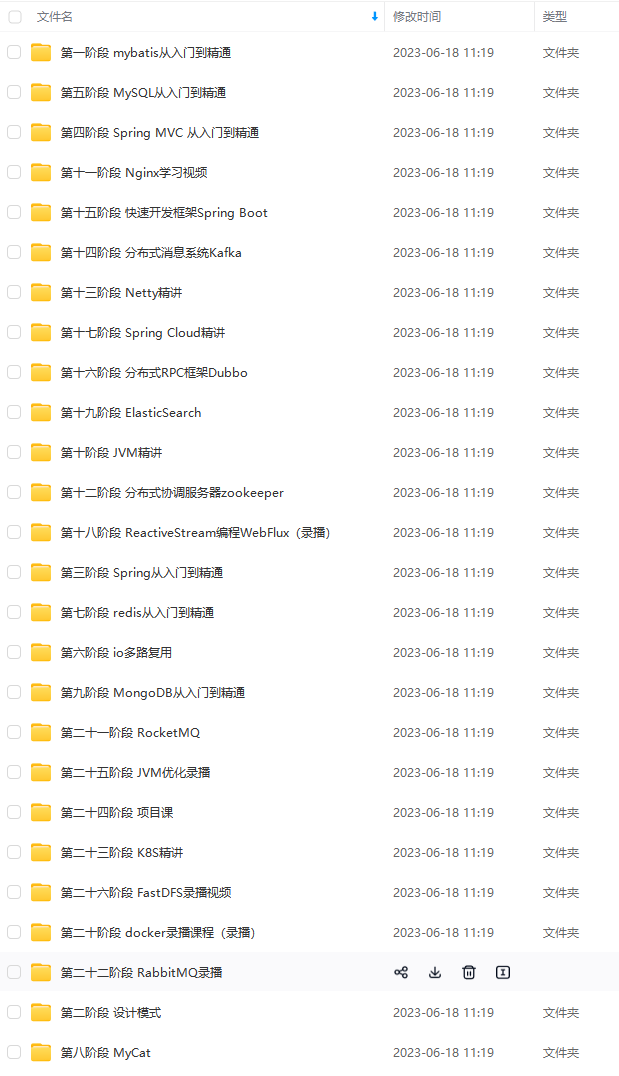
由于文件比较多,这里只是将部分目录截图出来,全套包含大厂面经、学习笔记、源码讲义、实战项目、大纲路线、讲解视频,并且后续会持续更新
如果你需要这些资料,可以添加V获取:vip1024b (备注Java)

正文
def.setSource(source);
beanDefs.add(registerPostProcessor(registry, def, EVENT_LISTENER_FACTORY_BEAN_NAME));
}
return beanDefs;
}
在该代码的第4点注册了 AutowiredAnnotationBeanPostProcessor,具体看 registerAnnotationConfigProcessors 方法的调用方,可以看到 AnnotationConfigBeanDefinitionParser 和 ComponentScanBeanDefinitionParser,而这两个正是 <context:component-scan /> 和 context:annotation-config/ 的 bean 定义解析器。


构造函数注入时做了什么
===========
构造函数注入通常来说有两种:1)xml 配置注入;2)@Autowire 注解注入;本文只讨论 @Autowire 注解注入。
AutowiredAnnotationBeanPostProcessor 中重写的方法不多,直接找一下就可以找到跟构造函数相关的方法:determineCandidateConstructors,该方法被定义在 SmartInstantiationAwareBeanPostProcessor 接口中,主要作用是:确定要用于给定 bean 的候选构造函数。
在 Spring IoC 的过程中,调用的入口在 Spring IoC:createBean详解(上)中的代码块4.5,下面介绍下 determineCandidateConstructors 方法。
AutowiredAnnotationBeanPostProcessor#determineCandidateConstructors
查看该方法的上下文,请参考:Spring IoC:createBean详解(上)中的代码块4.5。
@Override
public Constructor<?>[] determineCandidateConstructors(Class<?> beanClass, final String beanName)
throws BeanCreationException {
// Let’s check for lookup methods here…
// @Lookup注解检查
if (!this.lookupMethodsChecked.contains(beanName)) {
try {
ReflectionUtils.doWithMethods(beanClass, new ReflectionUtils.MethodCallback() {
@Override
public void doWith(Method method) throws IllegalArgumentException, IllegalAccessException {
Lookup lookup = method.getAnnotation(Lookup.class);
if (lookup != null) {
LookupOverride override = new LookupOverride(method, lookup.value());
try {
RootBeanDefinition mbd = (RootBeanDefinition) beanFactory.getMergedBeanDefinition(beanName);
mbd.getMethodOverrides().addOverride(override);
} catch (NoSuchBeanDefinitionException ex) {
throw new BeanCreationException(beanName,
“Cannot apply @Lookup to beans without corresponding bean definition”);
}
}
}
});
} catch (IllegalStateException ex) {
throw new BeanCreationException(beanName, “Lookup method resolution failed”, ex);
} catch (NoClassDefFoundError err) {
throw new BeanCreationException(beanName, “Failed to introspect bean class [” + beanClass.getName() +
“] for lookup method metadata: could not find class that it depends on”, err);
}
// 已经检查过的添加到lookupMethodsChecked
this.lookupMethodsChecked.add(beanName);
}
// Quick check on the concurrent map first, with minimal locking.
// 1.构造函数解析,首先检查是否存在于缓存中
Constructor<?>[] candidateConstructors = this.candidateConstructorsCache.get(beanClass);
if (candidateConstructors == null) {
// Fully synchronized resolution now…
// 2.加锁进行操作
synchronized (this.candidateConstructorsCache) {
// 3.再次检查缓存,双重检测
candidateConstructors = this.candidateConstructorsCache.get(beanClass);
if (candidateConstructors == null) {
// 存放原始的构造函数(候选者)
Constructor<?>[] rawCandidates;
try {
// 4.获取beanClass声明的构造函数(如果没有声明,会返回一个默认的无参构造函数)
rawCandidates = beanClass.getDeclaredConstructors();
} catch (Throwable ex) {
throw new BeanCreationException(beanName,
“Resolution of declared constructors on bean Class [” + beanClass.getName() +
“] from ClassLoader [” + beanClass.getClassLoader() + “] failed”, ex);
}
// 存放使用了@Autowire注解的构造函数
List<Constructor<?>> candidates = new ArrayList
// 存放使用了@Autowire注解,并且require=true的构造函数
Constructor<?> requiredConstructor = null;
// 存放默认的构造函数
Constructor<?> defaultConstructor = null;
// 5.遍历原始的构造函数候选者
for (Constructor<?> candidate : rawCandidates) {
// 6.获取候选者的注解属性
AnnotationAttributes ann = findAutowiredAnnotation(candidate);
if (ann == null) {
// 7.如果没有从候选者找到注解,则尝试解析beanClass的原始类(针对CGLIB代理)
Class<?> userClass = ClassUtils.getUserClass(beanClass);
if (userClass != beanClass) {
try {
Constructor<?> superCtor =
userClass.getDeclaredConstructor(candidate.getParameterTypes());
ann = findAutowiredAnnotation(superCtor);
} catch (NoSuchMethodException ex) {
// Simply proceed, no equivalent superclass constructor found…
}
}
}
// 8.如果该候选者使用了@Autowire注解
if (ann != null) {
if (requiredConstructor != null) {
// 8.1 之前已经存在使用@Autowired(required = true)的构造函数,则不能存在其他使用@Autowire注解的构造函数,否则抛异常
throw new BeanCreationException(beanName,
"Invalid autowire-marked constructor: " + candidate +
". Found constructor with ‘required’ Autowired annotation already: " +
requiredConstructor);
}
// 8.2 获取注解的require属性值
boolean required = determineRequiredStatus(ann);
if (required) {
if (!candidates.isEmpty()) {
// 8.3 如果当前候选者是@Autowired(required = true),则之前不能存在其他使用@Autowire注解的构造函数,否则抛异常
throw new BeanCreationException(beanName,
"Invalid autowire-marked constructors: " + candidates +
". Found constructor with ‘required’ Autowired annotation: " +
candidate);
}
// 8.4 如果该候选者使用的注解的required属性为true,赋值给requiredConstructor
requiredConstructor = candidate;
}
// 8.5 将使用了@Autowire注解的候选者添加到candidates
candidates.add(candidate);
} else if (candidate.getParameterTypes().length == 0) {
// 8.6 如果没有使用注解,并且没有参数,则为默认的构造函数
defaultConstructor = candidate;
}
}
// 9.如果存在使用了@Autowire注解的构造函数
if (!candidates.isEmpty()) {
// Add default constructor to list of optional constructors, as fallback.
// 9.1 但是没有使用了@Autowire注解并且required属性为true的构造函数
if (requiredConstructor == null) {
if (defaultConstructor != null) {
// 9.2 如果存在默认的构造函数,则将默认的构造函数添加到candidates
candidates.add(defaultConstructor);
} else if (candidates.size() == 1 && logger.isWarnEnabled()) {
logger.warn(“Inconsistent constructor declaration on bean with name '” + beanName +
"': single autowire-marked constructor flagged as optional - " +
"this constructor is effectively required since there is no " +
"default constructor to fall back to: " + candidates.get(0));
}
}
// 9.3 将所有的candidates当作候选者
candidateConstructors = candidates.toArray(new Constructor<?>[candidates.size()]);
} else if (rawCandidates.length == 1 && rawCandidates[0].getParameterTypes().length > 0) {
// 10.如果candidates为空 && beanClass只有一个声明的构造函数(非默认构造函数),则将该声明的构造函数作为候选者
candidateConstructors = new Constructor<?>[]{rawCandidates[0]};
} else {
// 11.否则返回一个空的Constructor对象
candidateConstructors = new Constructor<?>[0];
}
// 12.将beanClass的构造函数解析结果放到缓存
this.candidateConstructorsCache.put(beanClass, candidateConstructors);
}
}
}
// 13.返回解析的构造函数
return (candidateConstructors.length > 0 ? candidateConstructors : null);
}
6.获取候选者的注解属性,见代码块1详解。
关于 8.1 和 8.3 的异常校验,说的简单点:在一个 bean 中,只要有构造函数使用了 “@Autowired(required = true)” 或 “@Autowired”,就不允许有其他的构造函数使用 “@Autowire”;但是允许有多个构造函数同时使用 “@Autowired(required = false)”。
代码块1:findAutowiredAnnotation
private AnnotationAttributes findAutowiredAnnotation(AccessibleObject ao) {
// 1.判断ao是否有被注解修饰
if (ao.getAnnotations().length > 0) {
// 2.检查是否有autowiredAnnotationTypes中的注解:@Autowired、@Value(@Value无法修饰构造函数)
for (Class<? extends Annotation> type : this.autowiredAnnotationTypes) {
// 3.拿到注解的合并注解属性,@Autowire在这边拿到,required=true(默认属性)
AnnotationAttributes attributes = AnnotatedElementUtils.getMergedAnnotationAttributes(ao, type);
if (attributes != null) {
return attributes;
}
}
}
return null;
}
确定了要用于给定 bean 的候选构造函数后,之后的逻辑就是执行构造函数自动注入,该逻辑在 Spring IoC:createBean 详解(上)中的代码块5已经介绍。
属性注入时做了什么
=========
属性注入通常来说有两种:1)xml 配置注入;2)@Autowire 注解注入;本文只讨论 @Autowire 注解注入。
AutowiredAnnotationBeanPostProcessor 中跟属性注入有关的方法出口有两个:postProcessMergedBeanDefinition 和 postProcessPropertyValues。
1.postProcessMergedBeanDefinition 方法介绍
postProcessMergedBeanDefinition 被定义在 MergedBeanDefinitionPostProcessor 接口中,该方法的主要作用是:对指定 bean 的给定 MergedBeanDefinition 进行后置处理。
在 AutowiredAnnotationBeanPostProcessor 的实现中,主要是对使用了 @Autowire 注解的方法和属性进行预解析,并放到 injectionMetadataCache 缓存中,用于后续使用。
在 Spring IoC 的过程中,调用的入口在:Spring IoC:createBean详解(下)中的代码块1,下面介绍下 postProcessMergedBeanDefinition 方法。
AutowiredAnnotationBeanPostProcessor#postProcessMergedBeanDefinition
查看该方法的上下文,请参考:Spring IoC:createBean详解(下)中的代码块1。
@Override
public void postProcessMergedBeanDefinition(RootBeanDefinition beanDefinition, Class<?> beanType, String beanName) {
if (beanType != null) {
// 1.在指定Bean中查找使用@Autowire注解的元数据
InjectionMetadata metadata = findAutowiringMetadata(beanName, beanType, null);
// 2.检查元数据中的注解信息
metadata.checkConfigMembers(beanDefinition);
}
}
1.在指定 bean 中查找使用 @Autowire 注解的元数据,见代码块2详解。
2.检查元数据中的注解信息,见代码块4详解。
代码块2:findAutowiringMetadata
private InjectionMetadata findAutowiringMetadata(String beanName, Class<?> clazz, PropertyValues pvs) {
// Fall back to class name as cache key, for backwards compatibility with custom callers.
// 1.设置cacheKey的值(beanName 或者 className)
String cacheKey = (StringUtils.hasLength(beanName) ? beanName : clazz.getName());
// Quick check on the concurrent map first, with minimal locking.
// 2.检查beanName对应的InjectionMetadata是否已经存在于缓存中
InjectionMetadata metadata = this.injectionMetadataCache.get(cacheKey);
// 3.检查InjectionMetadata是否需要刷新(为空或者class变了)
if (InjectionMetadata.needsRefresh(metadata, clazz)) {
synchronized (this.injectionMetadataCache) {
// 4.加锁后,再次从缓存中获取beanName对应的InjectionMetadata
metadata = this.injectionMetadataCache.get(cacheKey);
// 5.加锁后,再次检查InjectionMetadata是否需要刷新
if (InjectionMetadata.needsRefresh(metadata, clazz)) {
if (metadata != null) {
// 6.如果需要刷新,并且metadata不为空,则先移除
metadata.clear(pvs);
}
try {
// 7.解析@Autowired注解的信息,生成元数据(包含clazz和clazz里解析到的注入的元素,
// 这里的元素包括AutowiredFieldElement和AutowiredMethodElement)
metadata = buildAutowiringMetadata(clazz);
// 8.将解析的元数据放到injectionMetadataCache缓存,以备复用,每一个类只解析一次
this.injectionMetadataCache.put(cacheKey, metadata);
} catch (NoClassDefFoundError err) {
throw new IllegalStateException(“Failed to introspect bean class [” + clazz.getName() +
“] for autowiring metadata: could not find class that it depends on”, err);
}
}
}
}
return metadata;
}
7.解析 @Autowired 注解的信息,生成元数据,见代码块3详解。
代码块3:buildAutowiringMetadata
private InjectionMetadata buildAutowiringMetadata(final Class<?> clazz) {
// 1.用于存放所有解析到的注入的元素的变量
LinkedList<InjectionMetadata.InjectedElement> elements = new LinkedList<InjectionMetadata.InjectedElement>();
Class<?> targetClass = clazz;
// 2.循环遍历
do {
// 2.1 定义存放当前循环的Class注入的元素(有序)
final LinkedList<InjectionMetadata.InjectedElement> currElements =
new LinkedList<InjectionMetadata.InjectedElement>();
// 2.2 如果targetClass的属性上有@Autowired注解,则用工具类获取注解信息
ReflectionUtils.doWithLocalFields(targetClass, new ReflectionUtils.FieldCallback() {
@Override
public void doWith(Field field) throws IllegalArgumentException, IllegalAccessException {
// 2.2.1 获取field上的@Autowired注解信息
AnnotationAttributes ann = findAutowiredAnnotation(field);
if (ann != null) {
// 2.2.2 校验field是否被static修饰,如果是则直接返回,因为@Autowired注解不支持static修饰的field
if (Modifier.isStatic(field.getModifiers())) {
if (logger.isWarnEnabled()) {
logger.warn("Autowired annotation is not supported on static fields: " + field);
}
return;
}
// 2.2.3 获取@Autowired注解的required的属性值(required:值为true时,如果没有找到bean时,自动装配应该失败;false则不会)
boolean required = determineRequiredStatus(ann);
// 2.2.4 将field、required封装成AutowiredFieldElement,添加到currElements
currElements.add(new AutowiredFieldElement(field, required));
}
}
});
// 2.3 如果targetClass的方法上有@Autowired注解,则用工具类获取注解信息
ReflectionUtils.doWithLocalMethods(targetClass, new ReflectionUtils.MethodCallback() {
@Override
public void doWith(Method method) throws IllegalArgumentException, IllegalAccessException {
// 2.3.1 找到桥接方法
Method bridgedMethod = BridgeMethodResolver.findBridgedMethod(method);
// 2.3.2 判断方法的可见性,如果不可见则直接返回
if (!BridgeMethodResolver.isVisibilityBridgeMethodPair(method, bridgedMethod)) {
return;
}
// 2.3.3 获取method上的@Autowired注解信息
AnnotationAttributes ann = findAutowiredAnnotation(bridgedMethod);
if (ann != null && method.equals(ClassUtils.getMostSpecificMethod(method, clazz))) {
// 2.3.4 校验method是否被static修饰,如果是则直接返回,因为@Autowired注解不支持static修饰的method
if (Modifier.isStatic(method.getModifiers())) {
if (logger.isWarnEnabled()) {
logger.warn("Autowired annotation is not supported on static methods: " + method);
}
return;
}
// 2.3.5 @Autowired注解标识在方法上的目的就是将容器内的Bean注入到方法的参数中,没有参数就违背了初衷
if (method.getParameterTypes().length == 0) {
if (logger.isWarnEnabled()) {
logger.warn("Autowired annotation should only be used on methods with parameters: " +
method);
}
}
// 2.3.6 获取@Autowired注解的required的属性值
boolean required = determineRequiredStatus(ann);
// 2.3.7 获取method的属性描述器
PropertyDescriptor pd = BeanUtils.findPropertyForMethod(bridgedMethod, clazz);
// 2.3.8 将method、required、pd封装成AutowiredMethodElement,添加到currElements
currElements.add(new AutowiredMethodElement(method, required, pd));
}
}
});
// 2.4 将本次循环获取到的注解信息添加到elements
elements.addAll(0, currElements);
// 2.5 在解析完targetClass之后,递归解析父类,将所有的@Autowired的属性和方法收集起来,且类的层级越高其属性会被越优先注入
targetClass = targetClass.getSuperclass();
}
while (targetClass != null && targetClass != Object.class); // 2.6 递归解析targetClass父类(直至父类为Object结束)
// 2.7 将clazz和解析到的注入的元素封装成InjectionMetadata
return new InjectionMetadata(clazz, elements);
}
2.2.1 获取 field 上的 @Autowired 注解信息、2.3.3 获取 method 上的 @Autowired 注解信息,见代码块1详解。
代码块4:checkConfigMembers
public void checkConfigMembers(RootBeanDefinition beanDefinition) {
Set checkedElements = new LinkedHashSet(this.injectedElements.size());
// 1.遍历检查所有要注入的元素
for (InjectedElement element : this.injectedElements) {
Member member = element.getMember();
// 2.如果beanDefinition的externallyManagedConfigMembers属性不包含该member
if (!beanDefinition.isExternallyManagedConfigMember(member)) {
// 3.将该member添加到beanDefinition的externallyManagedConfigMembers属性
beanDefinition.registerExternallyManagedConfigMember(member);
// 4.并将element添加到checkedElements
checkedElements.add(element);
if (logger.isDebugEnabled()) {
logger.debug(“Registered injected element on class [” + this.targetClass.getName() + "]: " + element);
}
}
}
// 5.赋值给checkedElements(检查过的元素)
this.checkedElements = checkedElements;
}
至此,使用 @Autowire 修饰的方法和属性的相关元数据信息都已经放到 injectionMetadataCache 缓存中,用于后续使用。
2.postProcessPropertyValues 方法介绍
postProcessPropertyValues 被定义在 InstantiationAwareBeanPostProcessor 接口中,该方法的主要作用是:将属性值应用于给定 bean 之前对给定属性值进行后置处理。
在 AutowiredAnnotationBeanPostProcessor 的实现中,主要是对使用了 @Autowire 注解的方法和属性进行自动注入,将依赖的 bean 赋值给对应的属性。
在 Spring IoC 的过程中,调用的入口在:Spring IoC:createBean详解(下)中的代码块4中的7.1.1,下面介绍下 postProcessPropertyValues 方法。
AutowiredAnnotationBeanPostProcessor#postProcessPropertyValues
查看该方法的上下文,请参考:Spring IoC:createBean详解(下)中的代码块4中的7.1.1。
@Override
public PropertyValues postProcessPropertyValues(
PropertyValues pvs, PropertyDescriptor[] pds, Object bean, String beanName) throws BeanCreationException {
// 1.在指定Bean中查找使用@Autowire注解的元数据
InjectionMetadata metadata = findAutowiringMetadata(beanName, bean.getClass(), pvs);
try {
// 2.InjectionMetadata: 执行inject()方法,开始执行属性注入或方法注入
metadata.inject(bean, beanName, pvs);
} catch (BeanCreationException ex) {
throw ex;
} catch (Throwable ex) {
throw new BeanCreationException(beanName, “Injection of autowired dependencies failed”, ex);
}
return pvs;
}
1.在指定 bean 中查找使用 @Autowire 注解的元数据,见代码块2详解,这边会直接从缓存中拿到之前已经解析好的数据。
2.执行 inject() 方法,开始执行属性注入或方法注入,见代码块5详解。
代码块5:inject
public void inject(Object target, String beanName, PropertyValues pvs) throws Throwable {
// 1.如果checkedElements存在,则使用checkedElements,否则使用injectedElements
Collection elementsToIterate =
(this.checkedElements != null ? this.checkedElements : this.injectedElements);
if (!elementsToIterate.isEmpty()) {
boolean debug = logger.isDebugEnabled();
for (InjectedElement element : elementsToIterate) {
if (debug) {
logger.debug(“Processing injected element of bean '” + beanName + "': " + element);
}
// 2.解析@Autowired注解生成的元数据类:AutowiredFieldElement、AutowiredMethodElement,
// 这两个类继承InjectionMetadata.InjectedElement,各自重写了inject方法。
element.inject(target, beanName, pvs);
}
}
}
2.解析 @Autowired 注解生成的元数据类:AutowiredFieldElement、AutowiredMethodElement,这两个类继承InjectionMetadata.InjectedElement,各自重写了 inject 方法。对于属性注入来说,会走到 AutowiredFieldElement 中的 inject 方法,见代码块6详解。
代码块6:AutowiredFieldElement#inject
@Override
protected void inject(Object bean, String beanName, PropertyValues pvs) throws Throwable {
// 1.拿到该元数据的属性值
Field field = (Field) this.member;
Object value;
// 2.如果缓存中已经存在,则直接从缓存中解析属性
if (this.cached) {
value = resolvedCachedArgument(beanName, this.cachedFieldValue);
} else {
// 3.将field封装成DependencyDescriptor
DependencyDescriptor desc = new DependencyDescriptor(field, this.required);
desc.setContainingClass(bean.getClass());
Set autowiredBeanNames = new LinkedHashSet(1);
TypeConverter typeConverter = beanFactory.getTypeConverter();
try {
// 4.解析当前属性所匹配的bean实例,并把解析到的bean实例的beanName存储在autowiredBeanNames中
value = beanFactory.resolveDependency(desc, beanName, autowiredBeanNames, typeConverter);
} catch (BeansException ex) {
throw new UnsatisfiedDependencyException(null, beanName, new InjectionPoint(field), ex);
}
synchronized (this) {
if (!this.cached) {
// 5.value不为空或者required为true
if (value != null || this.required) {
// 6.如果属性依赖注入的bean不止一个(Array,Collection,Map),缓存cachedFieldValue放的是DependencyDescriptor
最后

由于篇幅原因,就不多做展示了
网上学习资料一大堆,但如果学到的知识不成体系,遇到问题时只是浅尝辄止,不再深入研究,那么很难做到真正的技术提升。
需要这份系统化的资料的朋友,可以添加V获取:vip1024b (备注Java)

一个人可以走的很快,但一群人才能走的更远!不论你是正从事IT行业的老鸟或是对IT行业感兴趣的新人,都欢迎加入我们的的圈子(技术交流、学习资源、职场吐槽、大厂内推、面试辅导),让我们一起学习成长!
dBeanNames中
value = beanFactory.resolveDependency(desc, beanName, autowiredBeanNames, typeConverter);
} catch (BeansException ex) {
throw new UnsatisfiedDependencyException(null, beanName, new InjectionPoint(field), ex);
}
synchronized (this) {
if (!this.cached) {
// 5.value不为空或者required为true
if (value != null || this.required) {
// 6.如果属性依赖注入的bean不止一个(Array,Collection,Map),缓存cachedFieldValue放的是DependencyDescriptor
最后
[外链图片转存中…(img-1dvm0ZGX-1713571762120)]
[外链图片转存中…(img-OeJ1C2dA-1713571762121)]
[外链图片转存中…(img-sz03qtLr-1713571762121)]
[外链图片转存中…(img-G2CRFziR-1713571762122)]
[外链图片转存中…(img-ivlN4Brh-1713571762122)]
[外链图片转存中…(img-zG7Z0SuJ-1713571762123)]
由于篇幅原因,就不多做展示了
网上学习资料一大堆,但如果学到的知识不成体系,遇到问题时只是浅尝辄止,不再深入研究,那么很难做到真正的技术提升。
需要这份系统化的资料的朋友,可以添加V获取:vip1024b (备注Java)
[外链图片转存中…(img-qQvUrPQn-1713571762123)]
一个人可以走的很快,但一群人才能走的更远!不论你是正从事IT行业的老鸟或是对IT行业感兴趣的新人,都欢迎加入我们的的圈子(技术交流、学习资源、职场吐槽、大厂内推、面试辅导),让我们一起学习成长!


 8475
8475

 被折叠的 条评论
为什么被折叠?
被折叠的 条评论
为什么被折叠?
 到【灌水乐园】发言


