


各版本平台支持情况
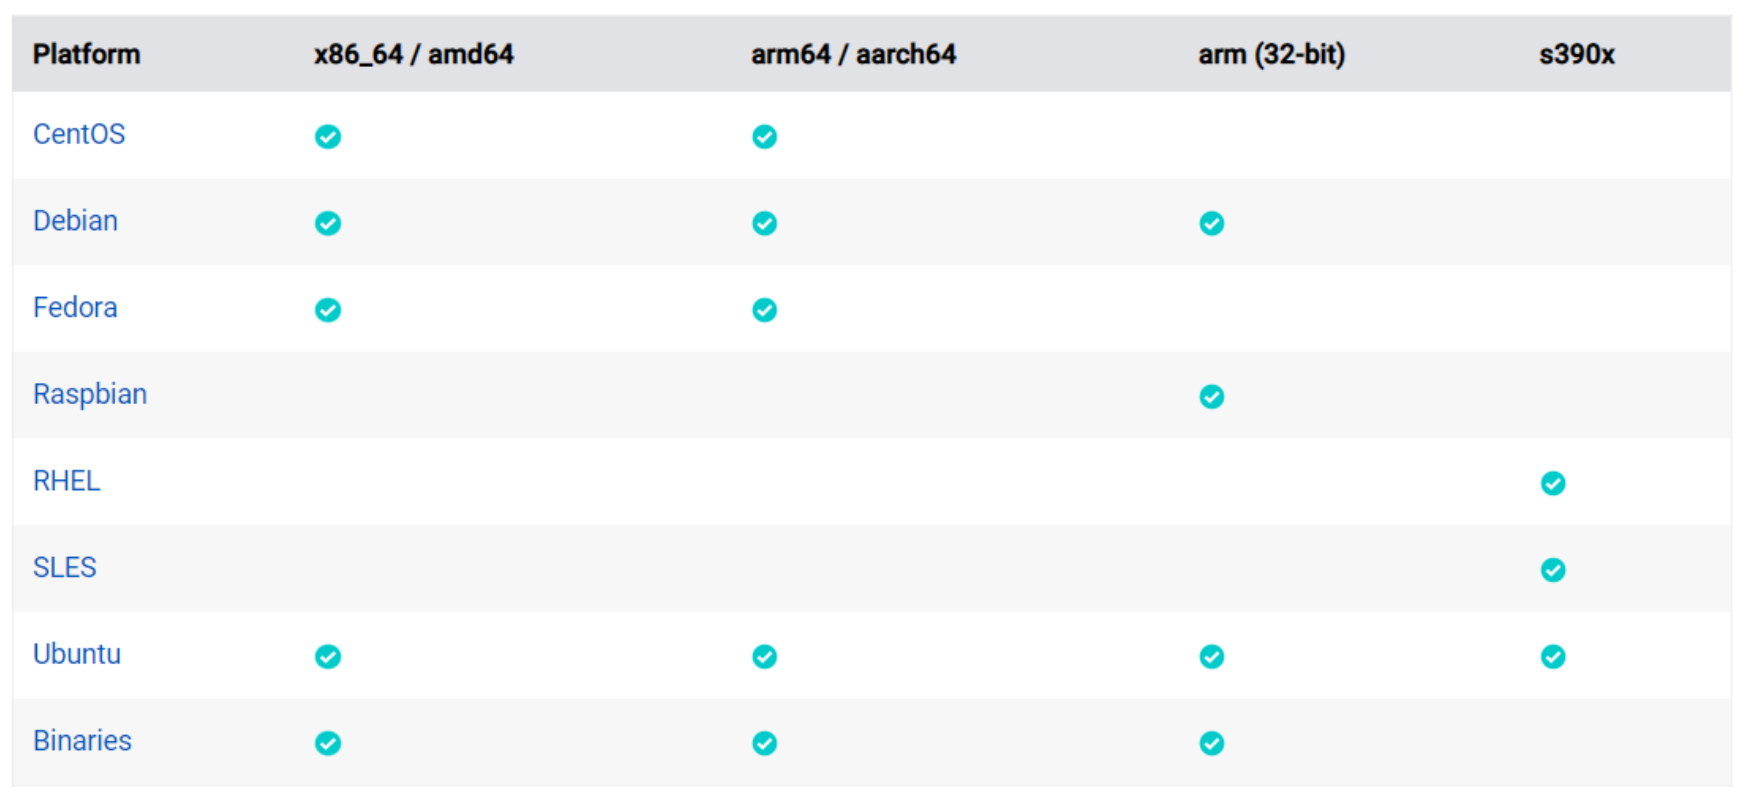
Server 版本
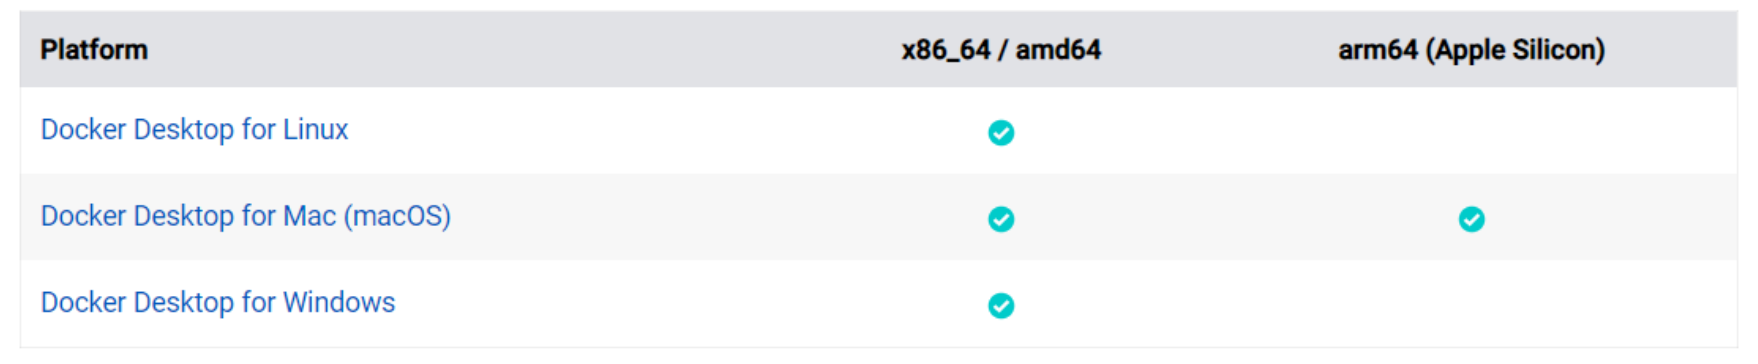
桌面版本
Server 版本安装
Ubuntu 安装
安装依赖
1.操作系统版本
Ubuntu Kinetic 22.10
Ubuntu Jammy 22.04 (LTS)
Ubuntu Focal 20.04 (LTS)
Ubuntu Bionic 18.04 (LTS)
2.CPU支持
ARM 和 X86_64
安装Docker
1.确定操作系统版本,本次我们使用的是 Ubuntu 22.04

2.确定 CPU,可以看到我们的是 X86_64,是支持的,如果是 arm 一般会显示aarch64

3.卸载旧版本,如果是新购买的云服务器是没有的,比如输入 docker 并没有这个命令,就不需要卸载
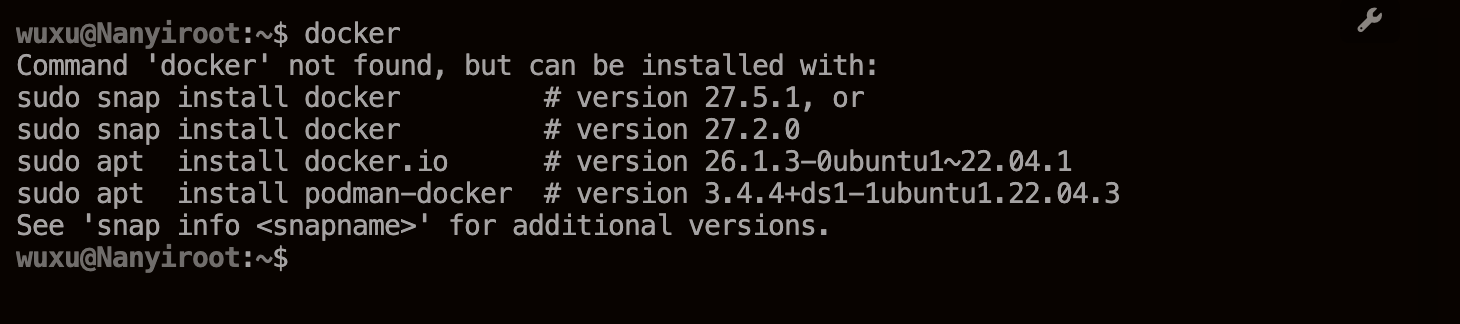
我们服务器是没有的,如果有,卸载指令
sudo apt-get remove docker docker-engine docker.io containerd runc
4.卸载历史版本
#卸载软件
sudo apt-get purge docker-ce docker-ce-cli containerd.io docker-buildx-plugin docker-compose-plugin docker-ce-rootless-extras -y

#删除目录
sudo rm -rf /var/lib/docker
sudo rm -rf /var/lib/containerd

#这个是修改后的目录,根据实际情况设置
sudo rm -rf /data/var/lib/docker
sudo rm -rf /etc/docker/daemon.json
5.配置 docker 下载源
在安装 Docker 之前,我们需要安装一些必要的依赖包。运行以下命令
sudo apt install apt-transport-https ca-certificates curl software-properties-common

添加 Docker 的官方 GPG 密钥
curl -fsSL https://download.docker.com/linux/ubuntu/gpg | sudo apt-key add -

添加 Docker 的 APT 源
sudo add-apt-repository "deb [arch=amd64] https://download.docker.com/linux/ubuntu $(lsb_release -cs) stable"
6.安装
sudo apt update
sudo apt-get install docker-ce docker-ce-cli containerd.io docker-buildx-plugin docker-compose-plugin -y
7.验证docker是否安装成功
sudo systemctl status docker

wuxu@Nanyiroot:~$ docker version
Client: Docker Engine - Community
 Version:           28.0.1
 API version:       1.48
 Go version:        go1.23.6
 Git commit:        068a01e
 Built:             Wed Feb 26 10:41:08 2025
 OS/Arch:           linux/amd64
 Context:           default
permission denied while trying to connect to the Docker daemon socket at unix:///var/run/docker.sock: Get "http://%2Fvar%2Frun%2Fdocker.sock/v1.48/version": dial unix /var/run/docker.sock: connect: permission denied
8.自动启动配置
#配置加载
sudo systemctl daemon-reload
#启动服务
sudo systemctl start docker
#开启启动
sudo systemctl enable docker
#查看服务状态
sudo systemctl status docker
9.更详细查看 docker 信息
wuxu@Nanyiroot:~$ docker info
Client: Docker Engine - Community
 Version:    28.0.1
 Context:    default
 Debug Mode: false
 Plugins:
  buildx: Docker Buildx (Docker Inc.)
    Version:  v0.21.1
    Path:     /usr/libexec/docker/cli-plugins/docker-buildx
  compose: Docker Compose (Docker Inc.)
    Version:  v2.33.1
    Path:     /usr/libexec/docker/cli-plugins/docker-compose

Server:
ERROR: permission denied while trying to connect to the Docker daemon socket at unix:///var/run/docker.sock: Get "http://%2Fvar%2Frun%2Fdocker.sock/v1.48/info": dial unix /var/run/docker.sock: connect: permission denied
errors pretty printing info
10.执行 hello-world 可以看到 Hello from Docker,表面 docker 服务正常
wuxu@Nanyiroot:~$ sudo docker run hello-world
Unable to find image 'hello-world:latest' locally
latest: Pulling from library/hello-world
e6590344b1a5: Pull complete
Digest: sha256:7e1a4e2d11e2ac7a8c3f768d4166c2defeb09d2a750b010412b6ea13de1efb19
Status: Downloaded newer image for hello-world:latest

Hello from Docker!
This message shows that your installation appears to be working correctly.

To generate this message, Docker took the following steps:
 1. The Docker client contacted the Docker daemon.
 2. The Docker daemon pulled the "hello-world" image from the Docker Hub.
    (amd64)
 3. The Docker daemon created a new container from that image which runs the
    executable that produces the output you are currently reading.
 4. The Docker daemon streamed that output to the Docker client, which sent it
    to your terminal.

To try something more ambitious, you can run an Ubuntu container with:
 $ docker run -it ubuntu bash

Share images, automate workflows, and more with a free Docker ID:
 https://hub.docker.com/

For more examples and ideas, visit:
 https://docs.docker.com/get-started/
如果不正常
vim /etc/docker/daemon.json

打开这个文件, 【如果没有这个文件, 就先创建一下, 如果有就直接写】

写入下面的内容:
{
        "registry-mirrors": [
                "https://docker.m.daocloud.io",
                "https://dockerhub.timeweb.cloud",
                "https://huecker.io"
  ]
}

然后

执行配置文件加载和重启docker的命令

systemctl daemon-reload
systemctl restart docker

你都拷贝执行就好了, 别自己手敲。 拷贝的保证不会错

虽然配置了镜像加速器, 但是上传镜像到dockerhub中大陆地区还是被封禁的。

如果需要上传镜像, 推荐阿里云镜像仓库或者腾讯云镜像仓库, 和朋友、同事、团队进行协作


 被折叠的 条评论
为什么被折叠?
被折叠的 条评论
为什么被折叠?
 到【灌水乐园】发言


