


 本文介绍了如何使用springfox将SpringMVC与Swagger2进行整合,特别是springfox的新特性,不再需要引入swagger-ui的静态文件。通过添加相关依赖,设置配置,并注意在最新的springfox版本中,参数注解需要改为在参数上使用@ApiParam。同时,文章提供了错误排查和相关资源链接。
swagger用于定义API文档。
1. 好处:
前后端分离开发
API文档非常明确
测试的时候不需要再使用URL输入浏览器的方式来访问Controller
传统的输入URL的测试方式对于post请求的传参比较麻烦(当然,可以使用postman这样的浏览器插件)
guava-19.0.jar
jackson-annotations-2.8.4.jar
jackson-core-2.8.7.jar
jackson-databind-2.8.7.jar
slf4j-api-1.7.24.jar
spring-plugin-core-1.2.0.RELEASE.jar
spring-plugin-metadata-1.2.0.RELEASE.jar
springfox-core-2.6.1.jar
springfox-schema-2.6.1.jar
springfox-spi-2.6.1.jar
springfox-spring-web-2.6.1.jar
springfox-swagger-common-2.6.1.jar
springfox-swagger-ui-2.6.1.jar
springfox-swagger2-2.6.1.jar
swagger-annotations-1.5.10.jar
swagger-models-1.5.10.jar
2.添加com.chensan.config.Swagger2Config.java
<!-- 注入swagger -->
<bean class="com.chensan.config.Swagger2Config" />
<!-- Enables swgger ui -->
<mvc:resources location="classpath:/META-INF/resources/" mapping="swagger-ui.html" />
<mvc:resources location="classpath:/META-INF/resources/webjars/" mapping="/webjars/**" />
访问:ip:port/{context-path}/swagger-ui.html
实例:http://localhost/bphss-sample/swagger-ui.html
访问到springfox-swagger-ui-2.6.1.jar/META-INF/resources下的swagger-ui.html
页面出现黄绿色背景即springfox + swagger2组合的API框架配置成功。
注:swagger + springmvc继承需要导入swagger-ui的静态文件到项目中。
springfox + swagger2则不需要,在springfox-swagger-ui-2.6.1.jar中已经包含swagger-ui的源码,并在springmvc-config.xml中引入。
1. 好处:
前后端分离开发
API文档非常明确
测试的时候不需要再使用URL输入浏览器的方式来访问Controller
传统的输入URL的测试方式对于post请求的传参比较麻烦(当然,可以使用postman这样的浏览器插件)
springfox基于swagger2,兼容老版本
以前的版本是swagger + springmvc,现在springfox中整合了swagger-ui,不需要再引入swagger-ui的静态文件;
1.添加支持的jar:
classmate-1.3.3.jarguava-19.0.jar
jackson-annotations-2.8.4.jar
jackson-core-2.8.7.jar
jackson-databind-2.8.7.jar
slf4j-api-1.7.24.jar
spring-plugin-core-1.2.0.RELEASE.jar
spring-plugin-metadata-1.2.0.RELEASE.jar
springfox-core-2.6.1.jar
springfox-schema-2.6.1.jar
springfox-spi-2.6.1.jar
springfox-spring-web-2.6.1.jar
springfox-swagger-common-2.6.1.jar
springfox-swagger-ui-2.6.1.jar
springfox-swagger2-2.6.1.jar
swagger-annotations-1.5.10.jar
swagger-models-1.5.10.jar
2.添加com.chensan.config.Swagger2Config.java
package com.chensan.config;

import org.springframework.context.annotation.Bean;
import org.springframework.context.annotation.Configuration;

import springfox.documentation.builders.ApiInfoBuilder;
import springfox.documentation.builders.PathSelectors;
import springfox.documentation.builders.RequestHandlerSelectors;
import springfox.documentation.service.ApiInfo;
import springfox.documentation.service.Contact;
import springfox.documentation.spi.DocumentationType;
import springfox.documentation.spring.web.plugins.Docket;
import springfox.documentation.swagger2.annotations.EnableSwagger2;

//@Configuration
@EnableSwagger2
public class Swagger2Config {
	@Bean
	public Docket createRestApi() {
		return new Docket(DocumentationType.SWAGGER_2)
			.apiInfo(apiInfo())
			.select()
			.apis(RequestHandlerSelectors.basePackage("com.chensan.api"))
			.paths(PathSelectors.any())
			.build();
	}

	private ApiInfo apiInfo() {
		Contact contact = new Contact("chenhf", "http://blog.youkuaiyun.com/qinshijangshan", "1619427973@qq.com");

		return new ApiInfoBuilder()
			.title("OAuth 2.0 RESTful APIs")
			.description("OAuth2.0 RESTFul API 文档")
			.termsOfServiceUrl("http://blog.youkuaiyun.com/qinshijangshan")
			.license("© 2017-2025 chenhf. All rights reserved.")
			.contact(contact)
			.version("1.0")
			.build();
	}
}User.java
package com.chensan.api.test.po;

public class User {
    private int userId;
    private String name;
    private int age;

    public User() {
    }

    public User(int userId, String name, int age) {
        this.userId = userId;
        this.name = name;
        this.age = age;
    }

    public String getName() {
        return name;
    }

    public User setName(String name) {
        this.name = name;
        return this;
    }

    public int getAge() {
        return age;
    }

    public User setAge(int age) {
        this.age = age;
        return this;
    }

    public int getUserId() {
        return userId;
    }

    public User setUserId(int userId) {
        this.userId = userId;
        return this;
    }
}package com.chensan.api.test.vo;
import java.io.Serializable;
public class Result implements Serializable {
private static final long serialVersionUID = 1L;
// 1:成功
private int code;
// 返回消息,成功为“success”,失败为具体失败信息
private String message;
// 返回数据
private Object data;
public int getCode() {
return code;
}
public void setCode(int code) {
this.code = code;
}
public String getMessage() {
return message;
}
public void setMessage(String message) {
this.message = message;
}
public Object getData() {
return data;
}
public void setData(Object data) {
this.data = data;
}
@Override
public String toString() {
return "Result{" +
"code=" + code +
", message='" + message + '\'' +
", data=" + data +
'}';
}
}package com.chensan.api.test;
import io.swagger.annotations.ApiOperation;
import io.swagger.annotations.ApiParam;
import io.swagger.annotations.ApiResponse;
import org.springframework.web.bind.annotation.RequestMapping;
import org.springframework.web.bind.annotation.RequestMethod;
import org.springframework.web.bind.annotation.RequestParam;
import org.springframework.web.bind.annotation.ResponseBody;
import org.springframework.web.bind.annotation.RestController;
import com.chensan.api.test.po.User;
import com.chensan.api.test.vo.Result;
import javax.servlet.http.HttpServletRequest;
@RestController
@RequestMapping("/userTest")
public class UserController {
@ApiOperation(value = "根据用户id查询用户信息", httpMethod = "GET", produces = "application/json")
@ApiResponse(code = 200, message = "success", response = Result.class)
@ResponseBody
@RequestMapping(value = "queryUserById", method = RequestMethod.GET, produces = "application/json")
public Result queryUserById(@ApiParam(name = "userId", required = true, value = "用户Id") @RequestParam("userId") int userId, HttpServletRequest request) {
User user = new User(userId, "chenhf", 25);
Result result = new Result();
result.setCode(0);
result.setData(user);
result.setMessage("success");
return result;
}
}<!-- 注入swagger -->
<bean class="com.chensan.config.Swagger2Config" />
<!-- Enables swgger ui -->
<mvc:resources location="classpath:/META-INF/resources/" mapping="swagger-ui.html" />
<mvc:resources location="classpath:/META-INF/resources/webjars/" mapping="/webjars/**" />
访问:ip:port/{context-path}/swagger-ui.html
实例:http://localhost/bphss-sample/swagger-ui.html
访问到springfox-swagger-ui-2.6.1.jar/META-INF/resources下的swagger-ui.html
页面出现黄绿色背景即springfox + swagger2组合的API框架配置成功。
注:swagger + springmvc继承需要导入swagger-ui的静态文件到项目中。
springfox + swagger2则不需要,在springfox-swagger-ui-2.6.1.jar中已经包含swagger-ui的源码,并在springmvc-config.xml中引入。


关于Springfox + swagger2的继承可参考: http://blog.youkuaiyun.com/u014231523/article/details/54411026
相关问题可参考: http://m.w2bc.com/article/229092
前面有个朋友说按我的配置报错:报错http://localhost:8080/onemap/swagger-resources/configuration/ui 404 ();那么显然是路径问题了,我前面用的springfox-2.6.1的版本没问题,后来用最新版的springfox-2.9.0也出现了问题(我这里是后面补得记录,懒得回溯去截图出来。swagger-ui.html访问下就知道问题了)。
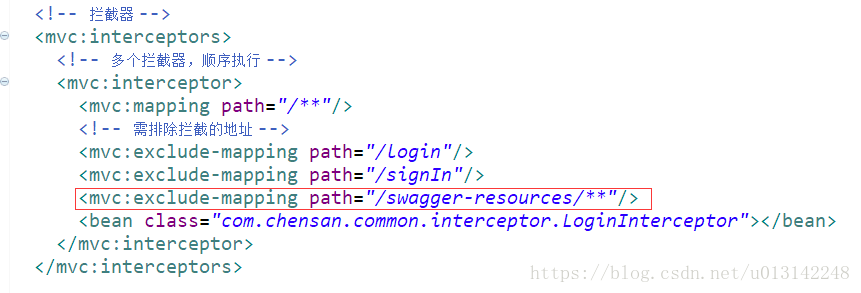
在springmvc配置文件设置:
而且发现换了springfox-2.9.0,api传参的方式的变化;
原来@ApiImplicitParams或@ApiImplicitParam的注解在方法体上,现在只能在参数体力设置@ApiParam,具体使用请参考springfox-petstore的jar包;
上一篇:SpringMVC框架搭建


 2497
2497

 被折叠的 条评论
为什么被折叠?
被折叠的 条评论
为什么被折叠?
 到【灌水乐园】发言


