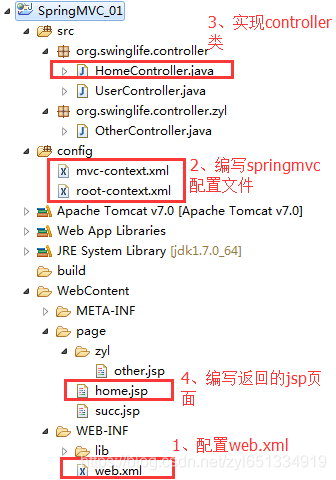
实例代码结构图:

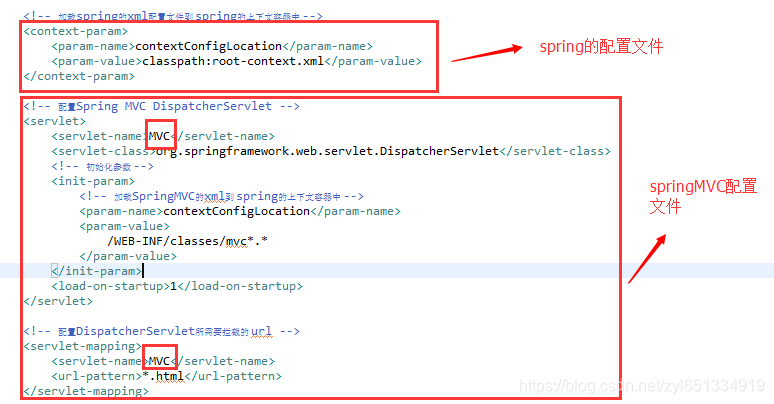
1、web.xml文件

<?xml version="1.0" encoding="UTF-8"?>
<web-app version="3.0" xmlns="http://java.sun.com/xml/ns/javaee"
xmlns:xsi="http://www.w3.org/2001/XMLSchema-instance"
xsi:schemaLocation="http://java.sun.com/xml/ns/javaee
http://java.sun.com/xml/ns/javaee/web-app_3_0.xsd">
<display-name></display-name>
<!-- 监听spring上下文容器 -->
<listener>
<listener-class>
org.springframework.web.context.ContextLoaderListener
</listener-class>
</listener>
<!-- 加载spring的xml配置文件到 spring的上下文容器中 -->
<context-param>
<param-name>contextConfigLocation</param-name>
<param-value>classpath:root-context.xml</param-value>
</context-param>
<!-- 配置Spring MVC DispatcherServlet -->
<servlet>
<servlet-name>MVC</servlet-name>
<servlet-class>org.springframework.web.servlet.DispatcherServlet</servlet-class>
<!-- 初始化参数 -->
<init-param>
<!-- 加载SpringMVC的xml到 spring的上下文容器中 -->
<param-name>contextConfigLocation</param-name>
<param-value>
/WEB-INF/classes/mvc*.*
</param-value>
</init-param>
<load-on-startup>1</load-on-startup>
</servlet>
<!-- 配置DispatcherServlet所需要拦截的 url -->
<servlet-mapping>
<servlet-name>MVC</servlet-name>
<url-pattern>*.html</url-pattern>
</servlet-mapping>
<welcome-file-list>
<welcome-file>index.html</welcome-file>
</welcome-file-list>
</web-app>
2、springMVC配置文件mvc-context.xml

<?xml version="1.0" encoding="UTF-8"?>
<beans:beans xmlns="http://www.springframework.org/schema/mvc"
xmlns:xsi="http://www.w3.org/2001/XMLSchema-instance" xmlns:beans="http://www.springframework.org/schema/beans"
xmlns:p="http://www.springframework.org/schema/p" xmlns:aop="http://www.springframework.org/schema/aop"
xmlns:context="http://www.springframework.org/schema/context"
xsi:schemaLocation="http://www.springframework.org/schema/mvc http://www.springframework.org/schema/mvc/spring-mvc.xsd
http://www.springframework.org/schema/aop
http://www.springframework.org/schema/aop/spring-aop-3.2.xsd http://www.springframework.org/schema/beans http://www.springframework.org/schema/beans/spring-beans.xsd
http://www.springframework.org/schema/context http://www.springframework.org/schema/context/spring-context.xsd">
<!-- 加载Spring的全局配置文件 -->
<beans:import resource="root-context.xml" />
<!-- SpringMVC配置 -->
<!-- 通过component-scan 让Spring扫描org.swinglife.controller下的所有的类,让Spring的代码注解生效 -->
<context:component-scan base-package="org.swinglife.controller"></context:component-scan>
<!-- 配置SpringMVC的视图渲染器, 让其前缀为:/ 后缀为.jsp 将视图渲染到/page/<method返回值>.jsp中 -->
<beans:bean
class="org.springframework.web.servlet.view.InternalResourceViewResolver"
p:prefix="/page/" p:suffix=".jsp">
</beans:bean>
</beans:beans>
3、spring配置文件root-context.xml
<?xml version="1.0" encoding="UTF-8"?>
<beans xmlns="http://www.springframework.org/schema/beans"
xmlns:xsi="http://www.w3.org/2001/XMLSchema-instance" xmlns:context="http://www.springframework.org/schema/context"
xsi:schemaLocation="http://www.springframework.org/schema/beans http://www.springframework.org/schema/beans/spring-beans-3.2.xsd
http://www.springframework.org/schema/context
http://www.springframework.org/schema/context/spring-context-3.2.xsd
http://www.springframework.org/schema/tx http://www.springframework.org/schema/tx/spring-tx-3.2.xsd">
<!-- Root Context: defines shared resources visible to all other web components -->
</beans>
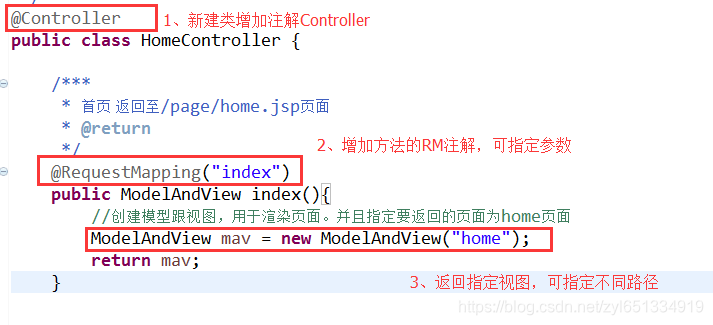
4、HomeController.java

package org.swinglife.controller;
import org.springframework.stereotype.Controller;
import org.springframework.web.servlet.ModelAndView;
import org.springframework.web.bind.annotation.RequestMapping;
/***
*
* @author
*
*/
@Controller
public class HomeController {
/***
* 首页 返回至/page/home.jsp页面
* @return
*/
@RequestMapping("index")
public ModelAndView index(){
//创建模型跟视图,用于渲染页面。并且指定要返回的页面为home页面
ModelAndView mav = new ModelAndView("home");
return mav;
}
}
5、编写对应的jsp页面
<%@ page language="java" contentType="text/html; charset=GB18030"
pageEncoding="GB18030"%>
<!DOCTYPE html PUBLIC "-//W3C//DTD HTML 4.01 Transitional//EN" "http://www.w3.org/TR/html4/loose.dtd">
<html>
<head>
<meta http-equiv="Content-Type" content="text/html; charset=GB18030">
<title>home</title>
</head>
<body>
<h2>spring mvc 实例</h2>
<form action="login.html" method="post">
username:<input type="text" name="username" />
<p>
password:<input type="password" name="password"/>
<p>
<input type="submit" value="submit" />
</form>
<a href="other.html">other page</a>
</body>
</html>


 446
446

 被折叠的 条评论
为什么被折叠?


