


 本文详细介绍如何在CentOS系统中通过LVM技术将硬盘从20G扩展至30G的具体步骤,包括虚拟机硬盘扩展、分区调整、文件系统格式化、物理卷创建及逻辑卷扩展等关键操作。
网上大把文章,步骤都很繁琐,写的也乱,今天写篇通俗易懂的
开始之前有点要注意的是下面的步骤不能在容量完全使用完了的时候操作,否则很容易出问题,例如,如果容量已经使用100%请自行删掉一些没用的东西再操作
lvm> pvcreate /dev/sda3
  Device /dev/sda3  not found.
lvm> vgextend centos /dev/sda3
WARNING: ext3 signature detected on /dev/sda3 at offset 1080. Wipe it? [y/n]: y
  Wiping ext3 signature on /dev/sda3.
  Physical volume "/dev/sda3" successfully created.
  Couldn't create temporary archive name.
环境:
VMware Workstation Pro+Centos7
我的是分配的硬盘是20G,查看使用情况
[root@hadoop-3 ~]# df -h
Filesystem               Size  Used Avail Use% Mounted on
/dev/mapper/centos-root   10G  7.5G  2.6G  75% /
devtmpfs                 438M     0  438M   0% /dev
tmpfs                    455M     0  455M   0% /dev/shm
tmpfs                    455M  7.6M  447M   2% /run
tmpfs                    455M     0  455M   0% /sys/fs/cgroup
/dev/sda1                197M  157M   41M  80% /boot
tmpfs                     91M     0   91M   0% /run/user/0
接下来准备扩充10G到30G
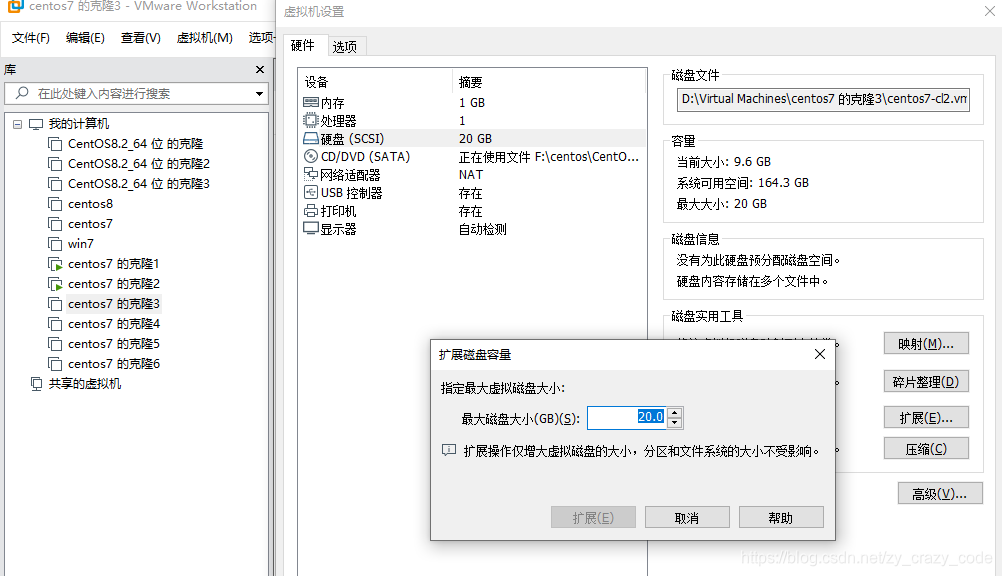
1、关机虚拟机之后,右键“设置”--->"硬盘"--->"扩展"
手动输入30,点击“扩展”,成功之后弹框提示--“磁盘已成功扩展。您必须从客户机操作系统内部对磁盘重新进行分区和扩展文件系统。”
开启此虚拟机
这个时候centos还并没有扩容成功,输入df -h 查看,跟之前是一样的
[root@hadoop-3 ~]# fdisk /dev/sda
Welcome to fdisk (util-linux 2.23.2).

Changes will remain in memory only, until you decide to write them.
Be careful before using the write command.


Command (m for help): p

Disk /dev/sda: 32.2 GB, 32212254720 bytes, 62914560 sectors
Units = sectors of 1 * 512 = 512 bytes
Sector size (logical/physical): 512 bytes / 512 bytes
I/O size (minimum/optimal): 512 bytes / 512 bytes
Disk label type: dos
Disk identifier: 0x00074ad1

   Device Boot      Start         End      Blocks   Id  System
/dev/sda1   *        2048      411647      204800   83  Linux
/dev/sda2          411648    25593855    12591104   8e  Linux LVM

Command (m for help): n
Partition type:
   p   primary (2 primary, 0 extended, 2 free)
   e   extended
Select (default p): p
Partition number (3,4, default 3): 3
First sector (25593856-62914559, default 25593856):
Using default value 25593856
Last sector, +sectors or +size{K,M,G} (25593856-62914559, default 62914559):
Using default value 62914559
Partition 3 of type Linux and of size 17.8 GiB is set

Command (m for help): t
Partition number (1-3, default 3): 3
Hex code (type L to list all codes): 8e
Changed type of partition 'Linux' to 'Linux LVM'

Command (m for help): w
The partition table has been altered!

Calling ioctl() to re-read partition table.

WARNING: Re-reading the partition table failed with error 16: Device or resource busy.
The kernel still uses the old table. The new table will be used at
the next reboot or after you run partprobe(8) or kpartx(8)
Syncing disks.
2、重启机器 输入:reboot
3、格式化分区,mkfs.ext3 /dev/sda3一直挂载的分区是sda3;
[root@hadoop-3 ~]# mkfs.ext3 /dev/sda3
mke2fs 1.42.9 (28-Dec-2013)
Filesystem label=
OS type: Linux
Block size=4096 (log=2)
Fragment size=4096 (log=2)
Stride=0 blocks, Stripe width=0 blocks
1166880 inodes, 4665088 blocks
233254 blocks (5.00%) reserved for the super user
First data block=0
Maximum filesystem blocks=4294967296
143 block groups
32768 blocks per group, 32768 fragments per group
8160 inodes per group
Superblock backups stored on blocks:
        32768, 98304, 163840, 229376, 294912, 819200, 884736, 1605632, 2654208,
        4096000

Allocating group tables: done
Writing inode tables: done
Creating journal (32768 blocks): done
Writing superblocks and filesystem accounting information: done
4、输入以下指令
lvm    //进入lvm管理
lvm>pvcreate /dev/sda3
lvm>vgextend centos /dev/sda3  //将初始化过的分区加入到虚拟卷组centos
lvm>vgdisplay -v
lvm>lvextend -l+1298 /dev/mapper/centos-root
lvm>pvdisplay   //查看卷容量
lvm>quit
执行如图
[root@hadoop-3 ~]# lvm
lvm> pvcreate /dev/sda3
  Device /dev/sda3  not found.
lvm> vgextend centos /dev/sda3
WARNING: ext3 signature detected on /dev/sda3 at offset 1080. Wipe it? [y/n]: y
  Wiping ext3 signature on /dev/sda3.
  Physical volume "/dev/sda3" successfully created.
  Volume group "centos" successfully extended
lvm> vgdisplay -v
  --- Volume group ---
  VG Name               centos
  System ID
  Format                lvm2
  Metadata Areas        2
  Metadata Sequence No  4
  VG Access             read/write
  VG Status             resizable
  MAX LV                0
  Cur LV                2
  Open LV               2
  Max PV                0
  Cur PV                2
  Act PV                2
  VG Size               <29.80 GiB
  PE Size               4.00 MiB
  Total PE              7628
  Alloc PE / Size       3072 / 12.00 GiB
  Free  PE / Size       4556 / <17.80 GiB
  VG UUID               B6bJIn-2id7-tGVg-bK5S-20RJ-wTo0-bT6ux6

  --- Logical volume ---
  LV Path                /dev/centos/root
  LV Name                root
  VG Name                centos
  LV UUID                5SdQv8-0Caf-xVOK-APSX-raEy-fGQi-ThufGs
  LV Write Access        read/write
  LV Creation host, time localhost.localdomain, 2020-07-08 19:32:48 +0800
  LV Status              available
  # open                 1
  LV Size                10.00 GiB
  Current LE             2560
  Segments               1
  Allocation             inherit
  Read ahead sectors     auto
  - currently set to     8192
  Block device           253:0

  --- Logical volume ---
  LV Path                /dev/centos/swap
  LV Name                swap
  VG Name                centos
  LV UUID                wIQfJG-8kfC-tj29-48To-5RRP-1RWk-MNEQni
  LV Write Access        read/write
  LV Creation host, time localhost.localdomain, 2020-07-08 19:32:48 +0800
  LV Status              available
  # open                 2
  LV Size                2.00 GiB
  Current LE             512
  Segments               1
  Allocation             inherit
  Read ahead sectors     auto
  - currently set to     8192
  Block device           253:1

  --- Physical volumes ---
  PV Name               /dev/sda2
  PV UUID               AcrMU0-3uB2-rxbk-yHyZ-9OYc-sgif-G361mz
  PV Status             allocatable
  Total PE / Free PE    3073 / 1

  PV Name               /dev/sda3
  PV UUID               Rd8jjv-KT7B-JUL3-ZTBw-uwjq-qmr3-p80TNg
  PV Status             allocatable
  Total PE / Free PE    4555 / 4555

lvm> lvextend -l+1298 /dev/mapper/centos-root
  Size of logical volume centos/root changed from 10.00 GiB (2560 extents) to 15.07 GiB (3858 extents).
  Logical volume centos/root successfully resized.
lvm> pvdisplay
  --- Physical volume ---
  PV Name               /dev/sda2
  VG Name               centos
  PV Size               <12.01 GiB / not usable 4.00 MiB
  Allocatable           yes (but full)
  PE Size               4.00 MiB
  Total PE              3073
  Free PE               0
  Allocated PE          3073
  PV UUID               AcrMU0-3uB2-rxbk-yHyZ-9OYc-sgif-G361mz

  --- Physical volume ---
  PV Name               /dev/sda3
  VG Name               centos
  PV Size               <17.80 GiB / not usable 3.00 MiB
  Allocatable           yes
  PE Size               4.00 MiB
  Total PE              4555
  Free PE               3258
  Allocated PE          1297
  PV UUID               Rd8jjv-KT7B-JUL3-ZTBw-uwjq-qmr3-p80TNg

lvm> quit
  Exiting.
5、xfs_growfs /dev/mapper/centos-root扩展容量,df -h可以看到扩展成功。
[root@hadoop-3 ~]# xfs_growfs /dev/mapper/centos-root
meta-data=/dev/mapper/centos-root isize=512    agcount=4, agsize=655360 blks
         =                       sectsz=512   attr=2, projid32bit=1
         =                       crc=1        finobt=0 spinodes=0
data     =                       bsize=4096   blocks=2621440, imaxpct=25
         =                       sunit=0      swidth=0 blks
naming   =version 2              bsize=4096   ascii-ci=0 ftype=1
log      =internal               bsize=4096   blocks=2560, version=2
         =                       sectsz=512   sunit=0 blks, lazy-count=1
realtime =none                   extsz=4096   blocks=0, rtextents=0
data blocks changed from 2621440 to 3950592
[root@hadoop-3 ~]# df -h
Filesystem               Size  Used Avail Use% Mounted on
/dev/mapper/centos-root   16G  7.5G  7.6G  50% /
devtmpfs                 438M     0  438M   0% /dev
tmpfs                    455M     0  455M   0% /dev/shm
tmpfs                    455M  7.6M  447M   2% /run
tmpfs                    455M     0  455M   0% /sys/fs/cgroup
/dev/sda1                197M  157M   41M  80% /boot
tmpfs                     91M     0   91M   0% /run/user/0
成功.....


 4097
4097

 被折叠的 条评论
为什么被折叠?
被折叠的 条评论
为什么被折叠?
 到【灌水乐园】发言


