


 本文详细记录了在CentOS 7上搭建Elasticsearch 6.4.0的过程,包括JDK安装、Elasticsearch配置与启动、安装Head插件以增强管理界面,以及如何安装IK分词器进行中文分词。同时,文章还总结了Elasticsearch与Solr的对比和在实际操作中遇到的问题与解决方案。
本文主要记录我从创建虚拟机到配置es服务的所有操作和遇到的问题总结
一、了解Elsticsearch
二、VMware和CentOS 7的安装
三、 Elasticsearch服务的安装和配置
一、了解Elsticsearch
首先对于elsticsearch的学习要先进行了解:
1.elsticsearch的版本
目前官网(elsticsearch官网链接)最新版本是7.7.0,我这次学习的是6.4.0(工作项目需求)。
6.x 7.x 的区别十分大, 6.x 的API (原生API、RestFul 高级!)。
2.概述
Elasticsearch,简称为es,es是一个开源的高扩展的分布式全文检索引擎,它可以近乎实时的存储、检索数据。
本身扩展性能很好,可扩展到上百台服务器,能处理PB级别(大数据时代)的数据,让你以前所未有的速度处理大数据成为可能。es也可使用Java开发并使用Lucene作为核心来实现所有索引和搜索的功能,但它的目的是通过简单的Restful API 来隐藏Lucene的复杂性,使全文搜索变得简单。
据国际权威的数据库产品评测机构DB Engines的统计,在2016年1月,ElasticSearch已超过Solr等,成为排名第一的搜索引擎类应用。
3.学习原因
如果要使用sql语句实现搜索功能,要用到如 like %查询数据% 的语句,对于大数据就会十分慢;es现在广泛用于百度、淘宝电商、github等平台进行搜索功能。
二、VMware虚拟机和CentOS 7的安装
对es有了一定的了解后,我们要在虚拟机Linux操作系统下自己搭建es服务,我是在Linux下的CentOS7系统中学习并搭建的。
1.下载并安装VMware虚拟机工作台
VMware下载链接
2.下载并安装CentOS 7 镜像
CentOS官网链接 选自对应的镜像版本下载,有8G左右,官网下载很慢,我用的迅雷下载快很多。
下载完成后,在VMware中创建新的虚拟机,网络选择桥接模式,然后选择下载好的镜像安装,如下图:

安装CentOS 7的步骤省略。。。
三、Elasticsearch服务的安装和配置
在CentOS 7 操作系统安装完成后,我就有了一台自己的虚拟机了,接下来就是搭建es服务
声明:JDK1.8 ,最低要求! ElasticSearch 客户端,界面工具!
1.JDK下载
Linux操作系统自带openjdk,我将它删除后自己下载
(1)查看是否有jdk
–rpm是管理套件命令,-qa表示使用询问模式查询所有套件;grep表示查询文件里符合条件的字符串;java表示查询包含java的字符串
# rpm -qa | grep java

java-1.8.0-openjdk-headless-1.8.0.242.b08-1.el7.x86_64
javapackages-tools-3.4.1-11.el7.noarch
java-1.8.0-openjdk-1.8.0.242.b08-1.el7.x86_64
python-javapackages-3.4.1-11.el7.noarch
tzdata-java-2019c-1.el7.noarch
(2)删除openjdk
rpm -e --nodeps java-1.8.0-openjdk-1.8.0.212.b04-0.el7_6.x86_64
rpm -e --nodeps java-1.8.0-openjdk-headless-1.8.0.212.b04-0.el7_6.x86_64
--删除命令,除了noarch文件不用删除
(3)下载jdk8
wget https://repo.huaweicloud.com/java/jdk/8u201-b09/jdk-8u201-linux-x64.tar.gz
--找到华为的jdk8 linux 下载链接,使用wget下载
(4)解压缩
tar -zxvf jdk-8u201-linux-x64.tar.gz
(5)配置jdk环境变量
vim /etc/profile	--编辑全局变量,vim是文本编辑命令,即编辑全局变量文件profile

shift+G让光标移动到最后一行,i键进入插入状态,
粘贴内容:
#java enviroment
export JAVA_HOME=/usr/local/java/jdk1.8.0_201
export CLASSPATH=.:${JAVA_HOME}/jre/lib/rt.jar:${JAVA_HOME}/lib/dt.jar:${JAVA_HOME}/lib/tools.jar
export PATH=$PATH:${JAVA_HOME}/bin

退出保存(先按ESC,键盘输入 :wq!)
source /etc/profile 	--重载刚设置环境使其生效

java -version	--查看java版本看是否成功
2.安装Elasticsearch-6.4.0
在Java开发中,ElasticSearch 的版本和我们之后对应的 Java 的核心jar包的版本对应!
es下载链接:https://www.elastic.co/,我下载的是Linux的6.4.0版本,上传到CentOS系统
(1)创建es工作目录
# mkdir –p /usr/es/data
# mkdir –p /usr/es/logs
(2)解压缩
# tar –zxvf elasticsearch-6.4.0.tar.gz –C /usr/es
(3)修改配置
配置文件:/usr/es/elasticsearch-6.4.0/config/ 下的 elasticsearch.yml
# ======================== Elasticsearch Configuration =========================
#
# NOTE: Elasticsearch comes with reasonable defaults for most settings.
#       Before you set out to tweak and tune the configuration, make sure you
#       understand what are you trying to accomplish and the consequences.
#
# The primary way of configuring a node is via this file. This template lists
# the most important settings you may want to configure for a production cluster.
#
# Please consult the documentation for further information on configuration options:
# https://www.elastic.co/guide/en/elasticsearch/reference/index.html
#
# ---------------------------------- Cluster -----------------------------------
#
# Use a descriptive name for your cluster:
#
cluster.name: my_es
#
# ------------------------------------ Node ------------------------------------
#
# Use a descriptive name for the node:
#
node.name: zhang001
#
# Add custom attributes to the node:
#
#node.attr.rack: r1
#
# ----------------------------------- Paths ------------------------------------
#
# Path to directory where to store the data (separate multiple locations by comma):
#
path.data: /usr/es/data
#
# Path to log files:
#
path.logs: /usr/es/logs
#
# ----------------------------------- Memory -----------------------------------
#
# Lock the memory on startup:
#
bootstrap.memory_lock: false
bootstrap.system_call_filter: false
#
# Make sure that the heap size is set to about half the memory available
# on the system and that the owner of the process is allowed to use this
# limit.
#
# Elasticsearch performs poorly when the system is swapping the memory.
#
# ---------------------------------- Network -----------------------------------
#
# Set the bind address to a specific IP (IPv4 or IPv6):
#
#任何ip都可以访问
network.host: 0.0.0.0
#network.bind_host: 192.168.2.190
#
# Set a custom port for HTTP:
#
#服务端口
http.port: 9210
#
# For more information, consult the network module documentation.
#
# --------------------------------- Discovery ----------------------------------
#
# Pass an initial list of hosts to perform discovery when new node is started:
# The default list of hosts is ["127.0.0.1", "[::1]"]
#
#使用集群的机器
#discovery.zen.ping.unicast.hosts: ["192.168.2.190", "192.168.2.103"]
#
# Prevent the "split brain" by configuring the majority of nodes (total number of master-eligible nodes / 2 + 1):
#
#discovery.zen.minimum_master_nodes: 1
#discovery.zen.ping.timeout: 3s
#
# For more information, consult the zen discovery module documentation.
#
# ---------------------------------- Gateway -----------------------------------
#
# Block initial recovery after a full cluster restart until N nodes are started:
#
#gateway.recover_after_nodes: 3
#
# For more information, consult the gateway module documentation.
#
# ---------------------------------- Various -----------------------------------
#
# Require explicit names when deleting indices:
#
#action.destructive_requires_name: true

#ram lock
#bootstrap.memory_lock: false
#bootstrap.system_call_filter: false

#head conf 跨域配置
http.cors.enabled: true
http.cors.allow-origin: "*"
3.配置并启动es
(1)由于es不能由root用户启动,需要创建用户并授权
# useradd elastic
# chown –R elastic:elastic /usr/es/
(2)由于系统对非root用户的一些文件的创建、内存、线程量有一定限制,需要配置修改
- 以下应为root用户操作
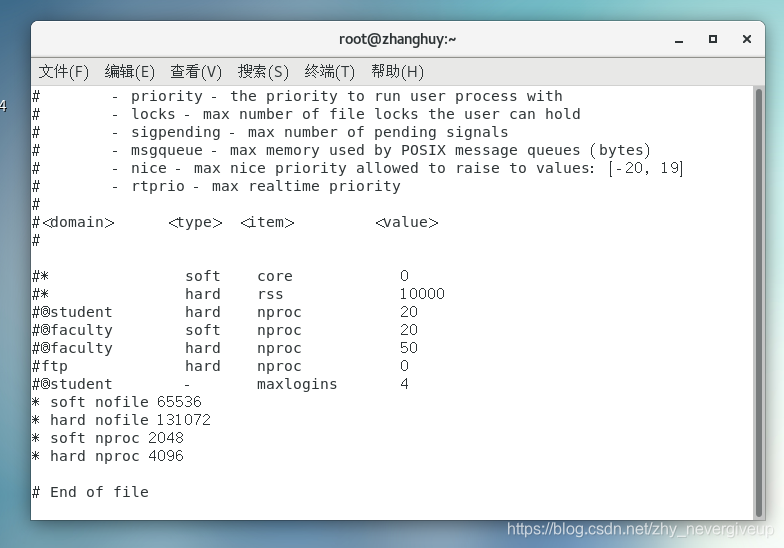
# vi /etc/security/limits.conf (根据具体配置修改,不能低于es最低要求)
* soft nofile 65536

* hard nofile 131072

* soft nproc 2048

* hard nproc 4096
# vi /etc/sysctl.conf
vm.max_map_count=655360
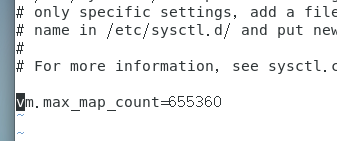
# sysctl –p (修改立即生效)
# vi /etc/security/limits.d/20-nproc.conf # 文件名称不定,到目录下看
- elastic 表示用户名

(3)启动es
切换用户:
#su elastic
进入es目录
$ cd /usr/es/elasticsearch-6.4.0/bin
启动es
$ ./elastaicsearch

$ ./elastaicsearch -d  #后台启动
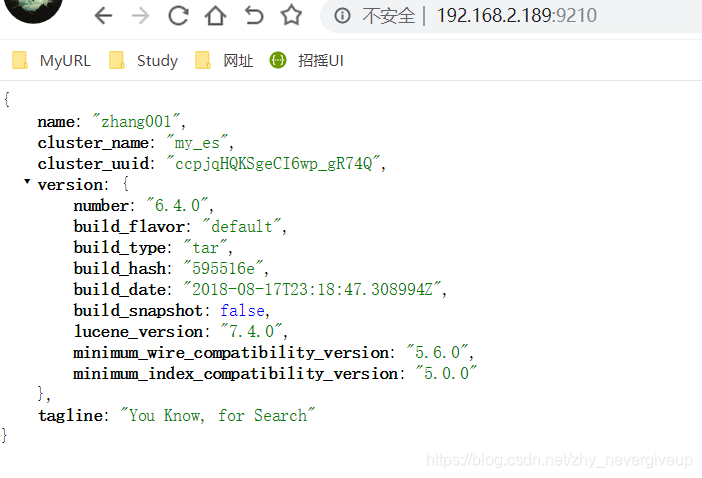
如上图,表示es安装成功。界面简单,需要安装head插件提高可操作性。
4.安装Elasticsearch-head-master 插件 (注意切换回root用户操作)
(1)直接在线下载:
# wget https://github.com/mobz/elasticsearch-head/archive/master.zip
或到github下载:https://github.com/mobz/elasticsearch-head
(2)解压zip文件(自定义到要存储目录,我解压到/usr/es目录下):
# unzip elasticsearch-head-master.zip
(3)由于head插件本质上还是一个nodejs的工程,因此需要安装node,使用npm来安装依赖的包。(npm可以理解为maven)
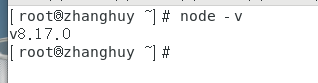
我下载的是node-v8.17.0-linux-x64.tar.xz,解压node:
# tar -zxvf node-v8.17.0-linux-x64.tar.xz
- 编辑/etc/profile,添加node配置:
export NODE_HOME=/usr/es/node/node-v8.17.0-linux-x64
export PATH=$NODE_HOME/bin:$PATH
- 执行修改,重载配置:
# source /etc/profile
- 测试node是否生效,
# node -v
(4)安装grunt
grunt是一个很方便的构建工具,可以进行打包压缩、测试、执行等等的工作,head插件就是通过grunt启动的。
安装grunt步骤如下: - 进入head安装目录,安装nodejs
# npm install -g grunt-cli  //执行后会生成node_modules文件夹

# npm install
- 修改head源码,增加hostname属性,设置为 0.0.0.0
vi /home/ntc/code/elasticsearch-head/Gruntfile.js

connect: {
    server: {
        options: {
            port: 9100,
            hostname: '0.0.0.0',
            base: '.',
            keepalive: true
        }
    }
}
- 修改连接地址
目录:vi /home/ntc/code/elasticsearch-head/_site/app.js

修改head的连接地址:
this.base_uri = this.config.base_uri || this.prefs.get("app-base_uri") || "http://localhost:9200";

把localhost修改成你es的服务器地址,如:
this.base_uri = this.config.base_uri || this.prefs.get("app-base_uri") || "http://192.168.2.189:9200";
*启动head
# grunt server #启动服务
启动成功后,访问 ip:9100 进入
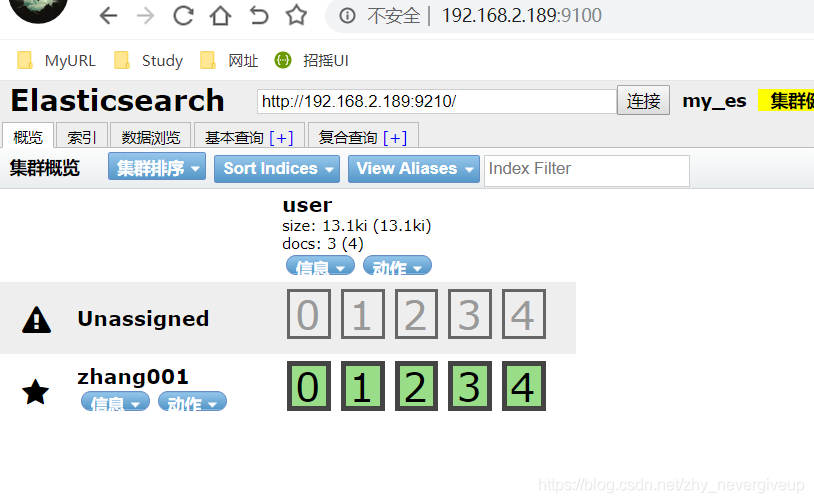
5.安装ik分词器
分词:即把一段中文或者别的划分成一个个的关键字,我们在搜索时候会把自己的信息进行分词,会把数据库中或者索引库中的数据进行分词,然后进行一个匹配操作,默认的中文分词是将每个字看成一个词,比如 “我爱中国” 会被分为"我",“爱”,“中”,“国”,这显然是不符合要求的,所以我们需要安装中文分词器ik来解决这个问题。
IK提供了两个分词算法:ik_smart 和 ik_max_word,其中 ik_smart 为最少切分,ik_max_word为最细粒度划分!
下载地址:https://github.com/medcl/elasticsearch-analysis-ik/releases
根据es版本下载,所以我下的也是6.4.0版本,在es的plugins下创建ik文件夹作为解压目录,解压后如图:
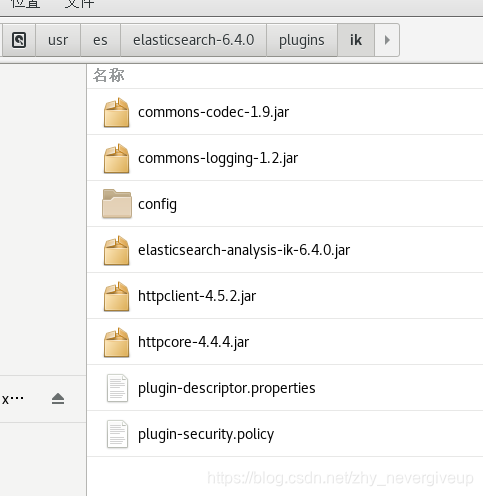
重启es后,会自动加载ik插件

- 测试ik插件
(1)创建指定分词器的索引
索引创建之后就可以使用ik进行分词了,当你使用ES搜索的时候也会使用ik对搜索语句进行分词,进行匹配
PUT book_v5
{
  "settings":{
    "number_of_shards": "6",
    "number_of_replicas": "1",
     //指定分词器
    "analysis":{
      "analyzer":{
        "ik":{
          "tokenizer":"ik_max_word"
        }
      }
    }
  },
  "mappings":{
    "novel":{
      "properties":{
        "author":{
          "type":"text"
        },
        "wordCount":{
          "type":"integer"
        },
        "publishDate":{
          "type":"date",
          "format":"yyyy-MM-dd HH:mm:ss || yyyy-MM-dd"
        },
        "briefIntroduction":{
          "type":"text"
        },
        "bookName":{
          "type":"text"
        }
      }
    }
  }
}
(2)未使用分词器测试效果
POST book_v5/_analyze
{
  "text": "我爱敲代码"
}

结果:
{
	"tokens": [
	{
		"token": "我",
		"start_offset": 0,
		"end_offset": 1,
		"type": "<IDEOGRAPHIC>",
		"position": 0
	}
	,
	{
		"token": "爱",
		"start_offset": 1,
		"end_offset": 2,
		"type": "<IDEOGRAPHIC>",
		"position": 1
	}
	,
	{
		"token": "敲",
		"start_offset": 2,
		"end_offset": 3,
		"type": "<IDEOGRAPHIC>",
		"position": 2
	}
	,
	{
		"token": "代",
		"start_offset": 3,
		"end_offset": 4,
		"type": "<IDEOGRAPHIC>",
		"position": 3
	}
	,
	{
		"token": "码",
		"start_offset": 4,
		"end_offset": 5,
		"type": "<IDEOGRAPHIC>",
		"position": 4
	}
	]
}
(3)使用分词器(ik_max_word 和 ik_smart)
- ik_max_word
POST book_v5/_analyze
{
  "analyzer": "ik_max_word",
  "text": "我是程序员"
}
结果:
{
	"tokens": [
	{
		"token": "我",
		"start_offset": 0,
		"end_offset": 1,
		"type": "CN_CHAR",
		"position": 0
	}
	,
	{
		"token": "是",
		"start_offset": 1,
		"end_offset": 2,
		"type": "CN_CHAR",
		"position": 1
	}
	,
	{
		"token": "程序员",
		"start_offset": 2,
		"end_offset": 5,
		"type": "CN_WORD",
		"position": 2
	}
	,
	{
		"token": "程序",
		"start_offset": 2,
		"end_offset": 4,
		"type": "CN_WORD",
		"position": 3
	}
	,
	{
		"token": "员",
		"start_offset": 4,
		"end_offset": 5,
		"type": "CN_CHAR",
		"position": 4
	}
	]
}
- ik_smart
POST book_v5/_analyze
{
  "analyzer": "ik_smart",
  "text": "我是程序员"
}
结果:
{
	"tokens": [
	{
		"token": "我",
		"start_offset": 0,
		"end_offset": 1,
		"type": "CN_CHAR",
		"position": 0
	}
	,
	{
		"token": "是",
		"start_offset": 1,
		"end_offset": 2,
		"type": "CN_CHAR",
		"position": 1
	}
	,
	{
		"token": "程序员",
		"start_offset": 2,
		"end_offset": 5,
		"type": "CN_WORD",
		"position": 2
	}
	]
}
关于ik分词器的分词类型(可以根据需求进行选择):
- ik_max_word:会将文本做最细粒度的拆分,比如会将“我是程序员”拆分为“我,是,程序员,程序,员”,会穷尽各种可能的组合。
- ik_smart:会做最粗粒度的拆分,比如会将“我是程序员”拆分为“我,是,程序员”。
四、问题总结
1.在虚拟机中启动后,外机能ping通ip地址,但是无法访问es服务
解决方式:需要关闭linux的防火墙
systemctl status firewalld 		--查看防火墙状态

systemctl stop firewalld 		--暂时关闭防火墙

systemctl disable firewalld 	--永久关闭防火墙
2.Elasticsearch vs Solr 总结
(1)es基本是开箱即用(解压就可以用 ! ),非常简单。Solr安装略微复杂一丢丢!
(2)Solr 利用 Zookeeper 进行分布式管理,而 Elasticsearch 自身带有分布式协调管理功能。
(3)Solr 支持更多格式的数据,比如JSON、XML、CSV,而 Elasticsearch 仅支持json文件格式。
(4)Solr 官方提供的功能更多,而 Elasticsearch 本身更注重于核心功能,高级功能多有第三方插件提 供,例如图形化界面需要kibana友好支撑~!
(5)Solr 查询快,但更新索引时慢(即插入删除慢),用于电商等查询多的应用; ES建立索引快(即查询慢),即实时性查询快,用于facebook新浪等搜索。 Solr 是传统搜索应用的有力解决方案,但 Elasticsearch 更适用于新兴的实时搜索应用。
(6)Solr比较成熟,有一个更大,更成熟的用户、开发和贡献者社区,而 Elasticsearch相对开发维护者 较少,更新太快,学习使用成本较高。(趋势!)
业精于勤而荒于嬉,行成于思而毁于随 – 韩愈


 638
638

 被折叠的 条评论
为什么被折叠?
被折叠的 条评论
为什么被折叠?
 到【灌水乐园】发言


