


 本文详细介绍使用ShardingSphere的shardingjdbc模块进行数据分表的过程。通过将table_data表拆分为5个分表,实现了数据的有效分布。配置了Apache ShardingSphere的最新版本,并在MySQL 8环境下进行了批量插入测试,验证了分表策略的有效性。
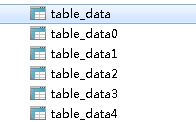
假设我们有一个table_data表,现在要将其分成5个分表table_data0、table_data1、table_data2、table_data3、table_data4
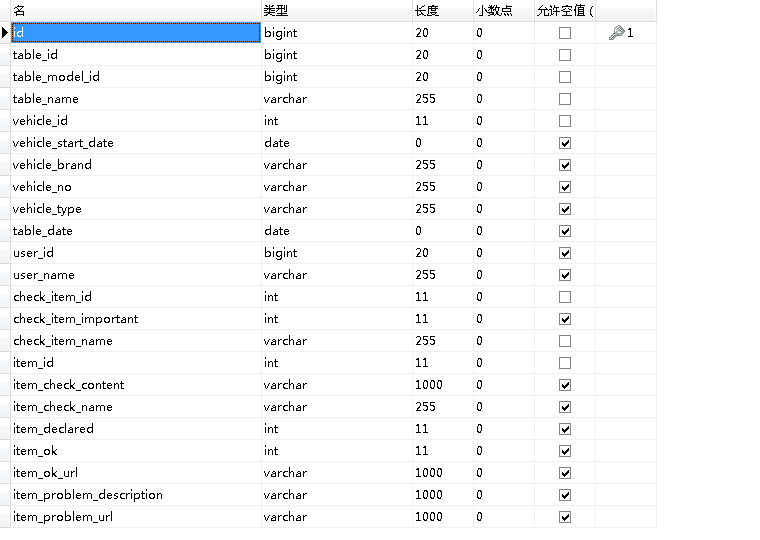
表内字段大致如下,id为主键
我们要使用的是shardingsphere的shardingjdbc模块,添加pom如下(该版本为Apache最新孵化版本)
<dependency>
   <groupId>org.apache.shardingsphere</groupId>
   <artifactId>sharding-jdbc-spring-boot-starter</artifactId>
   <version>4.0.0-RC1</version>
</dependency>
因为我使用的是mysql8的版本,配置文件如下
spring:
  shardingsphere:
    datasource:
      names: ds0
      ds0:
        driver-class-name: com.mysql.cj.jdbc.Driver
        url: jdbc:mysql://xx.xx.xx.xx:3306/database?useSSL=FALSE&serverTimezone=GMT%2B8
        username: root
        password: *****
        type: com.alibaba.druid.pool.DruidDataSource
        filters: stat
        maxActive: 20
        initialSize: 1
        maxWait: 60000
        minIdle: 1
        timeBetweenEvictionRunsMillis: 60000
        minEvictableIdleTimeMillis: 300000
        validationQuery: select 'x'
        testWhileIdle: true
        testOnBorrow: false
        testOnReturn: false
        poolPreparedStatements: true
        maxOpenPreparedStatements: 20
    sharding:
      tables:
        table_data:
          actual-data-nodes: ds0.table_data$->{0..4}
          table-strategy:
            inline:
              sharding-column: id
              algorithm-expression: table_data$->{id % 5}
以上配置中table_data为逻辑表
在SpringBootApplication标签中添加如下值
@SpringBootApplication(exclude = JtaAutoConfiguration.class)
我们在mybatis的配置文件中添加一个批量插入
@Mapper
public interface TableDataDao {
    int insert(List<TableData> tableDataList);
}
<insert id="insert" parameterType="java.util.List">
    insert into table_data (id,table_id,table_model_id,table_name,vehicle_id,
    vehicle_start_date,vehicle_brand,vehicle_no,vehicle_type,table_date,user_id,
    user_name,check_item_id,check_item_important,check_item_name,item_id,
    item_check_content,item_check_name,item_declared,item_ok,item_ok_url,
    item_problem_description,item_problem_url) values
    <foreach collection="list" item="item" index="index" separator=",">
        (#{item.id,jdbcType=BIGINT},
         #{item.tableId,jdbcType=BIGINT},
         #{item.tableModelId,jdbcType=BIGINT},
         #{item.tableName,jdbcType=VARCHAR},
         #{item.vehicleId,jdbcType=INTEGER},
         #{item.vehicleStartDate,jdbcType=TIMESTAMP},
         #{item.vehicleBrand,jdbcType=VARCHAR},
         #{item.vehicleNo,jdbcType=VARCHAR},
         #{item.vehicleType,jdbcType=VARCHAR},
         #{item.tableDate,jdbcType=TIMESTAMP},
         #{item.userId,jdbcType=BIGINT},
         #{item.userName,jdbcType=VARCHAR},
         #{item.checkItemId,jdbcType=INTEGER},
         #{item.checkItemImportant,jdbcType=INTEGER},
         #{item.checkItemName,jdbcType=VARCHAR},
         #{item.itemId,jdbcType=INTEGER},
         #{item.itemCheckContent,jdbcType=VARCHAR},
         #{item.itemCheckName,jdbcType=VARCHAR},
         #{item.itemDeclared,jdbcType=INTEGER},
         #{item.itemOk,jdbcType=INTEGER},
         #{item.itemOkUrl,jdbcType=VARCHAR},
         #{item.itemProblemDescription,jdbcType=VARCHAR},
         #{item.itemProblemUrl,jdbcType=VARCHAR})
    </foreach>
</insert>
以上批量插入的为逻辑表data_table
在Controller中对其进行插入
public void insertTableDataBatch(List<TableData> tableDataList) {
    tableDataDao.insert(tableDataList);
}
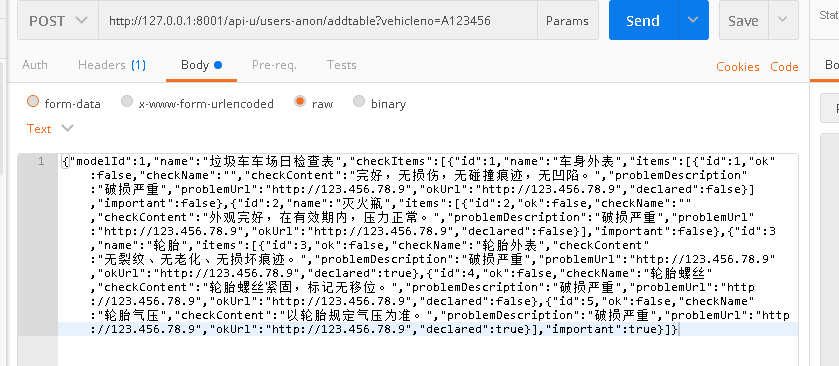
测试如下
成功执行后,我们来查看各个分表
table_data0中如下

table_data1中如下

table_data2中如下

table_data3中如下

table_data4中如下

我们可见这些数据被很好的分配到了5张不同的表中,证明分表对批量插入有效。
转载于:https://my.oschina.net/u/3768341/blog/3051296


 686
686

 被折叠的 条评论
为什么被折叠?
被折叠的 条评论
为什么被折叠?
 到【灌水乐园】发言


