


 本文介绍如何在Spring Boot项目中使用Swagger替代Postman进行接口测试。通过引入相关依赖、配置Swagger并结合Controller层注解,实现接口文档自动生成及在线测试。
对于一个后端开发人员,使用swagger能够很好的替代postman进行接口测试,其会随着代码的改变而自动进行适应,便捷之处不言而喻,下面我就开始一个快速入门吧。
环境说明:idea编辑器 , maven管理 ,Springboot2.1 ,jdk 1.8
一 、引入相关依赖
<dependency>
    <groupId>io.springfox</groupId>
    <artifactId>springfox-swagger2</artifactId>
    <version>2.5.0</version>
</dependency>
<dependency>
    <groupId>io.springfox</groupId>
    <artifactId>springfox-swagger-ui</artifactId>
    <version>2.5.0</version>
</dependency>
二 编写swagger配置类
1 配置类与项目启动类放在同一位置
2 配置类内容
import org.springframework.context.annotation.Bean;
import org.springframework.context.annotation.Configuration;
import springfox.documentation.builders.ApiInfoBuilder;
import springfox.documentation.builders.PathSelectors;
import springfox.documentation.builders.RequestHandlerSelectors;
import springfox.documentation.service.ApiInfo;
import springfox.documentation.service.Contact;
import springfox.documentation.spi.DocumentationType;
import springfox.documentation.spring.web.plugins.Docket;
import springfox.documentation.swagger2.annotations.EnableSwagger2;

/**
 * @author zhangxh
 * @since 1.0
 */
@Configuration
@EnableSwagger2
public class Swagger2 {
    //swagger2的配置文件,这里可以配置swagger2的一些基本的内容,比如扫描的包等等
    @Bean
    public Docket createRestApi() {
        return new Docket(DocumentationType.SWAGGER_2)
            .apiInfo(apiInfo())
            .select()
            //为当前controller层的包路径
            .apis(RequestHandlerSelectors.basePackage("com.eogo.item.web"))
            .paths(PathSelectors.any())
            .build();
    }
    //构建 api文档的详细信息函数,注意这里的注解引用的是哪个
    private ApiInfo apiInfo() {
        return new ApiInfoBuilder()
            //页面标题
            .title("Eogo后台商品管理RESTful API")
            //创建人
            .contact(new Contact("Zhangxh", "http://www.eogo.shop", "zhangxh940426@163.com"))
            //版本号
            .version("1.0")
            //描述
            .description("API 描述")
            .build();
    }

}
三 、在controller层使用
1 具体代码如下:此处只是为了演示,只对一个参数进行描述,各位伙伴根据需求自行添加。里面的注解内容会在稍后详细介绍,此处先看下效果。
@RestController
@RequestMapping("brand")
@Api(tags = "品牌信息的Api")
public class BrandController {

    @Autowired
    private BrandService brandService;


    /**
     *
     * @param page 第几页
     * @param rows    每页的行数
     * @param sortBy 排序的列
     * @param desc   是否排序
     * @param key  搜索条件
     * @return
     */
    @GetMapping("page")
    @ApiOperation(value = "根据关键字ley查询品牌信息",notes = "查询品牌信息")
    @ApiImplicitParam(name = "key", value = "关键字", paramType = "query", required = false, dataType = "String")
    public ResponseEntity<PageResult<Brand>> queryBrandByPage(
            @RequestParam(value = "page", defaultValue = "1") Integer page,
            @RequestParam(value = "rows", defaultValue = "5") Integer rows,
            @RequestParam(value = "sortBy", required = false) String sortBy,
            @RequestParam(value = "desc", defaultValue = "false") Boolean desc,
            @RequestParam(value = "key", required = false) String key) {
        PageResult<Brand> result = this.brandService.queryBrandByPageAndSort(page,rows,sortBy,desc, key);
        if (result == null || result.getItems().size() == 0) {
            return new ResponseEntity<>(HttpStatus.NOT_FOUND);
        }
        return ResponseEntity.ok(result);
    }
}
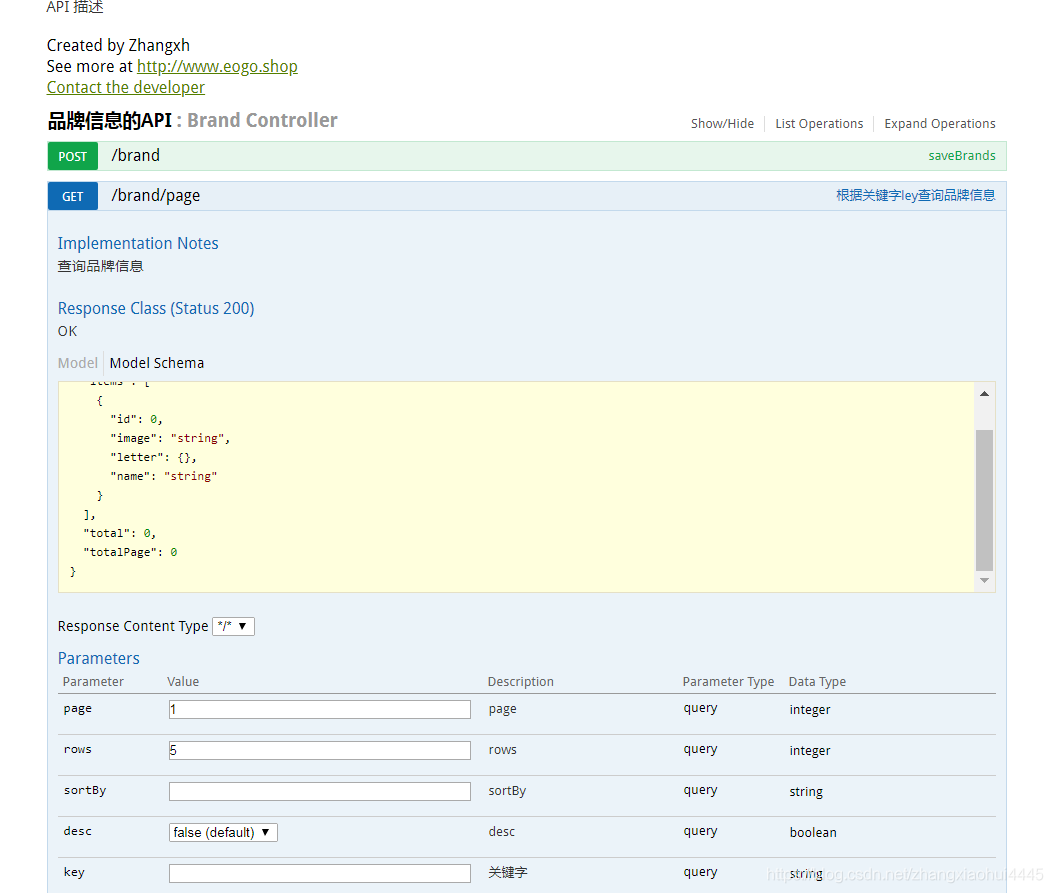
2 页面显示 输入http://localhost:8084/swagger-ui.html 即可
3 注解说明
@Api:用在请求的类上,表示对类的说明
tags="说明该类的作用,可以在UI界面上看到的注解"
value="该参数没什么意义,在UI界面上也看到,所以不需要配置"
@ApiOperation:用在请求的方法上,说明方法的用途、作用
value="说明方法的用途、作用"
notes="方法的备注说明"
@ApiImplicitParams:用在请求的方法上,表示一组参数说明
@ApiImplicitParam:用在@ApiImplicitParams注解中,指定一个请求参数的各个方面
name:参数名
value:参数的汉字说明、解释
required:参数是否必须传
paramType:参数放在哪个地方
· header --> 请求参数的获取:@RequestHeader
· query --> 请求参数的获取:@RequestParam
· path(用于restful接口)--> 请求参数的获取:@PathVariable
· body(不常用)
· form(不常用)
dataType:参数类型,默认String,其它值dataType="Integer"
defaultValue:参数的默认值
@ApiResponses:用在请求的方法上,表示一组响应
@ApiResponse:用在@ApiResponses中,一般用于表达一个错误的响应信息
code:数字,例如400
message:信息,例如"请求参数没填好"
response:抛出异常的类
@ApiModel:用于响应类上,表示一个返回响应数据的信息
(这种一般用在post创建的时候,使用@RequestBody这样的场景,
请求参数无法使用@ApiImplicitParam注解进行描述的时候)
@ApiModelProperty:用在属性上,描述响应类的属性
四 至此 我们就可以很愉快的在项目中进行使用swagger了。如有错误欢迎留言,本人也是在学习中不断总结,希望各位大神一起交流。


 3658
3658

 被折叠的 条评论
为什么被折叠?
被折叠的 条评论
为什么被折叠?
 到【灌水乐园】发言


