


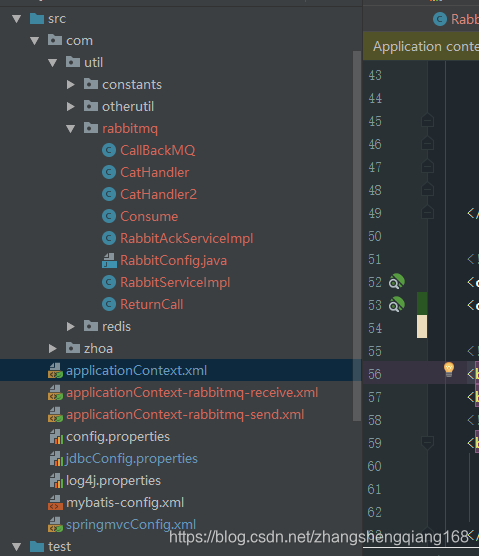
0.我的目录结构
1.需要依赖的jar包
<dependency>
    <groupId>com.rabbitmq</groupId>
    <artifactId>amqp-client</artifactId>
    <version>3.5.7</version>
</dependency>

<dependency>
    <groupId>org.springframework.amqp</groupId>
    <artifactId>spring-amqp</artifactId>
    <version>1.5.6.RELEASE</version>
</dependency>

<dependency>
    <groupId>org.springframework</groupId>
    <artifactId>spring-messaging</artifactId>
    <version>4.2.5.RELEASE</version>
</dependency>

<dependency>
    <groupId>org.springframework.amqp</groupId>
    <artifactId>spring-rabbit</artifactId>
    <version>1.5.6.RELEASE</version>
</dependency>

<dependency>
    <groupId>org.springframework.retry</groupId>
    <artifactId>spring-retry</artifactId>
    <version>1.1.2.RELEASE</version>
</dependency>
2.生产者配置文件 applicationContext-rabbitmq-send.xml
<?xml version="1.0" encoding="UTF-8"?>
<beans xmlns="http://www.springframework.org/schema/beans"
	xmlns:xsi="http://www.w3.org/2001/XMLSchema-instance"
	xmlns:rabbit="http://www.springframework.org/schema/rabbit"
	xmlns:task="http://www.springframework.org/schema/task"
	xsi:schemaLocation="
	http://www.springframework.org/schema/rabbit
	http://www.springframework.org/schema/rabbit/spring-rabbit-1.4.xsd
    http://www.springframework.org/schema/task
    http://www.springframework.org/schema/task/spring-task-4.1.xsd
    http://www.springframework.org/schema/beans
	http://www.springframework.org/schema/beans/spring-beans-4.1.xsd">
	<!--导入配置文件 -->
	<bean id="mysqlSource"
		  class="org.springframework.beans.factory.config.PropertyPlaceholderConfigurer">
		<property name="location" value="classpath:jdbcConfig.properties"/>
	</bean>

	<!-- 定义RabbitMQ的连接工厂 -->
	<rabbit:connection-factory id="connectionFactory"
							   username="${rabbit.username}" password="${rabbit.password}" host="${rabbit.host}" port="${rabbit.port}"
							   virtual-host="${rabbit.virtual-host}"
							   publisher-confirms="true"
							   publisher-returns="true"
							   channel-cache-size="5"
							   />

	<!-- 定义Rabbit模板,指定连接工厂以及定义exchange
		rabbitTemplate
	 -->
	<!--定义rabbit template用于数据的接收和发送 -->
	<rabbit:template id="rabbitTemplate"  connection-factory="connectionFactory"
					 exchange="${rabbit.direct-exchange}" confirm-callback="CallBackMQ"
					 mandatory="true"
					 return-callback="ReturnCall"/>

	<!-- MQ的管理,包括队列、交换器等 -->
	<rabbit:admin connection-factory="connectionFactory" />

	<!--<rabbit:fanout-exchange name=""></rabbit:fanout-exchange>-->


	<!--定义queue -->
	<rabbit:queue name="queueZhoa111" auto-declare="true"/>

    <!-- 定义direct exchange,绑定queue -->
	<rabbit:direct-exchange name="exchangeZhoa111" auto-declare="true" durable="true">
		<rabbit:bindings>
			<rabbit:binding queue="queueZhoa111" key="zhoa"/>
		</rabbit:bindings>
	</rabbit:direct-exchange>

	<!--消息是否成功发送到Exchange 的回调-->
	<bean id="CallBackMQ" class="com.util.rabbitmq.CallBackMQ"></bean>
	<!--消息从Exchange路由到队列的回调,注意这里只有路由失败的时候才会调此方法-->
	<bean id="ReturnCall" class="com.util.rabbitmq.ReturnCall"></bean>
</beans>
3.消费者配置文件 applicationContext-rabbitmq-receive.xml
<?xml version="1.0" encoding="UTF-8"?>
<beans xmlns="http://www.springframework.org/schema/beans"
	xmlns:xsi="http://www.w3.org/2001/XMLSchema-instance"
	xmlns:rabbit="http://www.springframework.org/schema/rabbit"
	xmlns:task="http://www.springframework.org/schema/task"
	xsi:schemaLocation="
	http://www.springframework.org/schema/rabbit
	http://www.springframework.org/schema/rabbit/spring-rabbit-1.4.xsd
    http://www.springframework.org/schema/task
    http://www.springframework.org/schema/task/spring-task-4.1.xsd
    http://www.springframework.org/schema/beans
	http://www.springframework.org/schema/beans/spring-beans-4.1.xsd">

	<!--导入配置文件 -->
	<bean id="mysqlSource"
		  class="org.springframework.beans.factory.config.PropertyPlaceholderConfigurer">
		<property name="location" value="classpath:jdbcConfig.properties"/>
	</bean>

	<!-- 定义RabbitMQ的连接工厂 -->
	<rabbit:connection-factory id="connectionFactory"
							   username="${rabbit.username}" password="${rabbit.password}" host="${rabbit.host}" port="${rabbit.port}"
							   virtual-host="${rabbit.virtual-host}"
							   publisher-confirms="true"
							   publisher-returns="true"
							   channel-cache-size="5"
							   />

	<!-- MQ的管理,包括队列、交换器等 -->
	<rabbit:admin connection-factory="connectionFactory" />

	<!--定义消息队列queue -->
	<rabbit:queue name="queueZhoa111" auto-declare="true"/>

    <!-- 定义交换机,并且完成队列和交换机的绑定 -->
	<rabbit:direct-exchange name="exchangeZhoa111" auto-declare="true">
		<rabbit:bindings>
			<rabbit:binding queue="queueZhoa111" key="zhoa"/>
		</rabbit:bindings>
	</rabbit:direct-exchange>

	<!-- 定义监听 -->
	<!--定义消费者监听队列 acknowledge设置消费者手动确认消息 原因是:rabbitmq默认是自动确认消息的,不管消费者有没有消费成功
    只要消费者收到消息后就直接确认了,确认后rabbitmq就会将队列中的消息删除掉 如果消费者收到消息后实际没有消费成功,就会导致消息丢失
        -->
	<rabbit:listener-container connection-factory="connectionFactory" acknowledge="manual">
		<!-- 监听一个队列,当队列中有消息,就会自动触发类.方法,传递消息就作为方法的参数,根据方法声明的参数强转 -->
		<rabbit:listener ref="messageReceiver2"  queue-names="queueZhoa111"/>
	</rabbit:listener-container>

	<bean id="messageReceiver2" class="com.util.rabbitmq.CatHandler2"/>
</beans>
4.引入的配置文件配置 jdbcConfig.properties (路径错误的话自己修改)
rabbit.host=127.0.0.1
rabbit.port=5672
rabbit.username=zsq
rabbit.password=zsq
rabbit.virtual-host=/zhang
rabbit.direct-exchange=exchangeZhoa
5. applicationContext.xml 引入配置文件 ,添加线程池配置
<!--添加配置文件-->
	<import resource="classpath*:applicationContext-rabbitmq-receive.xml" />
	<import resource="classpath*:applicationContext-rabbitmq-send.xml" />

	<!--添加线程池-->
	<bean id="taskExecutor" class="org.springframework.scheduling.concurrent.ThreadPoolTaskExecutor">
		<!-- 核心线程数 -->
		<property name="corePoolSize" value="10" />
		<!-- 最大线程数 -->
		<property name="maxPoolSize" value="20" />
		<!-- 队列最大长度 -->
		<property name="queueCapacity" value="1800" />
		<!-- 线程池维护线程所允许的空闲时间,默认为60s -->
		<property name="keepAliveSeconds" value="60" />
	</bean>
	<!-- 注解式 -->
	<task:annotation-driven />
6.springmvcConfig.xml 配置文件,添加扫包范围
<context:component-scan base-package="com.util.rabbitmq"/>
7,核心代码
controller控制层,调用发送消息工具类
@RestController
@RequestMapping("/test")
public class RabbitMQTest {

    @Autowired
    private RabbitAckServiceImpl rabbitAckService;

    @RequestMapping("/test2")
    public void sendMessage2() {
        for (int i = 1; i <=100 ; i++) {
            Map<String,Object> map=new HashMap<>();
            map.put("hh","zsq"+i);
            System.out.println("to send message:  "+ map);
            String json = JSON.toJSONString(map);
            boolean zhoa = rabbitAckService.sendMessage("exchangeZhoa111","zhoa", json);
            if(zhoa){
                System.out.println("发送成功1");
            }else {
                System.out.println("发送失败");
            }
        }
    }
}
工具类发送消息
@Service
public class RabbitAckServiceImpl {

    @Autowired
    private RabbitTemplate rabbitTemplate;

    /**
     * @param exchange      交换机
     * @param routingKey    路由key
     * @param message       消息
     */
    public boolean sendMessage(String exchange,String routingKey , String message) {
        boolean result=false;
        if(!checkParam(exchange,routingKey,message)){
            return false;
        }
        try {
            rabbitTemplate.convertAndSend(exchange,routingKey,message);
            result = true;
        }catch (AmqpException e){
            e.printStackTrace();
        }
        return result;
    }

    public boolean checkParam(String param1){
        if(StringUtils.isEmpty(param1)){
            return false;
        }else {
            return true;
        }
    }

    public boolean checkParam(String param1,String param2){
        if(StringUtils.isEmpty(param1)||StringUtils.isEmpty(param2)){
            return false;
        }else {
            return true;
        }
    }

    public boolean checkParam(String param1,String param2,String param3){
        if(StringUtils.isEmpty(param1)||StringUtils.isEmpty(param2)||StringUtils.isEmpty(param3)){
            return false;
        }else {
            return true;
        }
    }
}
实现接口 , 消息发送到exchang交换机 , 返回投递结果
public class CallBackMQ implements RabbitTemplate.ConfirmCallback {

    int i=1;
    @Override   //消息投递到exchange是否成功
    public void confirm(CorrelationData correlationData, boolean b, String s) {
        if (b) {
            //设置消息投递成功
            System.out.println("消息投递成功"+i);
            i++;
        } else {
            //消息投递失败
            System.out.println(s);
            System.out.println("消息投递失败");
        }
    }
}
实现接口, 消息从Exchange交换机 发送到 对列Queue 失败时回调执行此方法
public class ReturnCall implements RabbitTemplate.ReturnCallback {
    /**
     *只有消息从Exchange路由到Queue失败才会回调这个方法
     */
    @Override
    public void returnedMessage(Message message, int replyCode, String replyText, String exchange, String routingKey) {
        System.out.println("消息从Exchage路由到Queue失败");
    }
}
消费者消费 ,采用多线程异步消费
//消费者 采用异步多线程消费
public class CatHandler2 implements ChannelAwareMessageListener {

    @Autowired
    private TaskExecutor taskExecutor;

    @Override
    public void onMessage(Message message, Channel channel) throws Exception {
        taskExecutor.execute(new Consume(message,channel));
    }
}
线程类方法
public class Consume implements  Runnable{

    private Message message;
    private Channel channel;

    public  Consume(Message message, Channel channel){
        this.message=message;
        this.channel=channel;
    }


    @Override
    public void run() {
        boolean falg = false;
        try {
            // msg就是rabbitmq传来的消息,需要的同学自己打印看一眼
            // 使用jackson解析
            Map map = JSON.parseObject(message.getBody(), Map.class);
            System.out.println(Thread.currentThread().getName()+"收到消息:我是可爱的小猪,我的名字是" + map.get("hh"));
            //Thread.sleep(2000);
            falg = true;
        } catch (Exception e) {
            e.printStackTrace();
        }finally {
            MessageProperties properties = message.getMessageProperties();
            long tag = properties.getDeliveryTag();
            //消费成功后将手动确认消息
            if (falg) {
                //消息确认,发送成功
                try {
                    channel.basicAck(tag, false);
                } catch (IOException e) {
                    e.printStackTrace();
                }
            } else {
                //如果发送失败,消息会重新进入队列,再次被这个消费者消费
                //消息发送失败后,也可以将消息发送到别的队列,让其他消费者进行消费
                //第三个参数 true为重新将消息放入队列,如果设置为false,则抛弃这条消息
                try {
                    channel.basicNack(tag, false, true);
                } catch (IOException e) {
                    e.printStackTrace();
                }
            }
        }
    }
}
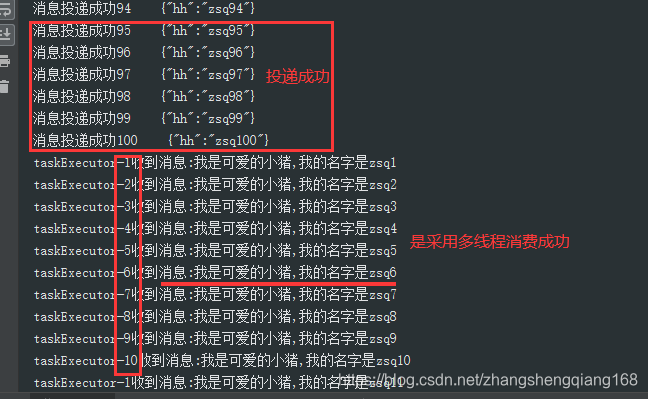
8.测试结果


 4260
4260


 到【灌水乐园】发言


