


1.多智能体概述
1.1为什么要用多智能体
在后台服务的世界里,单体服务难以扩展、难以维护、缺乏弹性和柔性、难以重用而不能适应复杂的业务需求,所以在生产环境中已经很难看到单体应用的身影了。同样,在智能体的世界里,单智能体因承载太多的逻辑而出现如下问题:
1)选择工具难。一个大模型如果有太多可用的工具,在选择应该使用的工具时往往表现不佳,甚至做出错误的选择
2)理解上下文难。经过多轮次不同目的的交互后,上下文混杂了大量各种信息,导致智能体越来越难以理解上下文
3)扩充维护难。一个智能体承载太多的功能,内聚性自然变差,随着规模变大,扩充新功能、修改BUG等举步维艰
借鉴微服务的思想,把一个单智能体拆分为多个规模小、功能内聚、易于维护的智能体,langgraph也提供了对于多智能体架构的支持,使用多智能体有如下好处:
1)模块化。每个智能体都足够简单和内聚,开发、测试和维护工作都更容易完成
2)专业化。每个智能体在自己的领域都是专家,专家比“杂家”处理问题更高效,从而可以优化整体表现
3)可控性。开发者可以显式控制智能体之间的交互方式,而不是仅仅依赖function calling进行交互。
1.2多智能体架构
设计多智能体的关键智能体之间的交互方式,根据交互方式把智能体架构分成以下五种:
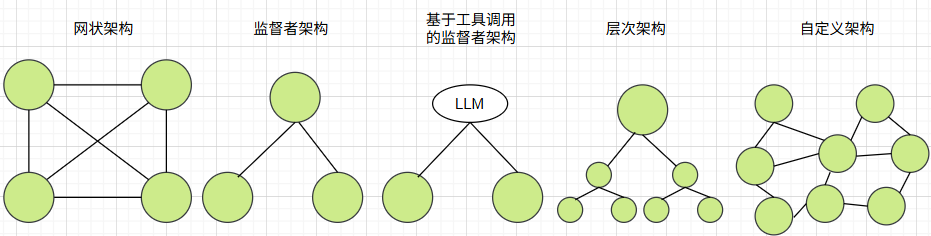
1)网状架构。所有智能体构成全连接的网络图,每个智能体可以跟任何一个智能体交互,每个智能体可以自主确定下一步调用哪个智能体
2)监督者架构。有一个智能体承担监督者的角色,监督者可以跟任何一个智能体交互,监督者决定下一步调用哪个智能体
3)基于工具调用的监督者。属于监督者架构的一种特例。监督者之外的其他智能体全部封装为工具,并绑定到监督者的大模型,监督者基于大模型的工具调用决定下一步调用哪个智能体工具
4)层次架构。是监督者架构的纵向扩展,每个智能体都是下层智能体的监督者
5)自定义架构。网状架构、监督者架构和层次架构的综合。每个智能体仅与部分智能体交互,部分智能体作为监督者,有些工作流时固定的
1.3交接
在langgraph中,智能体完全等同于langgraph图中的节点,也等同于子图。工作流从一个节点流转到另一个节点称为交接。每个智能体自主执行并决定何时结束,何时交接给下一个节点,交接时需要传递哪些数据。
在langgraph中使用Command实现智能体之间的交接。在使用langgraph创建工作流系列4:人机回环中使用Command从终端中恢复,在这里Command用于节点之间交接,在一个智能体内部节点之间交接或者在不同智能体之间的交接均由Command实现。
1.3.1内部交接
在一个智能体内部节点之间使用Command跳转,则不需要在节点之间用边来连接。
以下示例是一个简单的两节点图,在node1中使用Command跳转到node2,并且同时更新状态中的值,代码如下:
from typing_extensions import TypedDict
from langgraph.graph import StateGraph, START, END
from langgraph.types import Command
class State(TypedDict):
v: int
def node1(state: State):
return Command(
goto='node2', #goto指定目的节点
update={'v': state['v'] * 5} #同步更新状态值
)
def node2(state: State):
return {'v': state['v'] * 2}"""
以下创建图时,不需要在node1和node2之间增加边。所以绘制图时,不能正常显示
"""
graph_builder = StateGraph(State)
graph_builder.add_node("node1", node1)
graph_builder.add_node("node2", node2)
graph_builder.add_edge(START, "node1")
graph_builder.add_edge("node2", END)
graph = graph_builder.compile()
1.3.2跨智能体交接
从一个智能体跳到另一个智能体使用Command交接时,除了需要指定目标节点外,还需要指定在哪个图内跳转。
以下示例是一个包括两个子智能体的主智能体,从第一个智能体跳转到第二个智能体,具体代码如下:
from typing_extensions import TypedDict
from langgraph.graph import StateGraph, START, END
from langgraph.types import Command
class State(TypedDict):
v: int"""
构建第一个子智能体,仅有一个节点,从节点内部跳到第二个智能体,并同步更新状态v未原来的5倍
"""
def node1(state: State):
return Command(
goto='sub_graph2',
update={'v': state['v'] * 5},
graph=Command.PARENT
)
sub_graph_builder1 = StateGraph(State)
sub_graph_builder1.add_node("node1", node1)
sub_graph_builder1.add_edge(START, "node1")
sub_graph_builder1.add_edge("node1", END)
sub_graph1 = sub_graph_builder1.compile()#构建第二个智能体,把状态中的v更新为原来的2倍
def node2(state: State):
return {'v': state['v'] * 2}
sub_graph_builder2 = StateGraph(State)
sub_graph_builder2.add_node("node2", node2)
sub_graph_builder2.add_edge(START, "node2")
sub_graph2 = sub_graph_builder2.compile()#构建主智能体
graph_builder = StateGraph(State)
graph_builder.add_node("sub_graph1", sub_graph1)
graph_builder.add_node("sub_graph2", sub_graph2)
graph_builder.add_edge(START, "sub_graph1")#先进入sub_graph1智能体
graph = graph_builder.compile()
2.网状架构多智能体
如果所有智能体地位平等,没有明确的层级结构,也没有固定的执行顺序,每个智能体有最大的自主权,并且仅根据上下文确定何时跳转到哪个智能体,此时应采用网状多智能体架构。
有三个智能体,agent1、agent2和agent3,每个智能体都调用大模型根据上下文确定下一步交接的智能体,每个智能体都能够调用其他的两个智能体,具体代码如下:
from typing import Annotated
from typing_extensions import TypedDictfrom typing import Literal
from langchain_openai import ChatOpenAI
from langgraph.types import Command
from langgraph.graph import StateGraph, START, END
from langchain.chat_models import init_chat_modelfrom langgraph.graph.message import add_messages
import os
os.environ["OPENAI_API_KEY"] = "sk-*"model = init_chat_model(model='qwen-plus', model_provider='openai', base_url='https://dashscope.aliyuncs.com/compatible-mode/v1')
class State(TypedDict):
messages: Annotated[list, add_messages]#智能体agent1,跳转目标是agent2或agent3
def agent1(state: State) -> Command[Literal["agent2", "agent3", END]]:
response = model.invoke(...)return Command(
goto=response["next_agent"],
update={"messages": [response["content"]]},
)#智能体agent2,跳转目标是agent1或agent3
def agent2(state: State) -> Command[Literal["agent1", "agent3", END]]:
response = model.invoke(...)
return Command(
goto=response["next_agent"],
update={"messages": [response["content"]]},
)
#智能体agent3,跳转目标是agent1或agent2
def agent3(state: State) -> Command[Literal["agent1", "agent2", END]]:
response = model.invoke(...)
return Command(
goto=response["next_agent"],
update={"messages": [response["content"]]},
)builder = StateGraph(State)
builder.add_node(agent1)
builder.add_node(agent2)
builder.add_node(agent3)builder.add_edge(START, "agent1")
network = builder.compile()
3.监督者架构多智能
在监督者架构中,监督者作为中控,根据上下文确定跳转到智能体1还是智能体2,智能体1和智能体2都要回到监督者,具体代码如下:
from typing import Literal
from langchain_openai import ChatOpenAI
from langgraph.types import Command
from langgraph.graph import StateGraph, MessagesState, START, END
from langchain.chat_models import init_chat_model
import os
os.environ["OPENAI_API_KEY"] = "sk-*"model = init_chat_model(model='qwen-plus', model_provider='openai', base_url='https://dashscope.aliyuncs.com/compatible-mode/v1')
#监督者
def supervisor(state: MessagesState) -> Command[Literal["agent1", "agent2", END]]:
response = model.invoke(...)
return Command(goto=response["next_agent"])#智能体1,跳回监督者
def agent1(state: MessagesState) -> Command[Literal["supervisor"]]:
response = model.invoke(...)
return Command(
goto="supervisor",
update={"messages": [response]},
)#智能体1,跳回监督者
def agent2(state: MessagesState) -> Command[Literal["supervisor"]]:
response = model.invoke(...)
return Command(
goto="supervisor",
update={"messages": [response]},
)builder = StateGraph(MessagesState)
builder.add_node(supervisor)
builder.add_node(agent1)
builder.add_node(agent2)builder.add_edge(START, "supervisor")
supervisor = builder.compile()
4.基于工具调用的监督者架构智能体
基于工具调用的监督者架构,把除监督者之外的智能体全部封装为工具,示例代码如下:
from typing import Annotated
from langchain_openai import ChatOpenAI
from langgraph.prebuilt import create_react_agent
from typing_extensions import TypedDict
from langgraph.graph.message import add_messages
import os
os.environ["OPENAI_API_KEY"] = "sk-*"
model = init_chat_model(model='qwen-plus', model_provider='openai', base_url='https://dashscope.aliyuncs.com/compatible-mode/v1')class State(TypedDict):
messages: Annotated[list, add_messages]def agent1(state: State): #智能体1
response = model.invoke(...)
return response.contentdef agent2(state: State): #智能体2
response = model.invoke(...)
return response.contenttools = [agent1, agent2] #把智能体1和智能体2作为工具集
supervisor = create_react_agent(model, tools) #创建监督者智能体并传入工具集
5.层次架构智能体
以下是一个三层架构的智能体,第一层为一个监督者,第二层为两个监督者,第三方为分别隶属于第二层监督着的普通智能体,具体代码如下:
from typing import Annotated
from typing import Literal
from langchain_openai import ChatOpenAI
from langgraph.graph import StateGraph, MessagesState, START, END
from langgraph.types import Command
from typing_extensions import TypedDict
from langgraph.graph.message import add_messages
import os
os.environ["OPENAI_API_KEY"] = "sk-*"
model = init_chat_model(model='qwen-plus', model_provider='openai', base_url='https://dashscope.aliyuncs.com/compatible-mode/v1')class State(TypedDict):
messages: Annotated[list, add_messages]#第二层监督者1
def group_1_supervisor(state: State) -> Command[Literal["group_1_agent_1", "group_1_agent_2", END]]:
response = model.invoke(...)
return Command(goto=response["next_agent"])#受第二层监督者1控制的第三层智能体1
def group_1_agent_1(state: State) -> Command[Literal["group_1_supervisor"]]:
response = model.invoke(...)
return Command(goto="group_1_supervisor", update={"messages": [response]})#受第二层监督者1控制的第三层智能体2
def group_1_agent_2(state: State) -> Command[Literal["group_1_supervisor"]]:
response = model.invoke(...)
return Command(goto="group_1_supervisor", update={"messages": [response]})#构建第一个监督者架构智能体
group_1_builder = StateGraph(State)
group_1_builder.add_node(group_1_supervisor)
group_1_builder.add_node(group_1_agent_1)
group_1_builder.add_node(group_1_agent_2)
group_1_builder.add_edge(START, "group_1_supervisor")
group_1_graph = group_1_builder.compile()#以下代码构建第二个监督者架构智能体
#第二层监督者2
def group_2_supervisor(state: State) -> Command[Literal["group_2_agent_1", "group_2_agent_2", END]]:
response = model.invoke(...)
return Command(goto=response["next_agent"])#第三方受第二层监督者2控制的智能体1
def group_1_agent_1(state: State) -> Command[Literal["group_2_supervisor"]]:
response = model.invoke(...)
return Command(goto="group_2_supervisor", update={"messages": [response]})#第三方受第二层监督者2控制的智能体2
def group_1_agent_2(state: State) -> Command[Literal["group_2_supervisor"]]:
response = model.invoke(...)
return Command(goto="group_2_supervisor", update={"messages": [response]})#构建第二个监督者架构智能体
group_2_builder = StateGraph(State)
group_2_builder.add_node(group_2_supervisor)
group_2_builder.add_node(group_2_agent_1)
group_2_builder.add_node(group_2_agent_2)
group_2_builder.add_edge(START, "group_2_supervisor")
group_2_graph = group_2_builder.compile()builder = StateGraph(State)#第一层监督者
def top_level_supervisor(state: State) -> Command[Literal["group_1_graph", "group_2_graph", END]]:
response = model.invoke(...)
return Command(goto=response["next_team"])#以下代码构建层次架构智能体
builder = StateGraph(MessagesState)
builder.add_node(top_level_supervisor)
builder.add_node("group_1_graph", group_1_graph)
builder.add_node("group_2_graph", group_2_graph)
builder.add_edge(START, "top_level_supervisor")
builder.add_edge("group_1_graph", "top_level_supervisor")
builder.add_edge("group_2_graph", "top_level_supervisor")
graph = builder.compile()
6.自定义架构智能体
自定义架构智能体是所有多整体架构之集大成者,后面专门文章进行讲解。


 1035
1035

 被折叠的 条评论
为什么被折叠?
被折叠的 条评论
为什么被折叠?
 到【灌水乐园】发言


