


定时任务使用较为频繁的,常用于自动化测试,通过频繁刷新获取任务等,本文通过python编写自动化脚本,实现定时任务的抓取。
比如这个呼叫系统,如果需要从任务池中领取任务,就要重复的进行退出,重登,刷新,点击等操作,通过分析发现,可以将需求归纳为两个部分,模拟输入和模拟点击。在设计的时候就可以通过定时任务将特定的输入内容输出到特定的位置,然后按顺序进行点击即可。具体如下:
登录界面:

退出界面:

设计的界面如下:
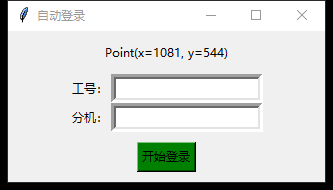
界面代码如下:
def on_closing():
    timer.cancel()
    timer_pos.cancel()
    root.destroy()

beg_timer = False
current_position = pyautogui.position()

root = tk.Tk()
root.title(r"自动登录")

root.attributes("-topmost", True)

label = tk.Label(root, text=r"鼠标位置:")
label.pack(pady=10)

frame_id = tk.Frame(root)
label_id = tk.Label(frame_id, text=r"工号:")
label_id.pack(side = "left")
txt_id = tk.Entry(frame_id, bd =5)
txt_id.pack(side = "right")
frame_id.pack()

frame_up = tk.Frame(root)
label_up = tk.Label(frame_up, text=r"分机:")
label_up.pack(side = "left")
txt_up = tk.Entry(frame_up, bd =5)
txt_up.pack(side = "right")
frame_up.pack()

button = tk.Button(root, text=r"开始登录", command=beg_update)
button.config(bg='green')
button.pack(pady=10)

root.protocol("WM_DELETE_WINDOW", on_closing)

timer = RepeatingTimer(10, update_task) # 10秒后执行my_task
timer.start()

timer_pos = RepeatingTimer(1, showpos_task) # 10秒后执行my_task
timer_pos.start()

root.mainloop()
模拟点击代码如下:
 # 1.假设目标位置的屏幕坐标为(837,105)
pyautogui.moveTo(x=837, y=105)
pyautogui.click(x=837, y=105)
time.sleep(1)
模拟输入代码如下:
# 2.模拟向目标位置(538,105)文本框输入指定内容
pyautogui.moveTo(x=538, y=105)
pyautogui.click(x=538, y=105)
time.sleep(1)
pyautogui.hotkey('ctrl', 'a')
pyautogui.typewrite(txt_id.get(), interval=0.1)
time.sleep(1)
定时任务代码如下:
class RepeatingTimer(Timer):
    def run(self):
        while not self.finished.is_set():
            self.function(*self.args, **self.kwargs)
            self.finished.wait(self.interval)

def update_task():
    global beg_timer
    if beg_timer:
        # 1.先退出(837,105),我知道了(1164,752)
        pyautogui.moveTo(x=837, y=105)
        pyautogui.click(x=837, y=105)
        time.sleep(1)


timer = RepeatingTimer(10, update_task) # 10秒后执行my_task
timer.start()
完整代码如下:
import tkinter as tk
import time
from threading import Timer
import pyautogui


class RepeatingTimer(Timer):
    def run(self):
        while not self.finished.is_set():
            self.function(*self.args, **self.kwargs)
            self.finished.wait(self.interval)

def update_task():
    global beg_timer
    if beg_timer:
        # 1.先退出(837,105),我知道了(1164,752)
        pyautogui.moveTo(x=837, y=105)
        pyautogui.click(x=837, y=105)
        time.sleep(1)
        pyautogui.moveTo(x=1164, y=752)
        pyautogui.click(x=1164, y=752)
        time.sleep(1)
        # 2.选择(客服天擎)
        pyautogui.moveTo(x=428, y=105)
        pyautogui.click(x=428, y=105)
        time.sleep(1)
        pyautogui.moveTo(x=374, y=178)
        pyautogui.click(x=374, y=178)
        time.sleep(1)
        # 3.模拟输入工号和分机号
        # id = txt_id.get()
        pyautogui.moveTo(x=538, y=105)
        pyautogui.click(x=538, y=105)
        time.sleep(1)
        pyautogui.hotkey('ctrl', 'a')
        pyautogui.typewrite(txt_id.get(), interval=0.1)
        time.sleep(1)
        pyautogui.moveTo(x=731, y=105)
        pyautogui.click(x=731, y=105)
        time.sleep(1)
        pyautogui.hotkey('ctrl', 'a')
        pyautogui.typewrite(txt_up.get(), interval=0.1)
        time.sleep(1)
        # 4.登录
        pyautogui.moveTo(x=934, y=105)
        pyautogui.click(x=934, y=105)
        time.sleep(1)
        # 5.更新
        pyautogui.moveTo(x=204, y=105)
        pyautogui.click(x=204, y=105)
        time.sleep(1)
        # 6.刷新任务列表
        pyautogui.moveTo(x=88, y=147)
        pyautogui.click(x=88, y=147)
        time.sleep(1)
        pyautogui.moveTo(x=156, y=147)
        pyautogui.click(x=156, y=147)
        time.sleep(1)
        pyautogui.moveTo(x=226, y=147)
        pyautogui.click(x=226, y=147)
        time.sleep(1)

def showpos_task():
    global label
    pos = pyautogui.position()
    label.config(text=f"{pos}")

def beg_update():
    global beg_timer,current_position
    if beg_timer:
        button.config(bg='green')
        button.config(text=r'开始登录')
        beg_timer = False
    else:
        button.config(bg='red')
        button.config(text=r'结束登录')
        beg_timer = True

def on_closing():
    timer.cancel()
    timer_pos.cancel()
    root.destroy()

beg_timer = False
current_position = pyautogui.position()

root = tk.Tk()
root.title(r"自动登录")

root.attributes("-topmost", True)

label = tk.Label(root, text=r"鼠标位置:")
label.pack(pady=10)

frame_id = tk.Frame(root)
label_id = tk.Label(frame_id, text=r"工号:")
label_id.pack(side = "left")
txt_id = tk.Entry(frame_id, bd =5)
txt_id.pack(side = "right")
frame_id.pack()

frame_up = tk.Frame(root)
label_up = tk.Label(frame_up, text=r"分机:")
label_up.pack(side = "left")
txt_up = tk.Entry(frame_up, bd =5)
txt_up.pack(side = "right")
frame_up.pack()

button = tk.Button(root, text=r"开始登录", command=beg_update)
button.config(bg='green')
button.pack(pady=10)

root.protocol("WM_DELETE_WINDOW", on_closing)

timer = RepeatingTimer(10, update_task) # 10秒后执行my_task
timer.start()

timer_pos = RepeatingTimer(1, showpos_task) # 10秒后执行my_task
timer_pos.start()

root.mainloop()


 被折叠的 条评论
为什么被折叠?
被折叠的 条评论
为什么被折叠?
 到【灌水乐园】发言


