


 本文深入解析Netty中ChannelPipeline的工作原理,包括ChannelHandlerContext的作用、ChannelHandler的添加与触发流程、事件传播机制等内容。
转载自:https://blog.youkuaiyun.com/u010853261/article/details/62218715
http://blog.youkuaiyun.com/z69183787/article/details/52623501
在netty中,每个Channel 有且仅有一个ChannelPipeline与之对应,他们的组成关系如下图所示:
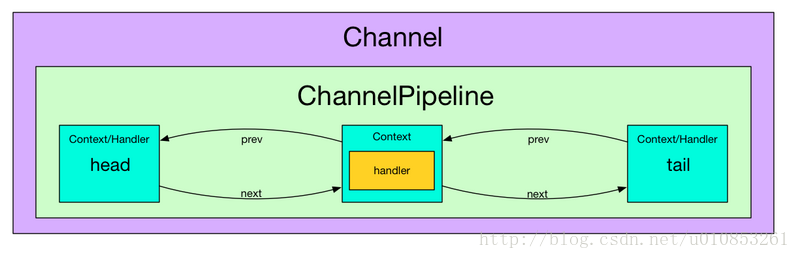
每一个Channel都与一个ChannelPipeline对应。ChannelPipeline实际上应该叫做ChannelHandlerPipeline,在ChannelPipeline中又维护了一个由ChannelHandlerContext组成的双向链表。这个链表的头是HeadContext, 链表的尾是TailContext, 并且每个ChannelHandlerContext又与一个 ChannelHandler一一对应。当需要对Channel进行某种处理的时候,Pipeline负责依次调用每一个Handler进行处理。
每个Channel都有一个属于自己的Pipeline,调用Channel#pipeline()方法可以获得Channel的Pipeline,调用Pipeline#channel()方法可以获得Pipeline关联的Channel。
在分析netty的启动引导类源码的时候,在执行bind()函数时会对channel进行初始化并注册,其中进行到后面会调用基类AbstractChannel的构造函数:
protected AbstractChannel(Channel parent) {
    this.parent = parent;
    unsafe = newUnsafe();
    this.pipeline = new DefaultChannelPipeline(this);
}
AbstractChannel 有一个 pipeline 字段, 在构造器中会初始化它为DefaultChannelPipeline的实例。ChannelPipeline并不是直接管理ChannelHandler,而是通过ChannelHandlerContext来间接管理。
/**
 * The default {@link ChannelPipeline} implementation.  It is usually created
 * by a {@link Channel} implementation when the {@link Channel} is created.
 */
public class DefaultChannelPipeline implements ChannelPipeline {

    //…略
    final AbstractChannelHandlerContext head;
    final AbstractChannelHandlerContext tail;

    private final Channel channel;

    //…略
protected DefaultChannelPipeline(Channel channel) {
this.channel = ObjectUtil.checkNotNull(channel, "channel");
succeededFuture = new SucceededChannelFuture(channel, null);
voidPromise = new VoidChannelPromise(channel, true);
tail = new TailContext(this);
head = new HeadContext(this);
head.next = tail;
tail.prev = head;
}
//…略
}构造器中, 首先将与DefaultChannelPipeline关联的Channel保存到字段channel中, 然后实例化两个ChannelHandlerContext,一个是HeadContext实例head,另一个是TailContext实例tail。接着将head和tail互相指向,构成一个双向链表。
AbstractChannelHandlerContext的定义如下:
abstract class AbstractChannelHandlerContext extends DefaultAttributeMap
        implements ChannelHandlerContext, ResourceLeakHint {

    //…略
    volatile AbstractChannelHandlerContext next;
    volatile AbstractChannelHandlerContext prev;

    private final boolean inbound;
    private final boolean outbound;
    private final DefaultChannelPipeline pipeline;
    private final String name;
    private final boolean ordered;

    //…略
TailContext实现了ChannelInboundHandler 接口,作为入站事件的起点。HeadContext作为出站事件的起点。并且head和tail都实现了 ChannelHandlerContext 接口, 因此可以说 head 和 tail 既是一个 ChannelHandler, 又是一个 ChannelHandlerContext。
Channel、ChannelPipeline、ChannelHandlerContext会形成如下关系:

在ChinnelPipeline内部,ChannelHandlerContext组成了一个双向链表,ChinnelPipeline内部会使用了head和tail变量来标志头和尾。
那么最开始的时候 ChannelPipeline中含有两个ChannelHandlerContext(同时也是 ChannelHandler),Netty是什么时候把自定义的 ChannelHandler添加到ChannelPipeline中呢?
Bootstrap b = new Bootstrap();
b.group(group)
 .channel(NioSocketChannel.class)
 .option(ChannelOption.TCP_NODELAY, true)
 .handler(new ChannelInitializer<SocketChannel>() {
     @Override
     public void initChannel(SocketChannel ch) throws Exception {
         ChannelPipeline p = ch.pipeline();
         p.addLast(new EchoClientHandler());
     }
 });
ChannelInitializer 实现了 ChannelHandler, 那么它是在什么时候添加到 ChannelPipeline 中的呢?在Bootstrap.init()方法中:
void init(Channel channel) throws Exception {
    ChannelPipeline p = channel.pipeline();
    p.addLast(config.handler());

    //…略
}
上面的代码将handler()返回的ChannelHandler添加到Pipeline中,而handler()返回的handler其实就是我们在调用handler()方法时设置的ChannelInitializer实例,因此这里就是将ChannelInitializer插入到了 Pipeline的末端.
@Override
public final ChannelPipeline addLast(EventExecutorGroup group, String name, ChannelHandler handler) {
    final AbstractChannelHandlerContext newCtx;
    synchronized (this) {
        checkMultiplicity(handler);

        newCtx = newContext(group, filterName(name, handler), handler);

        addLast0(newCtx);

        // If the registered is false it means that the channel was not registered on an eventloop yet.
        // In this case we add the context to the pipeline and add a task that will call
        // ChannelHandler.handlerAdded(...) once the channel is registered.
        if (!registered) {
            newCtx.setAddPending();
            callHandlerCallbackLater(newCtx, true);
            return this;
        }

        //...略
    }
    //...略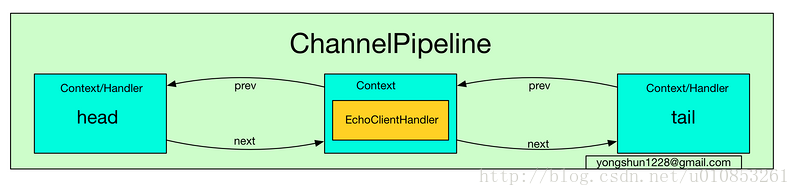
} ChannelInitializer是一个InboundHandler,netty会把它包装成DefaultChannelHandlerContext,最终调用addLast0()插入到pipeline的结点,插入的位置就是双链表的尾部,其实是tail尾结点的前面:
private void addLast0(AbstractChannelHandlerContext newCtx) {
    AbstractChannelHandlerContext prev = tail.prev;
    newCtx.prev = prev;
    newCtx.next = tail;
    prev.next = newCtx;
    tail.prev = newCtx;
}
此时 Pipeline 的结构如下图所示:
除了把newCtx加到ChannelPipeline中,还调用了callHandlerCallbackLater方法,将newCtx生成PendingHandlerAddedTask任务。
已经分析了ChannelInitializer 如何插入到 Pipeline 中的, 接下来就来探讨一下 ChannelInitializer 的 initChannel()方法在哪里被调用?
在分析Netty 源码 Bootstrap 的 channel 的注册过程中, 已经分析过 Channel 的注册过程了, 这里再简单地复习一下:
- 首先在AbstractBootstrap.initAndRegister中, 通过group().register(channel), 调用 MultithreadEventLoopGroup.register方法
- 在MultithreadEventLoopGroup.register中, 通过next()获取一个可用的SingleThreadEventLoop, 然后调用它的 register
- 在 SingleThreadEventLoop.register 中, 通过 channel.unsafe().register(this, promise) 来获取 channel 的 unsafe() 底层操作对象, 然后调用它的 register.
- 在 AbstractUnsafe.register 方法中, 调用 register0 方法注册 Channel
- 在 AbstractUnsafe.register0 中, 调用 AbstractNioChannel#doRegister 方法
- AbstractNioChannel.doRegister 方法通过 javaChannel().register(eventLoop().selector, 0, this) 将 Channel 对应的 Java NIO SockerChannel 注册到一个 eventLoop 的 Selector 中, 并且将当前 Channel 作为 attachment.
我们自定义 ChannelHandler 的添加过程, 发生在 AbstractUnsafe.register0中, 在这个方法中调用了pipeline.invokeHandlerAddedIfNeeded()方法, 其实现如下:
final void invokeHandlerAddedIfNeeded() {
    assert channel.eventLoop().inEventLoop();
    if (firstRegistration) {
        firstRegistration = false;
        // We are now registered to the EventLoop. It's time to call the callbacks for the ChannelHandlers,
        // that were added before the registration was done.
        callHandlerAddedForAllHandlers();
    }
}
private void callHandlerAddedForAllHandlers() {
    final PendingHandlerCallback pendingHandlerCallbackHead;
    synchronized (this) {
        assert !registered;

        // This Channel itself was registered.
        registered = true;

        pendingHandlerCallbackHead = this.pendingHandlerCallbackHead;
        // Null out so it can be GC'ed.
        this.pendingHandlerCallbackHead = null;
    }

    // This must happen outside of the synchronized(...) block as otherwise handlerAdded(...) may be called while
    // holding the lock and so produce a deadlock if handlerAdded(...) will try to add another handler from outside
    // the EventLoop.
    PendingHandlerCallback task = pendingHandlerCallbackHead;
    while (task != null) {
        task.execute();
        task = task.next;
    }
} 还记得之前,将newCtx生成PendingHandlerAddedTask任务的流程,这里就开始执行了,会调用到DefaultChannelPipeline#callHandlerAdded0:
private void callHandlerAdded0(final AbstractChannelHandlerContext ctx) {
    try {
        ctx.handler().handlerAdded(ctx);
        ctx.setAddComplete();
    } catch (Throwable t) {
        //…略
    }
}
@Override
public void handlerAdded(ChannelHandlerContext ctx) throws Exception {
if (ctx.channel().isRegistered()) {
// This should always be true with our current DefaultChannelPipeline implementation.
// The good thing about calling initChannel(...) in handlerAdded(...) is that there will be no ordering
// surprises if a ChannelInitializer will add another ChannelInitializer. This is as all handlers
// will be added in the expected order.
initChannel(ctx);
}
}
@SuppressWarnings("unchecked")
private boolean initChannel(ChannelHandlerContext ctx) throws Exception {
if (initMap.putIfAbsent(ctx, Boolean.TRUE) == null) { // Guard against re-entrance.
try {
initChannel((C) ctx.channel());
} catch (Throwable cause) {
// Explicitly call exceptionCaught(...) as we removed the handler before calling initChannel(...).
// We do so to prevent multiple calls to initChannel(...).
exceptionCaught(ctx, cause);
} finally {
remove(ctx);
}
return true;
}
return false;
} 这样我们自定义的 ChannelHandler 就插入到 Pipeline 了, 当添加完自定义的 ChannelHandler 后, 会删除 ChannelInitializer 这个ChannelHandler, 即在initChannel(ctx)方法里面的finally块调用remove(this)。
那么事件如何在Pipeline里传播呢?从Channel的抽象子类AbstractChannel开始,下面是AbstractChannel#write()方法的实现:
    @Override
    public ChannelFuture write(Object msg) {
        return pipeline.write(msg);
    }
AbstractChannel直接调用了Pipeline的write()方法,再看DefaultChannelPipeline的write()方法实现:
    @Override
    public final ChannelFuture write(Object msg) {
        return tail.write(msg);
    }
因为write是个outbound事件,所以DefaultChannelPipeline直接找到tail指向的ChannelHandlerContext,调用其write()方法,接着看AbstractChannelHandlerContext的write()方法:
    @Override
    public ChannelFuture write(Object msg) {
        return write(msg, newPromise());
    }

    @Override
    public ChannelFuture write(final Object msg, final ChannelPromise promise) {
        if (msg == null) {
            throw new NullPointerException("msg");
        }

        try {
            if (isNotValidPromise(promise, true)) {
                ReferenceCountUtil.release(msg);
                // cancelled
                return promise;
            }
        } catch (RuntimeException e) {
            ReferenceCountUtil.release(msg);
            throw e;
        }
        write(msg, false, promise);

        return promise;
    }

    private void write(Object msg, boolean flush, ChannelPromise promise) {
        AbstractChannelHandlerContext next = findContextOutbound();
        final Object m = pipeline.touch(msg, next);
        EventExecutor executor = next.executor();
        if (executor.inEventLoop()) {
            if (flush) {
                next.invokeWriteAndFlush(m, promise);
            } else {
                next.invokeWrite(m, promise);
            }
        } else {
            AbstractWriteTask task;
            if (flush) {
                task = WriteAndFlushTask.newInstance(next, m, promise);
            }  else {
                task = WriteTask.newInstance(next, m, promise);
            }
            safeExecute(executor, task, promise, m);
        }
}

    private AbstractChannelHandlerContext findContextOutbound() {
        AbstractChannelHandlerContext ctx = this;
        do {
            ctx = ctx.prev;
        } while (!ctx.outbound);
        return ctx;
}
ChannelHandlerContext的write()方法沿着context链往前找,直至找到一个outbound类型的context为止,然后调用其invokeWrite()方法,最终调用ChannelOutboundHandler的write方法,即ChannelOutboundHandlerAdapter的write方法:
    @Override
    public void write(ChannelHandlerContext ctx, Object msg, ChannelPromise promise) throws Exception {
        ctx.write(msg, promise);
    }
这里会调用context链中前一个outbound的ChannelHandlerContext的write,然后重复上述流程,这样write事件就沿着outbound链继续传播。
Netty中的inbound事件通常由I/O线程触发,例如TCP链路建立事件、链路关闭事件、读事件、异常通知事件等。
触发Inbound事件的方法如下:
1)ChannelHandlerCOntext.fireChannelRegistered():Channel注册事件;
2)ChannelHandlerContext.fireChannelActive():TCP链路建立成功,Channel激活事件;
3)ChannelHandlerContext.fireChannelRead(Object):读事件;
4)ChannelHandlerContext.fireChannelReadComplete():读操作完成通知事件;
5)ChannelHandlerContext.fireExceptionCautght(Throwable):异常通知事件;
6)ChannelHandlerContext.fireUserEventTriggered(Object):用户自定义事件;
7)ChannelHandlerContext.fireChannelWritabilityChanged():Channel的可写状态变化通知事件;
8)ChannelHandlerContext.fireChannelInactive():TCP连接关闭,链路不可用通知事件。
Outbound事件通常是用户主动发起的网络I/O操作,例如用户发起的连接操作、绑定操作、消息发送等操作。
触发outbound事件的方法如下:
1)ChannelHandlerContext.bind(SocketAddress, ChannelPromise):绑定本地地址事件;
2)ChannelHandlerContext.connect(SocketAddress, SocketAddress, ChannelPromise):连接服务端事件;
3)ChannelHandlerContext.write(Object, ChannelPromise):发送事件;
4)ChannelHandlerContext.flush():刷新事件;
5)ChannelHandlerContext.read():读事件;
6)ChannelHandlerContext.disconnect(ChannelPromise):断开连接事件;
7)ChannelHandlerContext.close(ChannelPromise):关闭当前Channel事件;
补充:
ChannelPipeline是一个大的接口,是一个Facade门面模式的实例。它主要包括三部分的接口,
- 链表的接口,包括各种遍历,修改链表的操作;
- inbound事件的接口,以fireXXXX开头的方法;
- outbound事件的接口, 不带fire的方法,比如read, write,bind, connect等。
inbound,outbound事件是Netty抽象的事件概念,从底层IO事件到用户事件的方向是inbound事件,从用户事件到底层IO事件的方向是outbound事件
DefaultChannelPipeline是ChannelPipeline接口的具体实现,它处理实际的事件分发。它采用了两个单链表head, tail 来处理inbound,outbound事件。
单链表的节点是ChannelHandlerContext,它通过next, prev两个指针指向前后的节点。head链表的第一个节点是HeadHandler, tail节点的第一个节点是TailHandler。HeadHandler里面封装了Unsafe接口, 来进行实际的IO读写。inbound事件从底层IO开始,outbound事件到底层IO结束,所以inbound事件链的起点从HeadHandler开始,outbound事件链的终点在HeadHandler结束。
连接在pipeline的整个生命周期是:
Server端:
1、ServerSocketChannel: fireChannelRegistered(注册到EventLoop) -> bind(绑定端口)-> fireChannelActive(激活) -> 【 read(注册OP_ACCEPT到SelectorKey) -> fireChannelRead(接收到客户端连接,此时会将客户端连接注册到workerGroup) -> fireChannelReadComplete(读取客户端连接完成) -> 接收下一个连接】 -> 直到最终关闭触发fireChannelUnregistered(从EventLoop中取消注册);
2、SocketChannel: ServerSocketChannel接收到客户端请求后,将其注册到workerGroup -> fireChannelRegistered(注册) -> fireChannelActive (激活) ->【 read(注册OP_READ到SelectorKey) -> fireChannelRead(读取到数据) -> (业务数据处理) -> write(写数据到buffer) -> flush(数据最终发送)/ writeAndFlush(前两个操作的组合) -> fireChannelReadComplete(读取过程结束)】 -> fireChannelInactive(连接关闭) -> fireChannelUnregistered(从EventLoop中取消注册);
Client端:
SocketChannel: fireChannelRegistered(注册到EventLoop) -> connect(连接server) -> fireChannelActive(连接成功) -> 【 read(注册OP_READ) -> write(写数据到buffer) -> flush(数据最终发送) / writeAndFlush(前两个操作的组合) -> fireChannelRead(读取到server传回的数据) -> (业务数据处理) -> fireChannelReadComplete(读取完成)】-> fireChannelInactive(接收关闭连接的请求)-> close(关闭连接) -> fireChannelUnregistered(从EventLoop中取消注册);
上面是一个简化的监听、连接、处理、关闭流程,实际的流程会更加复杂。


 8119
8119

 被折叠的 条评论
为什么被折叠?
被折叠的 条评论
为什么被折叠?
 到【灌水乐园】发言


