


 本文介绍了一个使用Angular框架实现的商品详情页面案例,其中包括了如何创建商品描述和销售员信息两个子组件,并通过Angular路由模块来配置子路由实现导航。
一、新建两个组件(商品描述组件和销售员信息组件)
ng g component productDesc
ng g component sellerInfo
二、product-desc.component.html
<p>
  来自XXXX的山泉水
</p>
三、seller-info.component.html
<p>
  销售员ID : {{sellerId}}
</p>
四、seller-info.component.ts
import { Component, OnInit } from '@angular/core';
import {ActivatedRoute} from '@angular/router';

@Component({
  selector: 'app-seller-info',
  templateUrl: './seller-info.component.html',
  styleUrls: ['./seller-info.component.css']
})
export class SellerInfoComponent implements OnInit {

  private sellerId: number;

  constructor(private routeInfo: ActivatedRoute) { }

  ngOnInit() {
    this.sellerId = this.routeInfo.snapshot.params['id'];
  }

}
五、app-routing.module.ts 添加子路由
const routes: Routes = [
  {path: '', redirectTo: '/home', pathMatch: 'full'},
  {path: 'home', component: HomeComponent},
  {path: 'product/:id', component: ProductComponent, children:[
      {path: '', component: ProductDescComponent},
      {path: 'seller/:id', component: SellerInfoComponent}
    ]},
  {path: '**', component: Code404Component}
];
六、修改product.component.html
<p>
  这里是商品信息组件
</p>
<p>
  商品ID : {{productId}}
</p>
<a [routerLink]="['./']">商品描述</a>
<a [routerLink]="['./seller',99]">销售员信息</a>
<router-outlet></router-outlet>
七、访问localhost:4200
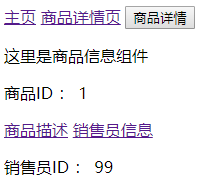


 1万+
1万+

 被折叠的 条评论
为什么被折叠?
被折叠的 条评论
为什么被折叠?
 到【灌水乐园】发言


