


源码 https://github.com/whynot-todo/wxminiprogram.git
1 新建项目
1.1 注册账号新建项目
- 按照步骤拿到AppID,详情点击
- 打开微信开发者工具,点击
项目,点击新建,使用收集扫描二维码新建项目

3. 项目基本配置,这里我们不需要云开发
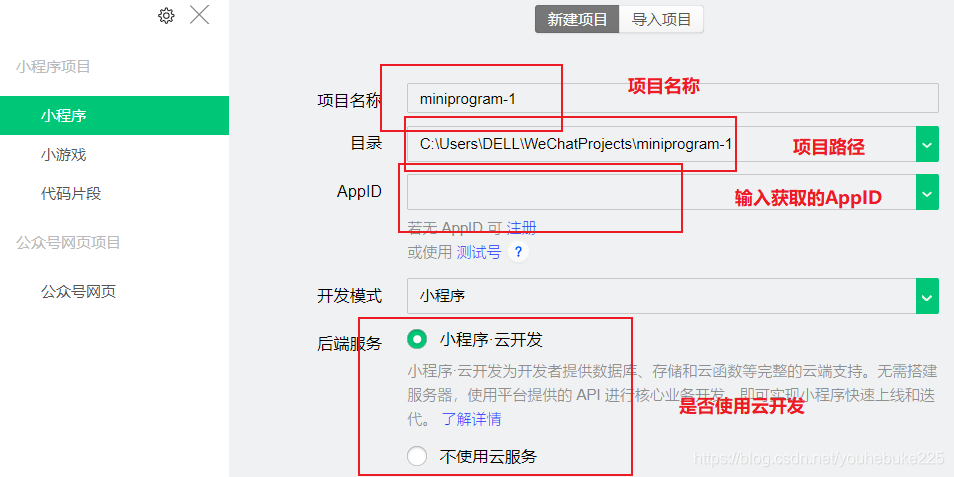
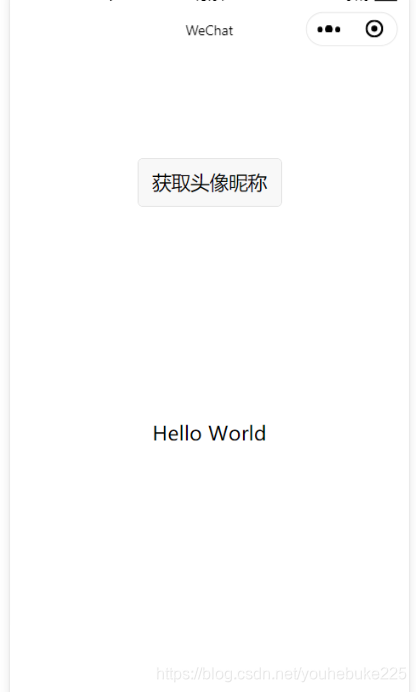
4. 新建好项目,出现的页面如下
1.2 对于目录的说明
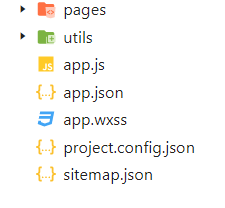
- 对于
sitemap的配置 详情点击 project.config.json项目的配置文件,类似于vue.config.json
1.3 首页的结构样式
结构
<!--index.wxml-->
<view class="container">
  <view class="userinfo">
    <button wx:if="{{!hasUserInfo && canIUse}}" open-type="getUserInfo" bindgetuserinfo="getUserInfo"> 获取头像昵称 </button>
    <block wx:else>
      <image bindtap="bindViewTap" class="userinfo-avatar" src="{{userInfo.avatarUrl}}" mode="cover"></image>
      <text class="userinfo-nickname">{{userInfo.nickName}}</text>
    </block>
  </view>
  <view class="usermotto">
    <text class="user-motto">{{motto}}</text>
  </view>
</view>
样式
/**index.wxss**/
.userinfo {
  display: flex;
  flex-direction: column;
  align-items: center;
}

.userinfo-avatar {
  width: 128rpx;
  height: 128rpx;
  margin: 20rpx;
  border-radius: 50%;
}

.userinfo-nickname {
  color: #aaa;
}

.usermotto {
  margin-top: 200px;
}
JS
//index.js
//获取应用实例
const app = getApp()

Page({
  data: {
    motto: 'Hello World',
    userInfo: {},
    hasUserInfo: false,
    canIUse: wx.canIUse('button.open-type.getUserInfo')
  },
  //事件处理函数
  bindViewTap: function() {
    wx.navigateTo({
      url: '../logs/logs'
    })
  },
  onLoad: function () {
    if (app.globalData.userInfo) {
      this.setData({
        userInfo: app.globalData.userInfo,
        hasUserInfo: true
      })
    } else if (this.data.canIUse){
      // 由于 getUserInfo 是网络请求,可能会在 Page.onLoad 之后才返回
      // 所以此处加入 callback 以防止这种情况
      app.userInfoReadyCallback = res => {
        this.setData({
          userInfo: res.userInfo,
          hasUserInfo: true
        })
      }
    } else {
      // 在没有 open-type=getUserInfo 版本的兼容处理
      wx.getUserInfo({
        success: res => {
          app.globalData.userInfo = res.userInfo
          this.setData({
            userInfo: res.userInfo,
            hasUserInfo: true
          })
        }
      })
    }
  },
  getUserInfo: function(e) {
    console.log(e)
    app.globalData.userInfo = e.detail.userInfo
    this.setData({
      userInfo: e.detail.userInfo,
      hasUserInfo: true
    })
  }
})
1.5 入口文件
app.js
//app.js
App({
  onLaunch: function () {
    // 展示本地存储能力
    var logs = wx.getStorageSync('logs') || []
    logs.unshift(Date.now())
    wx.setStorageSync('logs', logs)

    // 登录
    wx.login({
      success: res => {
        // 发送 res.code 到后台换取 openId, sessionKey, unionId
      }
    })
    // 获取用户信息
    wx.getSetting({
      success: res => {
        if (res.authSetting['scope.userInfo']) {
          // 已经授权,可以直接调用 getUserInfo 获取头像昵称,不会弹框
          wx.getUserInfo({
            success: res => {
              // 可以将 res 发送给后台解码出 unionId
              this.globalData.userInfo = res.userInfo

              // 由于 getUserInfo 是网络请求,可能会在 Page.onLoad 之后才返回
              // 所以此处加入 callback 以防止这种情况
              if (this.userInfoReadyCallback) {
                this.userInfoReadyCallback(res)
              }
            }
          })
        }
      }
    })
  },
  globalData: {
    userInfo: null
  }
})
这里用到了globalData,他相当于一个全局的数据库
- 用户授权后才能得到用户的信息
1.4 语法
1.4.1 数据绑定
- 微信语法与Vue的语法很相似,一般把
v-改成wx: - 小程序不是双向绑定数据,想要修改数据,必须调用
this.setData,这一点与React类似
1.4.2 事件绑定
这里有两种绑定事件的方式
- 冒泡绑定
bindtap - 非冒泡绑定
catchtap
1.5 小程序生命周期
-
onLoad: function (options) {}:监听页面加载 -
onReady: function () {}:监听页面初次渲染完成 -
onShow: function () {}:监听页面显示 -
onHide: function () {}:监听页面隐藏 -
onUnload: function () {}:监听页面卸载
-
onPullDownRefresh: function () {}:监听用户下拉动作 -
onReachBottom: function () {},页面上拉触底事件的处理函数 -
onShareAppMessage: function () {}:用户点击右上角分享
2 list 页面
2.1 新建页面,并配置路径
- 在
pages上面右击,选择新建文件夹,并输入文件夹的名字list
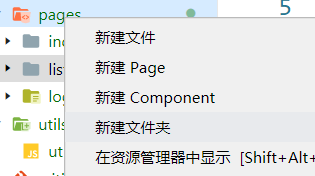
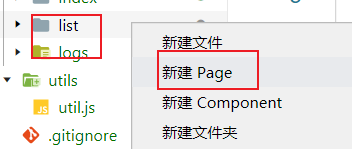
- 右击
list选择新建页面
- 在新建页面的同时,路径已经为我们配置好了,可以打开
app.json查看
 "pages": [
   "pages/index/index",
   "pages/logs/logs",
   "pages/list/list"
 ],
2.2 轮播图
关于轮播图组件 详情点击
- 我们可以将
app.json中的路径位置进行修改,默认显示某一页,这个和uniapp中完全相同 - 我们仍旧需要给滑动组件一定的宽高
swiper{
  width:100%;
  height:400rpx;
}

swiper image {
  width:100%;
  height:100%;
}
2.3 tempate的使用
这相当于我们在H5中缩写的费路由组件,只不过引入的时候,我们要分开引入
引入
wxss使用的引入方式
@import '/pages/template/template.wxss';
wxml使用的引入方式
<import src='/pages/template/template.wxml' />
他们都需要在最上部引入
定义
pages/template/template.wxml
<template name="detailTemplate">
  <view class="tmpContainer">
    <view class="avatar_date">
      <image src='{{avatar}}'></image>
      <text>{{date}}</text>
    </view>
    <text class="company">{{title}}</text>
    <image class="content_img" src="{{headImgSrc}}"></image>
    <text class="content">{{detail_content}}</text>
    <view class="love_attention">
      <image src="{{detail_love_image1}}"></image>
      <text>{{love_count}}</text>
      <image src="{{detail_love_image2}}"></image>
      <text>{{attention_count}}</text>
    </view>
  </view>
</template>
pages/template/template.wxss
/* pages/template/template.wxss */
.tmpContainer {
  display: flex;
  flex-direction: column;
  border-top:1px solid #efefef;
  border-bottom:1px solid #efefef;
  padding:5px 0;
  margin:20rpx 0 40rpx;
}

.avatar_date {
  margin:10rpx 0 20rpx 10rpx;
}

.avatar_date image {
  width: 60rpx;
  height:60rpx;
  vertical-align: middle;
}

.avatar_date text {
  font-size: 14px;
  vertical-align: middle;
  margin-left: 10px;
}

.company {
  font-size: 18px;
  font-weight: 700;
  margin:10rpx 0;
}

.content_img {
  width: 100%;
  height:340rpx;
}

.content {
  font-size: 16px;
  color: #666;
  text-indent: 16px;
  line-height: 28px;
}

.love_attention image {
  width:32rpx;
  height:32rpx;
  vertical-align: middle;
}

.love_attention text {
  font-size: 14px;
  color: #666;
  vertical-align: middle;
  margin:0 16rpx;
}
使用
<template is="name" data="{{...item}}"></template>
2.4 加载数据
这里我们不使用后台的数据,而是使用本地的数据,使用commonJS规范
pages/list/list.js
let datas = require('../../datas/list-data');
Page({
  data: {
    datas: []
  },
  onLoad: function (options) {
    this.setData({datas: datas.list_data});
  }
})
- 在根目录下新建文件夹
datas,把我们的数据文件放里面注意这里是JS文件 - 加载到
data中
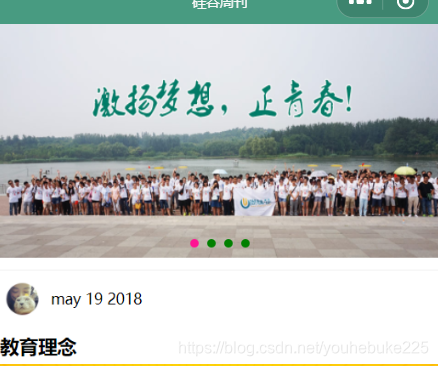
2.5 循环遍历
<block wx:for="{{datas}}" wx:key="index">
  <view catchtap="toDetail" data-id="{{index}}">
    <template is="detailTemplate" data="{{...item}}"></template>
  </view>
</block>
效果图

2.6 首页到列表页的跳转
绑定点击监听
<text catchtap="toList" class="user-motto">{{motto}}</text>
定义跳转方法
toList:function () {
  wx.navigateTo({
    url: '../list/list',
  })
},
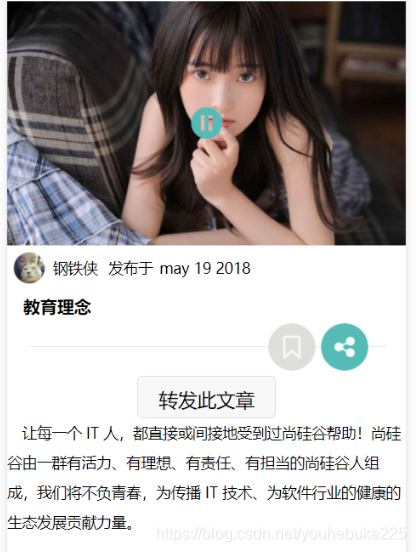
3 详情页
3.1 静态结构获取数据
<!--pages/detail/detail.wxml-->
<view class="detailContainer">
  <image class="detail_header" src="{{isPlay? detailObj.music.coverImgUrl:detailObj.detail_img}}"></image>
  <image catchtap="musicControl" class="musicImg" src="{{isPlay?'/images/music/music-start.png':'/images/music/music-stop.png'}}"></image>
  <view class="detail_author_date">
    <image src="{{detailObj.avatar}}"></image>
    <text>{{detailObj.author}}</text>
    <text>发布于</text>
    <text>{{detailObj.date}}</text>
  </view>
  <text class="detail_company">{{detailObj.title}}</text>
  <view class="detail_collection_share">
    <view class="col_share_img">
      <image catchtap="handleCollection" src="{{isCollected?'/images/icon/collection.png': '/images/icon/collection-anti.png'}}"></image>
      <image catchtap="handleShare" src="/images/icon/share.png"></image>
    </view>
    <view class="line"></view>
  </view>
  <button open-type="share">转发此文章</button>
  <text class="detail_content">{{detailObj.detail_content}}</text>
</view>
/* pages/detail/detail.wxss */
.detailContainer {
  display: flex;
  flex-direction: column;
}

.detail_header{
  width:100%;
  height:460rpx;
}

.musicImg {
  width:60rpx;
  height:60rpx;
  position: absolute;
  left:50%;
  top:200rpx;
  margin-left: -30rpx;
}

.detail_author_date {
  padding:10rpx;
}

.detail_author_date image{
  width:64rpx;
  height:64rpx;
  border-radius: 32rpx;
  vertical-align: middle;
}

.detail_author_date text {
  font-size: 14px;
  vertical-align: middle;
  margin-left: 6px;
}

.detail_company {
  font-size: 32rpx;
  font-weight: bold;
  margin:10rpx 0 10rpx 30rpx;
}

.detail_collection_share{
  position: relative;
}


.col_share_img {
  float: right;
  margin-right: 60rpx;
}

.col_share_img image {
  width:90rpx;
  height:90rpx;
  margin-right:10rpx;
}


.line {
  position: absolute;
  top:45rpx;
  left: 5%;
  width:90%;
  height:1px;
  background: #eee;
  z-index:-1;
}

.detail_content {
  font-size: 14px;
  line-height: 28px;
  text-indent: 14px;
}

button{
  width:260rpx;
  height:80rpx;
}
引入数据
let datas = require('../../datas/list-data');
Page({
	data:{
		detailObj: {},
		index: 0,
	}
  onLoad: function (options) {
    // 获取传递过来的数据,更新当前的data
    this.setData({detailObj:datas.list_data[0], index: options.id});
	}
})
效果图
3.2 点击跳转
在list页面绑定事件进行跳转
<view catchtap="toDetail" data-id="{{index}}">
toDetail(event) {
  console.log(event);
  let id = event.currentTarget.dataset.id;
  wx.navigateTo({
    url: '/pages/detail/detail?id=' + id
  })
},
3.3 音乐的播放
绑定点击监听,进行音乐的播放
<image catchtap="musicControl" class="musicImg" src="{{isPlay?'/images/music/music-start.png':'/images/music/music-stop.png'}}"></image>
定义方法
musicControl: function () {
  let isPlay = !this.data.isPlay
  const {
    title,
    coverImgUrl
  } = this.data.detailObj.music
  const backgroundAudioManager = wx.getBackgroundAudioManager()

  if (isPlay) {
    // 这段代码不能放在外部,不然会导致,暂停无效
    backgroundAudioManager.title = title
    backgroundAudioManager.coverImgUrl = coverImgUrl
    backgroundAudioManager.src = "http://m10.music.126.net/20200627124552/fc49c1a479497b00f343ecaed189d31f/ymusic/28a2/6955/ef9d/f5fd28ee442c30bf59e42d1a97fd1d29.mp3"
    backgroundAudioManager.play()
  } else {
    backgroundAudioManager.pause()
  }
  console.log(isPlay)
  this.setData({
    isPlay
  })
},
如果音乐需要后台播放,我们还需要配置
3.4 globalData的使用
当我们退出当前页面,就会发现当前的音乐仍旧在播放,并且当我们打开其他的详情页进行播放的时候,只能继续原来的音乐,这个时候我们就需要使用到globalData了 详情点击
app.js
- 在
app.js中新建两个属性,用来保存用来保存音乐是否播放,和哪一个页面播放的音乐 - 在加载的时候,我们先对全局数据进行读取
data: {
	isMusicPlay: false,
	playPageIndex: null,
}
pages\detail\detail.js
onLoad: function (options) {
    this.setData({
        detailObj: datas.list_data[options.id],
        index: options.id
    })
    // 从全局中读取音乐是否播放
    if (appData.globalData.isMusicPlay && appData.globalData.playPageIndex === this.data.index) {
        this.setData({isPlay:true})
    }
    // 监听音乐是否播放
    backgroundAudioManager.onPlay(() => {
        appData.globalData.isMusicPlay = true
        appData.globalData.playPageIndex = this.data.index
        this.setData({isPlay:true})
    })
    // 监听音乐关闭
    backgroundAudioManager.onPause(() => {
        this.setData({isPlay:false})
    })
},
4 配置底部导航栏
配置导航栏并新建页面
app.json
"tabBar": {
    "position": "bottom",
    "list": [
      {
        "pagePath": "pages/list/list",
        "text": "咨询",
        "iconPath": "/images/tab/yuedu.png",
        "selectedIconPath": "/images/tab/yuedu_hl.png"
      },
      {
        "pagePath": "pages/movie/movie",
        "text": "电影频道",
        "iconPath": "/images/tab/dianying.png",
        "selectedIconPath": "/images/tab/dianying_hl.png"
      }
    ]
  },
5 其他说明
跳转
除了用api进行跳转外,我们还可以选择用标签进行跳转<navigator> 详情点击
<navigator url="/pages/movieDetail/movieDetail?id={{index}}">


 2万+
2万+

 被折叠的 条评论
为什么被折叠?
被折叠的 条评论
为什么被折叠?
 到【灌水乐园】发言


