


一、引言:从单机编排到集群编排的革命
1.1 容器编排的演进历程
容器技术发展至今,已经从单机运行演变为大规模集群编排的时代。让我们回顾这一演进路径:
容器技术演进 = {
    "2000年代": "chroot -> LXC -> 进程隔离技术",
    "2013年": "Docker诞生,容器标准化",
    "2014年": "Docker Compose解决多容器编排",
    "2015年": "Kubernetes v1.0发布,谷歌开源",
    "2017年": "Kubernetes成为容器编排事实标准",
    "2020年代": "云原生生态体系成熟"
}
现实世界的需求变化:
-
从运行几个容器到管理成千上万个容器
-
从单机部署到跨多数据中心的多集群管理
-
从手动运维到自动化的弹性伸缩
-
从简单的服务部署到复杂的微服务架构
1.2 Kubernetes的诞生背景
Kubernetes(K8s)源自谷歌内部的Borg系统,谷歌每周运行数十亿个容器,积累了15年的容器管理经验。
# 谷歌容器管理经验的传承
Borg (2003) -> Omega (2010) -> Kubernetes (2014)

# 核心设计哲学:
# 1. 声明式API:描述期望状态,系统自动实现
# 2. 控制器模式:持续监控并调整实际状态
# 3. 微服务架构:各组件松耦合,可独立升级
1.3 为什么选择Kubernetes?
让我们通过一个实际场景对比Docker Compose与Kubernetes:
# Docker Compose限制(单机场景)
场景问题:
1. 单点故障:主机宕机,服务全部中断
2. 资源限制:无法超越单机硬件限制
3. 扩展困难:手动管理多实例负载均衡
4. 网络局限:跨主机网络配置复杂
5. 存储局限:数据卷无法在主机间迁移

# Kubernetes解决方案(集群场景)
核心优势:
1. 高可用:节点故障自动迁移容器
2. 弹性伸缩:根据负载自动调整实例数
3. 服务发现:自动DNS解析和负载均衡
4. 存储编排:支持动态卷供给和迁移
5. 自我修复:容器故障自动重启和替换
1.4 本章学习目标
-
深入理解Kubernetes的核心架构设计
-
掌握Pod、Deployment、Service三大核心概念
-
能够编写基本的Kubernetes资源配置文件
-
理解Kubernetes的工作机制和调度原理
-
为面试中的Kubernetes问题做好充分准备
二、Kubernetes架构深度解析
2.1 整体架构概览
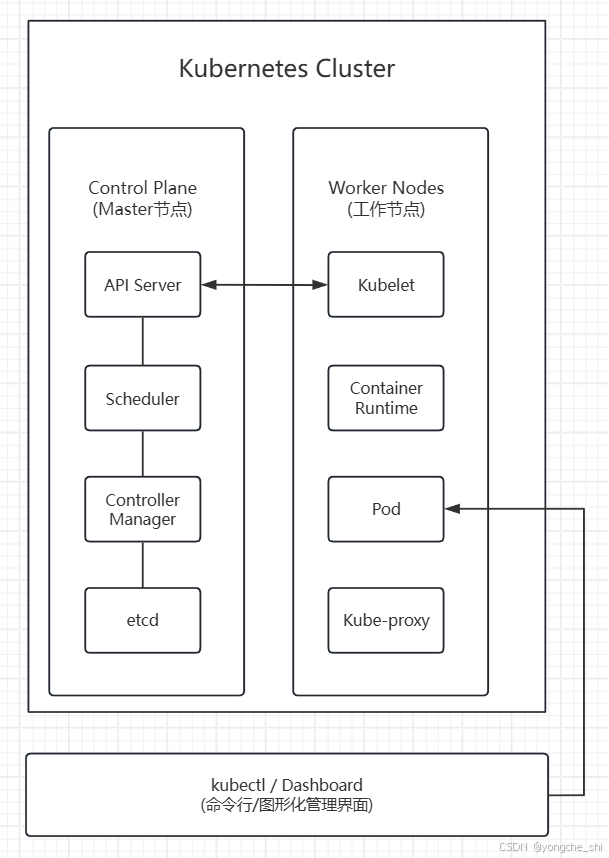
2.2 控制平面组件详解
2.2.1 API Server:集群的网关
API Server是Kubernetes集群的前端接口,所有组件都通过它与集群交互。
// API Server的核心功能(简化示例)
type APIServer struct {
    // 1. 认证(Authentication)
    Authenticate(request Request) (UserInfo, error)

    // 2. 授权(Authorization)
    Authorize(user UserInfo, action Action, resource Resource) bool

    // 3. 准入控制(Admission Control)
    Validate(request Request) (bool, []AdmissionReview)

    // 4. 资源操作(CRUD)
    Create(resource Resource) error
    Get(resource Resource) (Resource, error)
    Update(resource Resource) error
    Delete(resource Resource) error
    List(resources []Resource) ([]Resource, error)

    // 5. Watch机制(实时监控)
    Watch(resource Resource) <-chan Event
}

// 典型请求流程
1. kubectl apply -f deployment.yaml
   ↓
2. kubectl -> API Server (REST API over HTTPS)
   ↓
3. API Server -> 认证 -> 授权 -> 准入控制
   ↓
4. API Server -> etcd (存储资源定义)
   ↓
5. 控制器检测到变化 -> 执行相应操作
2.2.2 etcd:分布式键值存储
etcd是Kubernetes的"大脑",存储所有集群数据。
# etcd的关键特性
1. 强一致性:基于Raft共识算法
2. 高可用:支持多节点集群
3. 持久化:数据持久存储
4. 快速:读操作线性化,写操作在100ms内

# 存储的数据类型
/registry/pods/default/my-pod          # Pod定义
/registry/services/default/my-service  # Service定义
/registry/deployments/default/my-deploy # Deployment定义
/registry/nodes/node-1                 # Node信息
/registry/events                       # 事件记录
2.2.3 调度器(Scheduler)
调度器负责将Pod分配到合适的节点上运行。
// 调度决策流程(简化)
func Schedule(pod Pod, nodes []Node) (Node, error) {
    // 第一步:过滤(Filtering)
    feasibleNodes := Filter(pod, nodes)
    // 过滤条件包括:
    // - 节点资源是否足够(CPU、内存)
    // - 节点是否有污点(Taint)
    // - Pod是否有节点选择器(NodeSelector)
    // - 节点端口冲突检查
    // - 卷是否可用

    if len(feasibleNodes) == 0 {
        return nil, errors.New("no suitable nodes")
    }

    // 第二步:评分(Scoring)
    scores := make(map[Node]int)
    for _, node := range feasibleNodes {
        // 评分策略包括:
        // - 资源平衡:倾向于资源使用率低的节点
        // - 亲和性:倾向于特定节点或节点组
        // - 反亲和性:避免在同一节点运行相似Pod
        // - 节点亲和性:根据节点标签评分
        scores[node] = CalculateScore(pod, node)
    }

    // 第三步:选择(Selecting)
    selectedNode := SelectHighestScore(scores)
    return selectedNode, nil
}
2.2.4 控制器管理器(Controller Manager)
控制器管理器运行各种控制器,确保集群的当前状态与期望状态一致。
// 控制器工作模式:调谐循环(Reconciliation Loop)
func RunController() {
    for {
        // 1. 获取期望状态(来自etcd)
        desiredState := GetDesiredStateFromAPI()

        // 2. 获取当前状态(观察集群)
        currentState := ObserveCurrentState()

        // 3. 比较并采取行动
        if !CompareStates(desiredState, currentState) {
            // 执行调谐操作
            Reconcile(desiredState, currentState)
        }

        // 4. 等待下一轮检查
        time.Sleep(SyncPeriod)
    }
}

// 内置控制器列表
controllers := []string{
    "Deployment Controller",    // 管理Deployment
    "ReplicaSet Controller",    // 管理ReplicaSet
    "StatefulSet Controller",   // 管理有状态应用
    "DaemonSet Controller",     // 每个节点运行一个Pod
    "Job Controller",           // 管理一次性任务
    "CronJob Controller",       // 管理定时任务
    "Node Controller",          // 监控节点状态
    "Service Controller",       // 管理负载均衡
    "Endpoint Controller",      // 维护Service端点
    "Namespace Controller",     // 管理命名空间
    "PersistentVolume Controller", // 管理存储卷
}
2.3 工作节点组件详解
2.3.1 Kubelet:节点代理
Kubelet是运行在每个节点上的主要"节点代理",负责管理Pod生命周期。
// Kubelet的核心职责
type Kubelet struct {
    // 1. Pod生命周期管理
    func CreatePod(podSpec PodSpec) error
    func StartPod(podID string) error
    func StopPod(podID string) error
    func DeletePod(podID string) error

    // 2. 容器运行时接口(CRI)
    runtime ContainerRuntime  // Docker, containerd, CRI-O

    // 3. 容器网络接口(CNI)
    network NetworkPlugin     // Flannel, Calico, Weave

    // 4. 容器存储接口(CSI)
    storage StoragePlugin     // 各种存储驱动

    // 5. 监控和报告
    func ReportNodeStatus() NodeStatus
    func ReportPodStatus(podID string) PodStatus
}
2.3.2 Kube-Proxy:网络代理
Kube-Proxy维护节点上的网络规则,实现Service的网络抽象。
// Kube-Proxy的三种工作模式
type ProxyMode string

const (
    // 1. userspace模式(已弃用)
    UserspaceMode ProxyMode = "userspace"

    // 2. iptables模式(默认)
    IptablesMode ProxyMode = "iptables"

    // 3. IPVS模式(高性能)
    IPVSMode ProxyMode = "ipvs"
)

// IPVS模式的工作原理
type IPVSProxy struct {
    // 创建虚拟服务
    func CreateVirtualService(serviceIP string, port int) error

    // 添加真实服务器(Pod IP)
    func AddRealServer(virtualService string, podIP string, port int) error

    // 负载均衡算法
    schedulingAlgorithm := []string{
        "rr",      // 轮询
        "lc",      // 最少连接
        "dh",      // 目标哈希
        "sh",      // 源哈希
        "sed",     // 最短预期延迟
        "nq",      // 从不排队
    }
}
2.3.3 容器运行时(Container Runtime)
容器运行时负责运行容器,Kubernetes通过CRI接口与运行时交互。
# 支持的容器运行时
1. Docker(传统,通过dockershim)
2. containerd(推荐,云原生计算基金会项目)
3. CRI-O(专为Kubernetes设计)
4. Mirantis Container Runtime(原Docker Enterprise)

# 容器运行时接口(CRI)标准
CRI定义了两个gRPC服务:
1. RuntimeService: 管理容器生命周期
   - RunPodSandbox()   # 创建Pod沙箱
   - CreateContainer() # 创建容器
   - StartContainer()  # 启动容器
   - StopContainer()   # 停止容器

2. ImageService: 管理镜像
   - PullImage()      # 拉取镜像
   - ListImages()     # 列出镜像
   - RemoveImage()    # 删除镜像
2.4 插件组件
2.4.1 DNS插件(CoreDNS)
CoreDNS为集群提供DNS服务,实现服务发现。
# CoreDNS配置示例
apiVersion: v1
kind: ConfigMap
metadata:
  name: coredns
  namespace: kube-system
data:
  Corefile: |
    .:53 {
        errors          # 错误日志
        health          # 健康检查端点
        ready           # 就绪检查端点

        kubernetes cluster.local in-addr.arpa ip6.arpa {
            pods verified
            fallthrough in-addr.arpa ip6.arpa
        }

        prometheus :9153  # 监控指标
        forward . /etc/resolv.conf  # 上游DNS
        cache 30            # 缓存
        loop                # 检测循环查询
        reload              # 自动重载配置
        loadbalance         # 负载均衡
    }
2.4.2 网络插件(CNI)
容器网络接口(CNI)插件负责Pod之间的网络通信。
常见CNI插件对比
| 插件 | 网络模型 | 性能特点 | 适用场景 |
|---|---|---|---|
| Flannel | Overlay网络 | 简单易用 | 中小型集群 |
| Calico | BGP路由 | 高性能,策略丰富 | 生产环境 |
| Weave Net | Overlay网络 | 加密通信 | 安全要求高的环境 |
| Cilium | eBPF驱动 | 高性能,可观测性 | 大规模集群 |
| AWS VPC CNI | AWS VPC集成 | 高性能,AWS集成 | AWS EKS |
三、Pod:Kubernetes的基本构建块
3.1 Pod概念深度解析
3.1.1 什么是Pod?
Pod是Kubernetes中最小的可部署单元,但它不是一个容器,而是一个或多个容器的组合。
# Pod的核心特征
apiVersion: v1
kind: Pod
metadata:
  name: example-pod
spec:
  # Pod级别的配置
  restartPolicy: Always  # 重启策略
  terminationGracePeriodSeconds: 30  # 优雅终止宽限期

  # 共享资源
  volumes:  # 共享存储卷
    - name: shared-data
      emptyDir: {}

  # 容器定义
  containers:
  - name: main-app
    image: nginx:1.21
    volumeMounts:
    - name: shared-data
      mountPath: /data

    # 共享网络命名空间
    # 所有容器共享同一个IP地址
    # 容器间可以通过localhost互相访问

    # 共享UTS命名空间
    # 所有容器共享相同的主机名

    # 共享IPC命名空间
    # 容器间可以通过System V IPC或POSIX消息队列通信
3.1.2 为什么需要Pod?设计哲学
// Pod的设计哲学:亲密性容器组
type Pod struct {
    // 容器组共享的特征
    1. 生命周期一致:一起创建、一起调度、一起销毁
    2. 资源共享:网络、存储、IPC等
    3. 本地通信:通过localhost直接通信

    // 典型使用场景
    scenarios := []string{
        "主容器+边车容器(Sidecar)",
        "主容器+初始化容器(Init Container)",
        "主容器+适配器容器(Adapter)",
        "主容器+代理容器(Proxy)",
    }
}

// 与传统Docker容器的对比
传统Docker方式:
- 每个容器独立运行
- 容器间通信需要显式配置
- 生命周期管理复杂

Kubernetes Pod方式:
- 相关容器打包为一个单元
- 容器间共享网络和存储
- 统一调度和管理
3.2 Pod的生命周期
Pod生命周期状态图:
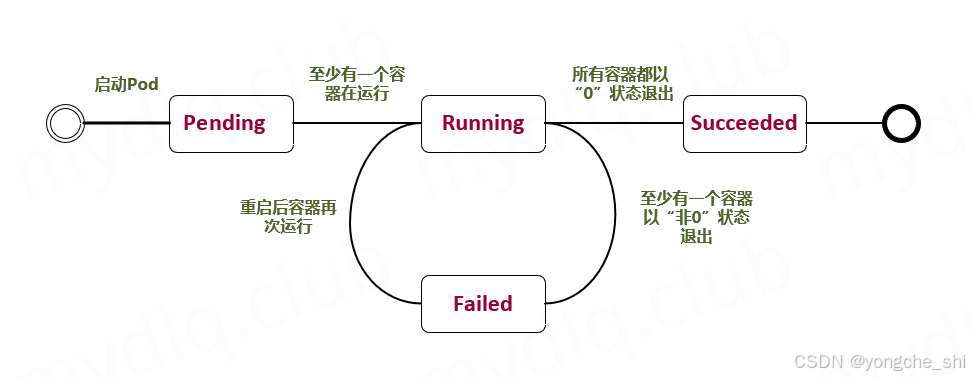
3.2.1 Pod状态详解
type PodPhase string

const (
    // Pending: Pod已被系统接受,但一个或多个容器尚未创建
    Pending PodPhase = "Pending"

    // Running: Pod已绑定到节点,所有容器已创建
    Running PodPhase = "Running"

    // Succeeded: Pod中所有容器成功终止,不会重启
    Succeeded PodPhase = "Succeeded"

    // Failed: Pod中所有容器已终止,至少一个容器失败
    Failed PodPhase = "Failed"

    // Unknown: 无法获取Pod状态
    Unknown PodPhase = "Unknown"
)

type ContainerState struct {
    // 容器可能的状态
    Waiting    *ContainerStateWaiting    // 等待启动
    Running    *ContainerStateRunning    // 正在运行
    Terminated *ContainerStateTerminated // 已终止
}
3.2.2 重启策略(RestartPolicy)
apiVersion: v1
kind: Pod
metadata:
  name: restart-policy-demo
spec:
  restartPolicy: Always  # 可选: Always, OnFailure, Never

  containers:
  - name: app
    image: busybox
    command: ["sh", "-c", "sleep 3600"]

# 重启策略的影响:
# 1. Always: 容器退出时总是重启(默认)
# 2. OnFailure: 容器异常退出(非0状态码)时重启
# 3. Never: 从不重启容器
3.2.3 Pod的创建过程
# Pod创建的时间线
时间线:
1. kubectl apply -f pod.yaml
   ↓
2. API Server验证并存储到etcd
   ↓
3. Scheduler检测到未调度的Pod
   ↓
4. Scheduler选择合适的节点
   ↓
5. Scheduler将节点信息写入Pod
   ↓
6. 目标节点的Kubelet检测到Pod
   ↓
7. Kubelet通过CRI创建Pod沙箱
   ↓
8. Kubelet创建volume(如果需要)
   ↓
9. Kubelet拉取容器镜像
   ↓
10. Kubelet通过CRI创建容器
   ↓
11. Kubelet执行容器启动后钩子
   ↓
12. 容器进入Running状态
3.3 Pod配置详解
3.3.1 资源请求和限制
apiVersion: v1
kind: Pod
metadata:
  name: resource-demo
spec:
  containers:
  - name: app
    image: nginx
    resources:
      # 请求资源(调度依据)
      requests:
        cpu: "250m"      # 250 milliCPU (0.25核心)
        memory: "512Mi"  # 512 Mebibytes
        ephemeral-storage: "2Gi"  # 临时存储

      # 限制资源(运行限制)
      limits:
        cpu: "500m"      # 最多使用0.5核心
        memory: "1Gi"    # 内存硬限制
        ephemeral-storage: "5Gi"
        nvidia.com/gpu: 1  # GPU资源

# CPU单位说明:
# 1 = 1个CPU核心
# 0.5 = 500m = 半个核心
# 100m = 0.1核心

# 内存单位说明:
# 1Ki = 1024 bytes
# 1Mi = 1024 KiB
# 1Gi = 1024 MiB
3.3.2 健康检查
apiVersion: v1
kind: Pod
metadata:
  name: health-check-demo
spec:
  containers:
  - name: web
    image: nginx

    # 1. 存活探针(Liveness Probe)
    # 检测容器是否正在运行
    livenessProbe:
      httpGet:
        path: /healthz
        port: 8080
        httpHeaders:
        - name: Custom-Header
          value: Awesome
      initialDelaySeconds: 3  # 启动后等待时间
      periodSeconds: 3        # 检查间隔
      timeoutSeconds: 1       # 超时时间
      successThreshold: 1     # 成功阈值
      failureThreshold: 3     # 失败阈值

    # 2. 就绪探针(Readiness Probe)
    # 检测容器是否准备好接收流量
    readinessProbe:
      exec:
        command:
        - cat
        - /tmp/healthy
      initialDelaySeconds: 5
      periodSeconds: 5

    # 3. 启动探针(Startup Probe)
    # 检测应用是否已启动(K8s 1.16+)
    startupProbe:
      tcpSocket:
        port: 8080
      failureThreshold: 30  # 允许长时间启动
      periodSeconds: 10

# 探针类型:
# 1. exec: 执行命令,返回0表示成功
# 2. httpGet: HTTP GET请求,2xx-3xx状态码表示成功
# 3. tcpSocket: TCP端口检查,连接成功表示成功
3.3.3 环境变量和配置
apiVersion: v1
kind: Pod
metadata:
  name: config-demo
spec:
  containers:
  - name: app
    image: nginx

    # 环境变量配置
    env:
    # 1. 直接指定值
    - name: LOG_LEVEL
      value: "debug"

    # 2. 从ConfigMap获取
    - name: DATABASE_HOST
      valueFrom:
        configMapKeyRef:
          name: app-config
          key: database.host
          optional: true  # 可选配置

    # 3. 从Secret获取
    - name: API_KEY
      valueFrom:
        secretKeyRef:
          name: app-secrets
          key: api-key

    # 4. 字段引用(引用Pod信息)
    - name: MY_NODE_NAME
      valueFrom:
        fieldRef:
          fieldPath: spec.nodeName
    - name: MY_POD_IP
      valueFrom:
        fieldRef:
          fieldPath: status.podIP
    - name: MY_POD_NAMESPACE
      valueFrom:
        fieldRef:
          fieldPath: metadata.namespace

    # 5. 资源字段引用
    - name: MY_CPU_REQUEST
      valueFrom:
        resourceFieldRef:
          containerName: app
          resource: requests.cpu
3.4 多容器Pod模式
3.4.1 Sidecar模式
apiVersion: v1
kind: Pod
metadata:
  name: sidecar-demo
spec:
  volumes:
  - name: shared-logs
    emptyDir: {}

  containers:
  # 主容器:Web应用
  - name: web-app
    image: myapp:1.0
    volumeMounts:
    - name: shared-logs
      mountPath: /var/log/app

    ports:
    - containerPort: 8080

  # 边车容器:日志收集器
  - name: log-collector
    image: fluentd:latest
    volumeMounts:
    - name: shared-logs
      mountPath: /var/log/app

    # 共享网络,可以直接访问localhost:8080
    # 共享存储,可以读取主容器的日志文件

  # 边车容器:监控代理
  - name: monitoring-agent
    image: prometheus/node-exporter
    ports:
    - containerPort: 9100
3.4.2 Init Container模式
apiVersion: v1
kind: Pod
metadata:
  name: init-container-demo
spec:
  containers:
  - name: app
    image: myapp:1.0
    volumeMounts:
    - name: data-dir
      mountPath: /data

  # 初始化容器(按顺序执行)
  initContainers:
  # 1. 等待数据库就绪
  - name: wait-for-db
    image: busybox:1.28
    command: ['sh', '-c',
      'until nslookup mysql-service; do echo waiting for mysql; sleep 2; done']

  # 2. 初始化数据
  - name: init-data
    image: busybox:1.28
    command: ['sh', '-c', 'echo "Initial data" > /data/init.txt']
    volumeMounts:
    - name: data-dir
      mountPath: /data

  # 3. 执行数据库迁移
  - name: db-migration
    image: alpine:3.14
    command: ['sh', '-c', 'python manage.py migrate']

  volumes:
  - name: data-dir
    emptyDir: {}

# Init Container特点:
# 1. 在应用容器之前运行
# 2. 按顺序执行,前一个成功后才执行下一个
# 3. 执行完成后会终止
# 4. 如果失败,Pod会根据restartPolicy重启
3.5 Pod实战示例
3.5.1 完整的Pod定义文件
# pod-complete.yaml
apiVersion: v1
kind: Pod
metadata:
  name: complete-pod-demo
  namespace: default
  labels:
    app: nginx
    environment: production
  annotations:
    kubernetes.io/description: "Complete Pod example"
    maintainer: "ops-team"
spec:
  # 调度相关
  nodeSelector:
    disktype: ssd
    gpu: "true"

  # 亲和性设置
  affinity:
    nodeAffinity:
      requiredDuringSchedulingIgnoredDuringExecution:
        nodeSelectorTerms:
        - matchExpressions:
          - key: kubernetes.io/arch
            operator: In
            values:
            - amd64

    podAffinity:
      requiredDuringSchedulingIgnoredDuringExecution:
      - labelSelector:
          matchExpressions:
          - key: app
            operator: In
            values:
            - nginx
        topologyKey: kubernetes.io/hostname

    podAntiAffinity:
      preferredDuringSchedulingIgnoredDuringExecution:
      - weight: 100
        podAffinityTerm:
          labelSelector:
            matchExpressions:
            - key: app
              operator: In
              values:
              - nginx
          topologyKey: kubernetes.io/hostname

  # 容忍度
  tolerations:
  - key: "node.kubernetes.io/unreachable"
    operator: "Exists"
    effect: "NoExecute"
    tolerationSeconds: 300

  # 容器定义
  containers:
  - name: nginx
    image: nginx:1.21.5
    imagePullPolicy: IfNotPresent

    # 端口配置
    ports:
    - name: http
      containerPort: 80
      protocol: TCP
    - name: https
      containerPort: 443
      protocol: TCP

    # 资源限制
    resources:
      requests:
        cpu: "100m"
        memory: "128Mi"
      limits:
        cpu: "500m"
        memory: "256Mi"

    # 环境变量
    env:
    - name: NGINX_PORT
      value: "80"
    - name: HOSTNAME
      valueFrom:
        fieldRef:
          fieldPath: metadata.name

    # 健康检查
    livenessProbe:
      httpGet:
        path: /
        port: 80
      initialDelaySeconds: 30
      periodSeconds: 10

    readinessProbe:
      httpGet:
        path: /
        port: 80
      initialDelaySeconds: 5
      periodSeconds: 5

    # 生命周期钩子
    lifecycle:
      postStart:
        exec:
          command: ["/bin/sh", "-c", "echo Hello from postStart > /usr/share/nginx/html/poststart.html"]
      preStop:
        exec:
          command: ["/bin/sh", "-c", "nginx -s quit"]

    # 安全上下文
    securityContext:
      runAsUser: 1000
      runAsGroup: 3000
      allowPrivilegeEscalation: false
      readOnlyRootFilesystem: true
      capabilities:
        add: ["NET_ADMIN", "SYS_TIME"]
        drop: ["ALL"]

    # 卷挂载
    volumeMounts:
    - name: config-volume
      mountPath: /etc/nginx/nginx.conf
      subPath: nginx.conf
      readOnly: true
    - name: html-volume
      mountPath: /usr/share/nginx/html

  # 初始化容器
  initContainers:
  - name: init-config
    image: busybox:1.28
    command: ['sh', '-c', 'echo "Initializing..." && sleep 5']

  # 存储卷
  volumes:
  - name: config-volume
    configMap:
      name: nginx-config
  - name: html-volume
    persistentVolumeClaim:
      claimName: html-pvc

  # Pod级别设置
  restartPolicy: Always
  terminationGracePeriodSeconds: 60
  hostNetwork: false
  hostPID: false
  hostIPC: false
  dnsPolicy: ClusterFirst
  dnsConfig:
    nameservers:
      - 1.1.1.1
    searches:
      - ns1.svc.cluster.local
      - my.dns.search.suffix
    options:
      - name: ndots
        value: "2"
      - name: edns0
3.5.2 创建和管理Pod
# 1. 创建Pod
kubectl apply -f pod-complete.yaml

# 2. 查看Pod状态
kubectl get pods -o wide
kubectl describe pod complete-pod-demo

# 3. 查看Pod日志
kubectl logs complete-pod-demo -c nginx  # 指定容器
kubectl logs -f complete-pod-demo        # 实时日志

# 4. 进入Pod执行命令
kubectl exec -it complete-pod-demo -- /bin/bash
kubectl exec complete-pod-demo -c nginx -- nginx -v

# 5. 调试Pod
kubectl port-forward complete-pod-demo 8080:80  # 端口转发
kubectl attach complete-pod-demo -i             # 附加到运行中的容器

# 6. 复制文件
kubectl cp /local/path complete-pod-demo:/remote/path
kubectl cp complete-pod-demo:/remote/path /local/path

# 7. 删除Pod
kubectl delete pod complete-pod-demo
kubectl delete -f pod-complete.yaml
四、Deployment:声明式更新的利器
4.1 Deployment核心概念
4.1.1 为什么需要Deployment?
Deployment解决了Pod管理的几个关键问题:
// Pod直接管理的问题
problems := []string{
    "1. 缺乏自我修复能力:Pod失败后不会自动重启",
    "2. 无法滚动更新:更新应用会导致服务中断",
    "3. 难以扩展:手动创建多个Pod实例很麻烦",
    "4. 版本回退困难:无法轻松回退到之前的版本",
}

// Deployment提供的解决方案
solutions := map[string]string{
    "自我修复": "自动替换失败或不可达的Pod",
    "滚动更新": "逐步用新版本替换旧版本Pod",
    "弹性伸缩": "轻松调整Pod副本数量",
    "版本管理": "支持版本历史和回退",
    "发布策略": "支持多种更新策略(滚动、蓝绿、金丝雀)",
}
4.1.2 Deployment、ReplicaSet和Pod的关系
Deployment → ReplicaSet → Pods
     │            │           │
     │            │           ├── Pod 1
     │            │           ├── Pod 2
     │            │           └── Pod 3
     │            │
     │            └── ReplicaSet v1 (管理v1版本的Pod)
     │
     └── ReplicaSet v2 (当更新时创建,管理v2版本的Pod)
# 关系示例
apiVersion: apps/v1
kind: Deployment
metadata:
  name: nginx-deployment
spec:
  replicas: 3
  selector:
    matchLabels:
      app: nginx
  template:
    metadata:
      labels:
        app: nginx
    spec:
      containers:
      - name: nginx
        image: nginx:1.21.0

# 创建后会产生:
# 1. 一个Deployment对象
# 2. 一个ReplicaSet对象(例如:nginx-deployment-7c6cf994f7)
# 3. 三个Pod对象(例如:nginx-deployment-7c6cf994f7-xxxxx)
4.2 Deployment配置详解
4.2.1 完整的Deployment定义
apiVersion: apps/v1
kind: Deployment
metadata:
  name: nginx-deployment
  namespace: default
  labels:
    app: nginx
    environment: production
  annotations:
    deployment.kubernetes.io/revision: "1"
spec:
  # 副本数
  replicas: 3

  # 选择器(必须匹配template中的labels)
  selector:
    matchLabels:
      app: nginx
    matchExpressions:
    - {key: environment, operator: In, values: [production, staging]}

  # 策略配置
  strategy:
    type: RollingUpdate  # 或Recreate
    rollingUpdate:
      maxSurge: 25%           # 最大激增数,可以是百分比或具体数字
      maxUnavailable: 25%     # 最大不可用数

  # 最短就绪时间(K8s 1.24+)
  minReadySeconds: 10

  # 修订历史限制
  revisionHistoryLimit: 10

  # 进度期限(默认600秒)
  progressDeadlineSeconds: 600

  # Pod模板
  template:
    metadata:
      labels:
        app: nginx
        version: "1.21.0"
      annotations:
        sidecar.istio.io/inject: "false"

    spec:
      containers:
      - name: nginx
        image: nginx:1.21.0
        imagePullPolicy: IfNotPresent

        ports:
        - containerPort: 80

        resources:
          requests:
            cpu: "100m"
            memory: "128Mi"
          limits:
            cpu: "200m"
            memory: "256Mi"

        livenessProbe:
          httpGet:
            path: /
            port: 80
          initialDelaySeconds: 30
          periodSeconds: 10

        readinessProbe:
          httpGet:
            path: /
            port: 80
          initialDelaySeconds: 5
          periodSeconds: 5

        # 容器安全上下文
        securityContext:
          privileged: false
          readOnlyRootFilesystem: true
          allowPrivilegeEscalation: false

      # Pod安全上下文
      securityContext:
        runAsNonRoot: true
        runAsUser: 1000
        runAsGroup: 1000
        fsGroup: 1000

      # 亲和性
      affinity:
        podAntiAffinity:
          preferredDuringSchedulingIgnoredDuringExecution:
          - weight: 100
            podAffinityTerm:
              labelSelector:
                matchExpressions:
                - key: app
                  operator: In
                  values:
                  - nginx
              topologyKey: kubernetes.io/hostname

      # 节点选择器
      nodeSelector:
        disktype: ssd

      # 容忍度
      tolerations:
      - key: "node.kubernetes.io/not-ready"
        operator: "Exists"
        effect: "NoExecute"
        tolerationSeconds: 300
      - key: "node.kubernetes.io/unreachable"
        operator: "Exists"
        effect: "NoExecute"
        tolerationSeconds: 300
4.2.2 更新策略详解
# 1. 滚动更新(RollingUpdate)- 默认策略
strategy:
  type: RollingUpdate
  rollingUpdate:
    maxSurge: 1        # 可以超出期望副本数的最大Pod数
    maxUnavailable: 0  # 更新过程中不可用Pod的最大数量

# 更新过程:
# 阶段1: 创建1个新Pod(因为maxSurge:1,总Pod数=4)
# 阶段2: 等待新Pod就绪
# 阶段3: 删除1个旧Pod(总Pod数=3)
# 阶段4: 重复阶段1-3,直到所有Pod更新完成

# 2. 重新创建(Recreate)
strategy:
  type: Recreate

# 更新过程:
# 阶段1: 删除所有旧Pod
# 阶段2: 创建所有新Pod
# 特点:有服务中断,适合不能同时运行多版本的应用
4.3 Deployment操作实战
4.3.1 创建和查看Deployment
# 1. 创建Deployment
kubectl apply -f deployment.yaml

# 2. 查看Deployment状态
kubectl get deployments
kubectl describe deployment nginx-deployment

# 3. 查看关联的ReplicaSet
kubectl get replicasets -l app=nginx
kubectl describe replicaset nginx-deployment-7c6cf994f7

# 4. 查看Pod
kubectl get pods -l app=nginx
kubectl get pods -o wide --show-labels

# 5. 查看详细事件
kubectl get events --sort-by=.metadata.creationTimestamp
4.3.2 更新和回滚
# 1. 更新镜像版本
kubectl set image deployment/nginx-deployment nginx=nginx:1.22.0
# 或
kubectl edit deployment nginx-deployment

# 2. 查看更新状态
kubectl rollout status deployment nginx-deployment
kubectl get deployments -w  # 实时监控

# 3. 查看更新历史
kubectl rollout history deployment nginx-deployment
kubectl rollout history deployment nginx-deployment --revision=2

# 4. 回滚到上一个版本
kubectl rollout undo deployment nginx-deployment

# 5. 回滚到特定版本
kubectl rollout undo deployment nginx-deployment --to-revision=1

# 6. 暂停和恢复更新
kubectl rollout pause deployment nginx-deployment
# 进行多个修改...
kubectl rollout resume deployment nginx-deployment

# 7. 强制回滚(当历史记录被清理时)
kubectl patch deployment nginx-deployment \
  -p '{"spec":{"template":{"spec":{"containers":[{"name":"nginx","image":"nginx:1.21.0"}]}}}}'
4.3.3 弹性伸缩
# 1. 手动伸缩
kubectl scale deployment nginx-deployment --replicas=5

# 2. 自动伸缩(需要Metrics Server)
kubectl autoscale deployment nginx-deployment \
  --min=2 \
  --max=10 \
  --cpu-percent=50

# 3. 查看HPA
kubectl get hpa
kubectl describe hpa nginx-deployment

# 4. 删除HPA
kubectl delete hpa nginx-deployment
4.3.4 高级操作
# 1. 金丝雀发布(部分更新)
# 方法1:使用两个Deployment
kubectl create deployment nginx-canary --image=nginx:1.22.0 --replicas=1

# 方法2:使用单个Deployment的maxSurge
# 设置maxSurge=1,先更新一个Pod测试

# 2. 蓝绿部署
# 创建v2 Deployment
kubectl create deployment nginx-v2 --image=nginx:1.22.0 --replicas=3

# 通过Service切换流量
kubectl patch service nginx-service \
  -p '{"spec":{"selector":{"version":"1.22.0"}}}'

# 3. 调试Deployment
# 查看详细状态
kubectl get deployment nginx-deployment -o yaml
kubectl get deployment nginx-deployment -o jsonpath='{.status}'

# 查看控制器事件
kubectl get events --field-selector involvedObject.kind=Deployment

# 4. 生成Deployment配置
kubectl create deployment nginx --image=nginx:1.21.0 --dry-run=client -o yaml > nginx-deployment.yaml

# 5. 导出当前配置
kubectl get deployment nginx-deployment -o yaml --export > exported.yaml
4.4 Deployment高级特性
4.4.1 就绪门(Readiness Gates)
apiVersion: apps/v1
kind: Deployment
metadata:
  name: readiness-gate-demo
spec:
  replicas: 3
  template:
    metadata:
      labels:
        app: nginx
    spec:
      # 就绪门
      readinessGates:
      - conditionType: "www.example.com/feature-available"

      containers:
      - name: nginx
        image: nginx:1.21.0

        # 自定义就绪探针
        readinessProbe:
          exec:
            command:
            - /bin/sh
            - -c
            - |
              # 检查外部条件
              if check-external-condition; then
                # 设置就绪门条件
                kubectl patch pod $POD_NAME \
                  -p '{"status":{"conditions":[{"type":"www.example.com/feature-available","status":"True"}]}}'
              fi
4.4.2 原地更新(In-place Update)
# Kubernetes 1.27+ 支持原地更新
# 通过改变PodSpec触发重启而不创建新Pod

# 1. 启用特性门控
# 在kube-apiserver和kubelet中添加:
# --feature-gates=InPlacePodVerticalScaling=true

# 2. 更新资源请求/限制
kubectl patch deployment nginx-deployment \
  --type='json' \
  -p='[{"op": "replace", "path": "/spec/template/spec/containers/0/resources", "value": {"requests": {"cpu": "200m", "memory": "256Mi"}, "limits": {"cpu": "400m", "memory": "512Mi"}}}]'
五、Service:服务发现与负载均衡
5.1 Service核心概念
5.1.1 为什么需要Service?
Pod是动态的、临时的,这带来了几个问题:
// Pod直接暴露的问题
problems := []string{
    "1. 动态IP: Pod重启后IP地址会改变",
    "2. 负载均衡: 多个Pod实例需要负载均衡",
    "3. 服务发现: 客户端如何发现Pod端点",
    "4. 外部访问: 如何从集群外部访问服务",
}

// Service的解决方案
solutions := map[string]string{
    "稳定端点": "提供稳定的虚拟IP和DNS名称",
    "负载均衡": "将流量分发到后端Pod",
    "服务发现": "通过DNS或环境变量自动发现",
    "外部访问": "提供多种外部访问方式",
}
5.1.2 Service的工作原理
Service工作原理示意图:

外部客户端             集群内部
    │                    │
    │                    ▼
    │           ┌─────────────────┐
    │           │   Service       │
    │           │   Virtual IP    │
    │           │   10.96.0.10    │
    └──────────►│    (ClusterIP)  │
                └─────────┬───────┘
                          │
        ┌─────────────────┼─────────────────┐
        │                 │                 │
        ▼                 ▼                 ▼
┌─────────────┐   ┌─────────────┐   ┌─────────────┐
│    Pod 1    │   │    Pod 2    │   │    Pod 3    │
│ 10.244.1.2  │   │ 10.244.1.3  │   │ 10.244.2.2  │
│   :8080     │   │   :8080     │   │   :8080     │
└─────────────┘   └─────────────┘   └─────────────┘
# Service创建后,Kubernetes会:
# 1. 分配一个稳定的ClusterIP(虚拟IP)
# 2. 创建Endpoints对象(后端Pod列表)
# 3. 配置kube-proxy创建iptables/IPVS规则
# 4. 在CoreDNS中注册DNS记录
5.2 Service类型详解
5.2.1 ClusterIP(默认类型)
apiVersion: v1
kind: Service
metadata:
  name: clusterip-service
  namespace: default
spec:
  type: ClusterIP  # 默认值,可省略

  # 手动指定ClusterIP(可选)
  clusterIP: 10.96.0.100

  # 选择器(选择后端Pod)
  selector:
    app: nginx
    environment: production

  # 端口映射
  ports:
  - name: http
    protocol: TCP
    port: 80        # Service端口
    targetPort: 80  # Pod端口

  # 会话保持(Session Affinity)
  sessionAffinity: ClientIP
  sessionAffinityConfig:
    clientIP:
      timeoutSeconds: 10800  # 3小时

  # 内部流量策略(K8s 1.21+)
  internalTrafficPolicy: Local  # 或Cluster

# 访问方式:
# 1. 集群内部通过Service名称:端口
#    http://clusterip-service.default.svc.cluster.local:80
#    或简写:http://clusterip-service:80
#
# 2. 环境变量注入(旧方式):
#    CLUSTERIP_SERVICE_SERVICE_HOST=10.96.0.100
#    CLUSTERIP_SERVICE_SERVICE_PORT=80
5.2.2 NodePort
apiVersion: v1
kind: Service
metadata:
  name: nodeport-service
spec:
  type: NodePort

  selector:
    app: nginx

  ports:
  - name: http
    protocol: TCP
    port: 80          # Service端口
    targetPort: 80    # Pod端口
    nodePort: 30080   # 节点端口(30000-32767)

  # 指定外部流量策略
  externalTrafficPolicy: Local  # 或Cluster

# 访问方式:
# 1. 通过任何节点的IP:NodePort访问
#    http://<任何节点IP>:30080
#
# 2. 集群内部仍然可以通过ClusterIP访问
#
# externalTrafficPolicy说明:
# - Local: 只将流量路由到运行Pod的节点,保留客户端IP
# - Cluster: 可以将流量路由到其他节点,客户端IP被替换
5.2.3 LoadBalancer
apiVersion: v1
kind: Service
metadata:
  name: loadbalancer-service
  annotations:
    # 云提供商特定注解
    service.beta.kubernetes.io/aws-load-balancer-type: "nlb"
    service.beta.kubernetes.io/azure-load-balancer-internal: "true"
    cloud.google.com/load-balancer-type: "Internal"
spec:
  type: LoadBalancer

  selector:
    app: nginx

  ports:
  - name: http
    protocol: TCP
    port: 80
    targetPort: 80

  # 分配特定IP(如果云提供商支持)
  loadBalancerIP: 203.0.113.10

  # 指定源IP范围(白名单)
  loadBalancerSourceRanges:
  - 203.0.113.0/24
  - 192.168.0.0/16

# 工作原理:
# 1. Kubernetes创建NodePort Service
# 2. 云控制器管理器创建云负载均衡器
# 3. 负载均衡器将流量转发到节点端口
# 4. 节点上的kube-proxy将流量转发到Pod
5.2.4 ExternalName
apiVersion: v1
kind: Service
metadata:
  name: external-service
spec:
  type: ExternalName

  # 外部服务的域名
  externalName: api.example.com

  # 注意:ExternalName Service没有选择器
  # 也没有端口定义

# 工作原理:
# 将external-service.default.svc.cluster.local
# CNAME解析到api.example.com
#
# 使用场景:
# 1. 迁移服务到Kubernetes时作为代理
# 2. 访问外部服务时使用统一的命名
5.3 Service配置进阶
5.3.1 多端口Service
apiVersion: v1
kind: Service
metadata:
  name: multi-port-service
spec:
  selector:
    app: myapp

  ports:
  - name: http
    protocol: TCP
    port: 80
    targetPort: 8080

  - name: https
    protocol: TCP
    port: 443
    targetPort: 8443

  - name: metrics
    protocol: TCP
    port: 9090
    targetPort: 9090

  - name: grpc
    protocol: TCP
    port: 50051
    targetPort: 50051

# DNS记录:
# multi-port-service.default.svc.cluster.local
# SRV记录会包含所有端口信息
5.3.2 无选择器的Service
# 1. 创建没有选择器的Service
apiVersion: v1
kind: Service
metadata:
  name: no-selector-service
spec:
  ports:
  - name: http
    protocol: TCP
    port: 80
    targetPort: 8080

  # 没有selector字段

# 2. 手动创建Endpoints
apiVersion: v1
kind: Endpoints
metadata:
  name: no-selector-service  # 必须与Service同名
subsets:
- addresses:
  - ip: 192.168.1.100
    nodeName: node-1  # 可选
    targetRef:  # 可选
      kind: Pod
      name: external-pod-1
      namespace: default
  - ip: 192.168.1.101
  ports:
  - name: http
    port: 8080
    protocol: TCP

# 使用场景:
# 1. 连接外部数据库
# 2. 连接另一个集群的服务
# 3. 迁移过程中连接传统系统
5.3.3 Headless Service
apiVersion: v1
kind: Service
metadata:
  name: headless-service
spec:
  clusterIP: None  # 关键设置

  selector:
    app: stateful-app

  ports:
  - name: http
    protocol: TCP
    port: 80
    targetPort: 8080

# 特点:
# 1. 没有ClusterIP
# 2. DNS返回所有Pod的IP地址(A记录)
# 3. 客户端直接连接到Pod,不经过负载均衡
#
# DNS查询结果:
# headless-service.default.svc.cluster.local
# 返回:
# - 10.244.1.2
# - 10.244.1.3
# - 10.244.2.2
#
# 使用场景:
# 1. StatefulSet需要稳定的网络标识
# 2. 客户端需要直接连接到特定Pod
# 3. 数据库集群等有状态应用
5.4 Service实战操作
5.4.1 创建和管理Service
# 1. 创建Service
kubectl apply -f service.yaml

# 2. 查看Service
kubectl get services
kubectl describe service my-service

# 3. 查看Endpoints
kubectl get endpoints
kubectl describe endpoints my-service

# 4. 查看Service的DNS信息
kubectl run -it --rm dns-test --image=busybox:1.28 --restart=Never -- nslookup my-service

# 5. 测试Service连通性
kubectl run -it --rm test-client --image=busybox:1.28 --restart=Never -- wget -O- http://my-service:80

# 6. 端口转发(调试用)
kubectl port-forward service/my-service 8080:80

# 7. 暴露Deployment为Service
kubectl expose deployment nginx-deployment --port=80 --target-port=80 --type=NodePort

# 8. 编辑Service
kubectl edit service my-service
5.5 Service与Ingress
5.5.1 Ingress基础
Service只能提供L4负载均衡,Ingress提供L7(HTTP/HTTPS)路由。
# 1. 部署Ingress Controller(以Nginx为例)
# https://kubernetes.github.io/ingress-nginx/deploy/

# 2. 创建Ingress资源
apiVersion: networking.k8s.io/v1
kind: Ingress
metadata:
  name: example-ingress
  annotations:
    nginx.ingress.kubernetes.io/rewrite-target: /
    nginx.ingress.kubernetes.io/ssl-redirect: "true"
spec:
  tls:
  - hosts:
    - example.com
    secretName: example-tls
  rules:
  - host: example.com
    http:
      paths:
      - path: /api
        pathType: Prefix
        backend:
          service:
            name: api-service
            port:
              number: 80
      - path: /web
        pathType: Prefix
        backend:
          service:
            name: web-service
            port:
              number: 80
  - host: admin.example.com
    http:
      paths:
      - path: /
        pathType: Prefix
        backend:
          service:
            name: admin-service
            port:
              number: 80

# 3. Service配置
apiVersion: v1
kind: Service
metadata:
  name: api-service
spec:
  selector:
    app: api
  ports:
  - name: http
    port: 80
    targetPort: 8080
5.5.2 Service与Ingress对比
| 特性 | Service | Ingress |
|---|---|---|
| 工作层 | L4(传输层) | L7(应用层) |
| 协议支持 | TCP/UDP/SCTP | HTTP/HTTPS(部分支持TCP/UDP) |
| 路由能力 | 基于IP和端口 | 基于主机名、路径、请求头等 |
| SSL终止 | 不支持 | 支持 |
| 负载均衡算法 | 简单轮询/会话保持 | 多种算法(轮询、最少连接等) |
| 使用场景 | 内部服务通信、基本暴露 | 外部HTTP/HTTPS流量管理 |
六、总结与面试准备
6.1 核心概念关系总结
6.1.1 Pod、Deployment、Service协作流程
完整应用部署流程:

1. 开发者编写Deployment YAML
   ↓
2. kubectl apply创建Deployment
   ↓
3. Deployment创建ReplicaSet
   ↓
4. ReplicaSet创建和管理Pod
   ↓
5. Pod调度到节点并运行容器
   ↓
6. Service根据选择器发现Pod
   ↓
7. Service创建Endpoints(Pod IP列表)
   ↓
8. kube-proxy配置负载均衡规则
   ↓
9. CoreDNS注册Service DNS记录
   ↓
10. 应用可通过Service名称访问后端Pod
6.1.2 三者的职责划分
type Pod struct {
    职责: "运行容器实例",
    特点: "临时性、动态IP、可扩展",
    生命周期: "创建、运行、终止",
}

type Deployment struct {
    职责: "声明式管理Pod副本",
    特点: "滚动更新、回滚、弹性伸缩",
    管理对象: "通过ReplicaSet管理Pod",
}

type Service struct {
    职责: "服务发现和负载均衡",
    特点: "稳定端点、多种类型、DNS名称",
    作用对象: "通过选择器关联Pod",
}

// 三者关系总结
关系模型 := {
    "Deployment": "管理Pod的期望状态",
    "Pod": "实际运行的工作负载",
    "Service": "暴露和访问Pod的入口",
}
6.2 面试高频问题解析
Q1: Pod和Deployment有什么区别?
参考答案:
-
抽象层级不同:
-
Pod是Kubernetes中最小的调度单元,直接运行容器
-
Deployment是更高层次的抽象,用于管理Pod的副本集
-
-
生命周期管理:
-
Pod是临时的,重启后IP会改变,没有自我修复能力
-
Deployment确保指定数量的Pod副本持续运行,具有自我修复能力
-
-
更新策略:
-
Pod不支持滚动更新,只能删除重建
-
Deployment支持多种更新策略(滚动更新、重新创建)
-
-
使用场景:
-
Pod:适合一次性任务、调试、测试
-
Deployment:适合生产环境的无状态应用
-
-
实际关系:
# Deployment创建和管理Pod
Deployment → ReplicaSet → Pods

# 示例:创建一个Deployment
kubectl create deployment nginx --image=nginx:1.21
# 这会创建:
# 1. 一个Deployment对象
# 2. 一个ReplicaSet对象
# 3. 一个Pod对象(默认replicas=1)
Q2: Service的ClusterIP、NodePort、LoadBalancer有什么区别?
参考答案:
-
ClusterIP:
-
默认类型,只在集群内部访问
-
分配一个稳定的虚拟IP(VIP)
-
通过kube-proxy实现内部负载均衡
-
访问方式:服务名.命名空间.svc.cluster.local
-
-
NodePort:
-
在ClusterIP基础上,在每个节点上开放一个端口
-
端口范围:30000-32767
-
可以从集群外部通过节点IP:NodePort访问
-
实际生产中通常配合外部负载均衡器使用
-
-
LoadBalancer:
-
在NodePort基础上,集成云提供商的负载均衡器
-
自动创建外部负载均衡器并分配公网IP
-
云提供商特定功能可通过annotations配置
-
成本较高,适用于生产环境
-
-
选择建议:
选择策略:
- 集群内部访问:使用ClusterIP
- 开发测试环境:使用NodePort
- 生产环境(云平台):使用LoadBalancer
- 生产环境(裸机):使用NodePort + 外部负载均衡器
Q3: 如何实现零停机部署?
参考答案:
- 使用Deployment的滚动更新:
strategy:
  type: RollingUpdate
  rollingUpdate:
    maxSurge: 1        # 先启动一个新Pod
    maxUnavailable: 0  # 保证始终有可用Pod
- 配置合适的健康检查:
readinessProbe:
  httpGet:
    path: /health
    port: 8080
  initialDelaySeconds: 5
  periodSeconds: 5
  successThreshold: 1
  failureThreshold: 3

livenessProbe:
  httpGet:
    path: /health
    port: 8080
  initialDelaySeconds: 30  # 给应用足够的启动时间
  periodSeconds: 10
- 使用minReadySeconds:
minReadySeconds: 30 # 新Pod就绪后等待30秒才认为可用
- 配置Pod Disruption Budget(PDB):
apiVersion: policy/v1
kind: PodDisruptionBudget
metadata:
  name: app-pdb
spec:
  minAvailable: 2  # 保证至少2个Pod可用
  selector:
    matchLabels:
      app: myapp
- 更新流程:
# 1. 先更新一个Pod(金丝雀发布)
kubectl set image deployment/app app=app:v2.0.0

# 2. 监控新Pod状态
kubectl rollout status deployment/app

# 3. 如果正常,继续更新剩余Pod
# 4. 如果有问题,立即回滚
kubectl rollout undo deployment/app
Q4: Service如何实现负载均衡?
参考答案:
-
kube-proxy的工作模式:
-
iptables模式(默认):通过iptables规则实现负载均衡
-
IPVS模式:使用IPVS(IP Virtual Server)实现高性能负载均衡
-
userspace模式(已弃用):在用户空间实现代理
-
-
负载均衡算法:
# iptables模式:随机选择(random)
# IPVS模式支持多种算法:
# - rr: 轮询
# - lc: 最少连接
# - dh: 目标哈希
# - sh: 源哈希
# - sed: 最短预期延迟
# - nq: 从不排队
- 会话保持:
sessionAffinity: ClientIP
sessionAffinityConfig:
  clientIP:
    timeoutSeconds: 10800
- 内部流量策略:
internalTrafficPolicy: Local # 优先将流量保持在节点内部
- 实际工作流程:
客户端请求 → Service ClusterIP → iptables/IPVS规则
             ↓
    根据负载均衡算法选择后端Pod
             ↓
        转发到Pod IP:Port
Q5: 如何调试Pod无法启动的问题?
参考答案:
# 系统化的调试流程
1. 查看Pod状态
kubectl get pods -o wide
kubectl describe pod <pod-name>

2. 查看Pod事件
kubectl get events --field-selector involvedObject.name=<pod-name>

3. 检查Pod调度
kubectl describe pod <pod-name> | grep -A10 Events

4. 查看节点资源
kubectl describe node <node-name>
kubectl get nodes -o wide

5. 检查镜像拉取
kubectl describe pod <pod-name> | grep -i image
kubectl get pods -o jsonpath='{range .items[*]}{.status.containerStatuses[*].state.waiting.reason}{"\n"}{end}'

6. 检查存储卷
kubectl describe pod <pod-name> | grep -i volume
kubectl get pvc

7. 检查配置映射和密钥
kubectl get configmaps
kubectl get secrets

8. 检查网络策略
kubectl get networkpolicies

9. 检查资源配额
kubectl describe quota -n <namespace>

10. 查看Kubelet日志(在节点上)
journalctl -u kubelet --since "10 minutes ago"
6.3 实战面试题
题目:设计一个高可用的Web应用部署架构
要求:
-
应用需要运行3个副本
-
支持零停机部署
-
可以从公网访问
-
需要监控和健康检查
-
配置和密钥需要安全管理
参考答案:
# 1. 配置映射(ConfigMap)
apiVersion: v1
kind: ConfigMap
metadata:
  name: webapp-config
data:
  APP_ENV: "production"
  LOG_LEVEL: "info"
  FEATURE_FLAGS: "new-ui,beta-api"

# 2. 密钥(Secret)
apiVersion: v1
kind: Secret
metadata:
  name: webapp-secrets
type: Opaque
data:
  DATABASE_URL: <base64编码>
  API_KEY: <base64编码>

# 3. 部署(Deployment)
apiVersion: apps/v1
kind: Deployment
metadata:
  name: webapp-deployment
spec:
  replicas: 3
  revisionHistoryLimit: 5
  strategy:
    type: RollingUpdate
    rollingUpdate:
      maxSurge: 1
      maxUnavailable: 0
  selector:
    matchLabels:
      app: webapp
  template:
    metadata:
      labels:
        app: webapp
        version: "v1.0.0"
    spec:
      containers:
      - name: webapp
        image: myapp:1.0.0
        imagePullPolicy: IfNotPresent
        ports:
        - containerPort: 8080
        env:
        - name: APP_ENV
          valueFrom:
            configMapKeyRef:
              name: webapp-config
              key: APP_ENV
        - name: DATABASE_URL
          valueFrom:
            secretKeyRef:
              name: webapp-secrets
              key: DATABASE_URL
        resources:
          requests:
            cpu: "100m"
            memory: "128Mi"
          limits:
            cpu: "200m"
            memory: "256Mi"
        livenessProbe:
          httpGet:
            path: /health
            port: 8080
          initialDelaySeconds: 30
          periodSeconds: 10
        readinessProbe:
          httpGet:
            path: /ready
            port: 8080
          initialDelaySeconds: 5
          periodSeconds: 5
        startupProbe:
          httpGet:
            path: /health
            port: 8080
          failureThreshold: 30
          periodSeconds: 10
      affinity:
        podAntiAffinity:
          preferredDuringSchedulingIgnoredDuringExecution:
          - weight: 100
            podAffinityTerm:
              labelSelector:
                matchExpressions:
                - key: app
                  operator: In
                  values:
                  - webapp
              topologyKey: kubernetes.io/hostname

# 4. 服务(Service)
apiVersion: v1
kind: Service
metadata:
  name: webapp-service
spec:
  selector:
    app: webapp
  ports:
  - name: http
    protocol: TCP
    port: 80
    targetPort: 8080
  type: ClusterIP

# 5. 入口(Ingress)
apiVersion: networking.k8s.io/v1
kind: Ingress
metadata:
  name: webapp-ingress
  annotations:
    nginx.ingress.kubernetes.io/ssl-redirect: "true"
spec:
  tls:
  - hosts:
    - myapp.example.com
    secretName: tls-secret
  rules:
  - host: myapp.example.com
    http:
      paths:
      - path: /
        pathType: Prefix
        backend:
          service:
            name: webapp-service
            port:
              number: 80

# 6. 水平Pod自动伸缩(HPA)
apiVersion: autoscaling/v2
kind: HorizontalPodAutoscaler
metadata:
  name: webapp-hpa
spec:
  scaleTargetRef:
    apiVersion: apps/v1
    kind: Deployment
    name: webapp-deployment
  minReplicas: 3
  maxReplicas: 10
  metrics:
  - type: Resource
    resource:
      name: cpu
      target:
        type: Utilization
        averageUtilization: 50
  - type: Resource
    resource:
      name: memory
      target:
        type: Utilization
        averageUtilization: 70

# 7. Pod中断预算(PDB)
apiVersion: policy/v1
kind: PodDisruptionBudget
metadata:
  name: webapp-pdb
spec:
  minAvailable: 2
  selector:
    matchLabels:
      app: webapp
6.4 学习路径建议
6.4.1 初学者学习路线
第一阶段:基础概念(1-2周)
  - 理解Pod、Deployment、Service核心概念
  - 掌握kubectl基本命令
  - 能够在Minikube或Kind上运行简单应用

第二阶段:进阶使用(2-4周)
  - 学习ConfigMap、Secret、Volume
  - 掌握健康检查、资源限制
  - 理解滚动更新和回滚
  - 学习基本的故障排查

第三阶段:生产实践(4-8周)
  - 学习Ingress、HPA、PDB
  - 理解网络策略和安全上下文
  - 掌握监控和日志收集
  - 学习Helm包管理

第四阶段:高级主题(8-12周)
  - StatefulSet、DaemonSet、Job/CronJob
  - 自定义资源定义(CRD)和Operator
  - 服务网格(Istio/Linkerd)
  - 多集群管理
6.4.2 推荐资源
-
官方文档:
-
Kubernetes官方文档
-
Kubernetes API参考
-
Kubernetes任务指南
-
-
实践环境:
-
Minikube(本地单节点集群)
-
Kind(Kubernetes in Docker)
-
K3s(轻量级Kubernetes)
-
各大云平台的Kubernetes服务(EKS、AKS、GKE)
-
-
认证和课程:
-
CKAD(Certified Kubernetes Application Developer)
-
CKA(Certified Kubernetes Administrator)
-
Kubernetes官方培训课程
-
6.5 常见陷阱和最佳实践
6.5.1 常见陷阱
# 陷阱1:忘记设置资源限制
containers:
- name: app
  image: myapp:latest
  # 缺少resources设置,可能导致节点资源耗尽

# 陷阱2:健康检查配置不当
livenessProbe:
  httpGet:
    path: /
    port: 8080
  initialDelaySeconds: 5  # 太短,应用可能还没启动
  periodSeconds: 1       # 太频繁,增加压力

# 陷阱3:标签选择器不匹配
apiVersion: apps/v1
kind: Deployment
metadata:
  name: app
spec:
  selector:
    matchLabels:
      app: myapp
  template:
    metadata:
      labels:
        app: different-app  # 错误!选择器无法匹配

# 陷阱4:使用latest标签
image: nginx:latest  # 可能导致版本不一致和更新问题

# 陷阱5:缺少Pod反亲和性
# 所有副本可能调度到同一个节点,节点故障时服务完全中断
6.5.2 最佳实践清单
✓ 总是设置资源请求和限制
✓ 配置合适的健康检查
✓ 使用有意义的标签和注解
✓ 指定具体的镜像标签(避免latest)
✓ 配置Pod反亲和性提高可用性
✓ 使用ConfigMap和Secret管理配置
✓ 为生产环境配置PDB
✓ 启用自动伸缩(HPA)
✓ 实施网络策略限制流量
✓ 使用非root用户运行容器
✓ 只读根文件系统
✓ 定期更新Kubernetes版本
✓ 实施备份和灾难恢复策略
✓ 监控和告警配置
✓ 安全上下文配置
最后的建议:Kubernetes是一个复杂的系统,但掌握其核心概念(Pod、Deployment、Service)是构建云原生应用的基础。建议从实际动手开始,先在小规模环境中实践,逐步深入理解各个组件的工作原理和最佳实践。记住,学习Kubernetes是一个持续的过程,随着生态系统的不断发展,总有新的东西需要学习。


 794
794

 被折叠的 条评论
为什么被折叠?
被折叠的 条评论
为什么被折叠?
 到【灌水乐园】发言


