


 本文详细介绍了Linux操作系统从启动到运行init()的过程,包括BIOS加载bootsect.s,setup.s解析硬件参数,内核加载,内存管理,中断及设备初始化等。还探讨了不同平台的适配和内核的多平台支持。最后,讲解了如何通过machine_desc结构体识别和配置硬件,以实现Linux在不同板卡上的移植。
一、linux操作系统的引导
1、Linux是如何从硬盘中读出
2、linux在启动的时候如何拿到硬件参数
3、linux在初始运行中都做了什么
trap.c trap_init()
mktime.c time_init()
sched.c sched_init()
引导程序就在boot 里面有三个引导程序。.s
BIOS/Bootloader
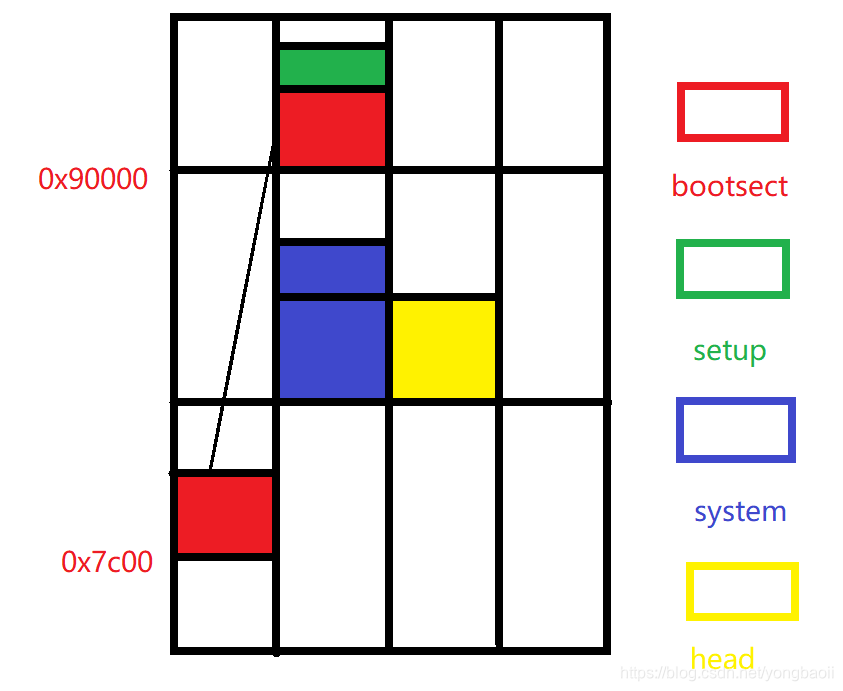
linux上电之后,cpu进入bios(0xFFFF0是BIOS存储的总线地址)模式,会自动的从每个地址开始,执行bios程序,把bootsect.s从某个固定的地址拿到内存中某个固定地址(0x7c00),并进行了一系列的硬件初始化和参数设置。
 bootsect.s is loaded at 0x7c00 by the bios-startup routines, and moves
! iself out of the way to address 0x90000, and jumps there.
!
! It then loads 'setup' directly after itself (0x90200), and the system
! at 0x10000, using BIOS interrupts.
!
! NOTE! currently system is at most 8*65536 bytes long. This should be no
! problem, even in the future. I want to keep it simple. This 512 kB
! kernel size should be enough, especially as this doesn't contain the
! buffer cache as in minix
!
! The loader has been made as simple as possible, and continuos
! read errors will result in a unbreakable loop. Reboot by hand. It
! loads pretty fast by getting whole sectors at a time whenever possible.
SETUPLEN = 4				! nr of setup-sectors
BOOTSEG  = 0x07c0			! original address of boot-sector
INITSEG  = 0x9000			! we move boot here - out of the way
SETUPSEG = 0x9020			! setup starts here
SYSSEG   = 0x1000			! system loaded at 0x10000 (65536).
ENDSEG   = SYSSEG + SYSSIZE		! where to stop loading
bootsect.s
(自己把自己移动到了0x90000.)
存在于磁盘引导块程序,在磁盘的第一个扇区中的程序。(0磁道 0磁头 1扇区)
作用:首先将后续的setup.s代码从磁盘中加载到紧接着bootsect.s的地方。
在显示屏上显示loading system 再将system(操作系统)模块加载到0x10000的地
最后跳转到setup去运行。
! setup.s is responsible for getting the system data from the BIOS,
! and putting them into the appropriate places in system memory.
! both setup.s and system has been loaded by the bootblock.
!
! This code asks the bios for memory/disk/other parameters, and
! puts them in a "safe" place: 0x90000-0x901FF, ie where the
! boot-block used to be. It is then up to the protected mode
! system to read them from there before the area is overwritten
! for buffer-blocks.
!

! NOTE! These had better be the same as in bootsect.s!
setup.s
解析BIOS/BOOTLOADER传来的参数
设置系统内核运行的LDT(局部描述符) IDT(中断描述符寄存器) 全局描述符(全局描述符寄存器)
设置中断控制芯片 进入保护模式 (svc32保护模式 设置寄存器中的值)
跳转到system模块的最前面的代码运行(head.s)
mov [0],dx 光标位置
mov [2],ax 扩展内存大小
mov [4],bx 显存大小和信息
mov [6],ax
mov [8],ax
mov [10],bx
mov [12],cx
两个银盘参数表
根文件系统
BIOS把各种信息存到内存中,然后之后用来读。
 *  head.s contains the 32-bit startup code.
 *
 * NOTE!!! Startup happens at absolute address 0x00000000, which is also where
 * the page directory will exist. The startup code will be overwritten by
 * the page directory.
head.s
加载内核运行时的各种数据寄存器,重新设置中断描述符表
开启内核正常运行时的协处理器等资源
设置内存管理的分页机制
跳转到main.c开始运行
ROOT_DEV = ORIG_ROOT_DEV;
//设置操作系统的根文件
drive_info = DRIVE_INFO;
//设置操作系统驱动参数
//解析setup.s代码后获取系统内存参数
memory_end = (1<<20) + (EXT_MEM_K<<10);
//设置系统的大小  系统本身内存(1MB) + 扩展内存大小
memory_end &= 0xfffff000;
//取整4k内存

//设置高速缓冲区的内存
//内存的长条有三个分区
//第一个分区是内核代码运行内存
//第三个分区时高速缓冲区
//第三个分区时用户内存
//sync 块设备驱动有关
if (memory_end > 16*1024*1024)
	memory_end = 16*1024*1024;
if (memory_end > 12*1024*1024)
	buffer_memory_end = 4*1024*1024;
else if (memory_end > 6*1024*1024)
	buffer_memory_end = 2*1024*1024;
else
	buffer_memory_end = 1*1024*1024;

//主内存是高速缓冲区的结束
main_memory_start = buffer_memory_end;

//如果有虚拟磁盘就在高速缓冲区后面先在来点虚拟磁盘
main_memory_start += rd_init(main_memory_start, RAMDISK*1024);
	mem_init(main_memory_start,memory_end);
	trap_init();
	blk_dev_init();
	chr_dev_init();
	tty_init();
	time_init();
	sched_init();
	buffer_init(buffer_memory_end);
	hd_init();
	floppy_init();
	sti();
	move_to_user_mode();
	if (!fork()) {		/* we count on this going ok */
		init();
	}
一大堆初始化之后创建了0号进程,运行了init()
1、初始化代码
起点:磁盘引导程序,需要将内核等移入内核进行运行并初始化多种模块
终点:运行第一个应用程序的根文件系统
在0号进程运行init函数
void init(void)
{
	int pid,i;

	setup((void *) &drive_info);
	//获取有关硬件驱动的信息

	(void) open("/dev/tty0",O_RDWR,0);
	(void) dup(0);
	(void) dup(0);
	//打开标准输入 输出 作物 控制台
	//通过渎职标准输入打开标准输出 错误。

	printf("%d buffers = %d bytes buffer space\n\r",NR_BUFFERS,
		NR_BUFFERS*BLOCK_SIZE);
	printf("Free mem: %d bytes\n\r",memory_end-main_memory_start);
	//打印信息

	//创建了1号进程,如果在0号父进程创建进程成功则fork函数返回0。如果在子进程中fork则返回父进程pid。
	if (!(pid=fork())) {
		//在一号进程中进行
		//如果fork返回值为-,则在新进程中执行,如果返回值不为0,返回值为子进程的进程号

		close(0);
		//关闭了0号进程创建的标准输入标准输出

		if (open("/etc/rc",O_RDONLY,0))
			_exit(1);
		//挂接文件系统,执行shell程序

		execve("/bin/sh",argv_rc,envp_rc);
		_exit(2);
	}
	if (pid>0)
		while (pid != wait(&i))
		//在0号进程中 等待创建的子进程退出

			/* nothing */;
	while (1) {
		if ((pid=fork())<0) {
			printf("Fork failed in init\r\n");
			continue;
		}
		if (!pid) {
			close(0);close(1);close(2);
			setsid();
			(void) open("/dev/tty0",O_RDWR,0);
			(void) dup(0);
			(void) dup(0);
			_exit(execve("/bin/sh",argv,envp));
		}
		while (1)
			if (pid == wait(&i))
				break;
		//如果还在父进程中,则进行等待子进程退出,并且重新开始循环

		printf("\n\rchild %d died with code %04x\n\r",pid,i);
		sync();
		//同步一下
	}
	_exit(0);	/* NOTE! _exit, not exit() */
}
操作系统的移植
1、进程操作系统初始化的适配 能够让main在你的板卡上跑起来
2、进程驱动的移植
BOOTLOADER的启动内核代码
创建
把指针移到ih_ep上去,linux的启动入口
执行linux并传入参数
bd->bi_arch_number 称为process id CPU的架构号
bd->bi_boot_params 称为参数地址
3.4.2内核分析
arch/arm/kernal/head.s
里面是用的arm的thumb指令集
在bootloader中启动内核如何进行?
比对当前板子的cpu是都支持linux,如果不支持则不启动直接退出,如果支持则继续进行。
mrc p15, 0, r9, c0, c0 @ get processor id
bl __lookup_processor_type @ r5=procinfo r9=cpuid
movs r10, r5 @ invalid processor (r5=0)?
THUMB( it eq ) @ force fixup-able long branch encoding
beq __error_p @ yes, error ‘p’
设置物理内存的页面
验证参数是否完整
创建虚拟内存的页表
把函数mmap_switched的地址
进程初始化c函数的调用
所以就是在0.1.1内核上增加了一些东西。3.4跟家体现了op的思想
3.4内核再分析
1、内核如何进行多平台的适配,在内核中式如何认识这些板子的?
2、内核启动的整体流程
3、认识一种高效的编程结构
head.S
 THUMB(	adr	r9, BSYM(1f)	)	@ Kernel is always entered in ARM.
 THUMB(	bx	r9		)	@ If this is a Thumb-2 kernel,
 THUMB(	.thumb			)	@ switch to Thumb now.
 THUMB(1:			)
初始化thumb
从uboot启动内核的时候我们用到了thekernel函数,传进来了三个参数。
第二个参数式process id
mrc	p15, 0, r9, c0, c0		@ get processor id
bl	__lookup_processor_type		@ r5=procinfo r9=cpuid
不同的板子有不同的cpu,我想去适配某一个cpu,那么你的cpu的号存在于内核中,对应的结构体中。适配不同的板子就是有不同的结构体,里面就有个process id
我们查找process id用了一个函数 lookup_processor_type
/arch/arm/kernal/vmlinux.lds.S
链接脚本
前面就是各种段,后面是些啥呢
.init.proc.info
.init.arch.info
等等等等
在代码段中定义了很多的段
这些段有啥用
这个文件中的段呢首先会在arch.h中出现宏定义
紧接着会在多种板子的bsp文件中出现的宏定义调用
在这个BSP文件中展开之后分析一下
创建了一个结构体叫做 machine_desc
指定把这个结构体放在了对应的段中,在这个里面赋值了一些参数
机械号 名字
.atag_offset task_list的偏移位置
还有一些其它的不知道啥玩意。
把我们的数据都放在之前申请的一些段里面。
每个板子都定义了一个machine_desc,这就是我们一个电脑能够适配不同板子的一个原因。
总结machine_desc结构体,用于linux做设备板子的识别结构体,这些结构体被限定在了内存的某一片区域。(创建)
并且通过uboot传过来的参数进行该结构体的配置,(通过检索taglist的方式来设置)
并且在我们移植linux的时候也要对结构体的变量进行赋值。
并且在之后的启动或者其他函数中对结构体的变量进行调用。
(最终目的让linux会使用你的板子。)
setup_arch 通过uboot参数找到最匹配的结构体并且给它复制,然后定义了各种全局变量。
创建一个CPU指令集描述结构体
从指定的内存中获取到该描述结构体
将获取到的cpu名字赋值给一个全局变量
使用当前函数进行uboot的tagglist的参数解析
找到一个移植linux时写的最适合的machine_desc结构体
然后各种复制,定义全局变量。
然后就是设置命令行等等。
然后是系统运行的第一个应用程序,根文件系统的挂接。
运行初始化程序,初始化一些程序。
最后呢执行根文件系统。


 966
966

 被折叠的 条评论
为什么被折叠?
被折叠的 条评论
为什么被折叠?
 到【灌水乐园】发言


