


 本文介绍Spring事务管理,先阐述事务的ACID特性和属性,以银行转账为例说明事务处理前的准备。接着讲解Spring编程式事务,还介绍了Spring的xml方式和注解方式进行事务控制,通过实例展示不同方式下事务的运行情况。
爱一个人是一回事,拥有一个人是另外一回事,爱上并拥有一个人,更是另外一回事。 蝴蝶,是什么,是希望,是真正的希望。
上一章简单介绍了Spring的JdbcTemplate的简单使用(七),如果没有看过,请观看上一章。
本文参考并摘录了 一弦一仙 前辈的文章: spring事务管理(详解和实例)
第一部门 事务处理,均是摘录。 谢谢前辈分享。
一. 事务处理
一.一 事务的四种特性 ACID
- 原子性(Atomicity):事务是一个原子操作,由一系列动作组成。事务的原子性确保动作要么全部完成,要么完全不起作用。
- 一致性(Consistency):一旦事务完成(不管成功还是失败),系统必须确保它所建模的业务处于一致的状态,而不会是部分完成部分失败。在现实中的数据不应该被破坏。
- 隔离性(Isolation):可能有许多事务会同时处理相同的数据,因此每个事务都应该与其他事务隔离开来,防止数据损坏。
- 持久性(Durability):一旦事务完成,无论发生什么系统错误,它的结果都不应该受到影响,这样就能从任何系统崩溃中恢复过来。通常情况下,事务的结果被写到持久化存储器中。
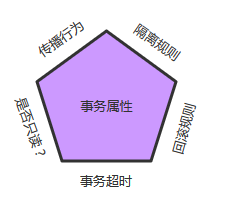
一.二 事务属性
事务属性包括五个方面
对应的接口定义
public interface TransactionDefinition {
    int getPropagationBehavior(); // 返回事务的传播行为
    int getIsolationLevel(); // 返回事务的隔离级别,事务管理器根据它来控制另外一个事务可以看到本事务内的哪些数据
    int getTimeout();  // 返回事务必须在多少秒内完成
    boolean isReadOnly(); // 事务是否只读,事务管理器能够根据这个返回值进行优化,确保事务是只读的
}
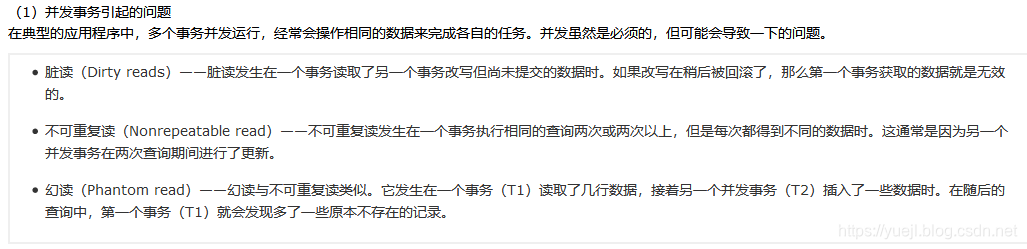
造成现象为:
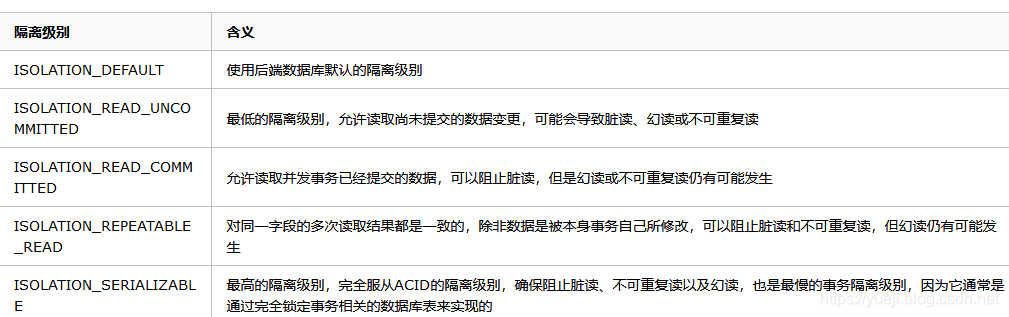
常见的隔离级别为:
只读:
事务的第三个特性是它是否为只读事务。如果事务只对后端的数据库进行该操作,数据库可以利用事务的只读特性来进行一些特定的优化。通过将事务设置为只读,你就可以给数据库一个机会,让它应用它认为合适的优化措施。
事务超时:
为了使应用程序很好地运行,事务不能运行太长的时间。因为事务可能涉及对后端数据库的锁定,所以长时间的事务会不必要的占用数据库资源。事务超时就是事务的一个定时器,在特定时间内事务如果没有执行完毕,那么就会自动回滚,而不是一直等待其结束。
回滚规则:
事务五边形的最后一个方面是一组规则,这些规则定义了哪些异常会导致事务回滚而哪些不会。默认情况下,事务只有遇到运行期异常时才会回滚,而在遇到检查型异常时不会回滚(这一行为与EJB的回滚行为是一致的)
但是你可以声明事务在遇到特定的检查型异常时像遇到运行期异常那样回滚。同样,你还可以声明事务遇到特定的异常不回滚,即使这些异常是运行期异常
二. 银行转账事务处理前的准备。
以常见的银行转账为例。在user 表中添加一个字段,money 的字段。
二.一 User 类添加一个money
User.java
	private Integer id;
	private String name;
	private String sex;
	private Integer age;
	private double money;
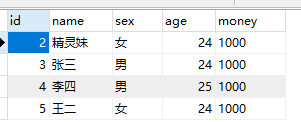
数据库中,均初始化为1000元,每次转账100元。用上一章的数据。
二.三 UserDao类
public interface UserDao {
	public int addMoney(int id,double money);
	public int removeMoney(int id,double money);
}
二.三 UserDaoImpl 类
package com.yjl.dao.impl;
import org.springframework.jdbc.core.support.JdbcDaoSupport;
import org.springframework.stereotype.Repository;
import com.yjl.dao.UserDao;
/**
 @author:yuejl
 @date: 2019年4月20日 上午10:17:09
 @Description 类的相关描述
*/
// 注意,并没有@Repository 的注解。
// 这里继承JdbcDaoSupport  类,用super.getJdbcTemplate() 方法来获取jdbcTemplate 对象。
public class UserDaoImpl extends JdbcDaoSupport implements UserDao {
	@Override
	public int addMoney(int id, double money) {
		String sql="update user set money=money+? where id=?";
		return super.getJdbcTemplate().update(sql,new Object[]{money,id});
	}
	@Override
	public int removeMoney(int id, double money) {
		String sql="update user set money=money-? where id=?";
		return super.getJdbcTemplate().update(sql,new Object[]{money,id});
	}
}
二.四 UserService 类
public interface UserService {
// 有一个转账的方法
	public int transfer(int from,int to,double money);
}
二.五 UserServiceImpl 类 (重点类)
@Service
public class UserServiceImpl implements UserService{
@Resource
	private UserDao userDao;
	@Override
	public int transfer(int from, int to, double money) {
		userDao.removeMoney(from, money);
		return userDao.addMoney(to, money);
	}
	public UserDao getUserDao() {
		return userDao;
	}
	public void setUserDao(UserDao userDao) {
		this.userDao = userDao;
	}
}
二.六 测试类
@RunWith(SpringJUnit4ClassRunner.class)
@ContextConfiguration("classpath:applicationContext.xml")
public class UserTest {
	@Resource
	private UserService userService;
	@Test
	public void transferTest(){
		System.out.println(userService.transfer(2, 3,100d));
	}
}
二.七 applicationContext.xml 配置文件
<!-- 开启注解扫描 -->
	<context:component-scan base-package="com.yjl"></context:component-scan>
	<!-- 引入配置文件 -->
    <context:property-placeholder location="jdbc.properties"/>
	<bean id="dataSource" class="com.mchange.v2.c3p0.ComboPooledDataSource">
        <property name="driverClass" value="${jdbc.driverClassName}"/>
        <property name="jdbcUrl" value="${jdbc.url}"/>
        <property name="user" value="${jdbc.username}"/>
        <property name="password" value="${jdbc.password}"/>
    </bean>
     <bean id="jdbcTemplate" class="org.springframework.jdbc.core.JdbcTemplate">
    	<property name="dataSource" ref="dataSource"></property>
    </bean>
     <bean id="userDao" class="com.yjl.dao.impl.UserDaoImpl">
    	<property name="jdbcTemplate" ref="jdbcTemplate"></property>
    </bean>
二.八 正常测试运行
二.九 异常运行
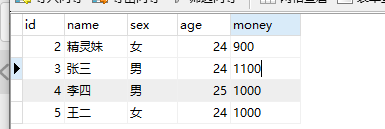
在service 中执行transfer() 方法时,出现异常,
public int transfer(int from, int to, double money) {
		userDao.removeMoney(from, money);
		int result=10/0; //发生了异常。
		return userDao.addMoney(to, money);
	}
这个时候,运行:

数据库中2的金额减少了,但是3的金额并没有增加,说明没有事务回滚,是错误的。
需要添加,事务的控制。

三. Spring 编程式事务
三.一 ApplicationContext.xml 添加事务配置
<!-- 配置事务管理器 -->
    <bean id="transactionManager" class="org.springframework.jdbc.datasource.DataSourceTransactionManager">
    	<property name="dataSource" ref="dataSource"></property>
    </bean>
    <!-- 配置事务管理模板-->
	<bean id="transactionTemplate"
		class="org.springframework.transaction.support.TransactionTemplate">
		<property name="transactionManager" ref="transactionManager"/>
	</bean>
	<bean id="userService"
		class="com.yjl.service.impl.UserServiceImpl">
		<property name="userDao" ref="userDao"/>
		<!-- 注入事务管理模板-->
		<property name="transactionTemplate" ref="transactionTemplate"/>
	</bean>
三.二 UserServcieImpl 类
// 注意,此时并没有@Service 的注解。 是xml bean形式的注入。
public class UserServiceImpl implements UserService{
// 利用setter  方法注入userDao 和transactionTemplate
	private UserDao userDao;
	private TransactionTemplate transactionTemplate;
	@Override
	public int transfer(int from, int to, double money) {
		transactionTemplate.execute(new TransactionCallbackWithoutResult() {
			@Override
			protected void doInTransactionWithoutResult(TransactionStatus arg0) {
				userDao.removeMoney(from, money);
				 int result=10/0; //发生了异常。
				 userDao.addMoney(to, money);
			}
		});
		return 1;
	}
	public UserDao getUserDao() {
		return userDao;
	}
	public void setUserDao(UserDao userDao) {
		this.userDao = userDao;
	}
	public TransactionTemplate getTransactionTemplate() {
		return transactionTemplate;
	}
	public void setTransactionTemplate(TransactionTemplate transactionTemplate) {
		this.transactionTemplate = transactionTemplate;
	}
}
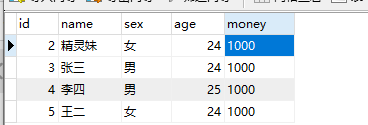
点击运行,出现了异常,但是数据库并没有发生改变。
四. Spring 的xml 方式事务控制
核心是利用AOP 的方式进行相应的注入
四.一 xml头部添加tx约束
xmlns:tx="http://www.springframework.org/schema/tx"
 	http://www.springframework.org/schema/tx
	http://www.springframework.org/schema/tx/spring-tx.xsd
四.二 配置事务管理器
 <bean id="transactionManager" class="org.springframework.jdbc.datasource.DataSourceTransactionManager">
    	<property name="dataSource" ref="dataSource"></property>
    </bean>
四.三 配置事务
 <tx:advice id="txAdvice" transaction-manager="transactionManager">
    	<tx:attributes>
    		<!-- 设置方法和隔离级别  name 指定方法。 可以 name="add*" 表示以add 开头。
    		name="*" 表示所有的方法。-->
    		<tx:method name="transfer" propagation="REQUIRED"/>
    	</tx:attributes>
    </tx:advice>
常用的配置为:
<tx:attributes>
            <tx:method name="insert*" propagation="REQUIRED" />
            <tx:method name="update*" propagation="REQUIRED" />
            <tx:method name="edit*" propagation="REQUIRED" />
            <tx:method name="save*" propagation="REQUIRED" />
            <tx:method name="add*" propagation="REQUIRED" />
            <tx:method name="new*" propagation="REQUIRED" />
            <tx:method name="set*" propagation="REQUIRED" />
            <tx:method name="remove*" propagation="REQUIRED" />
            <tx:method name="delete*" propagation="REQUIRED" />
            <tx:method name="change*" propagation="REQUIRED" />
            <tx:method name="get*" propagation="REQUIRED" read-only="true" />
            <tx:method name="find*" propagation="REQUIRED" read-only="true" />
            <tx:method name="load*" propagation="REQUIRED" read-only="true" />
            <tx:method name="*" propagation="REQUIRED" read-only="true" />
        </tx:attributes>
四.四 设置切面
 <aop:config>
    	<aop:pointcut expression="execution( * com.yjl.service.impl.*.*(..))" id="pointCut1"/>
    	<aop:advisor advice-ref="txAdvice" pointcut-ref="pointCut1"/>
    </aop:config>
这里,userService 可以用注解的方式,不用手动bean 了。
四.五 userServiceImpl 类
@Service
public class UserServiceImpl implements UserService{
	@Resource
	private UserDao userDao;
	public int transfer(int from, int to, double money) {
		userDao.removeMoney(from, money);
		int result=10/0; //发生了异常。
		return userDao.addMoney(to, money);
	}
	public UserDao getUserDao() {
		return userDao;
	}
	public void setUserDao(UserDao userDao) {
		this.userDao = userDao;
	}
}
五. Spring的注解事务控制
五.一 xml头部添加tx约束
xmlns:tx="http://www.springframework.org/schema/tx"
 	http://www.springframework.org/schema/tx
	http://www.springframework.org/schema/tx/spring-tx.xsd
五.二 配置事务管理器
 <bean id="transactionManager" class="org.springframework.jdbc.datasource.DataSourceTransactionManager">
    	<property name="dataSource" ref="dataSource"></property>
    </bean>
五.三 开启注解事务管理
<tx:annotation-driven transaction-manager="transactionManager"/>
五.四 在服务类上添加@Transactional 注解
相比于四.五代码而言:
@Service
@Transactional    //只添加这一个注解,可在类上,可在方法上。 类上,表示所有的方法,方法上,表示那个特定的方法。
public class UserServiceImpl implements UserService{
	@Resource
	private UserDao userDao;
	public int transfer(int from, int to, double money) {
		userDao.removeMoney(from, money);
		int result=10/0; //发生了异常。
		return userDao.addMoney(to, money);
	}
	public UserDao getUserDao() {
		return userDao;
	}
	public void setUserDao(UserDao userDao) {
		this.userDao = userDao;
	}
}
谢谢!!!


 2703
2703

 被折叠的 条评论
为什么被折叠?
被折叠的 条评论
为什么被折叠?
 到【灌水乐园】发言


