Apache Geode 1.3 初步配置

本文详细介绍了ApacheGeode的主机配置要求,包括JavaSEDevelopmentKit8的版本需求,系统时钟的正确设置,主机名和主机文件的配置,以及禁用TCPSYNcookie的重要性。同时,提供了Geode的安装步骤,包括下载、解压、环境变量设置和验证安装的方法。

主机配置要求

主机必须满足Apache Geode的一系列要求。

每台运行Apache Geode的主机都必须满足以下要求:

  • 带有更新121或更新版本8更新的Java SE Development Kit 8。OpenJDK支持相同的版本。
  • 系统时钟设置为正确的时间和时间同步服务,如网络时间协议(NTP)。正确的时间戳允许以下活动:
    • 对故障排除有用的日志。同步时间戳确保可以合并来自不同主机的日志消息,以再现分布式运行的准确时间历史记录。
    • 汇总产品级别和应用程序级别的时间统计信息。
    • 使用脚本和其他读取系统统计信息和日志文件的工具准确监控Geode系统。
  • 已为计算机正确配置主机名和主机文件。主机名和主机文件配置可能会影响gfsh和Pulse功能。
  • 禁用TCP SYN cookie。大多数默认Linux安装使用SYN cookie来保护系统免受泛滥TCP SYN数据包的恶意攻击,但此功能与稳定和繁忙的Geode集群不兼容。安全实现应该通过将Geode服务器集群置于高级防火墙保护之下来寻求防止攻击。

     永久禁用SYN cookie::

  1. Edit the /etc/sysctl.conf file to include the following line:

    net.ipv4.tcp_syncookies = 0
    

    将此值设置为零将禁用SYN Cookie。

  2. Reload sysctl.conf:

    sysctl -p
    

以二进制压缩包的方式进行安装

  1. 从 http://geode.apache.org找到的版本页面下载.zip或.tar文件.
  2. 解压缩.zip文件或展开.tar文件,其中path_to_product是绝对路径,文件名因版本号而异。对于.zip格式:

    $ unzip apache-geode-1.1.0.zip -d path_to_product
    

    对于 .tar 格式:

    $ tar -xvf apache-geode-1.1.0.tar -C path_to_product
    
  3. 设置 JAVA_HOME 环境变量. 对于Linux/Unix 平台:

    JAVA_HOME=/usr/java/jdk1.8.0_121
    export JAVA_HOME
    

    对于 Windows 平台:

    set JAVA_HOME="C:\Program Files\Java\jdk1.8.0_121"
    
  4. 把 Geode 应用路径 增加到环境变量中. 对于 Linux/Unix 平台:

    PATH=$PATH:$JAVA_HOME/bin:path_to_product/bin
    export PATH
    

    对于 Windows 平台:

    set PATH=%PATH%;%JAVA_HOME%\bin;path_to_product\bin 
    
  5. 要验证安装,请在命令行键入gfsh version,并注意输出列出已安装的Geode版本。
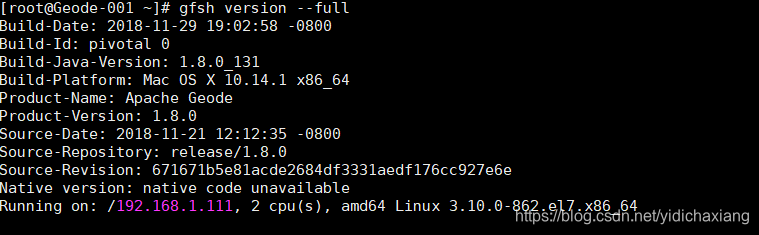
    $ gfsh version
    v1.1.0
    

    获取更详细的版本信息,例如构建日期,构建号和正在使用的JDK版本,请调用:

    $ gfsh version --full

后记:

 测试主机i系统为(在虚拟机中CentOS7最小化安装):

以系统光盘作为镜像源安装OpenJDK:

其中openjdk-devel是需要安装的,只装jre情况下,会报 java_path/bin/java 文件无法找到。

在/etc/profile文件最后追加以下内容:

 JAVA_HOME=/usr/lib/jvm/java-1.8.0-openjdk-1.8.0.161-2.b14.el7.x86_64
JRE_HOME=$JAVA_HOME/jre
CLASS_PATH=.:$JAVA_HOME/lib/dt.jar:$JAVA_HOME/lib/tools.jar:$JRE_HOME/lib
PATH=$PATH:$JAVA_HOME/bin:$JRE_HOME/bin:/var/local/apache-geode-1.8.0/bin
export JAVA_HOME JRE_HOME CLASS_PATH PATH

验证安装:


Spring Data for Apache Geode 2.2.5 是 Spring Data 项目的一部分,它提供了对 Apache Geode 的简化访问。通过使用 Spring Data for Apache Geode,开发者可以更容易地与 Geode 进行交互,包括数据的CRUD操作、查询等。下面是如何配置和使用 Spring Data for Apache Geode 2.2.5 的基本步骤: ### 1. 添加依赖 首先需要在项目的 `pom.xml` 文件中添加 Spring Data for Apache Geode 的依赖。假设你正在使用 Maven 作为构建工具,那么你需要添加以下依赖: ```xml <dependency> <groupId>org.springframework.data</groupId> <artifactId>spring-data-geode</artifactId> <version>2.2.5</version> </dependency> ``` ### 2. 配置 Geode 客户端 接下来,需要配置 Geode 客户端。这可以通过 Java 配置或者 XML 配置来完成。这里以 Java 配置为例: ```java import org.apache.geode.cache.client.ClientCache; import org.apache.geode.cache.client.ClientCacheFactory; import org.springframework.context.annotation.Bean; import org.springframework.context.annotation.Configuration; @Configuration public class GeodeConfig { @Bean public ClientCache clientCache() { ClientCacheFactory factory = new ClientCacheFactory(); factory.addPoolLocator("localhost", 10334); // 指定 Geode 集群的位置 return factory.create(); } } ``` ### 3. 创建实体和仓库接口 定义一个实体类和一个继承自 `GemfireRepository` 的仓库接口。例如: ```java import org.springframework.data.annotation.Id; import org.springframework.data.gemfire.mapping.annotation.Region; @Region("people") // 指定实体存储在名为 "people" 的区域中 public class Person { @Id private Long id; private String name; // getters and setters... } import org.springframework.data.gemfire.repository.GemfireRepository; public interface PersonRepository extends GemfireRepository<Person, Long> {} ``` ### 4. 使用仓库接口进行数据操作 现在你可以注入 `PersonRepository` 并使用它来进行数据操作了: ```java import org.springframework.beans.factory.annotation.Autowired; import org.springframework.stereotype.Service; @Service public class PersonService { @Autowired private PersonRepository personRepository; public void addPerson(Person person) { personRepository.save(person); } } ``` 以上就是使用 Spring Data for Apache Geode 2.2.5 进行基本配置和使用的一个简单示例。通过这种方式,你可以轻松地将应用程序与 Geode 集成,利用其分布式缓存功能来提高应用程序的性能和可伸缩性。
评论
添加红包

请填写红包祝福语或标题

红包个数最小为10个

红包金额最低5元

当前余额3.43前往充值 >
需支付:10.00
成就一亿技术人!
领取后你会自动成为博主和红包主的粉丝 规则
hope_wisdom
发出的红包
实付
使用余额支付
点击重新获取
扫码支付
钱包余额 0

抵扣说明:

1.余额是钱包充值的虚拟货币,按照1:1的比例进行支付金额的抵扣。
2.余额无法直接购买下载,可以购买VIP、付费专栏及课程。

余额充值