


 该博客介绍了Spring Boot、MyBatis与Redis的整合项目。首先引入相关jar并配置全局环境,包括配置application.properties和在启动类中配置扫描MyBatis映射文件、开启缓存。接着自定义Redis配置以Json格式保存对象数据,最后编写整合Demo,涵盖实体、映射接口、Service、Controller编写及测试。
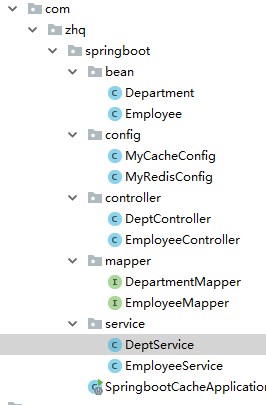
项目结构:
一、引入相关jar
<dependency>
    <groupId>org.springframework.boot</groupId>
    <artifactId>spring-boot-starter-cache</artifactId>
</dependency>

<dependency>
    <groupId>org.springframework.boot</groupId>
    <artifactId>spring-boot-starter-data-redis</artifactId>
</dependency>

<dependency>
    <groupId>org.mybatis.spring.boot</groupId>
    <artifactId>mybatis-spring-boot-starter</artifactId>
    <version>1.3.3</version>
</dependency>
二、配置全局环境
1)、配置application.properties:
#数据源配置
spring.datasource.url=jdbc:mysql://localhost:3306/spring_cache??useUnicode=true&characterEncoding=UTF-8
spring.datasource.username=root
spring.datasource.password=root
spring.datasource.driver-class-name=com.mysql.jdbc.Driver
#开启驼峰命名规则
mybatis.configuration.map-underscore-to-camel-case=true
#打印mapper日志
logging.level.com.zhq.springboot.mapper=debug
debug=true
#指定redis
spring.redis.host=192.168.43.118
2)、启动类SpringbootCacheApplication中配置扫描Mybatis映射文件以及开启缓存:
@MapperScan("com.zhq.springboot.mapper")//扫描mybatis映射文件
@SpringBootApplication
@EnableCaching//开启缓存
public class SpringbootCacheApplication {

    public static void main(String[] args) {
        SpringApplication.run(SpringbootCacheApplication.class, args);
    }

}
三、自定义Redis配置以Json格式保存对象数据
@Configuration
public class MyRedisConfig {

    @Bean
    public RedisTemplate<Object, Employee> empRedisTemplate(
            RedisConnectionFactory redisConnectionFactory)
            throws UnknownHostException {
        RedisTemplate<Object, Employee> template = new RedisTemplate<Object, Employee>();
        template.setConnectionFactory(redisConnectionFactory);
        Jackson2JsonRedisSerializer<Employee> ser = new Jackson2JsonRedisSerializer<Employee>(Employee.class);
        template.setDefaultSerializer(ser);
        return template;
    }
    @Bean
    public RedisTemplate<Object, Department> deptRedisTemplate(
            RedisConnectionFactory redisConnectionFactory)
            throws UnknownHostException {
        RedisTemplate<Object, Department> template = new RedisTemplate<Object, Department>();
        template.setConnectionFactory(redisConnectionFactory);
        Jackson2JsonRedisSerializer<Department> ser = new Jackson2JsonRedisSerializer<Department>(Department.class);
        template.setDefaultSerializer(ser);
        return template;
    }


    //CacheManagerCustomizers可以来定制缓存的一些规则
    @Primary  //将某个缓存管理器作为默认的
    @Bean
    public RedisCacheManager employeeCacheManager(RedisTemplate<Object, Employee> empRedisTemplate){
        RedisCacheManager cacheManager = new RedisCacheManager(empRedisTemplate);
        //key多了一个前缀

        //使用前缀,默认会将CacheName作为key的前缀
        cacheManager.setUsePrefix(true);

        return cacheManager;
    }

    @Bean
    public RedisCacheManager deptCacheManager(RedisTemplate<Object, Department> deptRedisTemplate){
        RedisCacheManager cacheManager = new RedisCacheManager(deptRedisTemplate);
        //key多了一个前缀

        //使用前缀,默认会将CacheName作为key的前缀
        cacheManager.setUsePrefix(true);

        return cacheManager;
四、编写整合Demo
1)、编写实体
public class Employee implements Serializable {

	private Integer id;
	private String lastName;
	private String email;
	private Integer gender; //性别 1男  0女
	private Integer dId;
...
public class Department {

	private Integer id;
	private String departmentName;
	...
2)、编写映射接口
public interface EmployeeMapper {
    @Select("select * from employee where id=#{id}")
    public Employee getEmpById(Integer id);

    @Update("update employee set lastName=#{lastName},email=#{email},gender=#{gender},d_id=#{dId} where id=#{id}")
    public void updateEmp(Employee employee);

    @Delete("delete employee where id=#{id}")
    public void deleteEmpById(Integer id);

    @Insert("insert into employee(lastName,email,gender,d_id) values(#{lastName},#{email},#{gender},#{dId})")
    public void insertEmp(Employee employee);

    @Select("select * from employee where lastName=#{lastName}")
    public Employee getEmpByLastName(String lastName);
public interface DepartmentMapper {

    @Select("SELECT * FROM department WHERE id = #{id}")
    Department getDeptById(Integer id);
}
3)、编写Service
@Service
@CacheConfig(cacheManager = "employeeCacheManager")
public class EmployeeService {
@Autowired
EmployeeMapper employeeMapper;
/**
* 将方法的运行结果进行缓存:以后再要相同的数据,直接从缓存中获取,不用调用方法
* CacheManager管理多个Cache组件的,对缓存的真正CRUD操作在Cache组件中,每一个缓存组件有自己唯一一个名字;
* 几个属性:
* cacheNames/value:指定缓存组件的名字;
* key缓存数据时使用的key,可以用它来指定,默认是使用方法参数的值 eg:1-方法的返回值
* 可编写SpEL表达式,eg:
* #id表示参数id的值 相当于#a0 #p0 #root.args[0]
* keyGenerator:key的生成器;可以自己指定key的生成器的组件id
* keyGenerator/key:二选一,用其中一个就行
* cacheManager:指定缓存管理器,或者指定缓存解析器cacheResolver
* condition:指定符合条件的情况下才缓存
* unless:否定缓存,当unless指定的条件为true,方法的返回值就不会被缓存;可以获取到结果集进行判断
* eg:unless="#result==null"
* sync:是否使用异步模式
*
* @param id
* @return
*/
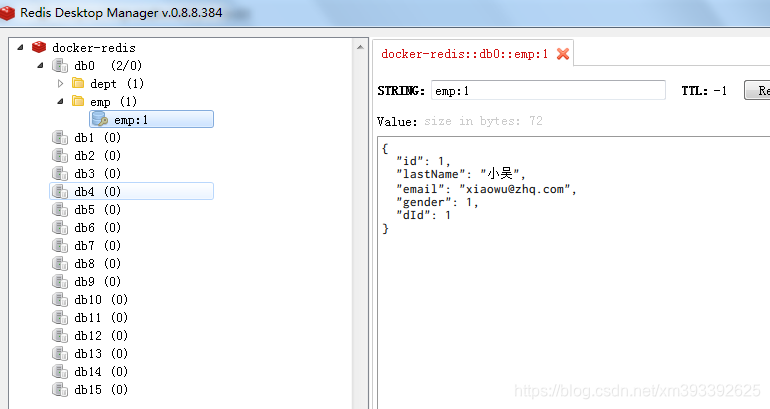
@Cacheable(cacheNames = "emp",key = "#id",condition = "#id>0",unless = "#result==null")
public Employee getEmp(Integer id){
System.out.println("查询"+id+"号员工");
Employee emp = employeeMapper.getEmpById(id);
return emp;
}
/**
* @CachePut:既调用方法,又更新缓存;
* 修改了数据库的某个数据,同时又更新缓存
*/
@CachePut(cacheNames= "emp",key = "#e.id")
public Employee updateEmp(Employee e){
System.out.println("更新员工"+e);
employeeMapper.updateEmp(e);
return e;
}
/**
* 清除缓存
* @param id
*/
@CacheEvict(value = "emp",key = "#id")
public void deleteEmp(Integer id){
System.out.println("删除员工:"+id);
//employeeMapper.deleteEmpById(id);
}
@Caching(
cacheable = {
@Cacheable(value = "emp",key = "#lastName")
},
put = {
@CachePut(value = "emp",key = "#result.id"),
@CachePut(value = "emp",key = "#result.email")
}
)
public Employee getEmpByLastName(String lastName){
return employeeMapper.getEmpByLastName(lastName);
}
public Employee insertEmp(Employee employee){
employeeMapper.insertEmp(employee);
return employee;
}
}
@Service
public class DeptService {

    @Autowired
    DepartmentMapper departmentMapper;

    @Qualifier("deptCacheManager")
    @Autowired
    RedisCacheManager deptCacheManager;


    /**
     *  缓存的数据能存入redis;
     *  第二次从缓存中查询就不能反序列化回来;
     *  存的是dept的json数据;CacheManager默认使用RedisTemplate<Object, Employee>操作Redis
     *
     *
     * @param id
     * @return
     */
//    @Cacheable(cacheNames = "dept",cacheManager = "deptCacheManager")
//    public Department getDeptById(Integer id){
//        System.out.println("查询部门"+id);
//        Department department = departmentMapper.getDeptById(id);
//        return department;
//    }

    // 使用缓存管理器得到缓存,进行api调用
    public Department getDeptById(Integer id){
        System.out.println("查询部门"+id);
        Department department = departmentMapper.getDeptById(id);

        //获取某个缓存
        Cache dept = deptCacheManager.getCache("dept");
        dept.put("dept:1",department);

        return department;
    }


}
4)、编写Controller
@RestController
public class EmployeeController {
@Autowired
EmployeeService employeeService;
/**
* 根据id查询员工
* @param id
* @return
*/
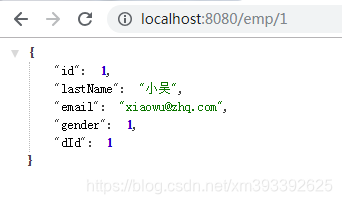
@GetMapping("/emp/{id}")
public Employee getEmp(@PathVariable("id") Integer id){
Employee emp = employeeService.getEmp(id);
return emp;
}
/**
* 修改员工
* @param employee
* @return
*/
@GetMapping("/emp")
public Employee updateEmp(Employee employee){
return employeeService.updateEmp(employee);
}
/**
* 添加员工
* @param employee
* @return
*/
@GetMapping("/emps")
public Employee insetEmp(Employee employee){
Employee employee1 = employeeService.insertEmp(employee);
return employee1;
}
/**
* 删除员工
* @param id
* @return
*/
@GetMapping("/delemp/{id}")
public String deleteEmp(@PathVariable("id") Integer id){
employeeService.deleteEmp(id);
return "success";
}
/**
* 按名字查询
* @param lastName
* @return
*/
@GetMapping("/emp/lastname/{lastName}")
public Employee getEmpByLastName(@PathVariable("lastName")String lastName){
return employeeService.getEmpByLastName(lastName);
}
}
@RestController
public class DeptController {

    @Autowired
    DeptService deptService;

    @GetMapping("/dept/{id}")
    public Department getDept(@PathVariable("id") Integer id){
        return deptService.getDeptById(id);
    }
}
5)、测试Demo


 8283
8283

 被折叠的 条评论
为什么被折叠?
被折叠的 条评论
为什么被折叠?
 到【灌水乐园】发言


