


 本文介绍如何使用SpringBoot Admin结合Eureka实现对SpringBoot应用的监控,包括依赖引入、配置步骤及邮件通知设置。
springboot admin,用于监控基于Spring Boot 的应用,并提供UI界面,是一个很好使,很方便的利器;项目要加入Admin监控目前主要有两中方式,一种是通过Admin client,另外一种就是通过eureka,将应用注册到eureka,他通过内置的zuul机制,可以读取到服务中心所有注册的应用,实现监控,本文主要介绍第二种方式。
首先要有eureka的服务注册中心,这个在本系列文章中已经介绍过,这里我们就不在多说,直接介绍spring boot admin项目的开发。
首先引入pom依赖:
[Java] 纯文本查看 复制代码
|
01
02
03
04
05
06
07
08
09
10
11
12
13
14
15
16
17
18
19
20
21
22
23
24
25
26
27
28
29
30
31
32
33
34
35
36
37
38
39
40
41
42
43
44
45
46
47
48
49
50
51
52
53
54
55
56
57
58
59
60
61
62
63
64
65
66
67
68
69
70
71
72
73
74
75
76
77
78
79
|
<parent>
<groupId>org.springframework.boot</groupId>
<artifactId>spring-boot-starter-parent</artifactId>
<version>1.5.9.RELEASE</version>
<relativePath/> <!-- lookup parent from repository -->
</parent>
<properties>
<project.build.sourceEncoding>UTF-8</project.build.sourceEncoding>
<project.reporting.outputEncoding>UTF-8</project.reporting.outputEncoding>
<java.version>1.8</java.version>
<mybatis.spring.boot.version>1.3.0</mybatis.spring.boot.version>
</properties>
<dependencies>
<dependency>
<groupId>de.codecentric</groupId>
<artifactId>spring-boot-admin-server</artifactId>
<version>1.4.6</version>
</dependency>
<dependency>
<groupId>de.codecentric</groupId>
<artifactId>spring-boot-admin-server-ui</artifactId>
<version>1.4.6</version>
</dependency>
<dependency>
<groupId>org.springframework.boot</groupId>
<artifactId>spring-boot-starter-actuator</artifactId>
</dependency>
<dependency>
<groupId>org.springframework.cloud</groupId>
<artifactId>spring-cloud-starter-eureka</artifactId>
</dependency>
<dependency>
<groupId>org.springframework.boot</groupId>
<artifactId>spring-boot-starter-test</artifactId>
<scope>test</scope>
</dependency>
<dependency>
<groupId>org.springframework.boot</groupId>
<artifactId>spring-boot-starter-mail</artifactId>
</dependency>
<dependency>
<groupId>org.springframework.boot</groupId>
<artifactId>spring-boot-starter-security</artifactId>
</dependency>
</dependencies>
<dependencyManagement>
<dependencies>
<dependency>
<groupId>org.springframework.cloud</groupId>
<artifactId>spring-cloud-dependencies</artifactId>
<version>Camden.SR5</version>
<type>pom</type>
<scope>import</scope>
</dependency>
</dependencies>
</dependencyManagement>
<build>
<plugins>
<plugin>
<groupId>org.springframework.boot</groupId>
<artifactId>spring-boot-maven-plugin</artifactId>
<executions>
<execution>
<goals>
<goal>build-info</goal>
</goals>
</execution>
</executions>
</plugin>
</plugins>
</build>
|
这里一定要注意springcloud的版本使用,要和springboot版本兼容,测试修改过多个版本,最终确定Camden.SR5和上面的springboot版本是兼容的,这样配置在本地使用idea直接启动程序可以正常使用,但是在使用maven编译成jar包是会报错,记住吧test包中的测试类删掉就可以编译成功了,这是一个坑,搞了一天才弄成功。
当前日志级别管理仅限 Logback,通过 JMX 实现,所以需要依赖 jolokia 。同时,还需要配置 Logback 的 JMXConfigurator:
logback.xml
[Java] 纯文本查看 复制代码
|
1
2
3
4
5
|
<?xml version="1.0" encoding="UTF-8"?>
<configuration>
<include resource="org/springframework/boot/logging/logback/base.xml"/>
<jmxConfigurator/>
</configuration>
|
启动类如下:
[Java] 纯文本查看 复制代码
|
01
02
03
04
05
06
07
08
09
10
|
@Configuration
@EnableAutoConfiguration
@EnableDiscoveryClient
@EnableAdminServer
public class AdminserverApplication {
public static void main(String[] args) {
SpringApplication.run(AdminserverApplication.class, args);
}
}
|
配置文件:
[Java] 纯文本查看 复制代码
|
01
02
03
04
05
06
07
08
09
10
11
12
13
14
15
16
17
18
19
20
21
22
23
24
25
26
27
28
29
30
31
32
33
34
|
# 解决windows下运行时无法识别主机名的问题
spring.boot.admin.client.prefer-ip=true
server.port=7086
spring.application.name=zk_admin
eureka.instance.preferIpAddress=true
eureka.client.service-url.defaultZone=http://172.16.1.28:7082/eureka/,http://172.16.1.29:7082/eureka/
#定义各种额外的详情给服务端显示
#从pom.xml中获取
info.app.name="@project.name@"
info.app.description="@project.description@"
info.app.version="@project.version@"
info.spring-boot-version="@project.parent.version@"
info.version=@project.version@
#宕机邮件提示
spring.mail.host=smtp.126.com
spring.mail.username=****
spring.mail.password=*****
spring.boot.admin.notify.mail.from=*****
spring.boot.admin.notify.mail.to=******
management.security.enabled=false
management.security.roles=SUPERUSER
security.user.name=xjgz2018
security.user.password=xjgz2018.
security.basic.enabled=false
#开启shutdown的安全验证
endpoints.health.sensitive= true
endpoints.cors.allowed-methods=HEAD,GET,POST
#启用shutdown
endpoints.shutdown.enabled=true
#禁用密码验证
endpoints.shutdown.sensitive=false
|
配置文件中还增加了服务状态变化邮件提示,以方便服务的管理。
服务启动后访问 http://127.0.0.1:7086
页面如下: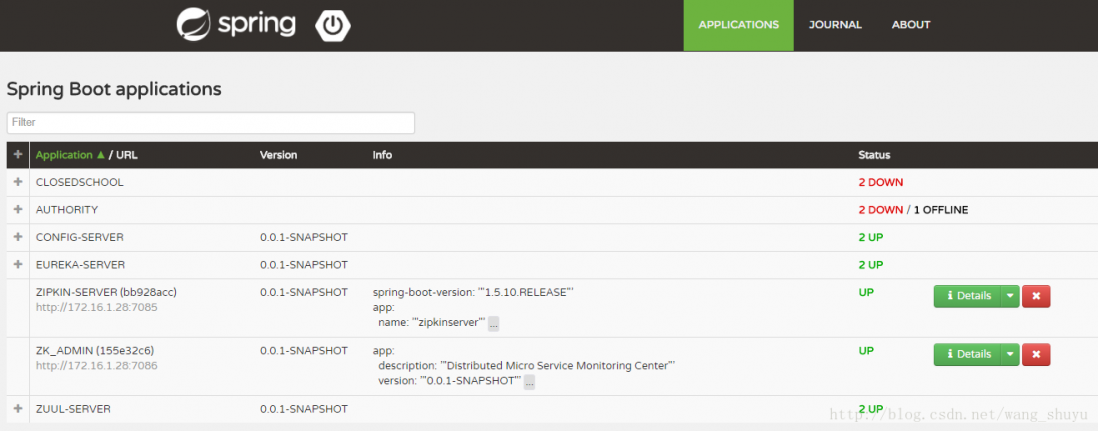
注:本文转载自优快云,版权归优快云所有。 原文链接:https://blog.youkuaiyun.com/wang_shuyu/article/details/79497218


 168万+
168万+

 被折叠的 条评论
为什么被折叠?
被折叠的 条评论
为什么被折叠?
 到【灌水乐园】发言


