


 本文详细记录了在CentOS7环境下从零开始安装MySQL5.7的全过程,包括下载、安装、配置、运行及登录修改密码等关键步骤,并解决了安装过程中遇到的问题。
虽然在windows上面安装过很多次Mysql5.7版本,但是作为Linux小白,在安装mysql方面不知道怎么入手,前两天安装了java环境,Tomcat,还有redis6.0.9,以为所有的软件在linux上面安装都是一个套路,其实不是,也查询了很多文章,测试了很多命令,还是没有安装成功,即使安装成功了,也运行起来了,也不知道是怎么回事,哪句代码起了关键作用;我的建议是,第一步,先按照网上的教程,安装成功一次,然后再查找官方文档,再安装一遍,理解就深了;感谢一篇博客:https://blog.youkuaiyun.com/qq_40200087/article/details/89479137,里面有很详细的步骤,但是很多命令都不怎么明白,然后参考官网文旦,再装一遍:https://dev.mysql.com/doc/refman/5.7/en/binary-installation.html
在网上学习Linux的态度就是:一篇文章说对,就怀疑,两篇文章说对,再查查,三篇文章说对,那就是对了......
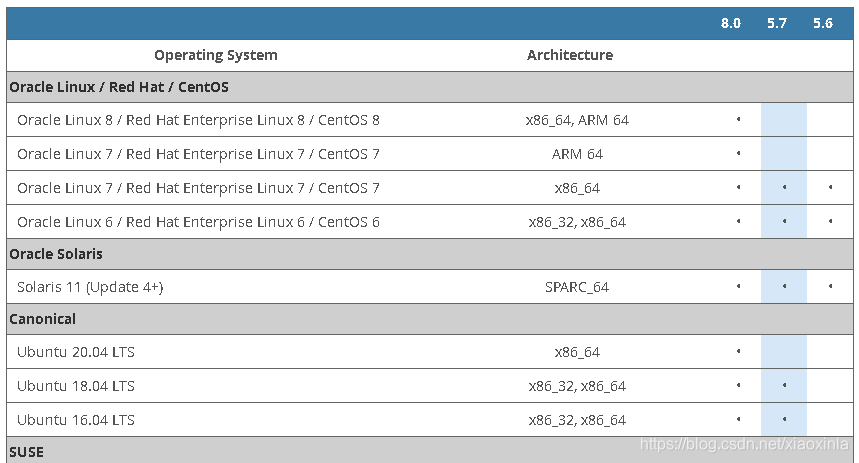
从官网上下载mysql安装包,有很多linux的分支版本,如果不知道怎么看,可以查阅官方文档:https://www.mysql.com/support/supportedplatforms/database.html
然后下载对应的版本
学习的套路是:下载,安装,配置,运行,停止,卸载;
开始正题:
在安装完centos7之后,系统默认自带mariadb数据库【这个数据库跟mysql是同一个作者】,需要先删除;
相关命令:rpm -qa | grep mariadb
拷贝找到的列表,一个个卸载:rpm -e --nodeps mariadb-libs-5.5.35-3.el7.x86_64
1:下载:官网地址是:https://dev.mysql.com/downloads/mysql/
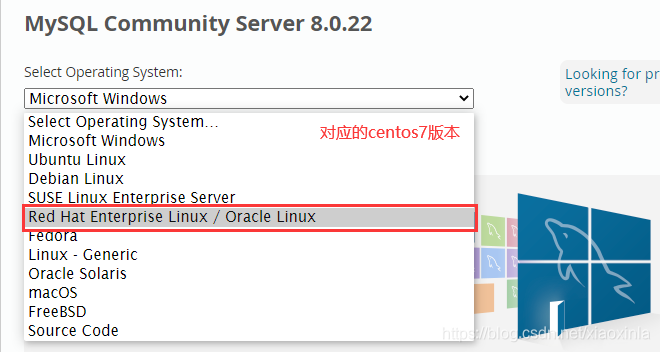
链接:https://cdn.mysql.com//Downloads/MySQL-5.7/mysql-5.7.23-linux-glibc2.12-x86_64.tar.gz
可以用迅雷下载,速度会快点,然后用winscp软件导入到/usr/local/mysql57路径下,使用命令解压:tar -zxvf mysql-5.7.23-linux-glibc2.12-x86_64.tar.gz
改名为改名为mysql-5.7.23-linux

2:添加系统mysql组和mysql用户
添加系统mysql组 groupadd mysql
添加mysql用户 useradd -r -g mysql mysql
3:安装数据库
切到mysql目录 cd /usr/local/mysql57/mysql-5.7.23-linux
修改当前目录拥有者为mysql用户 chown -R mysql:mysql ./
安装数据库,命令: bin/mysqld --initialize --user=mysql --basedir=/usr/local/mysql57/mysql-5.7.23-linux --datadir=/usr/local/mysql57/data
【将data文件夹放到mysql57目录下】
如果报一个错误:/mysqld: error while loading shared libraries: libaio.so.1: cannot open shared object file: No such file or directory
需要运行一下命令:yum install -y libaio;别问为什么,mysql官网上说的;
[root@localhost mysql-5.7.23-linux]# bin/mysqld --initialize --user=mysql --basedir=/usr/local/mysql57/mysql-5.7.23-linux --datadir=/usr/local/mysql57/data
2020-12-05T03:46:25.891241Z 0 [Warning] TIMESTAMP with implicit DEFAULT value is deprecated. Please use --explicit_defaults_for_timestamp server option (see documentation for more details).
2020-12-05T03:46:26.358848Z 0 [Warning] InnoDB: New log files created, LSN=45790
2020-12-05T03:46:26.416675Z 0 [Warning] InnoDB: Creating foreign key constraint system tables.
2020-12-05T03:46:26.473688Z 0 [Warning] No existing UUID has been found, so we assume that this is the first time that this server has been started. Generating a new UUID: 737c5bcb-36ac-11eb-8dfb-000c2975c027.
2020-12-05T03:46:26.474508Z 0 [Warning] Gtid table is not ready to be used. Table 'mysql.gtid_executed' cannot be opened.
2020-12-05T03:46:26.475232Z 1 [Note] A temporary password is generated for root@localhost: LPhyw,)wZ2pl     ####备注:localhost:后面是临时密码
[root@localhost mysql-5.7.23-linux]#
执行以下命令创建RSA private key (图在最后)
bin/mysql_ssl_rsa_setup --datadir=/usr/local/mysql57/data
修改当前目录拥有者为mysql用户 chown -R mysql:mysql ./
修改当前data目录拥有者为mysql用户 chown -R mysql:mysql data
4:配置my.cnf,按照官网的说法,这个文件默认在在/root/ect/下面,或者/root/etc/mysql/下面,也可以定义系统变量,放在系统变量的路径下面,官网解释如下:
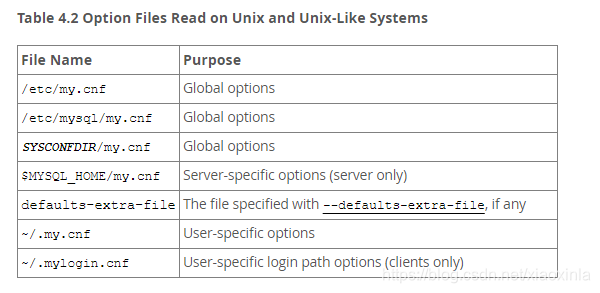
这个文件的内容可以先写的简单一点,等完全掌握安装调试方法之后,再一点一点补充;我的就直接放在了/etc/的下面:如下:
添加开机启动:cp /usr/local/mysql57/mysql-5.7.23-linux/support-files/mysql.server /etc/init.d/mysqld ##官网也是这么说的
[root@localhost mysql-5.7.23-linux]# vim /etc/my.cnf
[root@localhost mysql-5.7.23-linux]# cp /usr/local/mysql57/mysql-5.7.23-linux/support-files/mysql.server  /etc/init.d/mysqld             ###这个命令是设置开机启动的
[root@localhost mysql-5.7.23-linux]# vim /etc/init.d/mysqld
[root@localhost mysql-5.7.23-linux]# service mysqld start
Starting MySQL.Logging to '/usr/local/mysql57/data/localhost.localdomain.err'.
 SUCCESS!
修改 vim /etc/init.d/mysqld
添加路径 在46行
 basedir=/usr/local/mysql57/mysql-5.7.23-linux
 datadir=/usr/local/mysql57/data
多说一句,退出文本编辑模式:第一步:按ESC;第二步:按Shift+Q;第三步:按wq;第四步:按Enter【没有分号】
5:加入开机启动:systemctl enable mysqld
6:启动,命令是:service mysqld start 或者 systemctl start mysqld
7:查看是否启动,命令:ps -ef | grep mysql
8:登录修改密码 mysql -uroot -p 上面初始化时的密码
可能会报一个错误:bash: mysql: 未找到命令...
需要添加软连接 ln -s /usr/local/mysql57/mysql-5.7.23-linux/bin/mysql /usr/bin
参考:https://blog.youkuaiyun.com/cs23405/article/details/82022047
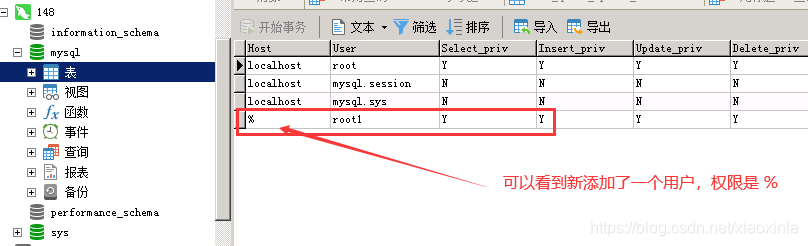
然后就可以登陆了,进入之后,第一件事,就是修改密码,第二件事,就是添加一个新的用户和权限,使之能在其他电脑上访问:
alter user 'root'@'localhost' identified by 'root';
flush privileges; #刷新权限
GRANT ALL PRIVILEGES ON *.* TO 'root1'@'%' IDENTIFIED BY 'root1' WITH GRANT OPTION; #授权新用户
flush privileges; #刷新权限
[root@localhost bin]# mysql -uroot -p
bash: mysql: 未找到命令...
[root@localhost bin]# mysql -u root -p
bash: mysql: 未找到命令...
[root@localhost bin]# cd /usr/local/mysql57/
[root@localhost mysql57]# mysql -u root -p
bash: mysql: 未找到命令...
[root@localhost mysql57]# ln -s /usr/local/mysql57/mysql-5.7.23-linux/bin/mysql /usr/bin
[root@localhost mysql57]# mysql -u root -p
Enter password:
Welcome to the MySQL monitor.  Commands end with ; or \g.
Your MySQL connection id is 8
Server version: 5.7.23

Copyright (c) 2000, 2018, Oracle and/or its affiliates. All rights reserved.

Oracle is a registered trademark of Oracle Corporation and/or its
affiliates. Other names may be trademarks of their respective
owners.

Type 'help;' or '\h' for help. Type '\c' to clear the current input statement.

mysql>
9:安装完毕;可以在windows上使用navicat软件访问了:
这种安装方法好像不能使用rpm -qa|grep mysql 查询到,怎么办呢?
下一篇文章讲停止和卸载


 369
369

 被折叠的 条评论
为什么被折叠?
被折叠的 条评论
为什么被折叠?
 到【灌水乐园】发言


