


配套视频:70.OAuth2 简介_哔哩哔哩_bilibili
OAuth2作为一个非常重要的认证协议,在当今的很多互联网应用、很多场景下都会使用到它,Spring Security对OAuth2协议也提供了相应的支持,开发者可以非常方便的在Spring Security使用OAuth2协议。
-
OAuth2简介
-
四种授权模式
-
Spring Security OAuth2
-
GitHub授权登录
-
授权服务器与资源服务器
-
使用JWT
1. OAuth2 简介
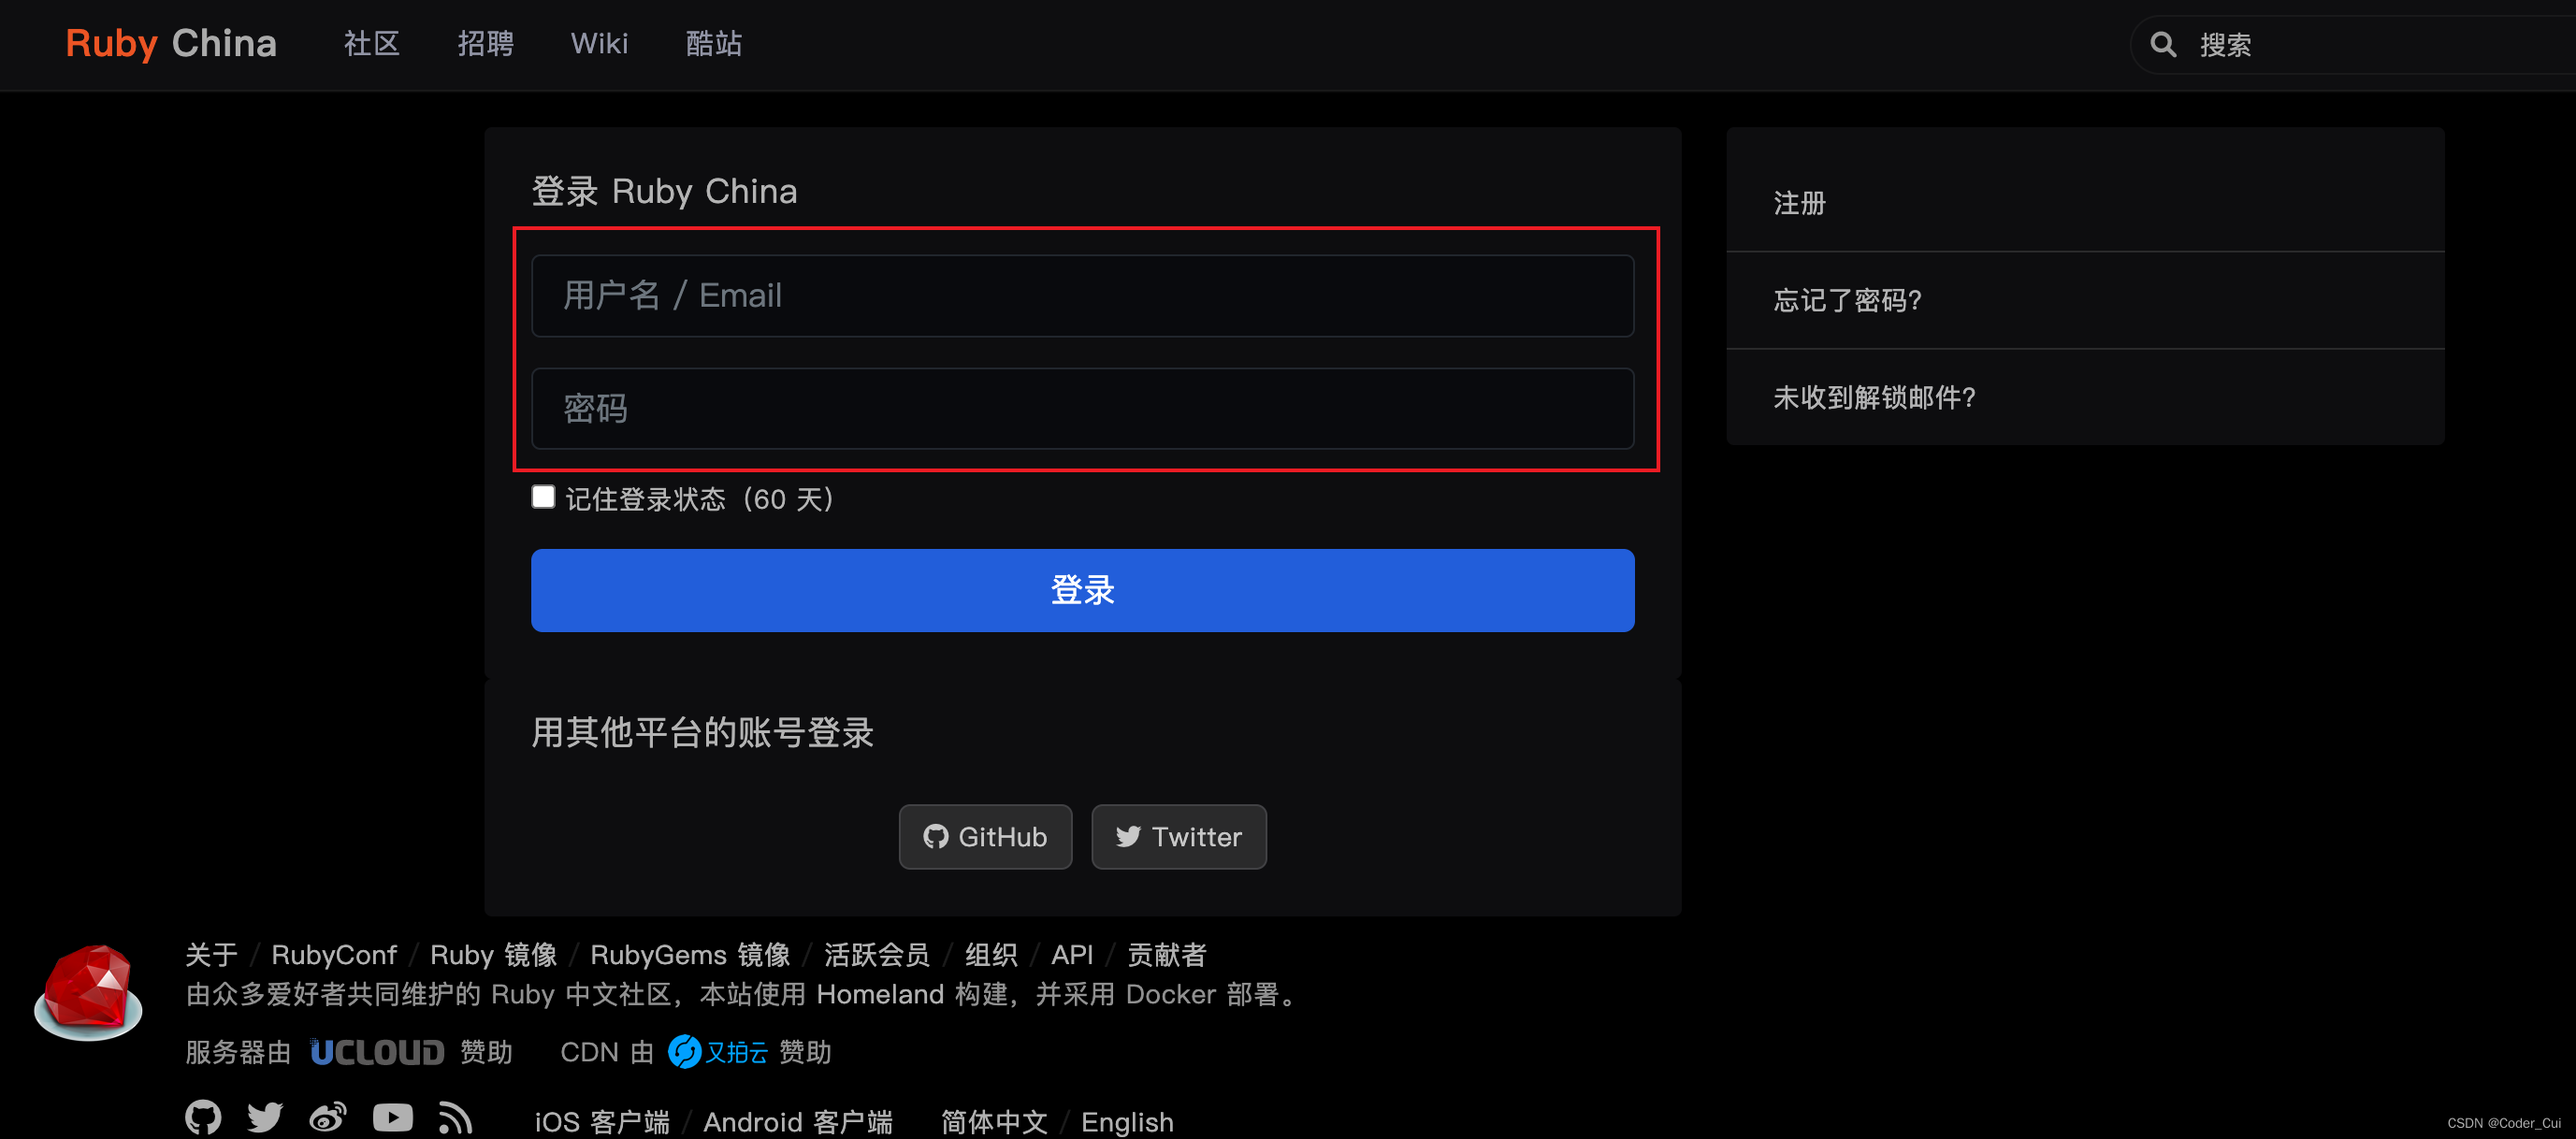
OAuth是一个开放的、非常重要的认证标准/协议,该标准允许用户让第三方应用(例如:Ruby China)访问该用户在某一网站(例如:GitHub)上存储的私密资源(如头像、照片、视频等),并且在这个过程中无需将用户名和密码提供给第三方应用(例如:Ruby China)。通过令牌(token)可以实现这一功能,每一个令牌授权一个特定的网站在特定的时段内可获取特定的资源。OAuth让用户可以授权第三方网站灵活访问它们存储在另外一些资源服务器上的特定信息,而非所有内容。对于用户而言,我们在互联网应用中最常见的 OAuth 应用就是各种第三方登录,例如QQ授权登录、微信授权登录、微博授权登录、GitHub授权登录等。
例如用户想登录Ruby China,传统方式是使用用户名、密码登录,但是这样并不安全,因为网站会存储你的用户名、密码,这样可能会导致你的账号、密码泄露。因此,这种授权方式安全隐患很大,如果使用OAuth协议就能很好地解决这一问题。
注意:OAuth 2是OAuth 1.0协议的下一版本,但并不兼容OAuth 1.0。 OAuth2关注客户端开发者的简易性,同时为Web应用、桌面应用、移动设备、IoT设备提供专门的认证流程。
2. OAuth2授权总体流程
配套视频:71.OAuth2.0 流程_哔哩哔哩_bilibili
OAuth2 协议一共支持4种不同的授权模式:
-
授权码模式:常见的第三方平台登录功能基本上都是使用的这种模式。 -
简化模式:简化模式是不需要第三方服务端参与,直接在浏览器中向授权服务器申请令牌 (token),如果网站是纯静态页面,则可以采用这种方式。 -
密码模式:密码模式是用户把用户名/密码直接告诉客户端,客户端使用这些信息向授权服务器申请令牌(token)。这需要用户对客户端高度信任,例如客户端应用和服务提供商就是同一家公司。 -
客户端模式:客户端模式是指客户端使用自己的名义而不是用户的名义向服务提供者申请授权。严格来说,客户端模式并不能算作OAuth 协议解决问题的一种解决方案,但是对于开发者而言,在一些为移动端提供的授权服务器上使用这种模式还是非常方便的。
无论哪种授权模式,其授权流程都是相似的,只不过是在个别步骤上有所差异而已。
OAuth2 中包含了四种不同的角色:
-
Client:第三方应用。
-
Resource Owner:资源所有者。
-
Authorization Server :授权服务器。
-
Resource Server: 资源服务器。
角色梳理: 第三方应用 <----> 存储用户私密信息应用 ----> 授权服务器 ----> 资源服务器
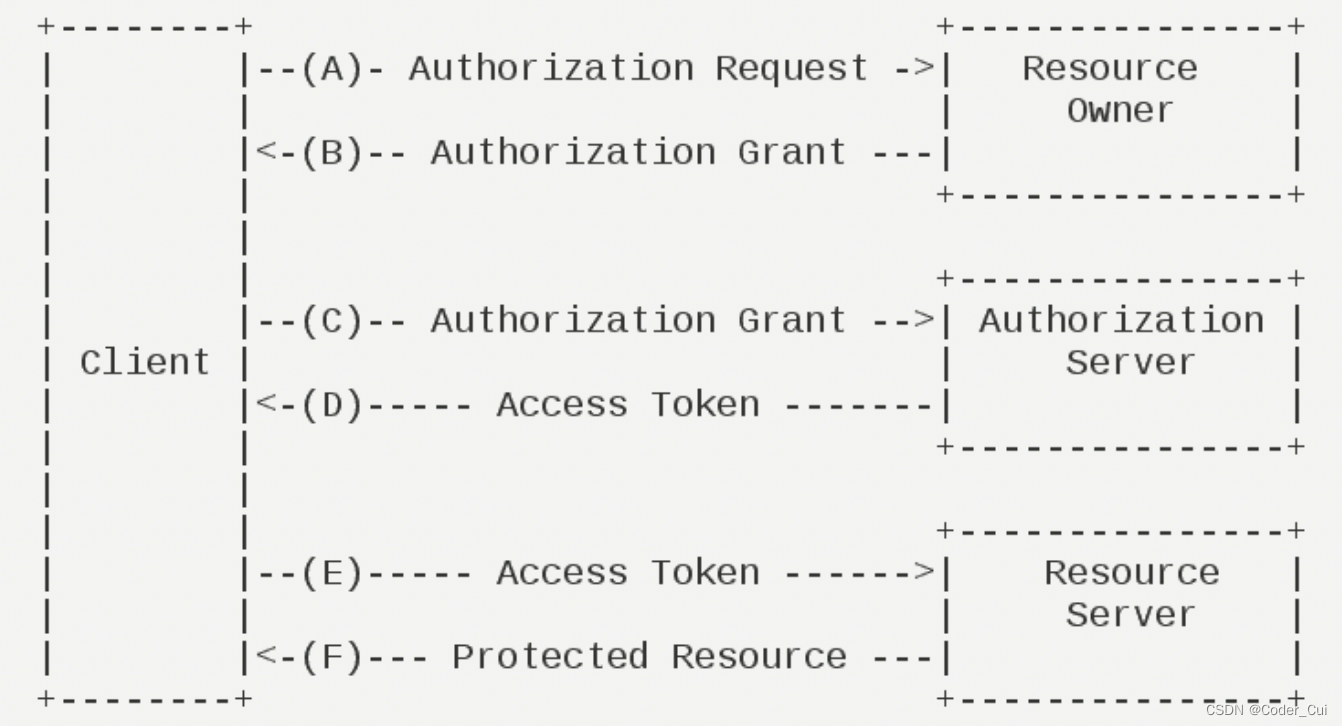
具体流程如下:
 - (A)用户打开客户端以后,客户端要求用户给予授权。
 - (B)用户同意给予客户端授权(即:用户点击允许授权)。****
 - (C)客户端使用上一步获得的授权,向认证服务器申请令牌。
 - (D)认证服务器对客户端进行认证以后,确认无误,同意发放令牌。
 - (E)客户端使用令牌,向资源服务器申请获取资源。
 - (F)资源服务器确认令牌无误,同意向客户端开放资源。
整体流程如下:(图片来自 RFC6749文档 RFC 6749: The OAuth 2.0 Authorization Framework)
或
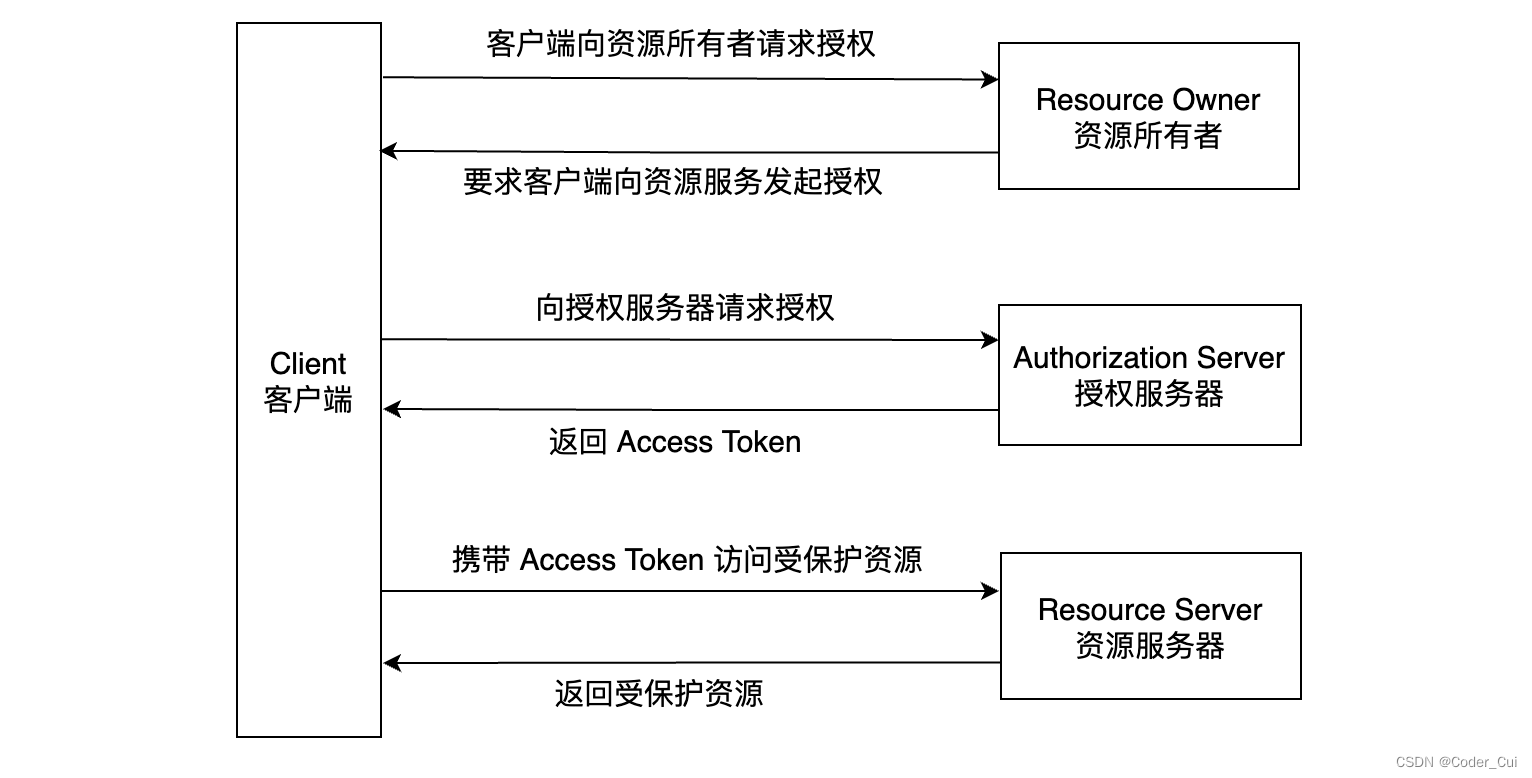
为了方便理解,以客户端(Ruby China)、服务器(GitHub)为例进行说明:
 - (A)用户打开Ruby China以后,要求用户给予授权。
 - (B)用户同意给予Ruby China授权。
 - (C)Ruby China使用上一步获得的授权,向GitHub认证服务器申请令牌。
 - (D)GitHub认证服务器对Ruby China进行认证以后,确认无误,同意发放令牌(即:GitHub确认Ruby China是GitHub下的合法授权伙伴)。
 - (E)Ruby China使用令牌,向GitHub资源服务器申请获取资源。
 - (F)GitHub资源服务器确认令牌无误,同意向Ruby China开放资源。
从上图中我们可以看出6个步骤之中,B是关键,即:用户怎样才能给于客户端授权。
3. 四种授权模式
配套视频:72.OAuth2四种授权模式_哔哩哔哩_bilibili
3.1 授权码模式
授权码模式(Authorization Code) 是功能最完整、流程最严密、最安全并且使用最广泛的一种OAuth2授权模式。同时也是最复杂的一种授权模式,它的特点就是通过客户端的后台服务器,与服务提供商的认证服务器进行互动。
其中涉及的角色如下:
-
Third-party application:第三方应用程序,简称"客户端"(client);
-
Resource Owner:资源所有者,简称"用户"(user);
-
User Agent:用户代理,是指浏览器;
-
Authorization Server:认证服务器,即服务端专门用来处理认证的服务器;
-
Resource Server:资源服务器,即服务端存放用户生成的资源的服务器。它与认证服务器,可以是同一台服务器,也可以是不同的服务器。
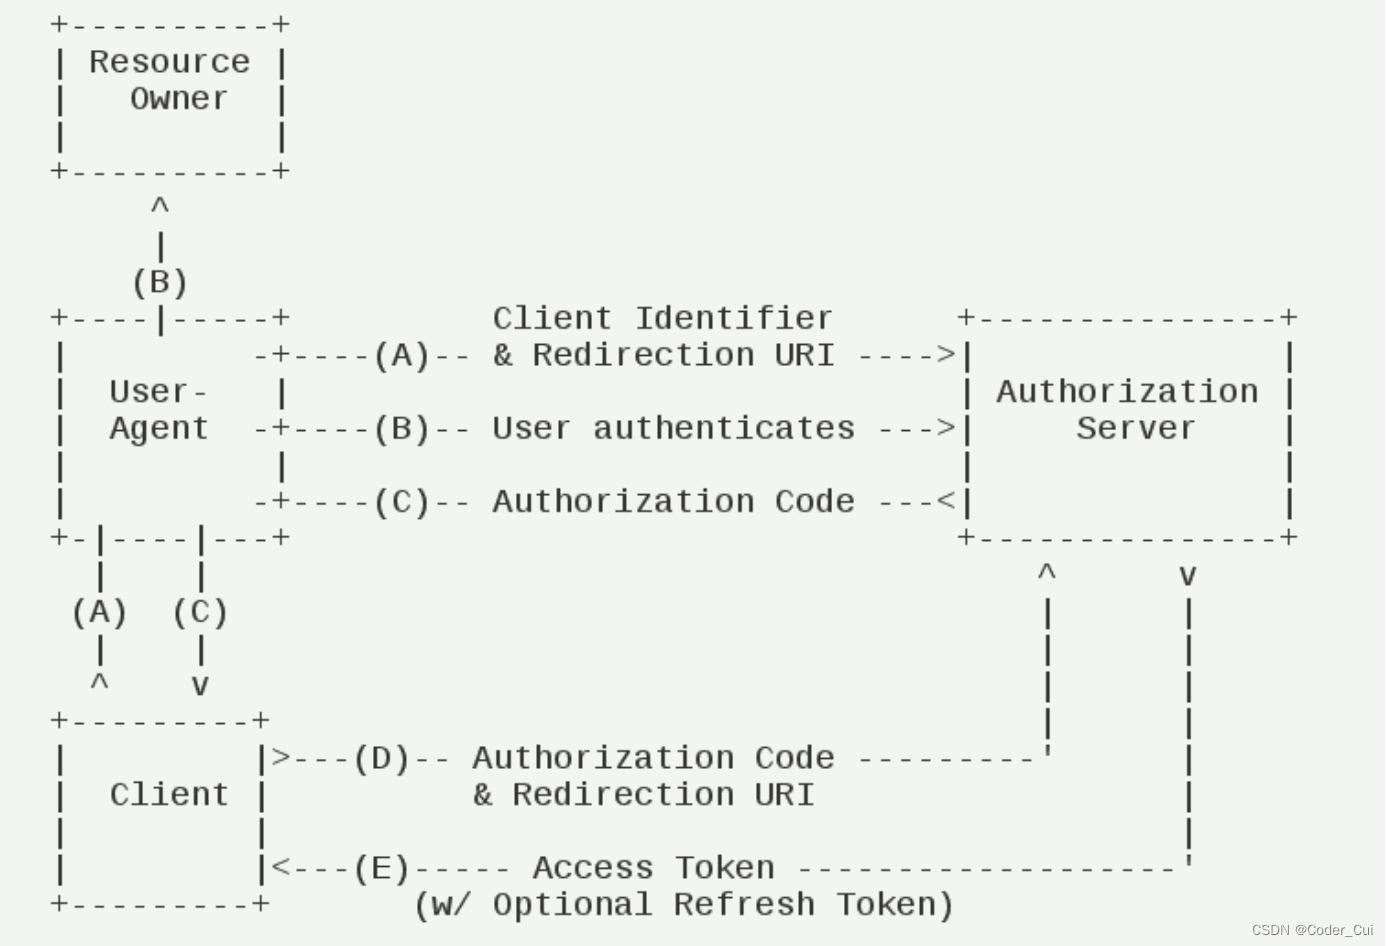
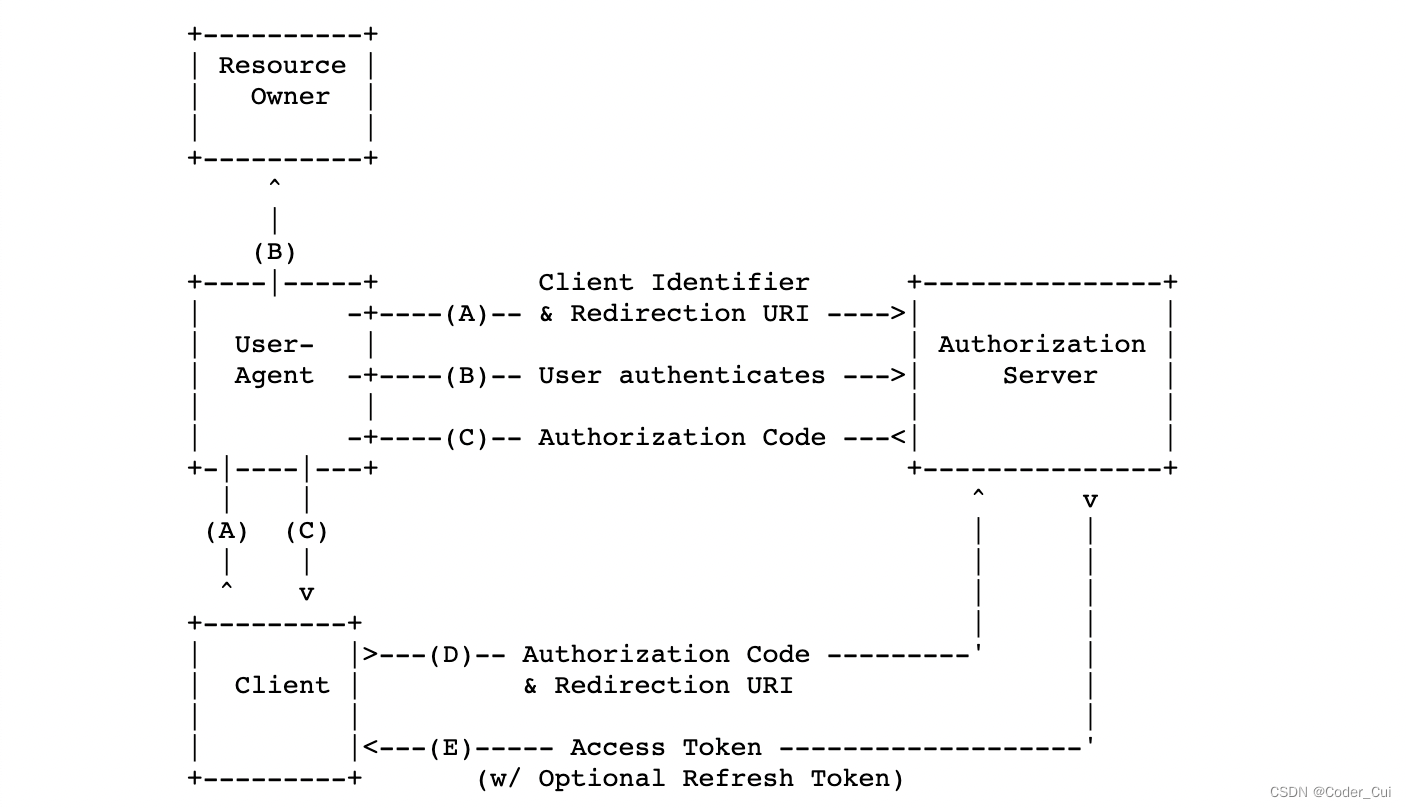
具体流程如下:
-
(A)用户访问第三方应用,第三方应用通过浏览器导向认证服务器。
-
(B)用户选择是否给予客户端授权。
-
(C)假设用户给予授权,认证服务器将用户导向客户端事先指定的"重定向URI"(redirection URI),同时附上一个授权码。
-
(D)客户端收到授权码,附上早先的"重定向URI",向认证服务器申请令牌。这一步是在客户端的后台的服务器上完成的,对用户不可见。
-
(E)认证服务器核对了授权码和重定向URI,确认无误后,向客户端发送访问令牌(access token)和更新令牌(refresh token)。
其具体的授权流程如图所示(图片来自 RFC6749文档 RFC 6749: The OAuth 2.0 Authorization Framework):
或
或
  +----------+
  | Resource |
  |   Owner  |
  |          |
  +----------+
       ^
       |
      (B)
  +----|-----+          Client Identifier      +---------------+
  |         -+----(A)-- & Redirection URI ---->|               |
  |  User-   |                                 | Authorization |
  |  Agent  -+----(B)-- User authenticates --->|     Server    |
  |          |                                 |               |
  |         -+----(C)-- Authorization Code ---<|               |
  +-|----|---+                                 +---------------+
    |    |                                         ^      v
   (A)  (C)                                        |      |
    |    |                                         |      |
    ^    v                                         |      |
  +---------+                                      |      |
  |         |>---(D)-- Authorization Code ---------'      |
  |  Client |          & Redirection URI                  |
  |         |                                             |
  |         |<---(E)----- Access Token -------------------'
  +---------+       (w/ Optional Refresh Token)
核心参数:
https://wx.com/oauth/authorize?response_type=code&client_id=CLIENT_ID&redirect_uri=http://www.baidu.com&scope=read
| 字段 | 描述 |
|---|---|
| client_id | 授权服务器注册应用后的唯一标识 |
| response_type | 必须,固定值,在授权码中必须为 code(授权码模式) |
| redirect_uri | 必须,通过客户端注册的重定向URL |
| scope | 必须,令牌可以访问资源权限:read 只读、all 读写 |
| state | 可选,存在原样返回客户端,用来防止 CSRF跨站攻击(建议设置) |
3.2 简化模式(了解即可)
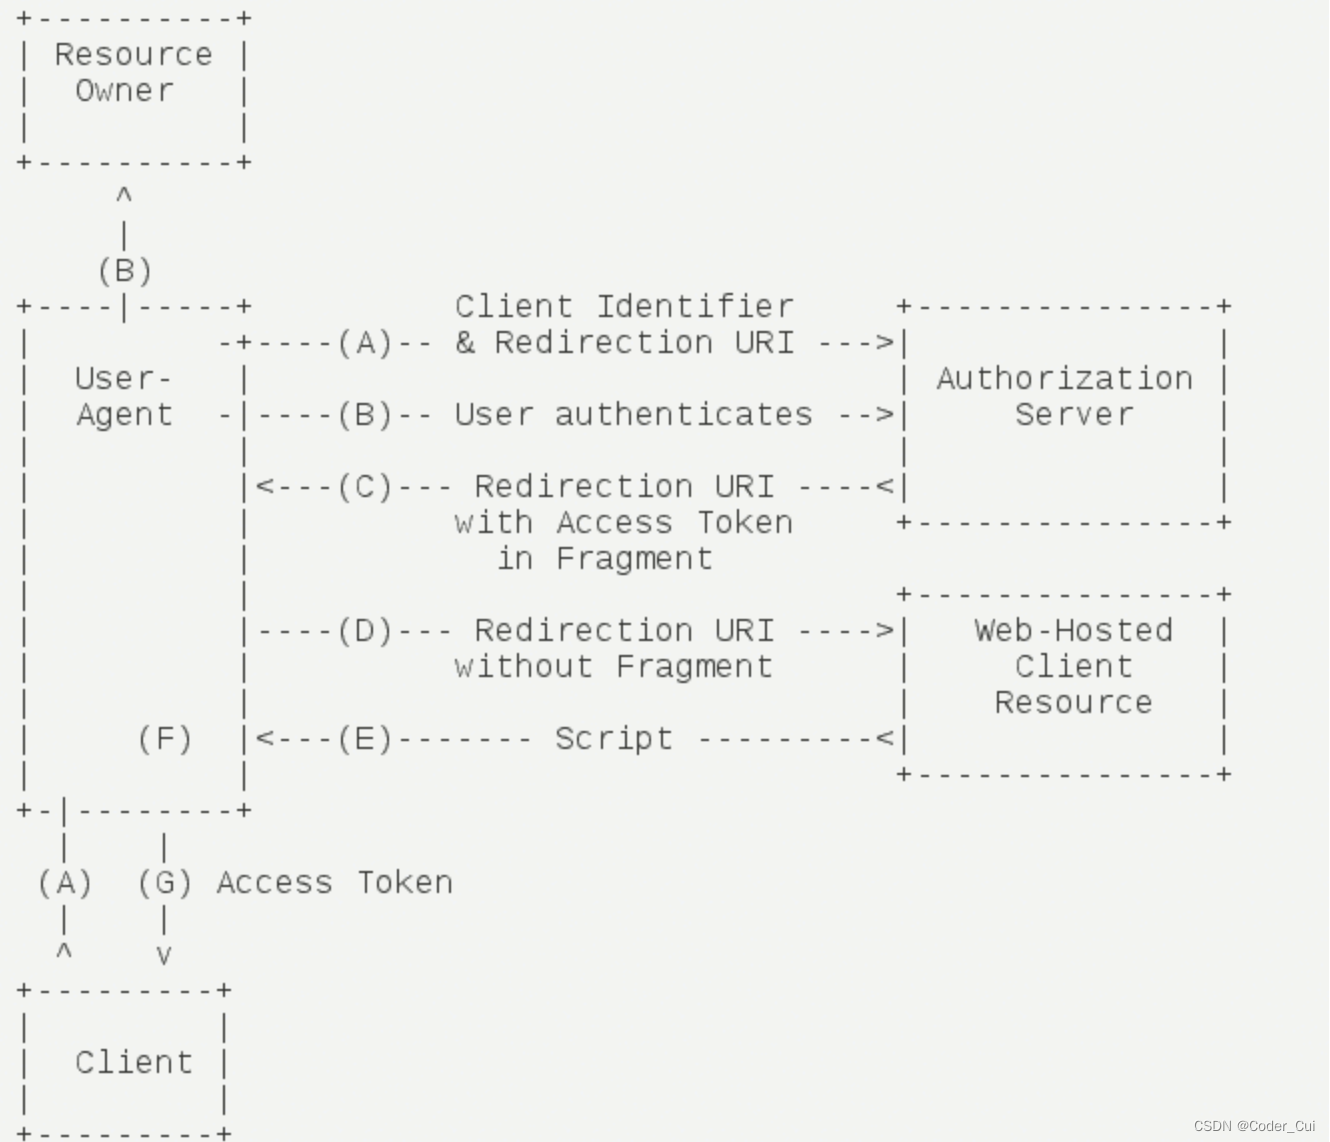
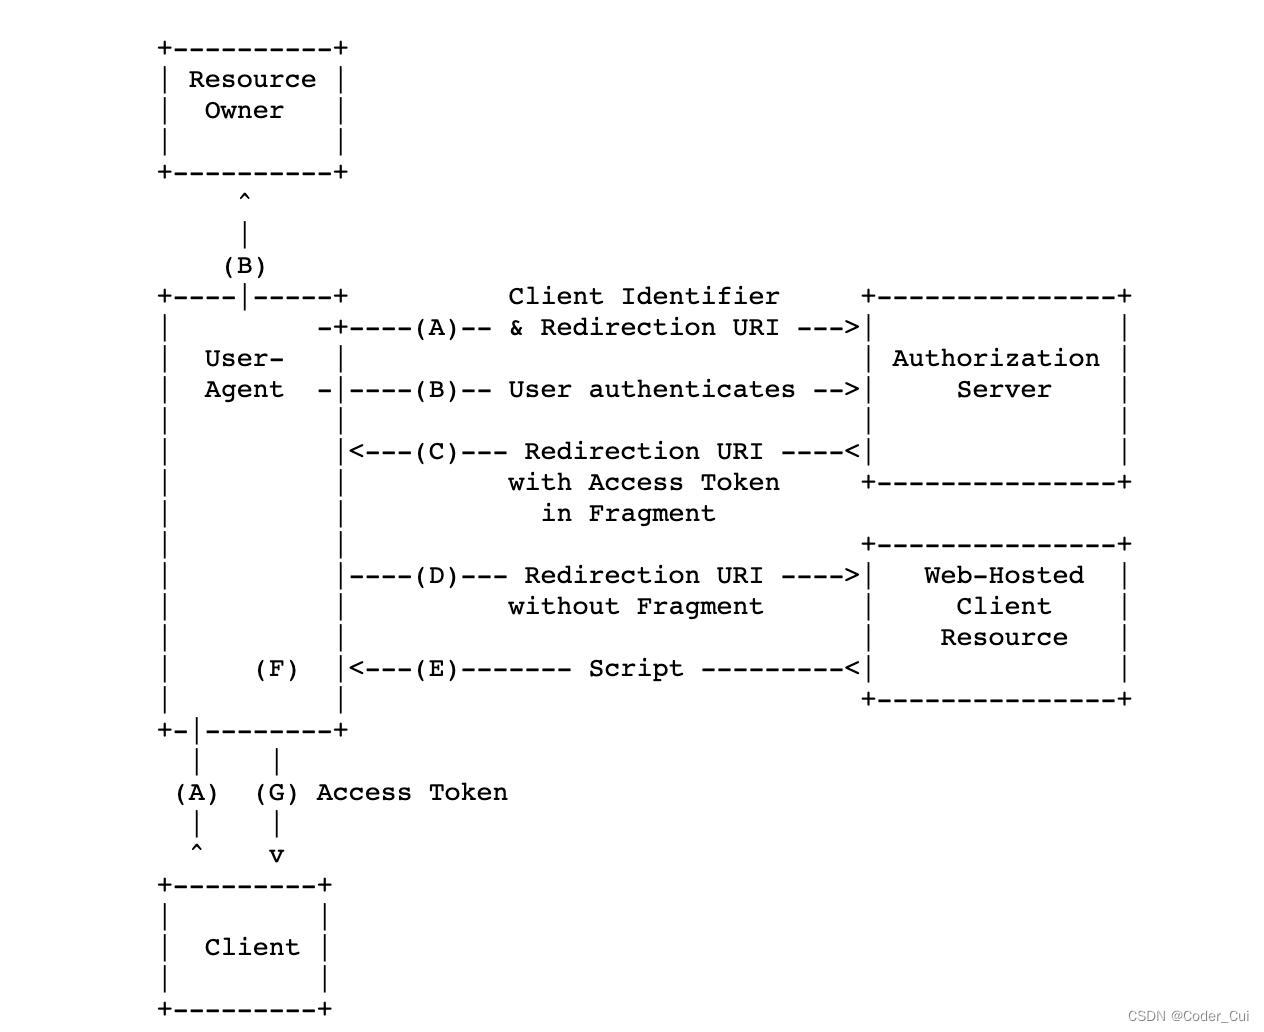
简化模式(implicit grant type)不通过第三方应用程序的服务器,直接在浏览器中向认证服务器申请令牌,跳过了"授权码"这个步骤,因此得名。所有步骤在浏览器中完成,令牌对访问者是可见的,且客户端不需要认证。
具体步骤如下:
-
(A)第三方应用将用户导向认证服务器。
-
(B)用户决定是否给于客户端授权。
-
(C)假设用户给予授权,认证服务器将用户导向客户端指定的"重定向URI",并在URI的Hash部分包含了访问令牌。#token
-
(D)浏览器向资源服务器发出请求,其中不包括上一步收到的Hash值。
-
(E)资源服务器返回一个网页,其中包含的代码可以获取Hash值中的令牌。
-
(F)浏览器执行上一步获得的脚本,提取出令牌。
-
(G)浏览器将令牌发给客户端。
其具体的授权流程如图所示(图片来自 RFC6749文档 RFC 6749: The OAuth 2.0 Authorization Framework):
或
或
      +----------+
      | Resource |
      |  Owner   |
      |          |
      +----------+
           ^
           |
          (B)
      +----|-----+          Client Identifier     +---------------+
      |         -+----(A)-- & Redirection URI --->|               |
      |  User-   |                                | Authorization |
      |  Agent  -|----(B)-- User authenticates -->|     Server    |
      |          |                                |               |
      |          |<---(C)--- Redirection URI ----<|               |
      |          |          with Access Token     +---------------+
      |          |            in Fragment
      |          |                                +---------------+
      |          |----(D)--- Redirection URI ---->|   Web-Hosted  |
      |          |          without Fragment      |     Client    |
      |          |                                |    Resource   |
      |     (F)  |<---(E)------- Script ---------<|               |
      |          |                                +---------------+
      +-|--------+
        |    |
       (A)  (G) Access Token
        |    |
        ^    v
      +---------+
      |         |
      |  Client |
      |         |
      +---------+
核心参数:
https://wx.com/oauth/authorize?response_type=token&client_id=CLIENT_ID&redirect_uri=http://www.baidu.com&scope=read
| 字段 | 描述 |
|---|---|
| client_id | 授权服务器注册应用后的唯一标识 |
| response_type | 必须,固定值,在授权码中必须为token(注意) |
| redirect_uri | 必须,通过客户端注册的重定向URL |
| scope | 必须,令牌可以访问资源权限 |
| state | 可选,存在原样返回客户端,用来防止CSRF跨站攻击 |
3.3 密码模式(了解即可)
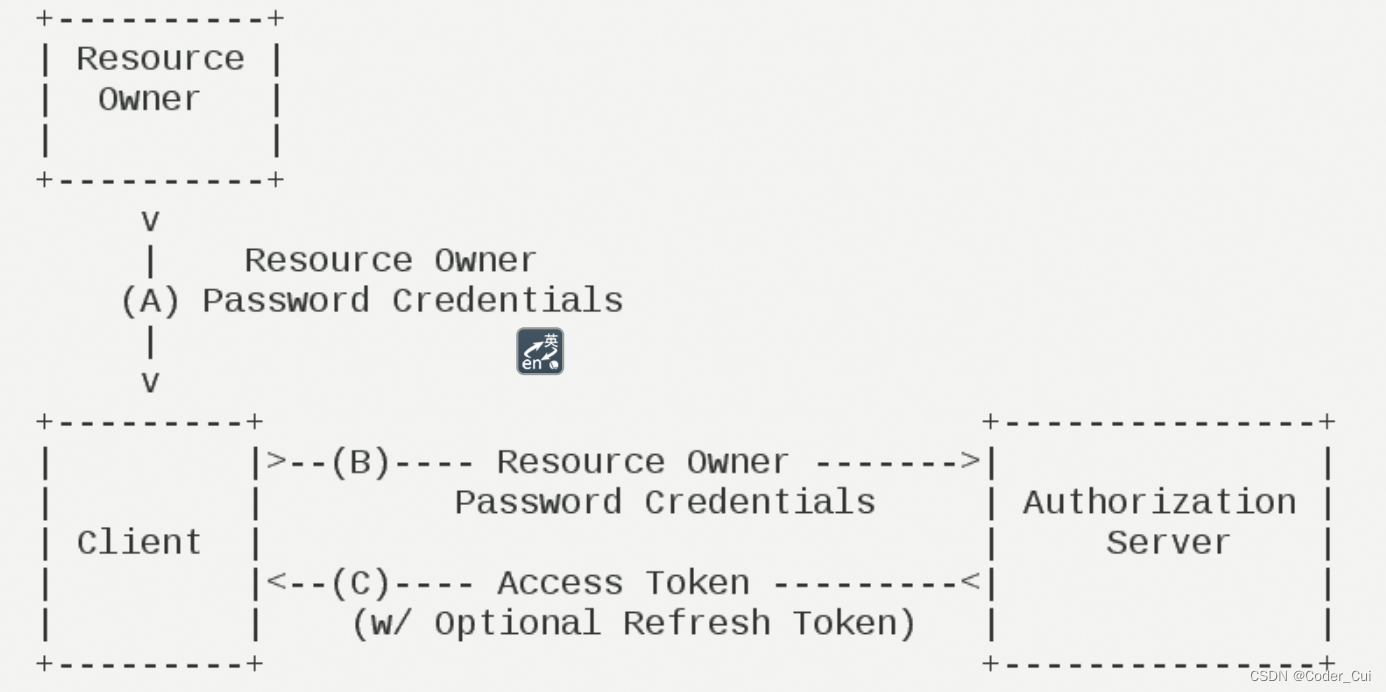
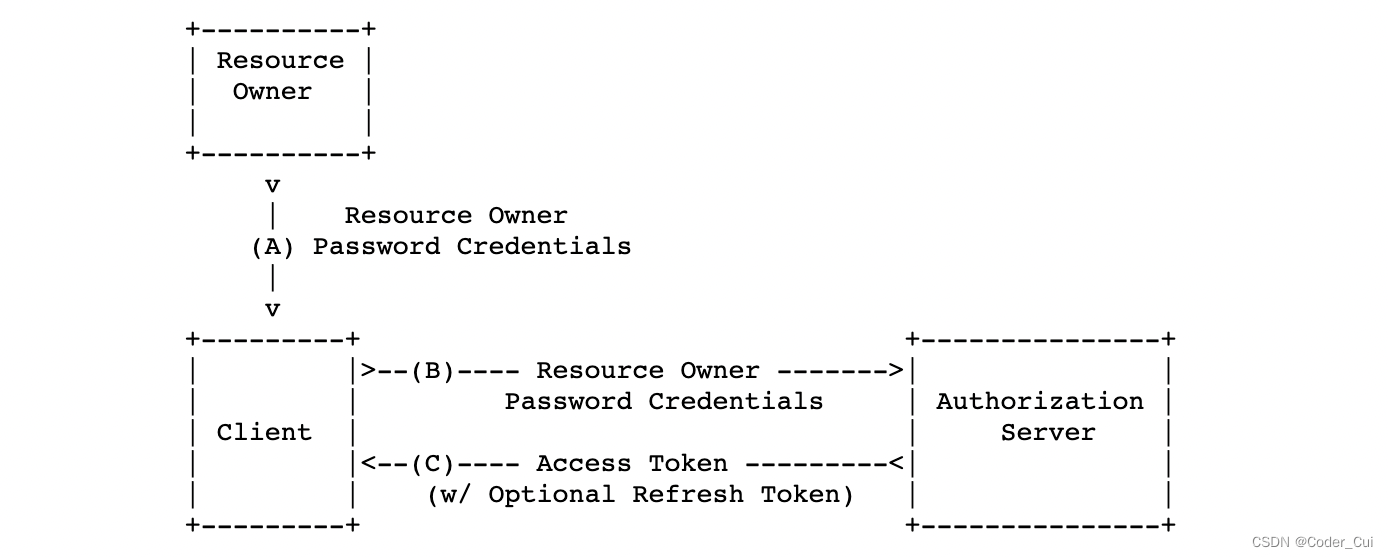
密码模式(Resource Owner Password Credentials Grant)中,用户向客户端提供自己的用户名和密码。客户端使用这些信息,向"服务商提供商"索要授权。在这种模式中,用户必须把自己的密码给客户端,但是客户端不得储存密码。这通常用在用户对客户端高度信任的情况下,比如客户端是操作系统的一部分,或者由一个相同公司出品。而认证服务器只有在其他授权模式无法执行的情况下,才能考虑使用这种模式。
具体步骤如下:
-
(A)用户向客户端提供用户名和密码。
-
(B)客户端将用户名和密码发给认证服务器,向后者请求令牌。
-
(C)认证服务器确认无误后,向客户端提供访问令牌。
其具体的授权流程如图所示(图片来自 RFC6749文档 RFC 6749: The OAuth 2.0 Authorization Framework):
或
或
      +----------+
      | Resource |
      |  Owner   |
      |          |
      +----------+
           v
           |    Resource Owner
          (A) Password Credentials
           |
           v
      +---------+                                  +---------------+
      |         |>--(B)---- Resource Owner ------->|               |
      |         |         Password Credentials     | Authorization |
      | Client  |                                  |     Server    |
      |         |<--(C)---- Access Token ---------<|               |
      |         |    (w/ Optional Refresh Token)   |               |
      +---------+                                  +---------------+
核心参数:
https://wx.com/token?grant_type=password&username=USERNAME&password=PASSWORD&client_id=CLIENT_ID
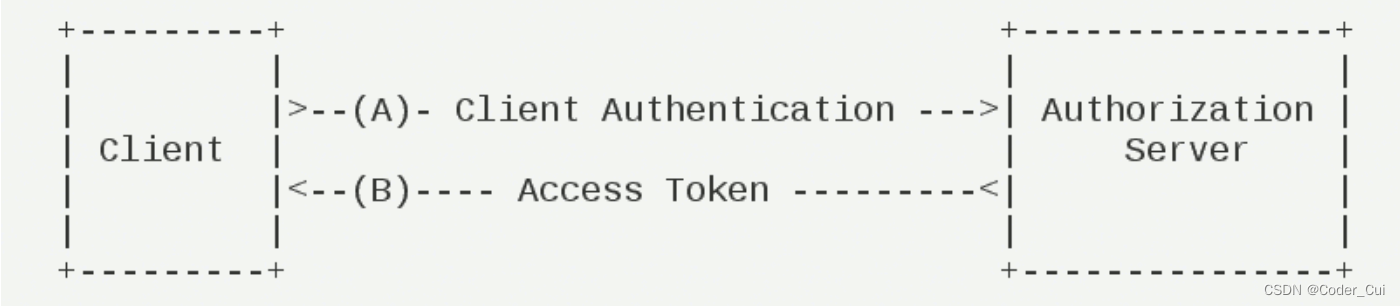
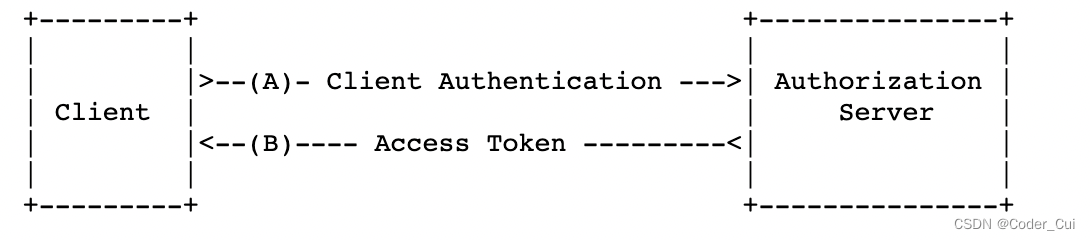
3.4 客户端模式(了解即可)
客户端模式(Client Credentials Grant)指客户端以自己的名义,而不是以用户的名义,向"服务提供商"进行认证。严格地说,客户端模式并不属于OAuth框架所要解决的问题。在这种模式中,用户直接向客户端注册,客户端以自己的名义要求"服务提供商"提供服务,其实不存在授权问题。
具体步骤如下:
-
(A)客户端向认证服务器进行身份认证,并要求一个访问令牌。
-
(B)认证服务器确认无误后,向客户端提供访问令牌。
https://wx.com/token?grant_type=client_credentials&client_id=CLIENT_ID&client_secret=CLIENT_SECRET
其具体的授权流程如图所示(图片来自 RFC6749文档 RFC 6749: The OAuth 2.0 Authorization Framework):
或
或
      +---------+                                  +---------------+
      |         |                                  |               |
      |         |>--(A)- Client Authentication --->| Authorization |
      | Client  |                                  |     Server    |
      |         |<--(B)---- Access Token ---------<|               |
      |         |                                  |               |
      +---------+                                  +---------------+
4. OAuth2 标准接口
配套视频:73.OAuth2 中标准接口_哔哩哔哩_bilibili
-
/oauth/authorize:授权端点
-
/oauth/token:获取令牌端点
-
/oauth/confirm_access:用户确认授权提交端点
-
/oauth/error:授权服务错误信息端点
-
/oauth/check_token:用于资源服务访问的令牌解析端点
-
/oauth/token_key:如果使用JWT令牌的话,提供公有密匙的端点
5. GitHub 授权登录
配套视频:74.OAuth Client 结合 GitHub 授权案例_哔哩哔哩_bilibili
5.1 创建OAuth应用(客户端)
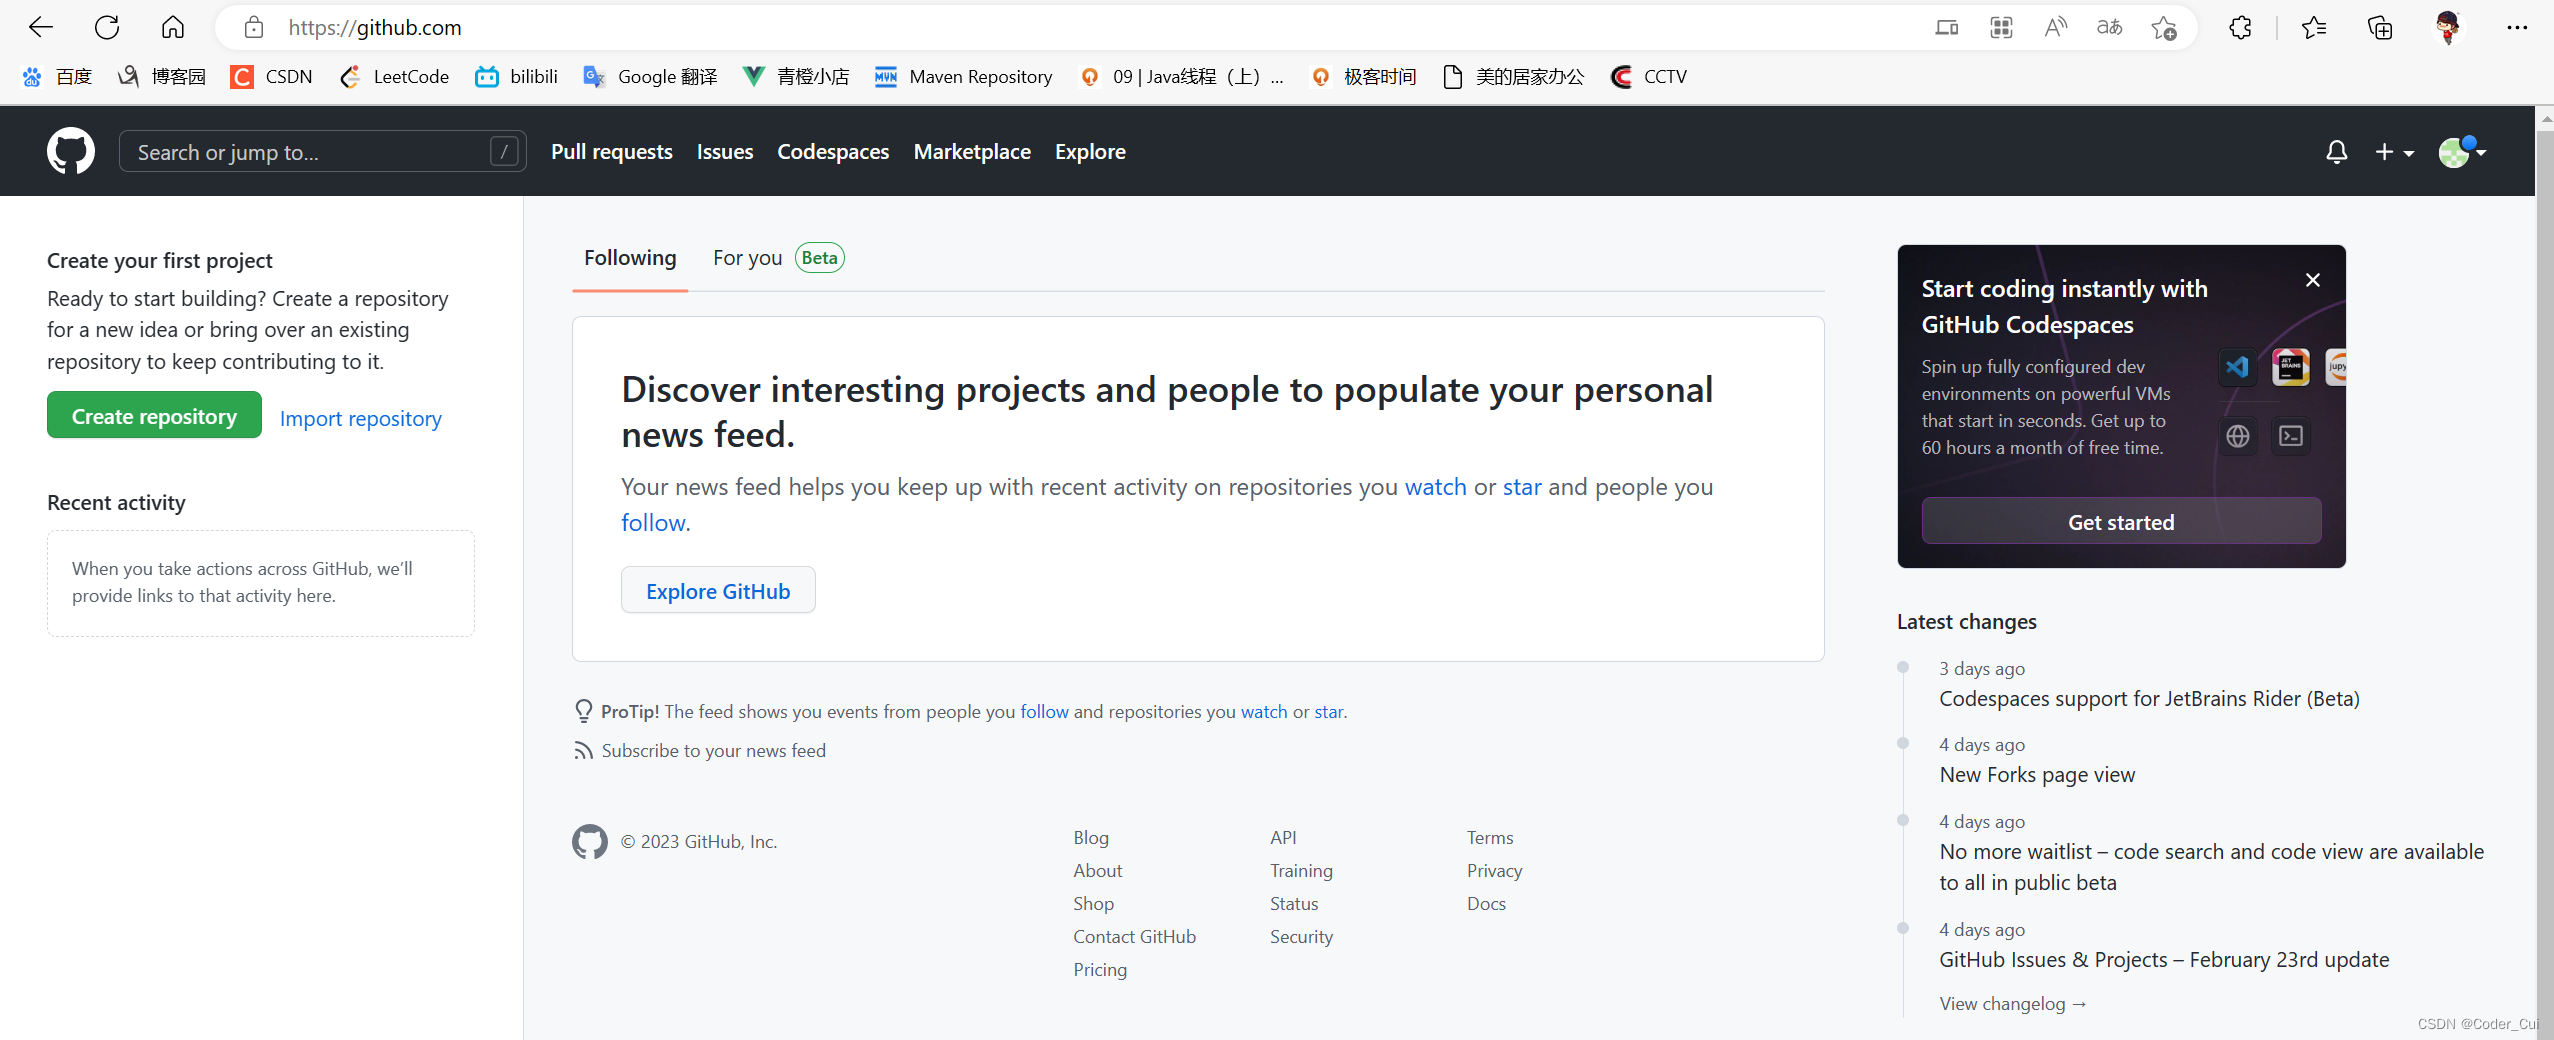
访问 GitHub 并登录,没有账号的要先注册,右侧有头像显示,才表示是登录成功的状态:
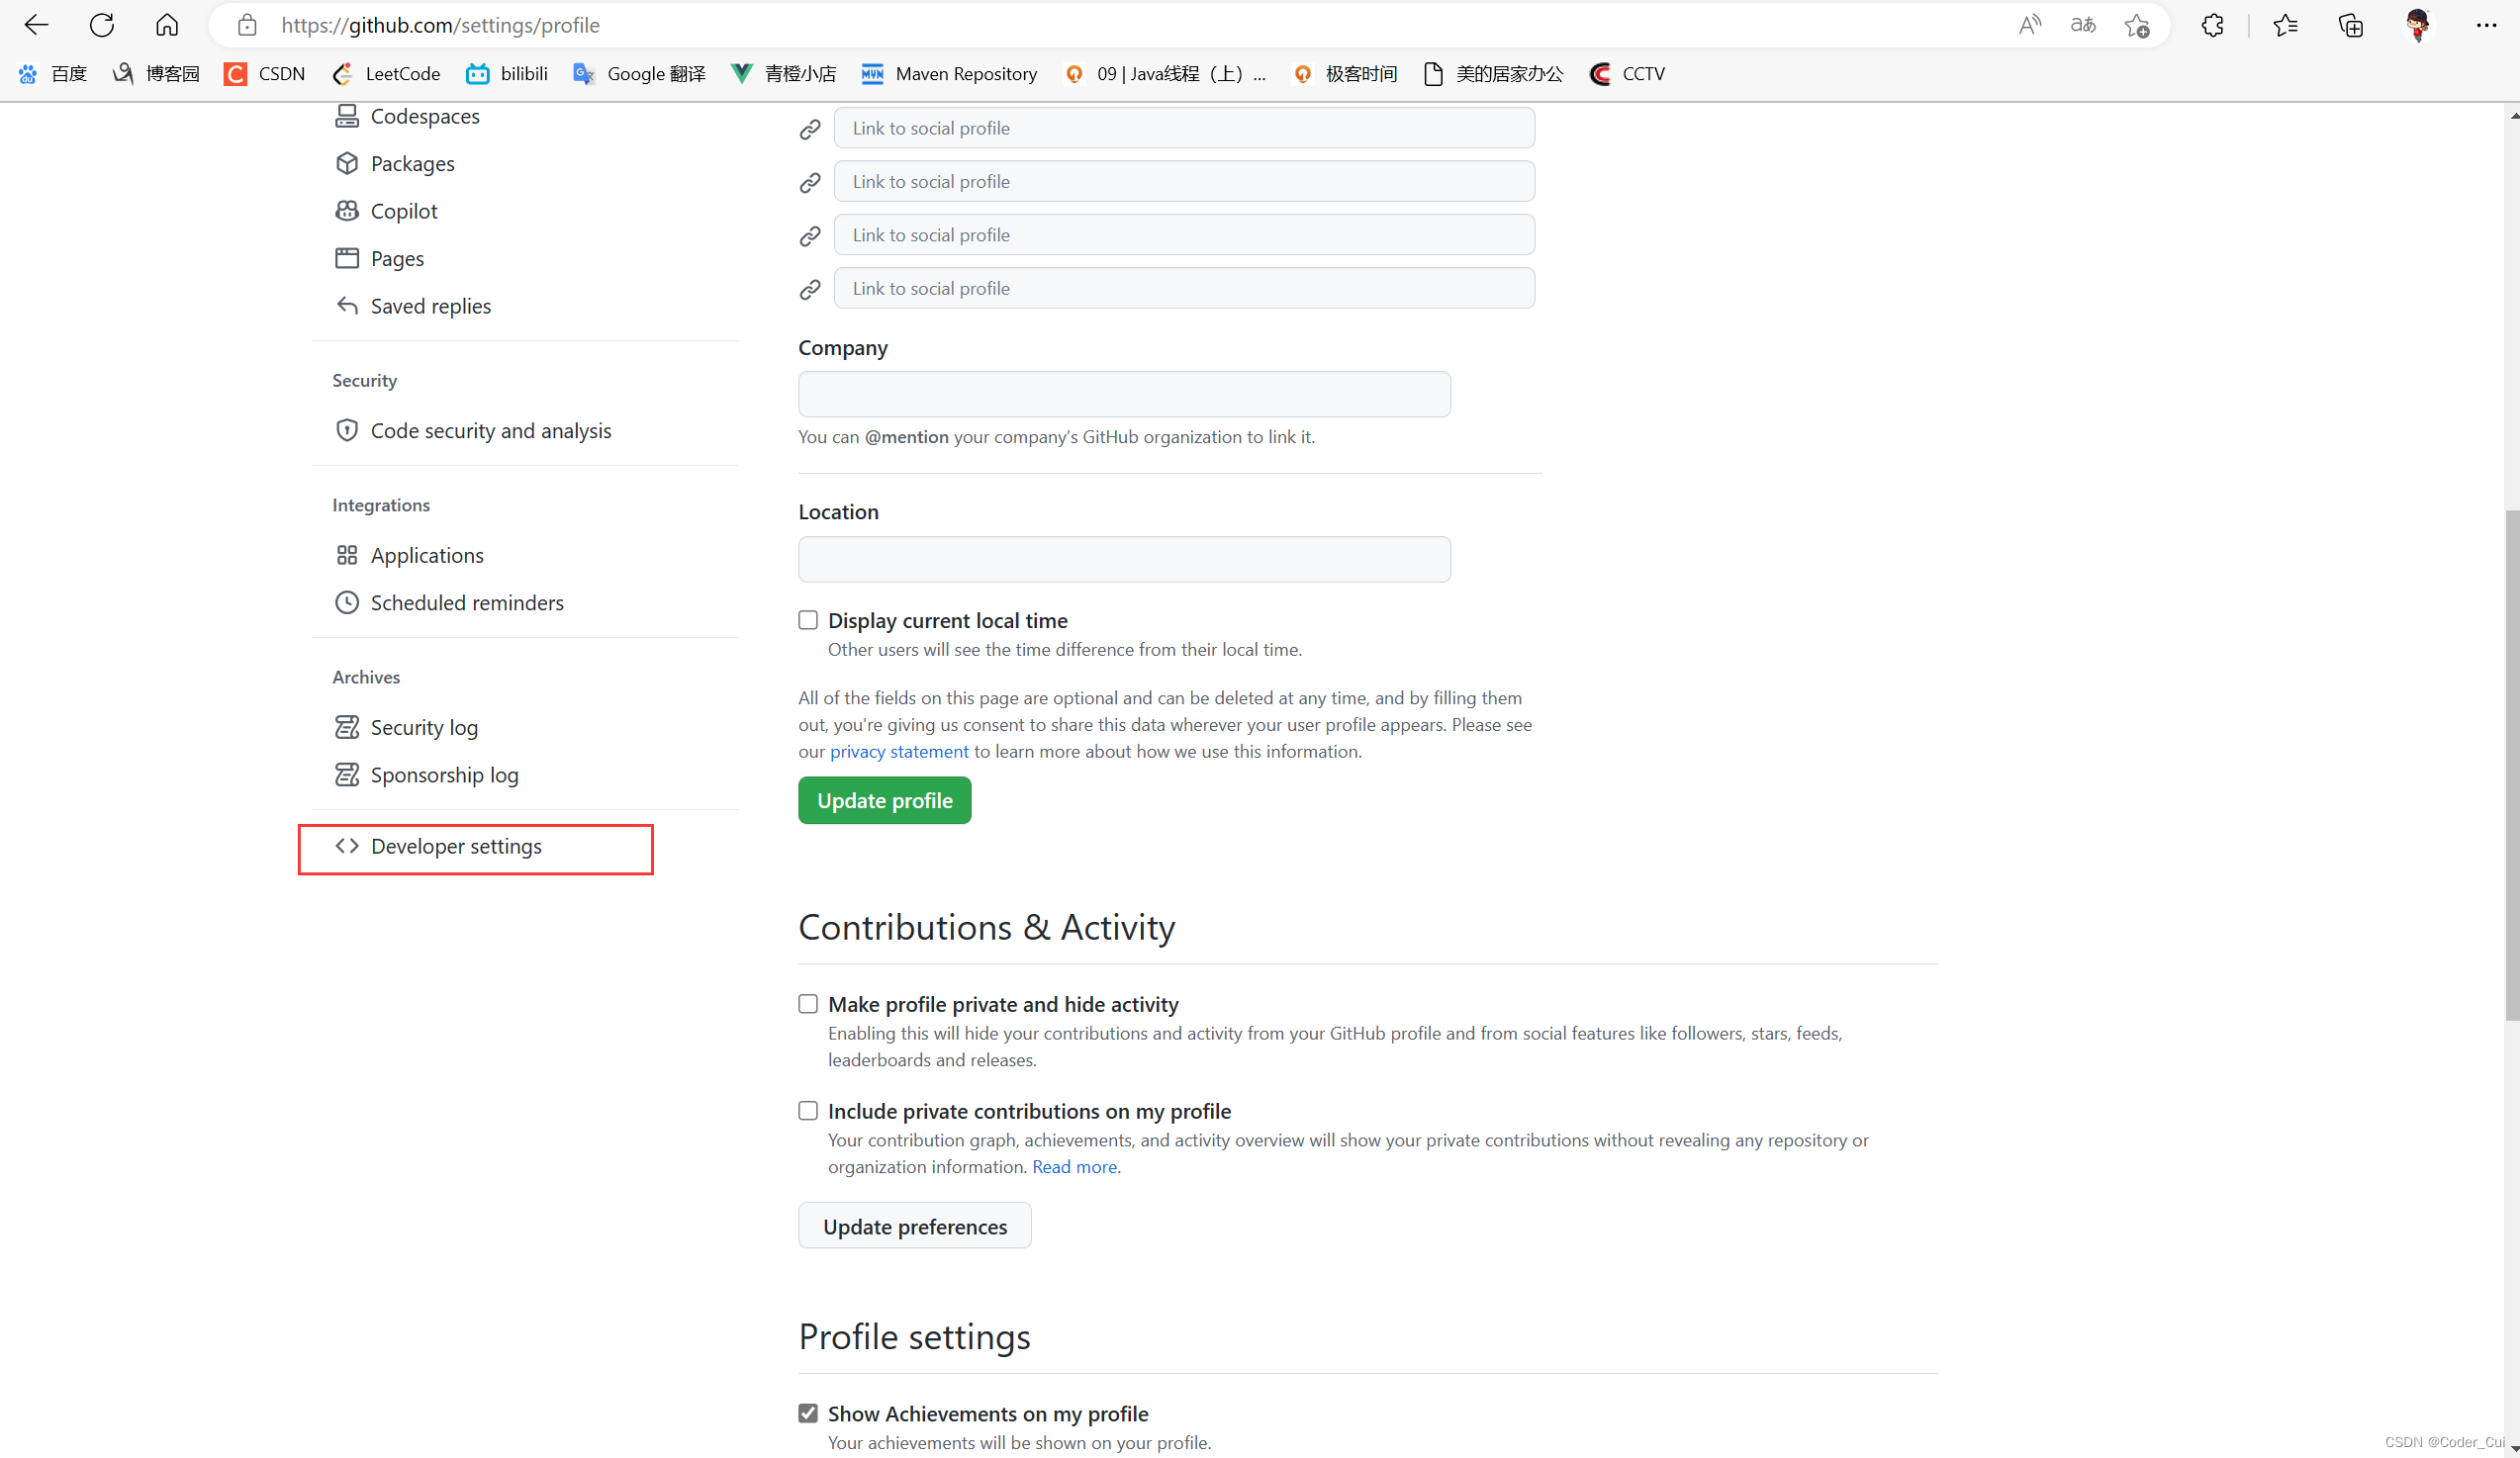
点击头像,选择Settings:

下划找到Developer settings:
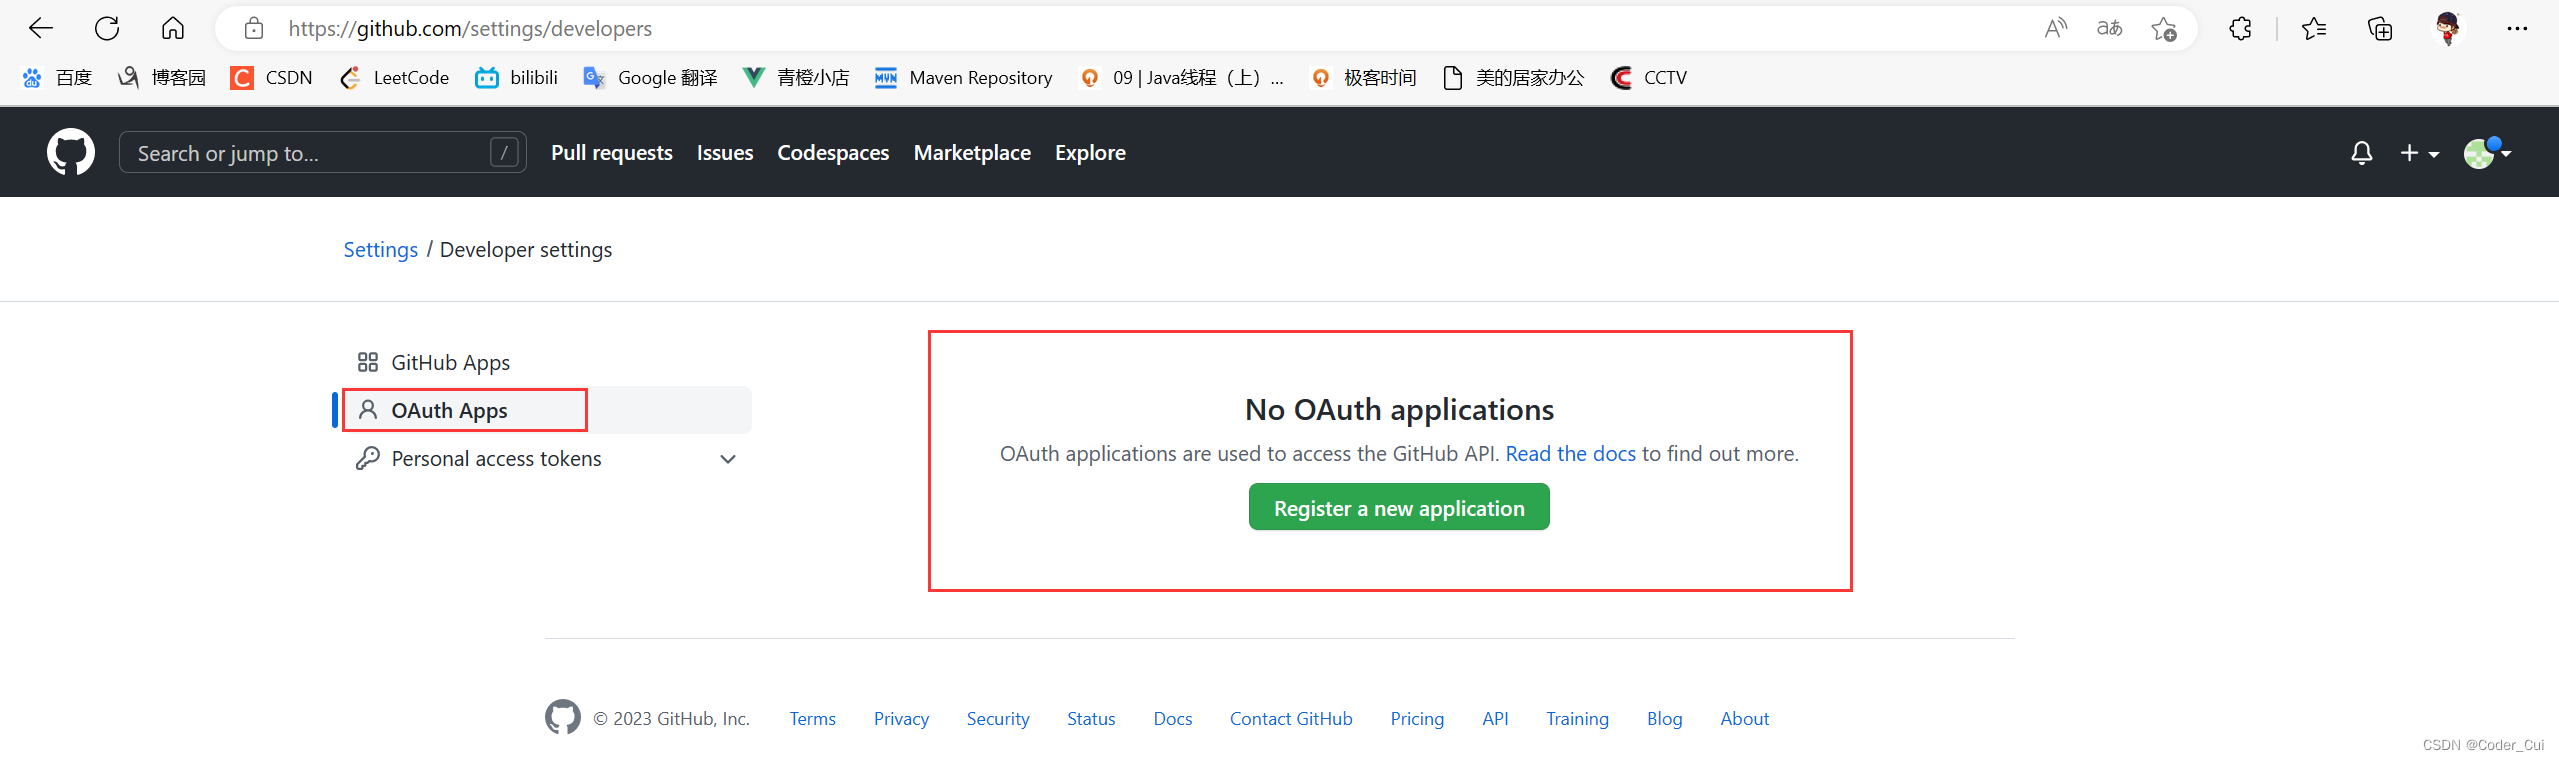
选择OAuth Apps,创建一个新的OAuth App:Register a new application
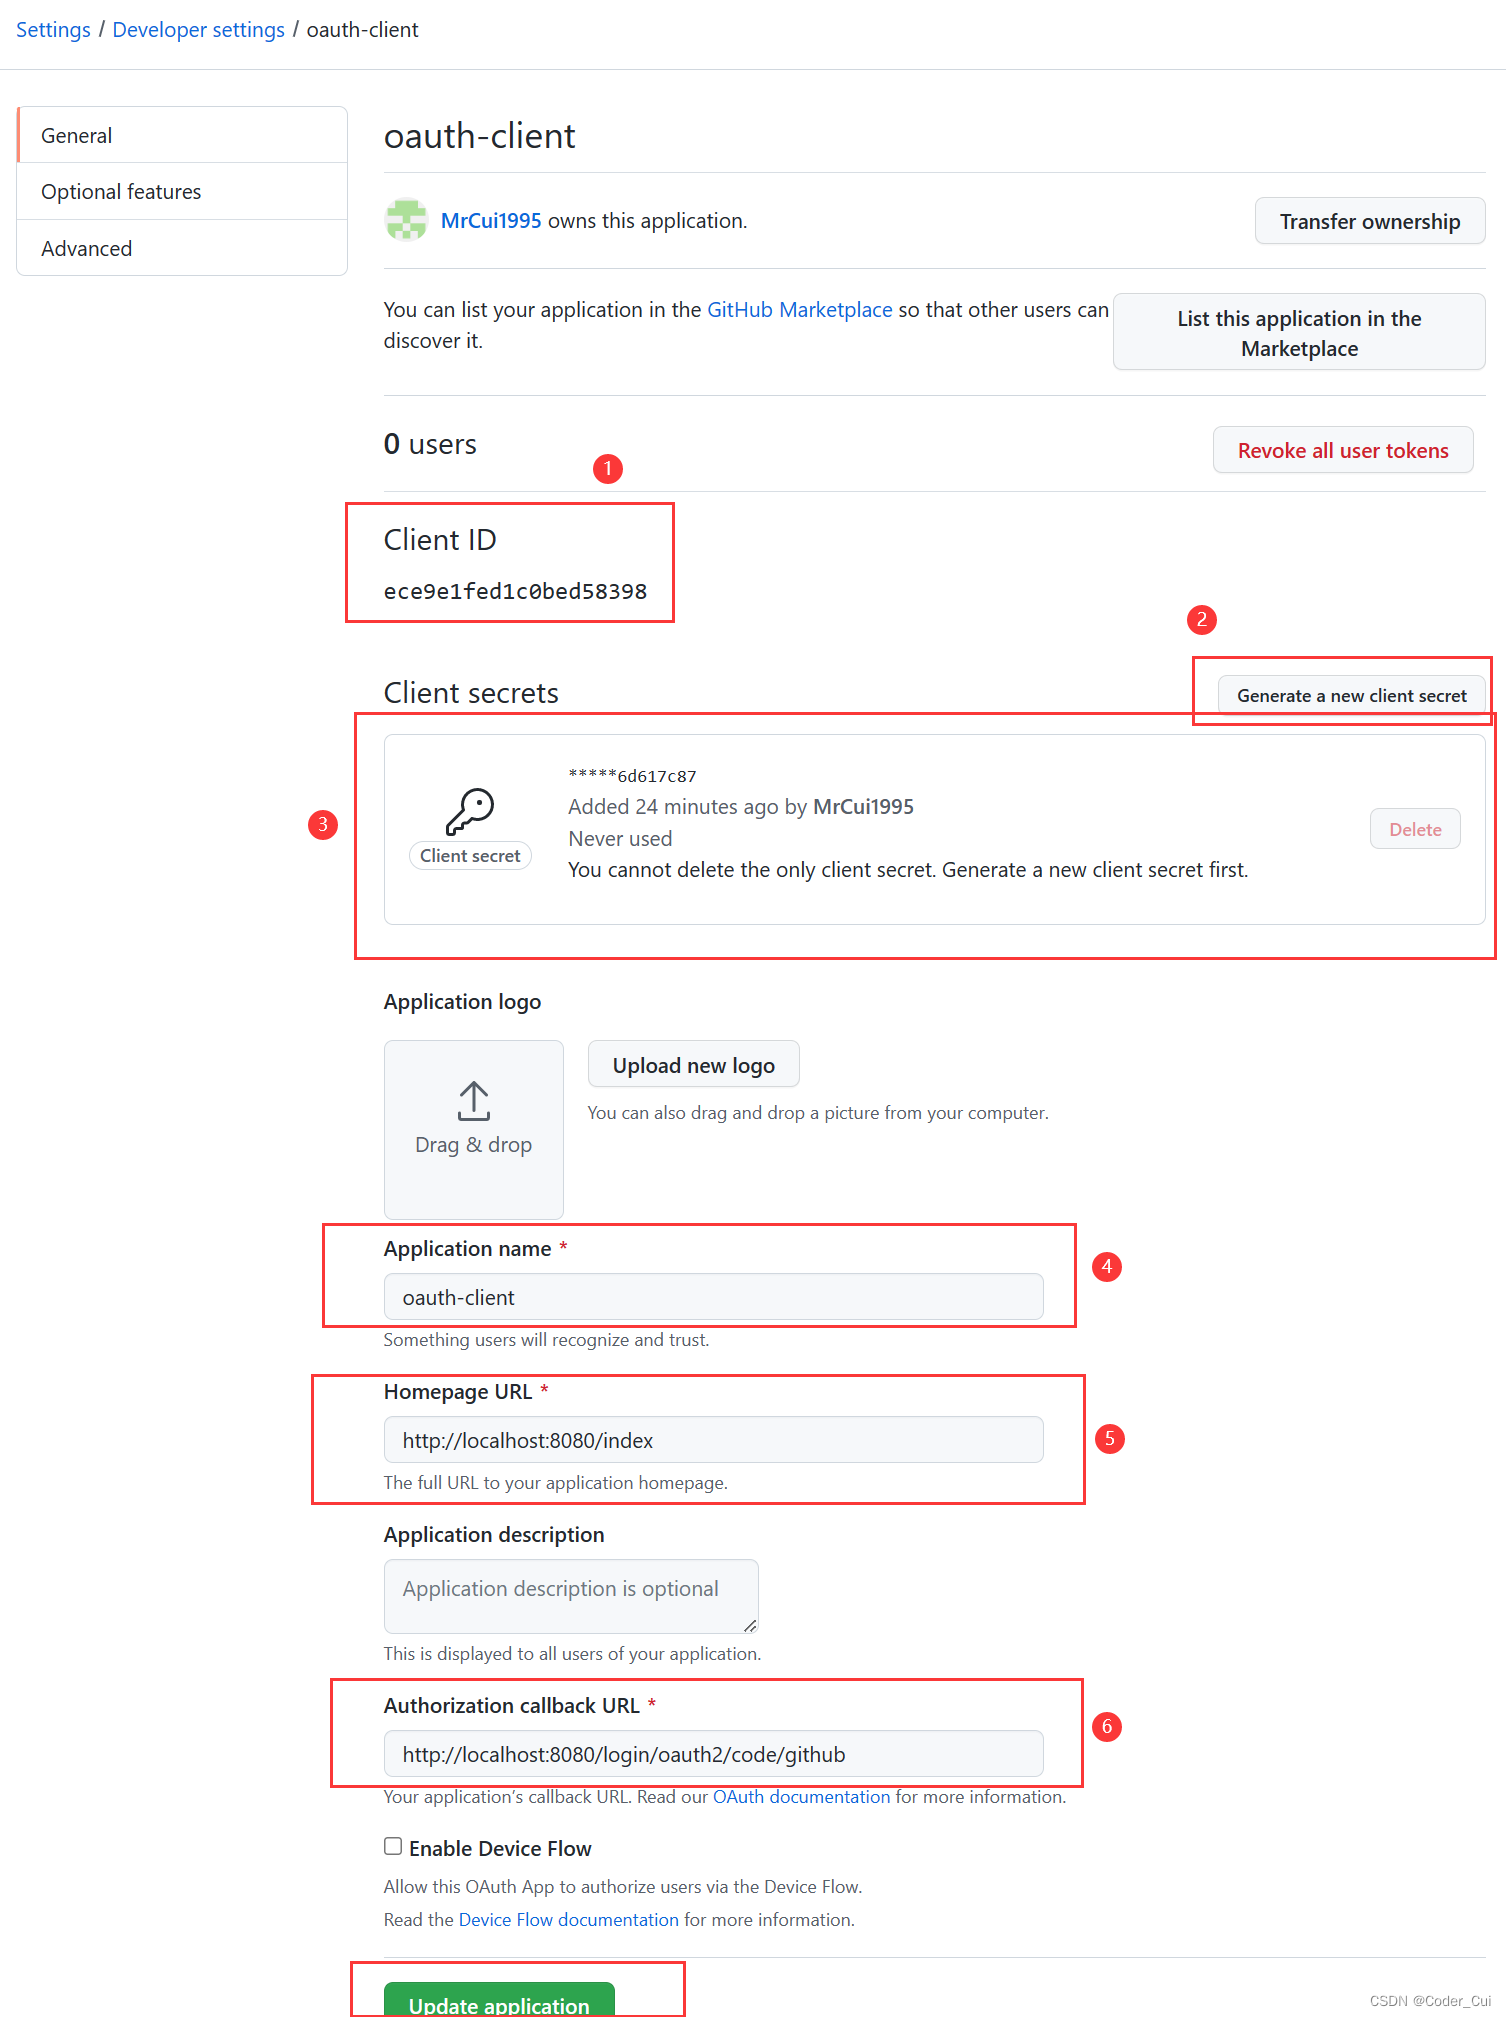
填写相关参数:
-
Application name:oauth-client
-
Homepage URL:http://localhost:8080/index
-
Authorization callback URL:http://localhost:8080/login/oauth2/code/github
-
创建application后生成ClientId、Client secrets:刚创建时0 users,授权之后这里数目会变,可在这里解除授权。
5.2 项目开发
5.2.1 创建SpringBoot应用
项目名:spring-security-oauth-client-github,boot选2.7以下版本,并引入如下依赖:
<dependencies> <dependency> <groupId>org.springframework.boot</groupId> <artifactId>spring-boot-starter-security</artifactId> </dependency> <dependency> <groupId>org.springframework.boot</groupId> <artifactId>spring-boot-starter-web</artifactId> </dependency> <dependency> <groupId>org.springframework.boot</groupId> <artifactId>spring-boot-starter-test</artifactId> <scope>test</scope> </dependency> <dependency> <groupId>org.springframework.security</groupId> <artifactId>spring-security-test</artifactId> <scope>test</scope> </dependency> <dependency> <groupId>org.springframework.boot</groupId> <artifactId>spring-boot-starter-oauth2-client</artifactId> </dependency> </dependencies>
5.2.2 创建测试controller:HelloController
package com.study.controller;
import org.springframework.security.core.Authentication;
import org.springframework.security.core.context.SecurityContextHolder;
import org.springframework.security.oauth2.core.user.DefaultOAuth2User;
import org.springframework.web.bind.annotation.GetMapping;
import org.springframework.web.bind.annotation.RestController;
/**
* @ClassName HelloController
* @Description TODO
* @Author Jiangnan Cui
* @Date 2023/3/11 15:49
* @Version 1.0
*/
@RestController
public class HelloController {
@GetMapping("/hello")
public DefaultOAuth2User hello() {
System.out.println("hello ");
Authentication authentication = SecurityContextHolder.getContext().getAuthentication();
return (DefaultOAuth2User) authentication.getPrincipal();
}
}
5.2.3 在SecurityConfig中配置spring security
package com.study.config;
import org.springframework.context.annotation.Configuration;
import org.springframework.security.config.annotation.web.builders.HttpSecurity;
import org.springframework.security.config.annotation.web.configuration.WebSecurityConfigurerAdapter;
/**
* @ClassName SecurityConfig
* @Description Security配置类
* @Author Jiangnan Cui
* @Date 2023/3/2 7:32
* @Version 1.0
*/
@Configuration
public class SecurityConfig extends WebSecurityConfigurerAdapter {
/**
* 基本配置:此处只是使用Oauth协议作认证,具体还要在配置文件中配置认证服务
*/
@Override
protected void configure(HttpSecurity http) throws Exception {
http.authorizeRequests()
.anyRequest().authenticated()
.and()
.oauth2Login();
}
}
5.2.4 在application.properties中配置认证服务
# 应用名称 spring.application.name=spring-security-oauth-client-github # 访问端口 server.port=8080 # clientId:按照自己注册的Oauth App来 spring.security.oauth2.client.registration.github.client-id=ece9e1fed1c0bed58398 # clientSecret:按照自己注册的Oauth App来 spring.security.oauth2.client.registration.github.client-secret=da7dce999aa9d7391a6f1f81c740fc22ba2ac0c7 # redirectURL,注意: 一定要与重定向回调URL一致 spring.security.oauth2.client.registration.github.redirect-uri=http://localhost:8080/login/oauth2/code/github
5.2.5 index页面
 <!DOCTYPE html>
 <html lang="en">
 <head>
     <meta charset="UTF-8">
     <title>主页</title>
 </head>
 <body>
 Hello,你好!
 </body>
 </html>
5.2.6 启动测试
访问:http://localhost:8080/login,弹出Oauth2默认认证页面:
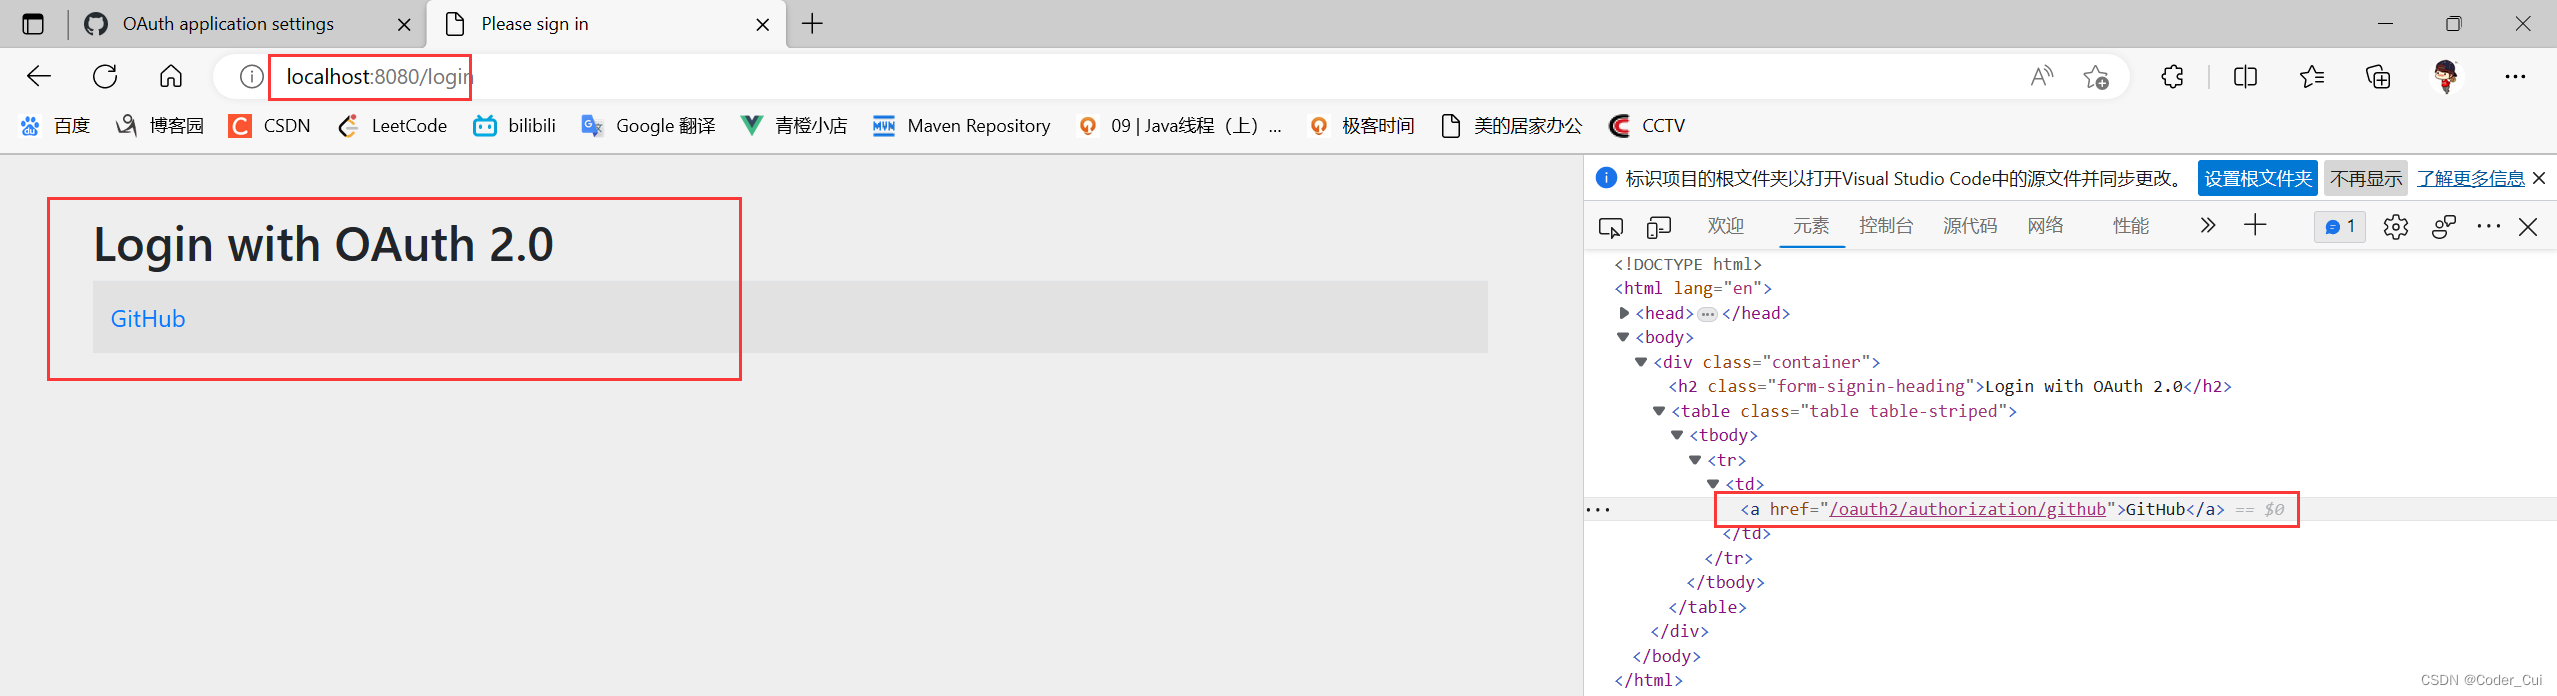
点击上图中的“GitHub”,同意授权:
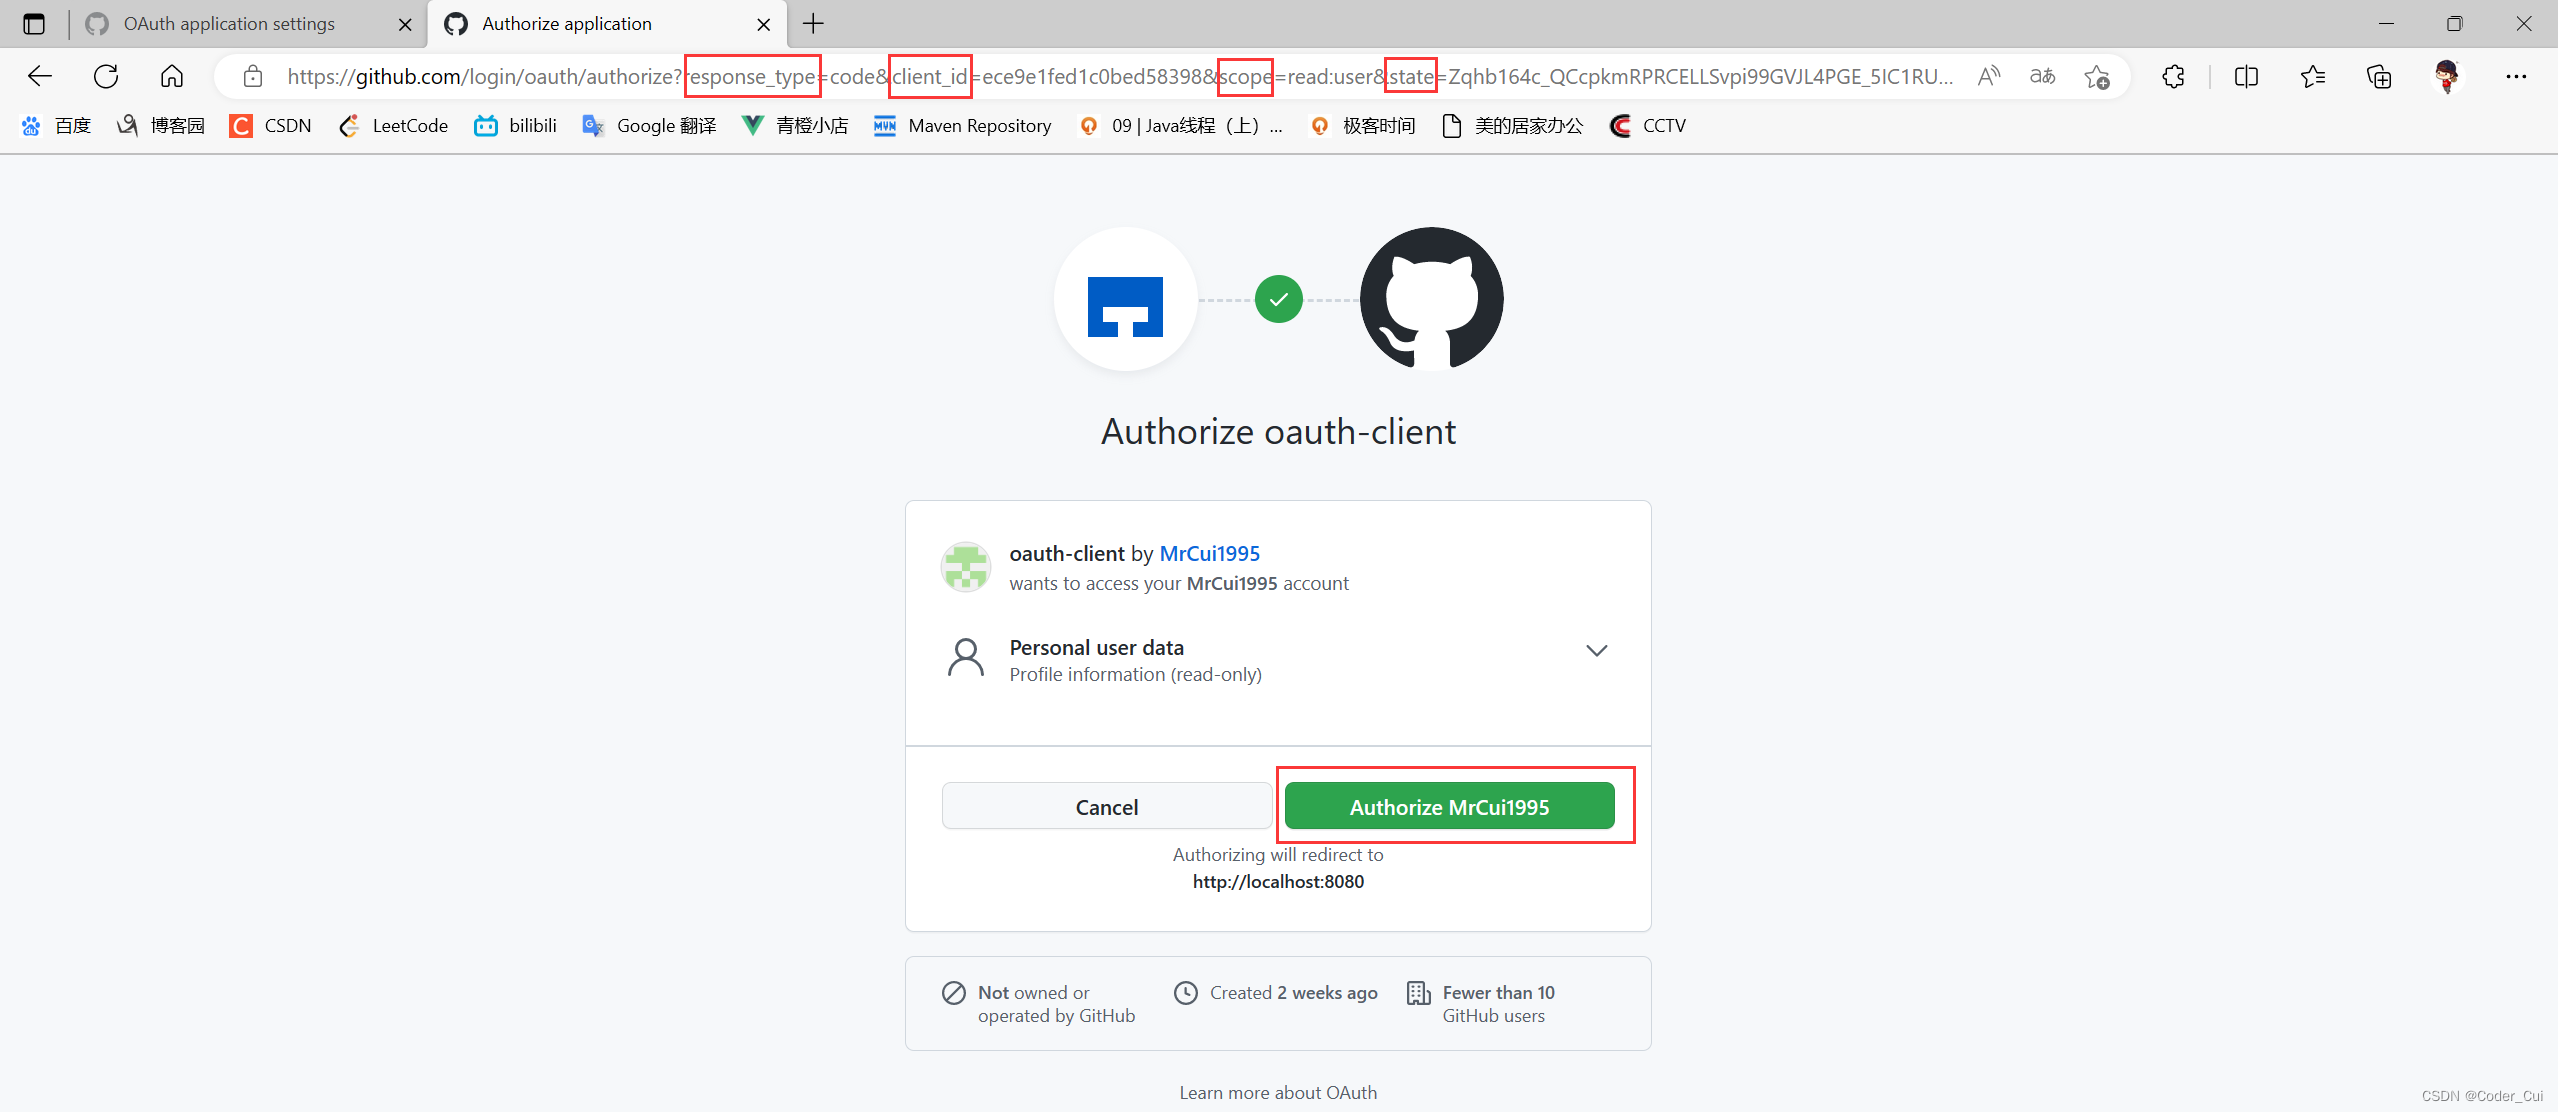
请求网址后含有请求参数的详细信息:
https://github.com/login/oauth/authorize?response_type=code&client_id=ece9e1fed1c0bed58398&scope=read:user&state=Zqhb164c_QCcpkmRPRCELLSvpi99GVJL4PGE_5IC1RU%3D&redirect_uri=http://localhost:8080/login/oauth2/code/github
授权成功:

自动跳转到主页:

之后再访问:http://localhost:8080/hello得到授权信息:

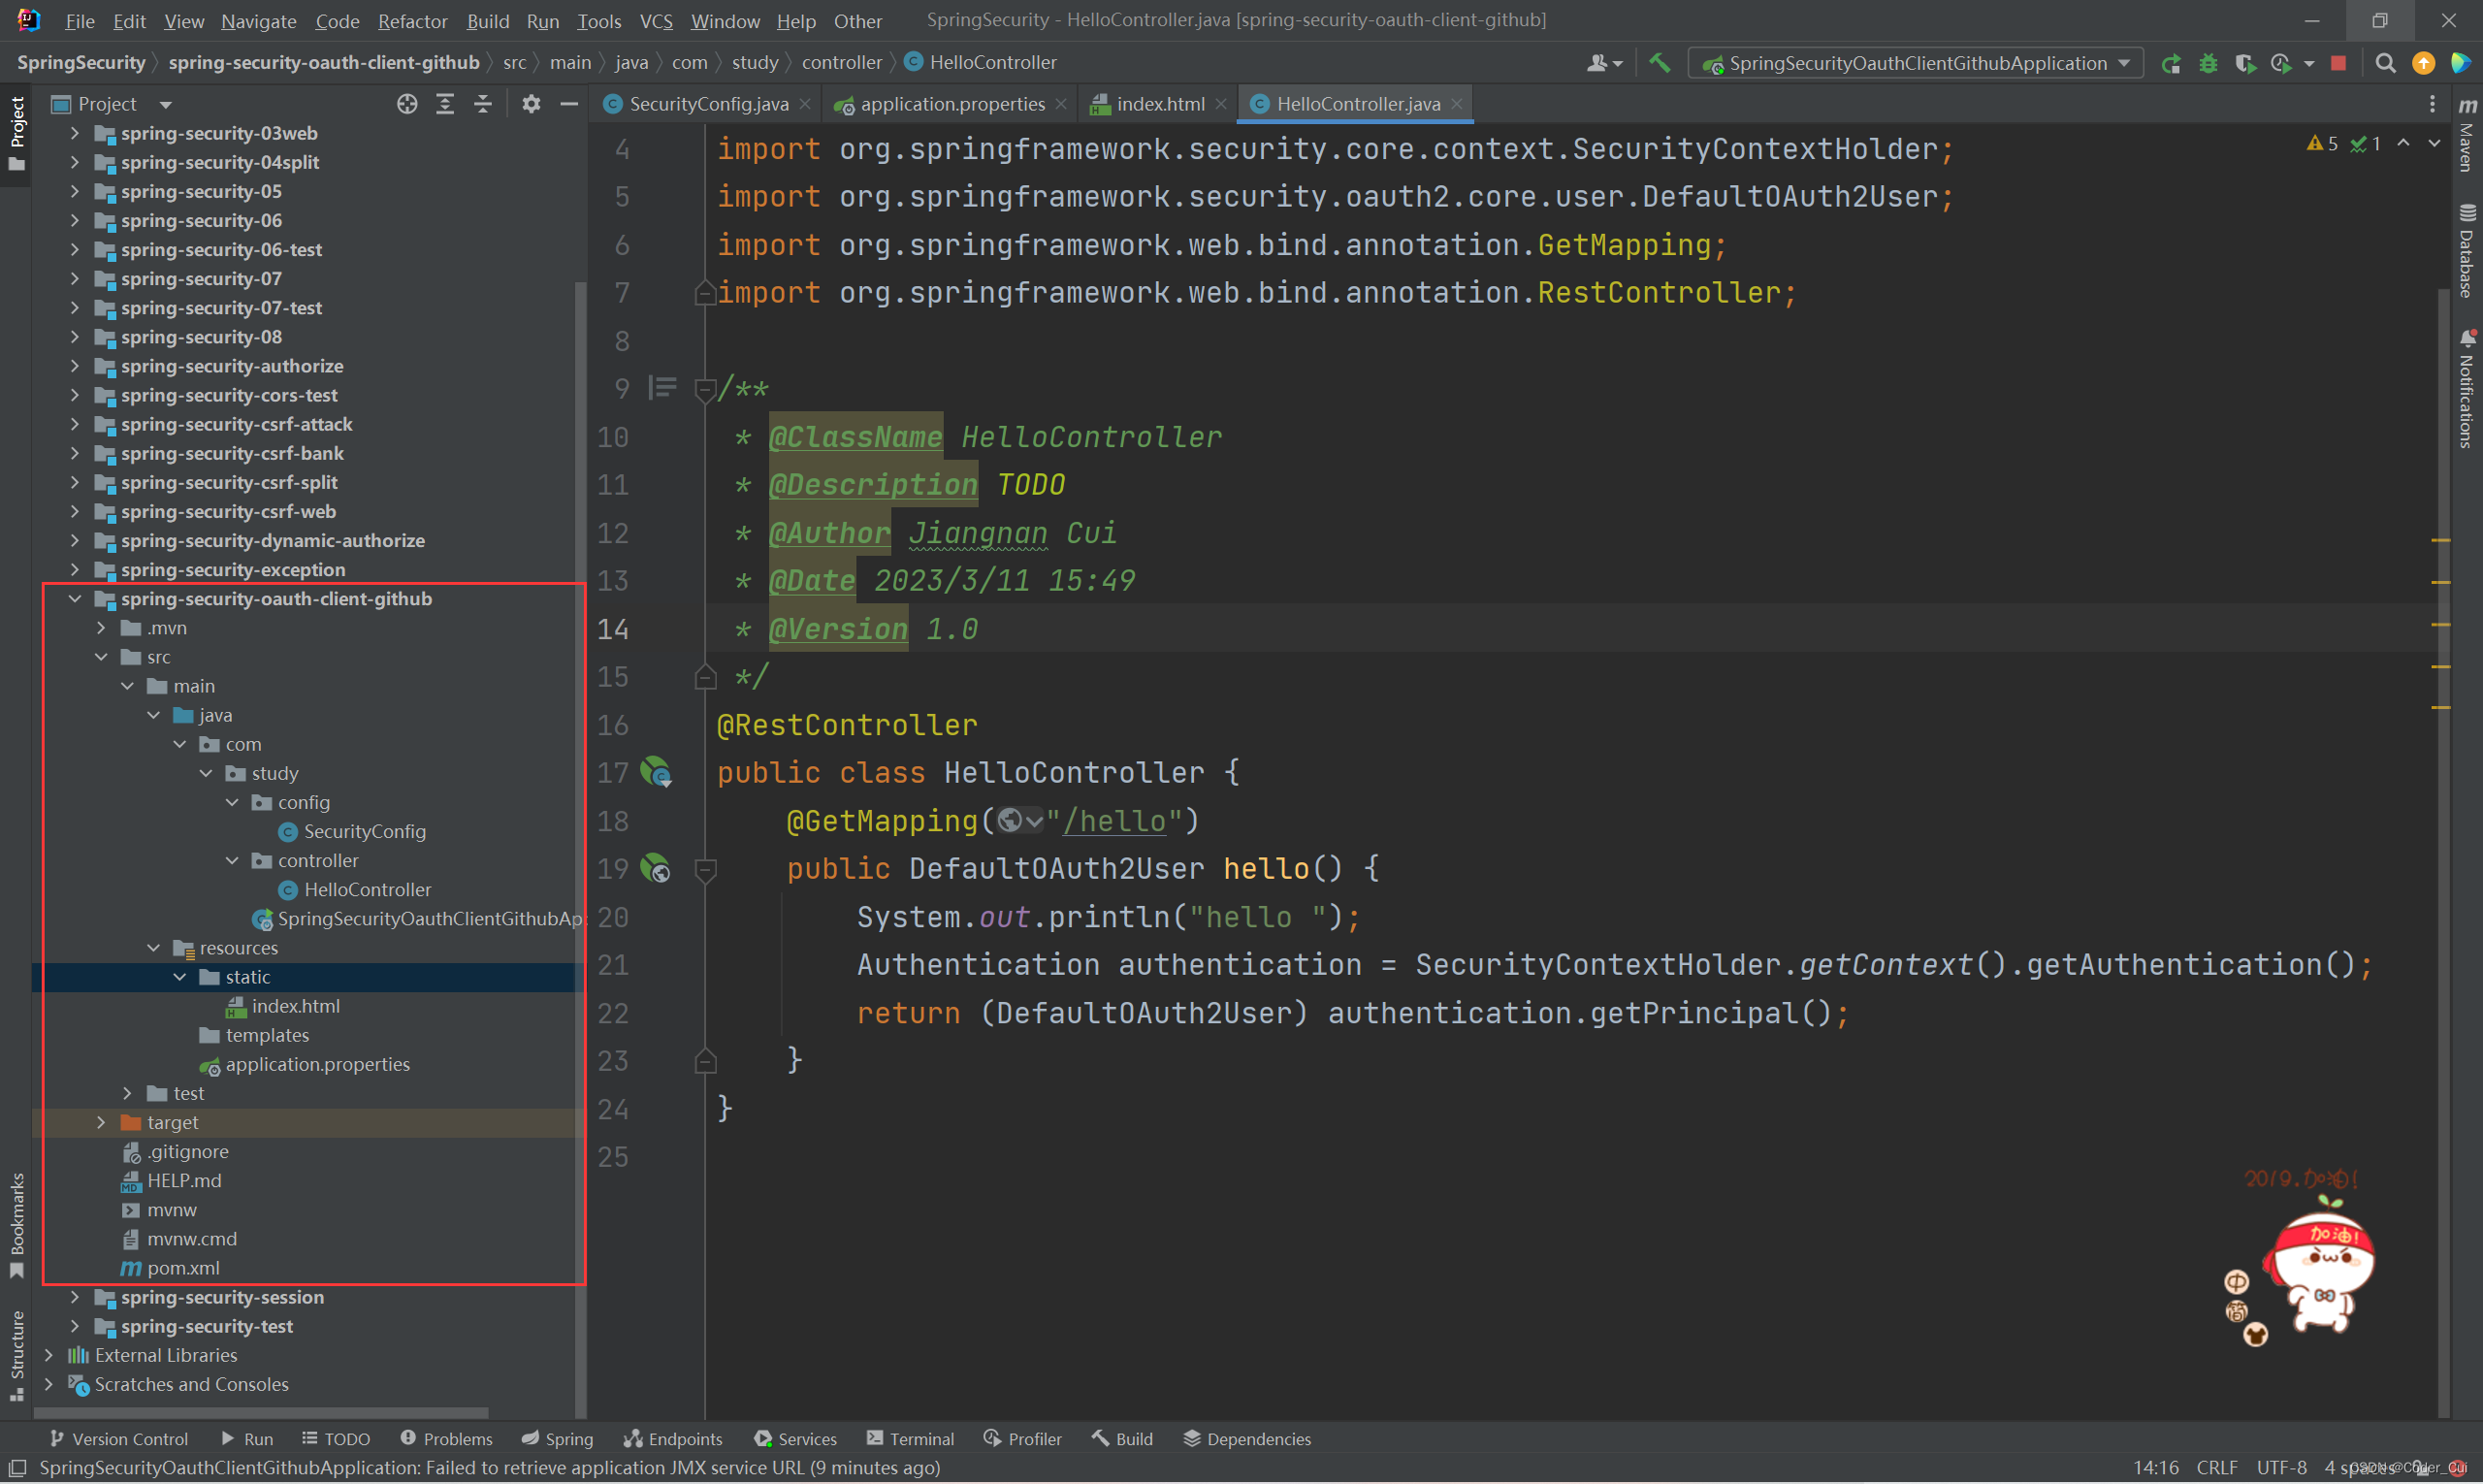
5.2.7 项目完整目录结构
6. Spring Security Oauth2
配套视频:75.OAuth Client 案例原理解析说明_哔哩哔哩_bilibili(Oauth2源码解析)
可参考:OAuth2 详细介绍!_oath2_千城丶Y的博客-优快云博客
配套视频:76.Spring Security OAuth2 简介和历史_哔哩哔哩_bilibili
6.1 简介
虽然Spring Security对OAuth2客户端的支持已经很完备了,但是在授权服务器、资源服务器还面临着很多问题。
Spring Security 对 OAuth2 提供了很好的支持,这使得我们在 Spring Security中使用 OAuth2 非常地方便。虽然Spring Security对OAuth2客户端的支持已经很完备了,但是在授权服务器、资源服务器还面临着很多问题。由于历史原因,Spring Seaurity对 OAuth2 的支持比较混乱,这里简单梳理一下。
大约十年前,Spring 引入了一个社区驱动的开源项目 Spring Security OAuth, 并将其纳入 Spring 项目组合中。到今天为止,这个项目己经发展成为一个成熟的项目,可以支持大部分OAuth 规范,包括资源服务器、 客户端和授权服务器等。然而早期的项目存在一些问题,例如:
-
OAuth 是在早期完成的,开发者无法预料未来的变化以及这些代码到底要被怎么使用,这导致很多 Spring 项目提供了自己的 OAuth 支持,也就带来了 OAuth 支持的碎片化。
-
最早的OAuth项目同时支持 OAuth1.0 和 OAuth2.0,而现在OAuth1.0 早已经不再使用,可以放弃了。
-
现在我们有更多的库可以选择,可以在这些库的基础上去开发,以便更好地支持JWT等新技术。
基于以上这些原因,官方决定重写 Spring Security OAuth, 以便更好地协调 Spring 和OAuth,并简化代码库,使Spring 的 OAuth 支持更加灵活。然而,在重写的过程中,发生了不少波折。
2018年1月30日,Spring 官方发了一个通知,表示要逐渐停止现有的 OAuth2支持,然后在 Spring Security 5中构建下一代 OAuth2.0 支持。这么做的原因是因为当时 OAuth2 的落地方案比较混乱,在 Spring Security OAuth、 Spring Cloud Security、Spring Boot 1.5.x 以及当时最新的Spring Security 5.x 中都提供了对 OAuth2 的实现。以至于当开发者需要使用 OAuth2 时,不得不问,到底选哪一个依赖合适呢?
所以Spring 官方决定有必要将 OAuth2.0 的支持统一到一个项目中,以便为用户提供明确的选择,并避免任何潜在的混乱,同时 OAuth2.0 的开发文档也要重新编写,以方便开发人员学习。所有的决定将在 Spring Security 5 中开始,构建下一代 OAuth2.0的支持。从那个时候起,Spring Security OAuth 项目就正式处于维护模式。官方将提供至少一年的错识/安全修复程序,并且会考虑添加次要功能,但不会添加主要功能。同时将 Spring Security OAuth中的所有功能重构到 Spring Security 5.x 中。
到了2019年11月14日,Spring 官方又发布一个通知,这次的通知首先表示 Spring Security OAuth 在迁往 Spring Security 5.x 的过程非常顺利,大部分迁程工作已经完成了,剩下的将在5.3 版本中完成迁移,在迁移的过程中还添加了许多新功能。包括对 OpenID Connect1.0 的支持。同时还宣布将不再支持授权服务器,不支持的原因有两个:
-
在2019年,已经有大量的商业和开源授权服务器可用。 -
授权服务器是使用一个库来构建产品,而 Spring Security 作为框架,并不适合做这件事情。
一石激起千层浪,许多开发者表示对此难以接受。这件事也在Spring 社区引发了激烈的讨论,好在 Spring 官方愿意倾听来自社区的声音。
到了2020年4月15日,Spring 官方宣布启动 Spring Authorization server 项目。这是一个由 Spring Security 团队领导的社区驱动的项目,致力于向 Spring 社区提供 Authorization Server支持,也就是说,Spring 又重新支持授权服务器了。
2020年8月21日,Spring Authorization Server 0.0.1 正式发布!
这就是 OAuth2 在Spring 家族中的发展历程了。在后面的学习中,客户端和资源服务器都将采用最新的方式来构建,授权服务器依然采用旧的方式来构建,因为目前的 Spring Authorization Server 0.0.1 功能较少且 BUG 较多。
一般来说,当我们在项目中使用 OAuth2 时,都是开发客户端,授权服务器和资源服务器都是由外部提供。例如我们想在自己搭建网站上集成 GitHub 第三方登录,只需要开发自己的客户端即可,认证服务器和授权服务器都是由 GitHub 提供的。
6.2 授权、资源服务器
配套视频:77.授权服务器搭建以及授权码模式_哔哩哔哩_bilibili
前面的 GitHub 授权登录主要向大家展示了 OAuth2 中客户端的工作模式。对于大部分的开发者而言,日常接触到的 OAuth2 都是开发客户端,例如接入 QQ 登录、接入微信登录等。不过也有少量场景,可能需要开发者提供授权服务器与资源服务器,接下来我们就通过一个完整的案例演示如何搭建授权服务器与资源服务器。
搭建授权服务器,我们可以选择一些现成的开源项目,直接运行即可,例如:
-
Keycloak: RedFat 公司提供的开源工具,提供了很多实用功能,倒如单点登录、支持OpenID、可视化后台管理等。
-
Apache Oltu: Apache 上的开源项目,最近几年没怎么维护了。
接下来我们将搭建一个包含授权服务器、资源服务器以及客户端在内的 OAuth2 案例。
项目规划首先把项目分为三部分:
-
授权服务器:采用较早的 spring-cloud-starter-oauth2 来搭建授权服务器。
-
资源服务器:采用最新的 Spring Security 5.x 搭建资源服务器,
-
客户端: 采用最新的 Spring Security 5.x 搭建客户端。
6.3 授权服务器搭建
6.3.1 基于内存客户端和令牌存储
创建 springboot 应用:spring-security-authorization-server,并引入依赖:
注意: 降低 springboot 版本为 2.2.5.RELEASE
<dependencies> <dependency> <groupId>org.springframework.boot</groupId> <artifactId>spring-boot-starter-security</artifactId> </dependency> <dependency> <groupId>org.springframework.boot</groupId> <artifactId>spring-boot-starter-web</artifactId> </dependency> <dependency> <groupId>org.springframework.boot</groupId> <artifactId>spring-boot-starter-test</artifactId> <scope>test</scope> </dependency> <dependency> <groupId>org.springframework.security</groupId> <artifactId>spring-security-test</artifactId> <scope>test</scope> </dependency> <dependency> <groupId>org.springframework.cloud</groupId> <artifactId>spring-cloud-starter-oauth2</artifactId> <version>2.2.5.RELEASE</version> </dependency> </dependencies>
编写配置类,添加 security 配置类以及 oauth 配置类
Spring Security 配置类:
package com.study.config;
import org.springframework.context.annotation.Bean;
import org.springframework.context.annotation.Configuration;
import org.springframework.security.authentication.AuthenticationManager;
import org.springframework.security.config.annotation.authentication.builders.AuthenticationManagerBuilder;
import org.springframework.security.config.annotation.web.builders.HttpSecurity;
import org.springframework.security.config.annotation.web.configuration.WebSecurityConfigurerAdapter;
import org.springframework.security.core.userdetails.User;
import org.springframework.security.core.userdetails.UserDetails;
import org.springframework.security.core.userdetails.UserDetailsService;
import org.springframework.security.crypto.bcrypt.BCryptPasswordEncoder;
import org.springframework.security.crypto.password.PasswordEncoder;
import org.springframework.security.provisioning.InMemoryUserDetailsManager;
/**
* @ClassName SecurityConfig
* @Description TODO
* @Author Jiangnan Cui
* @Date 2023/3/11 17:43
* @Version 1.0
*/
@Configuration
public class SecurityConfig extends WebSecurityConfigurerAdapter {
/**
* 密码加密
*
* @return
*/
@Bean
public PasswordEncoder passwordEncoder() {
return new BCryptPasswordEncoder();
}
/**
* 认证管理器:将内部的AuthenticationManager暴露出来,方便外部获取
*
* @return
* @throws Exception
*/
@Override
@Bean
protected AuthenticationManager authenticationManager() throws Exception {
return super.authenticationManager();
}
/**
* 使用基于内存的数据库
*
* @return
*/
@Bean
public UserDetailsService userDetailsService() {
InMemoryUserDetailsManager inMemoryUserDetailsManager = new InMemoryUserDetailsManager();
UserDetails user = User.withUsername("root").password(passwordEncoder().encode("123")).roles("ADMIN").build();
inMemoryUserDetailsManager.createUser(user);
return inMemoryUserDetailsManager;
}
/**
* 注入内存数据库
*
* @param auth
* @throws Exception
*/
@Override
protected void configure(AuthenticationManagerBuilder auth) throws Exception {
auth.userDetailsService(userDetailsService());
}
/**
* Spring Security基本配置
*
* @param http
* @throws Exception
*/
@Override
protected void configure(HttpSecurity http) throws Exception {
http.csrf().disable().formLogin();
}
}
Authorization Server 配置类:
package com.study.config;
import org.springframework.beans.factory.annotation.Autowired;
import org.springframework.context.annotation.Configuration;
import org.springframework.security.authentication.AuthenticationManager;
import org.springframework.security.core.userdetails.UserDetailsService;
import org.springframework.security.crypto.password.PasswordEncoder;
import org.springframework.security.oauth2.config.annotation.configurers.ClientDetailsServiceConfigurer;
import org.springframework.security.oauth2.config.annotation.web.configuration.AuthorizationServerConfigurerAdapter;
import org.springframework.security.oauth2.config.annotation.web.configuration.EnableAuthorizationServer;
import org.springframework.security.oauth2.config.annotation.web.configurers.AuthorizationServerEndpointsConfigurer;
/**
* @ClassName AuthorizationServerConfig
* @Description 自定义授权服务器配置
* @Author Jiangnan Cui
* @Date 2023/3/11 17:51
* @Version 1.0
*/
@Configuration
// 指定当前应用为授权服务器
@EnableAuthorizationServer
public class AuthorizationServerConfig extends AuthorizationServerConfigurerAdapter {
private final PasswordEncoder passwordEncoder;
private final UserDetailsService userDetailsService;
private final AuthenticationManager authenticationManager;
@Autowired
public AuthorizationServerConfig(PasswordEncoder passwordEncoder, UserDetailsService userDetailsService, AuthenticationManager authenticationManager) {
this.passwordEncoder = passwordEncoder;
this.userDetailsService = userDetailsService;
this.authenticationManager = authenticationManager;
}
/**
* 用来配置授权服务器可以为哪些客户端授权
* 1.id
* 2.secret
* 3.redirecturi
* 4.使用哪种授权模式、可刷新令牌
* 5.令牌允许获取的资源权限
*/
@Override
public void configure(ClientDetailsServiceConfigurer clients) throws Exception {
clients.inMemory().withClient("client")
.secret(passwordEncoder.encode("secret"))
.redirectUris("http://www.baidu.com")
// .authorizedGrantTypes("authorization_code", "refresh_token")
.authorizedGrantTypes("authorization_code", "refresh_token", "implicit", "password", "client_credentials")
.scopes("read:user");
}
/**
* AuthorizationServerEndpoints配置:配置授权服务器使用哪个userDetailsService
*
* @param endpoints
* @throws Exception
*/
@Override
public void configure(AuthorizationServerEndpointsConfigurer endpoints) throws Exception {
// 开启刷新令牌必须指定userDetailsService
endpoints.userDetailsService(userDetailsService);
endpoints.authenticationManager(authenticationManager);
}
}
启动服务:访问:http://localhost:8080/login,输入:root、123进行登录

登录之后输入:http://localhost:8080/oauth/authorize?client_id=client&response_type=code&redirect_uri=http://www.baidu.com,进行授权码获取: Approve同意,Deny拒绝

选择Approve、Authorize,授权获取授权码:code携带的内容就是授权码

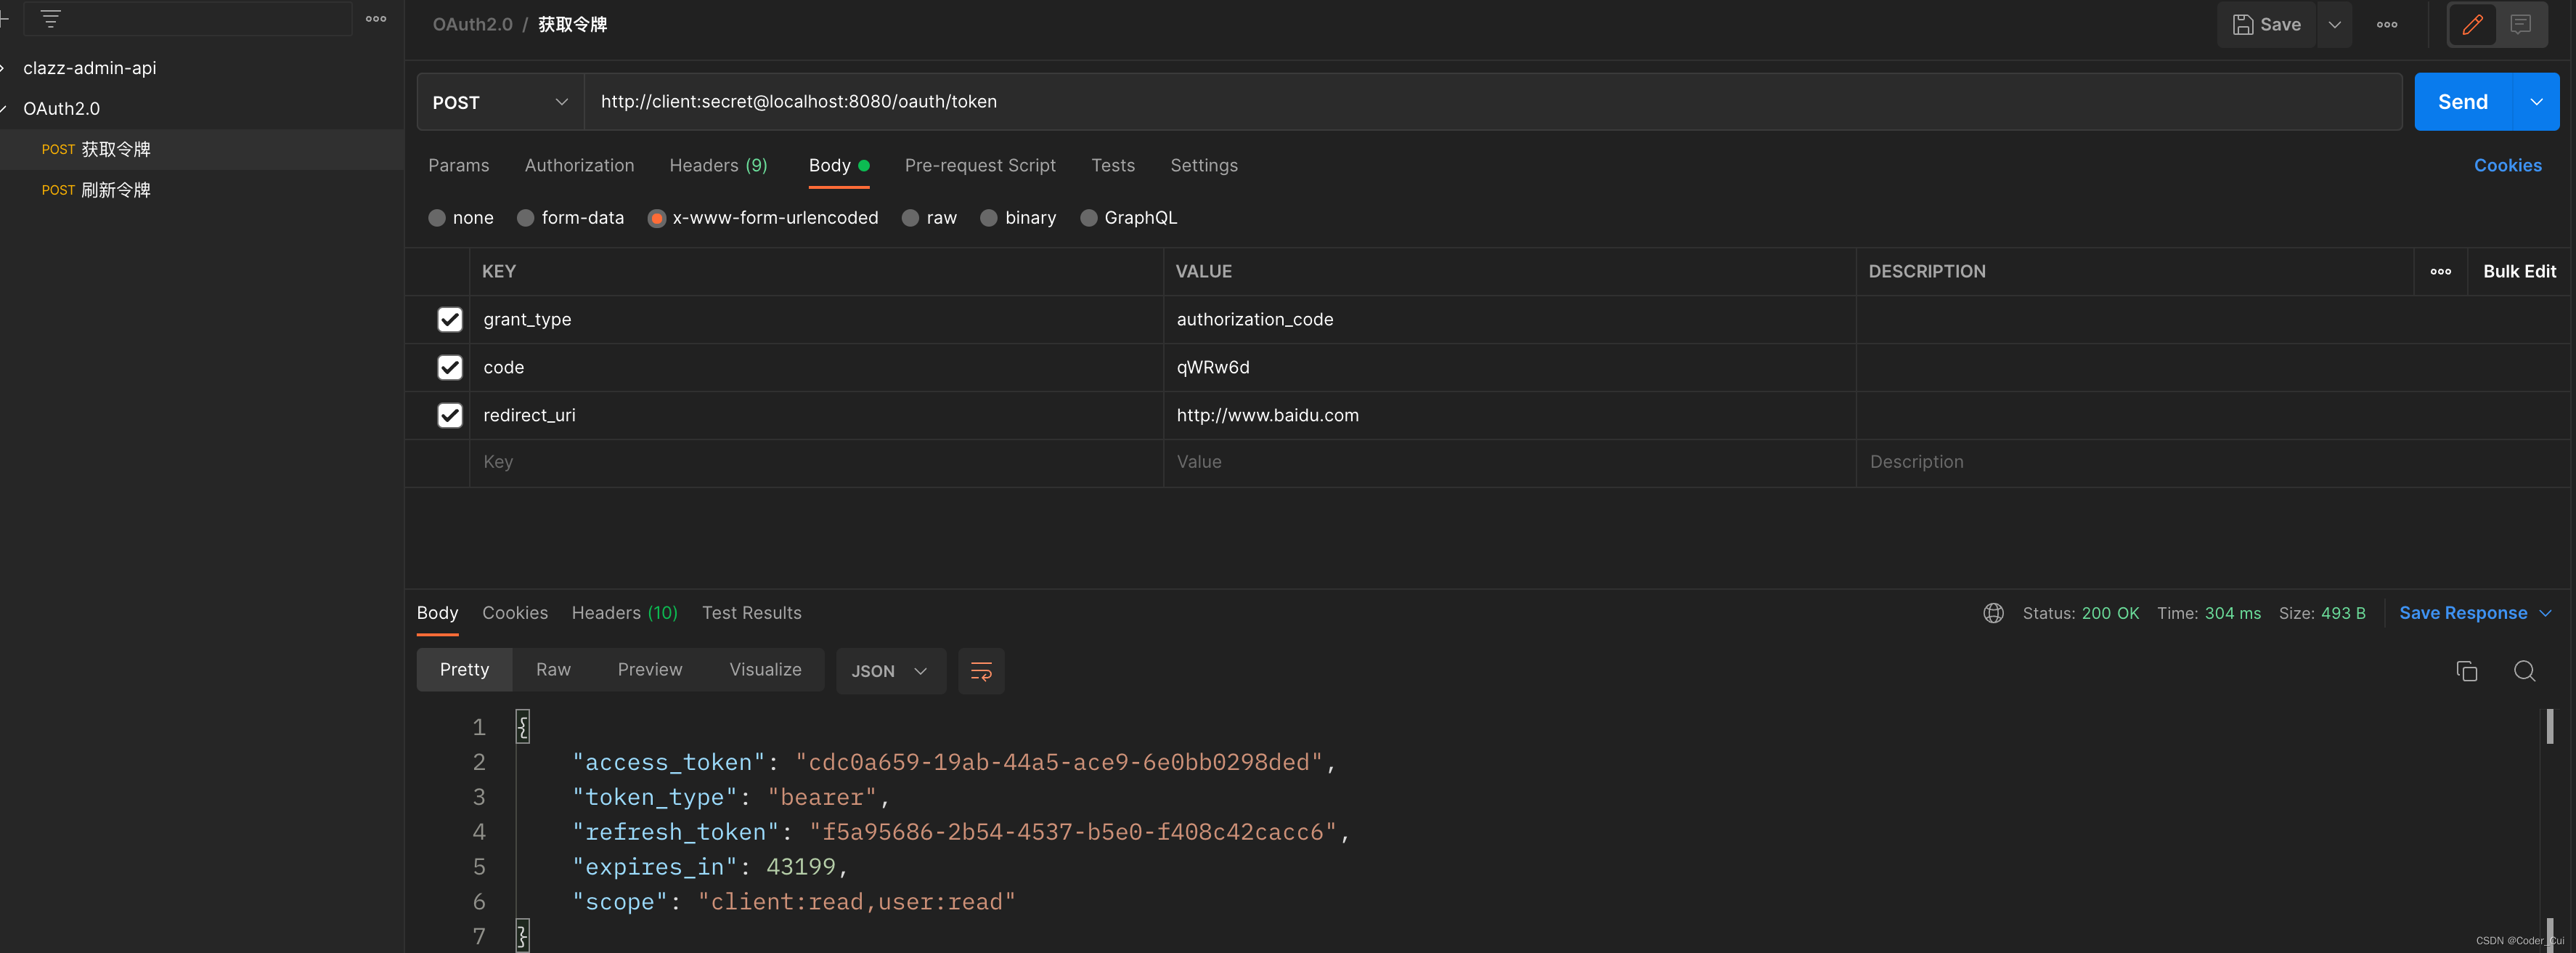
根据授权码模式申请令牌:
 访问地址:
 curl -X POST -H "Content-Type: application/x-www-form-urlencoded" -d 'grant_type=authorization_code&code=IwvCtx&redirect_uri=http://www.baidu.com' "http://client:secret@localhost:8080/oauth/token"
此处以Postman访问为例进行说明:
-
grant_type:authorization_code
-
code:自己得到的授权码
-
redirect_uri:百度一下,你就知道
配套视频:78.授权服务器之刷新令牌_哔哩哔哩_bilibili
刷新令牌:开启刷新令牌必须指定userDetailsService
curl -X POST -H "Content-Type: application/x-www-form-urlencoded" -d 'grant_type=refresh_token&refresh_token=f6583d8a-598c-46bb-81d8-01fa6484cf05&client_id=client' "http://client:secret@localhost:8080/oauth/token"
此处以Postman访问为例进行说明:
-
grant_type:refresh_token
-
code:自己得到的刷新令牌
-
client_id:client

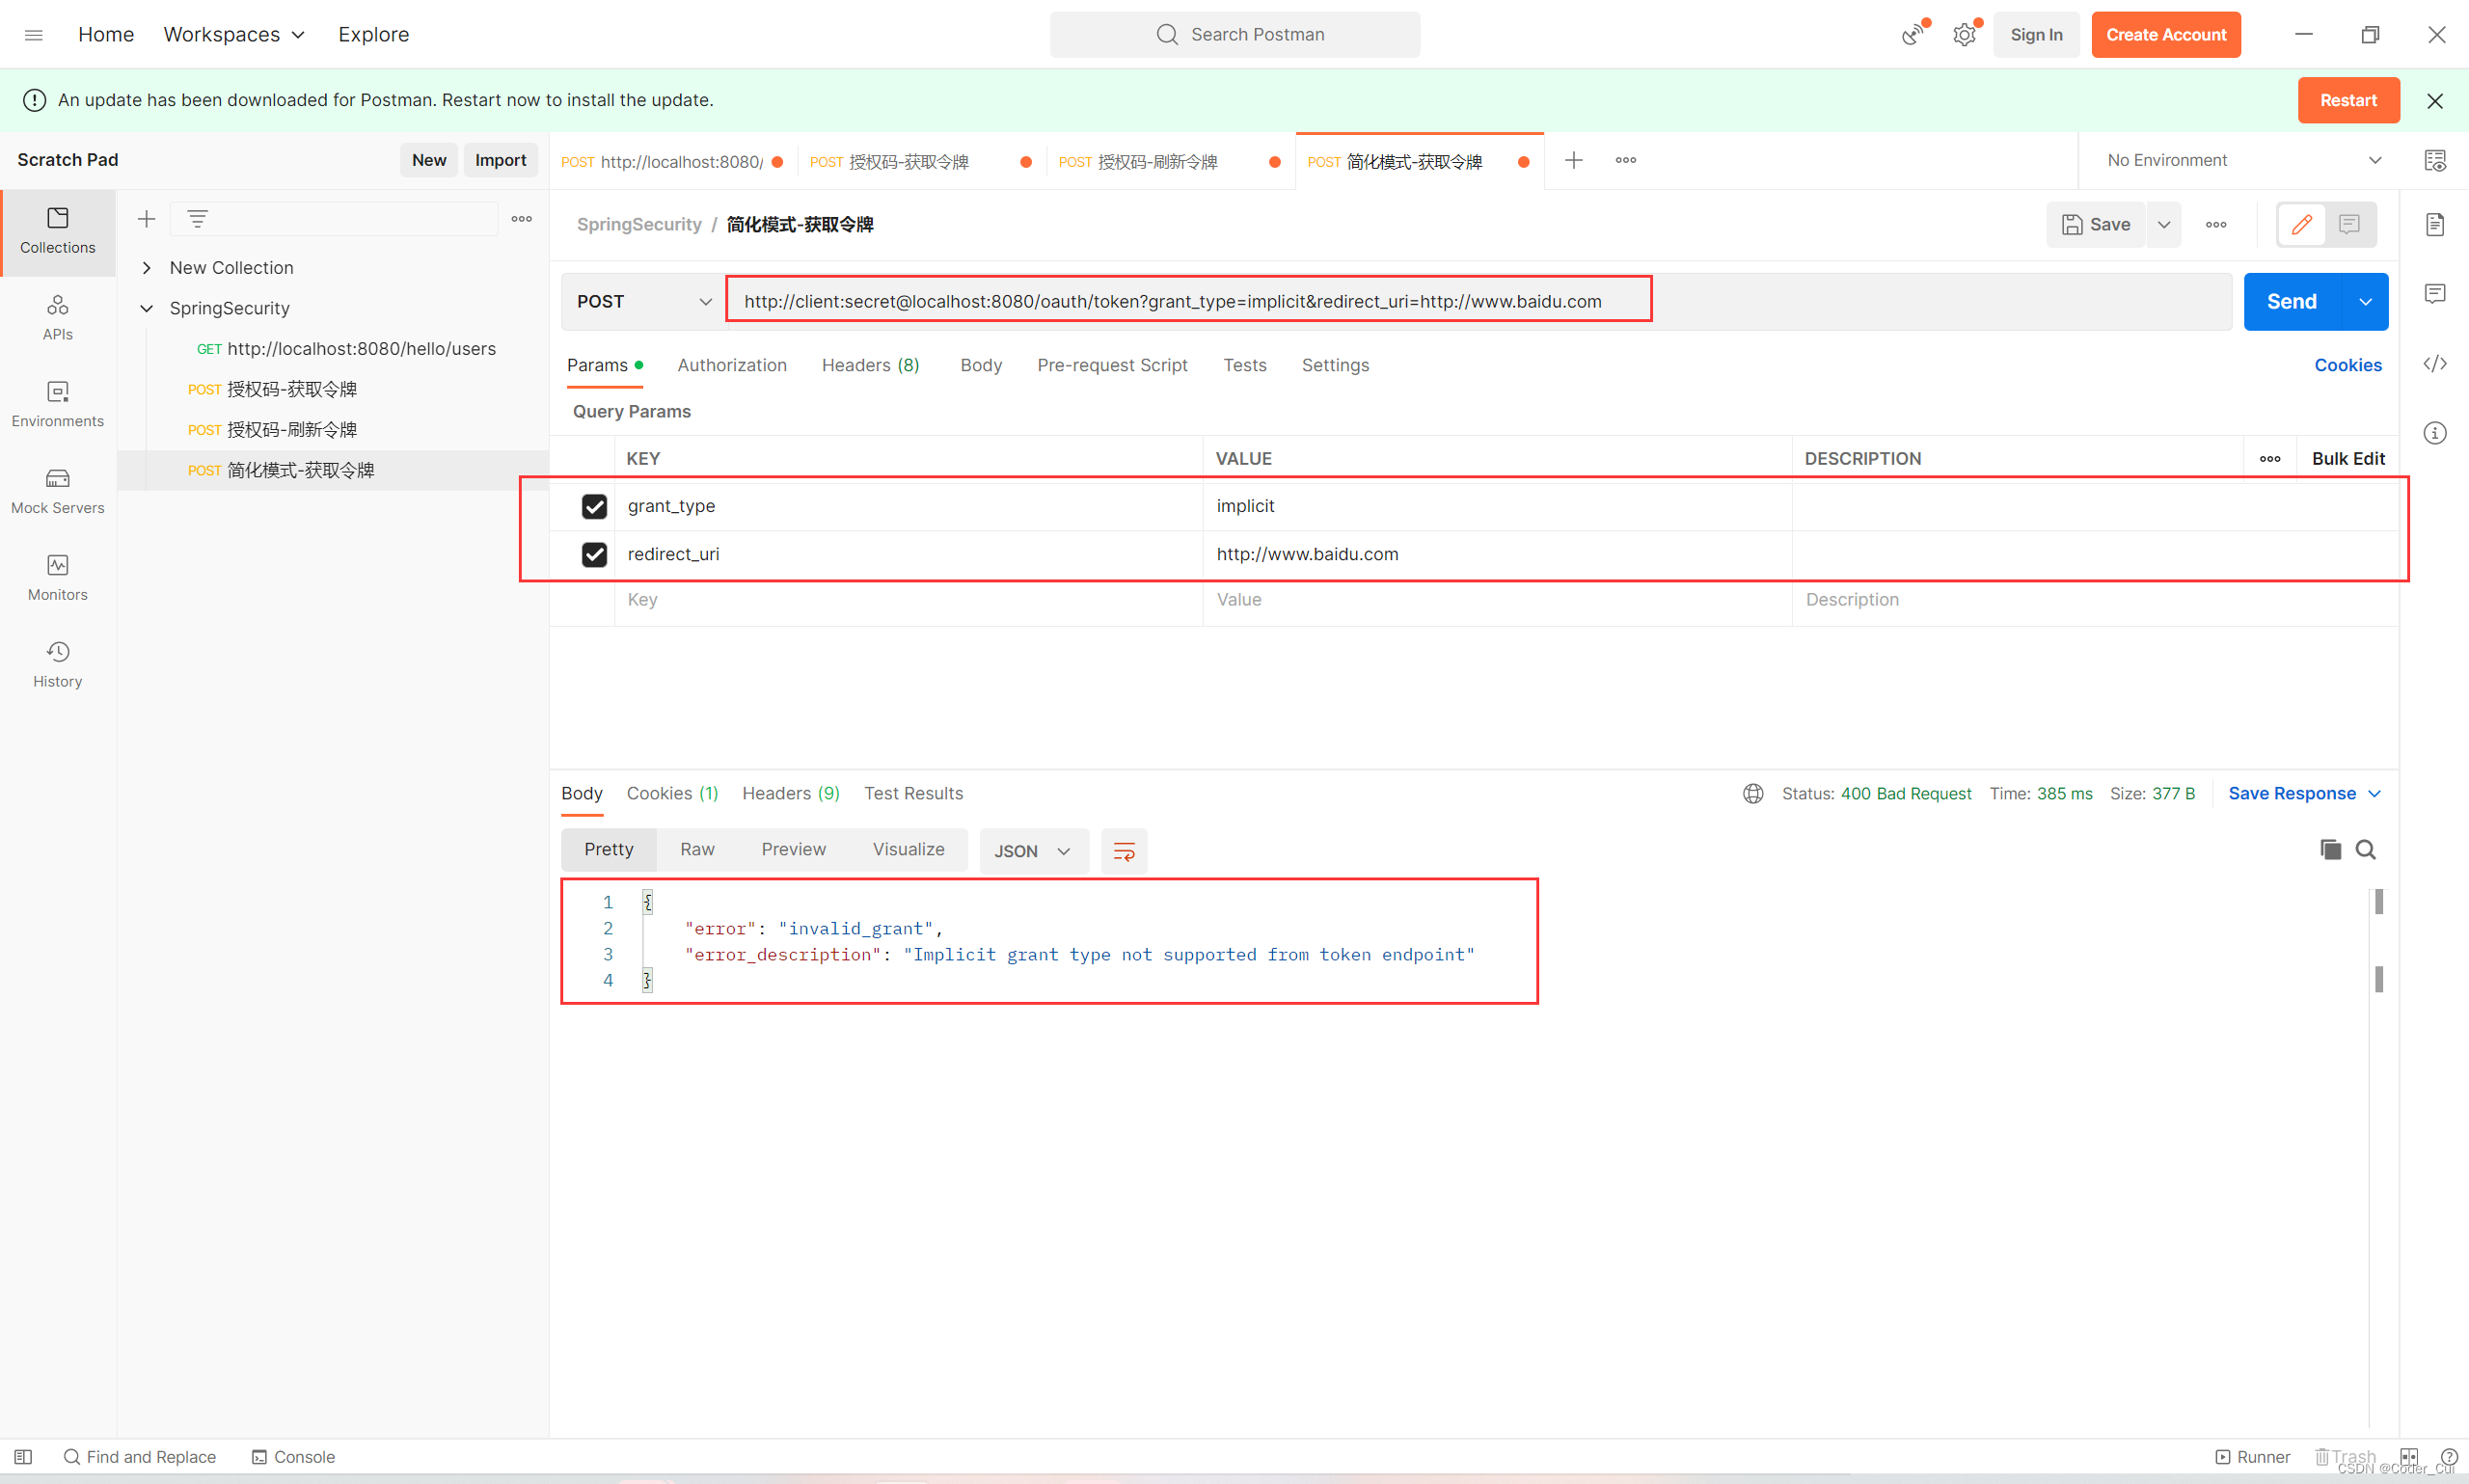
其余三种授权模式:79.授权服务器之简化、密码、客户端凭证模式_哔哩哔哩_bilibili
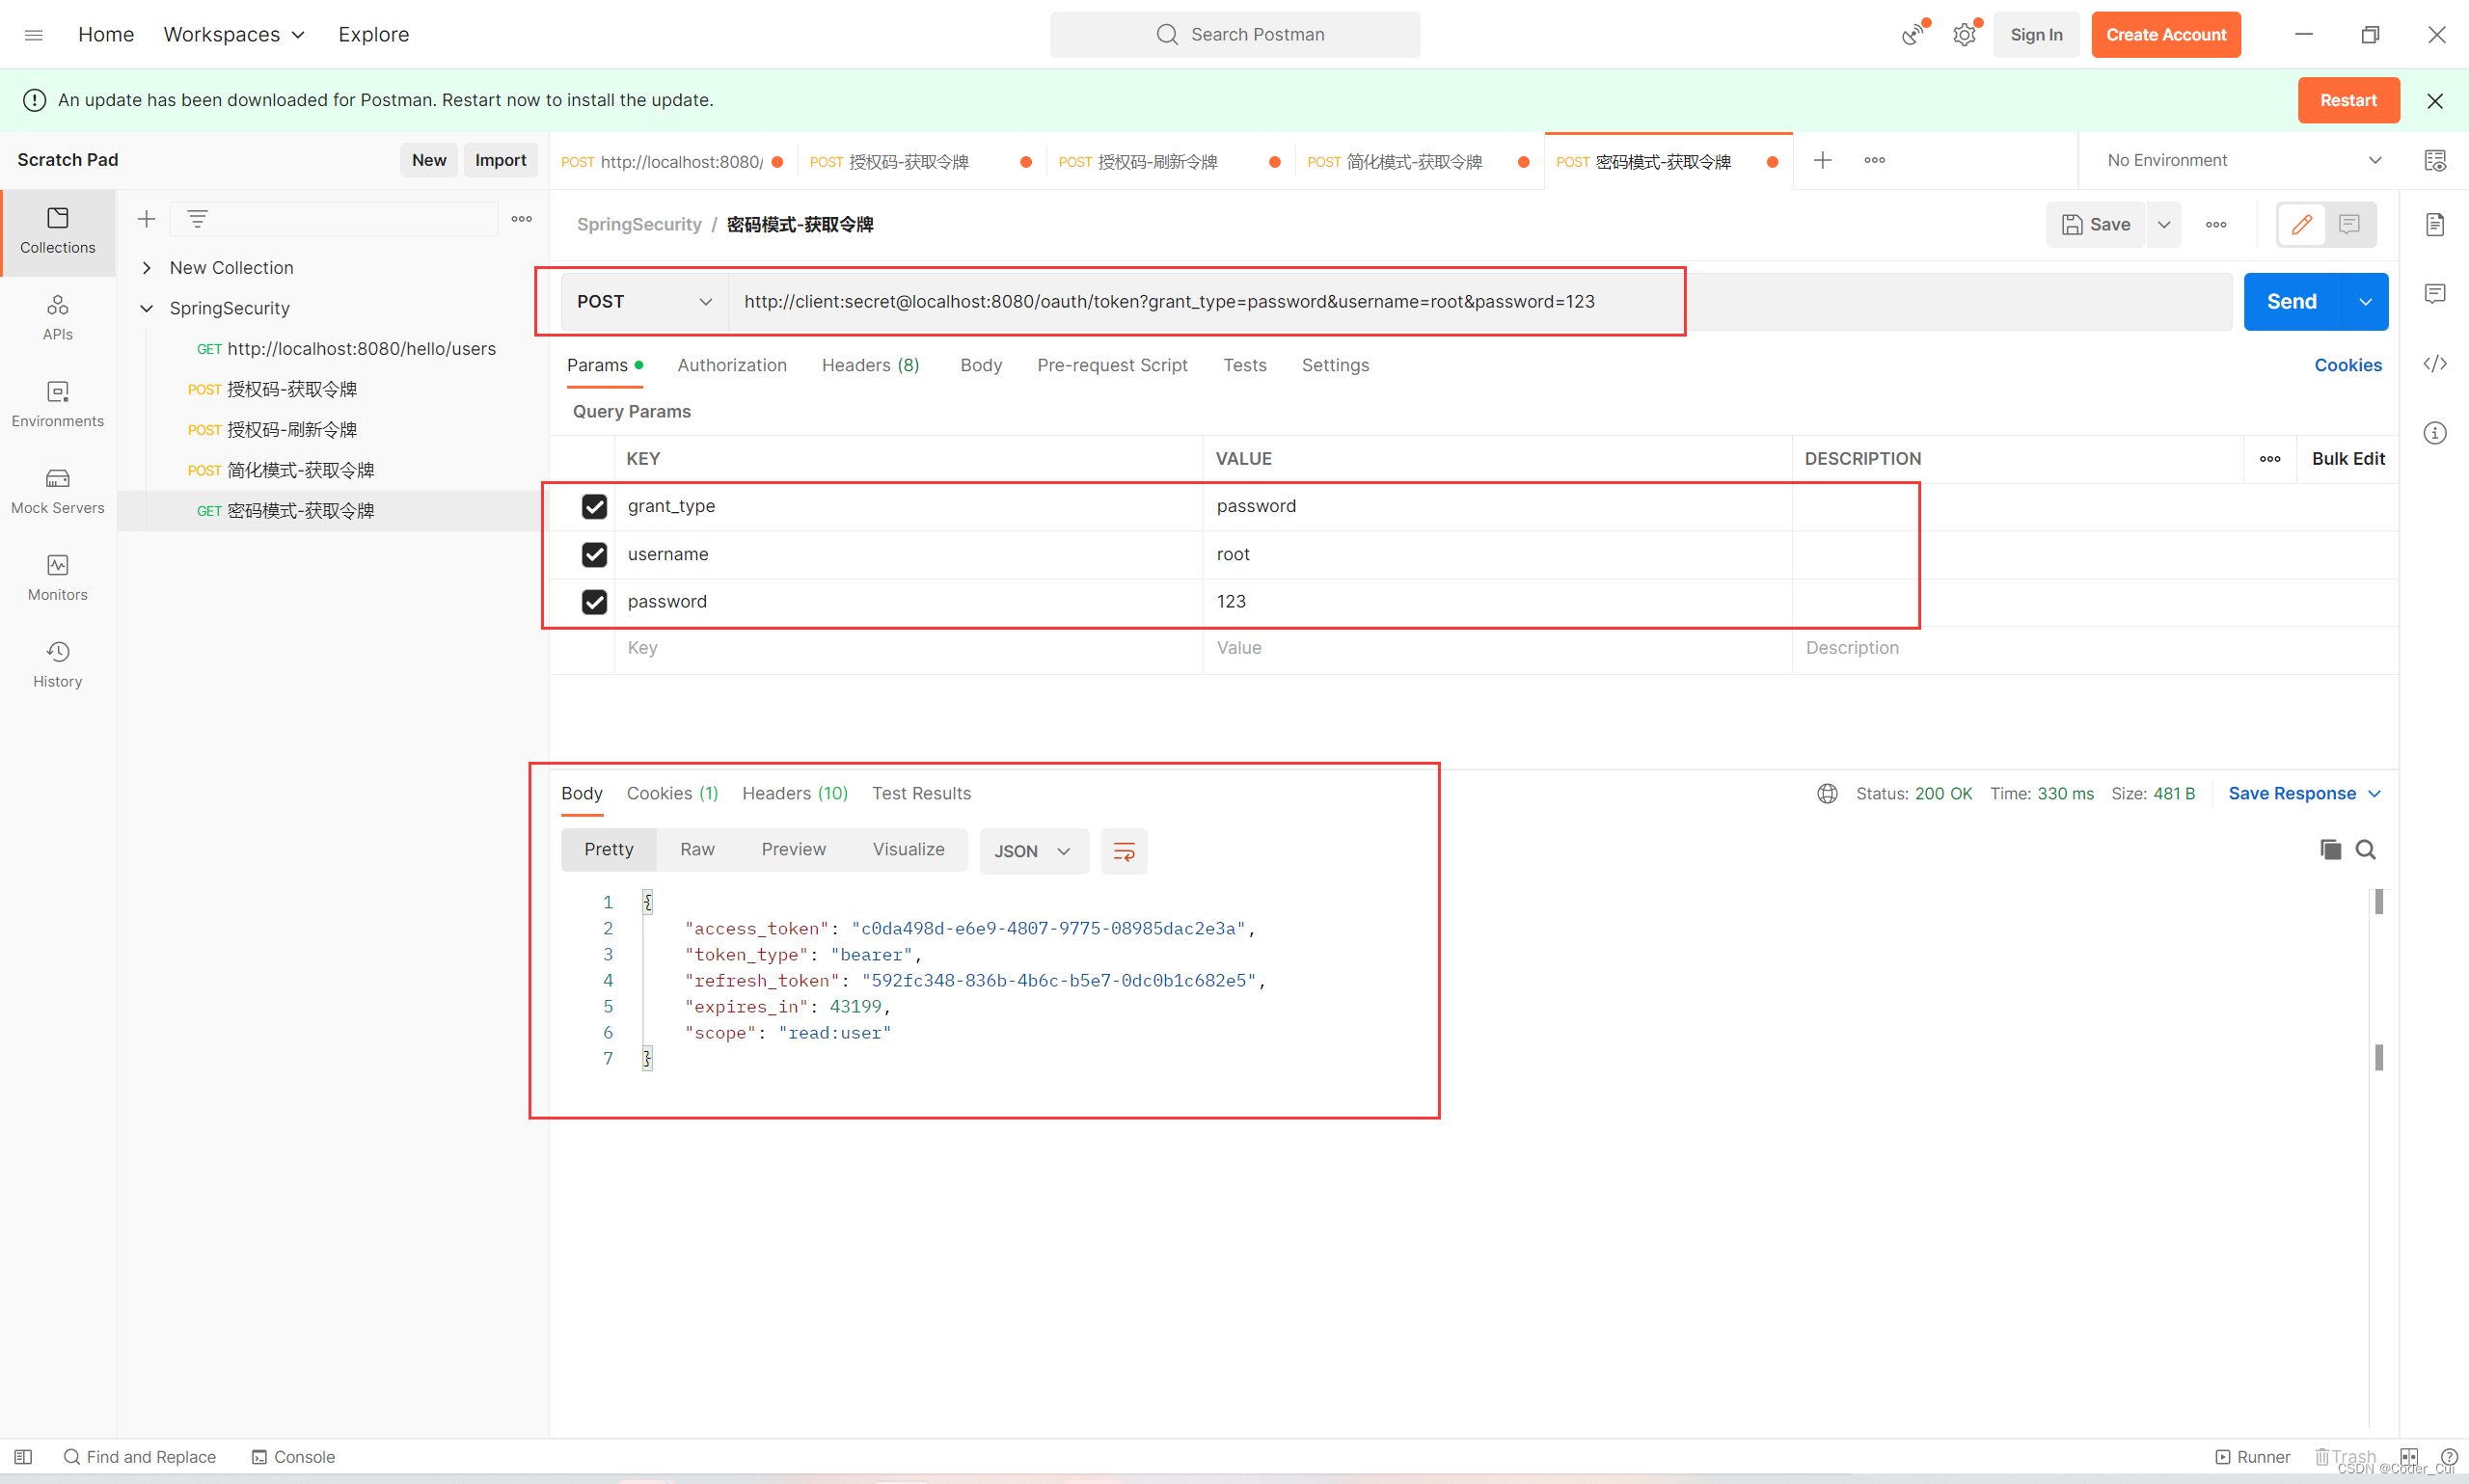
密码-刷新令牌:同授权码模式获取方式一致
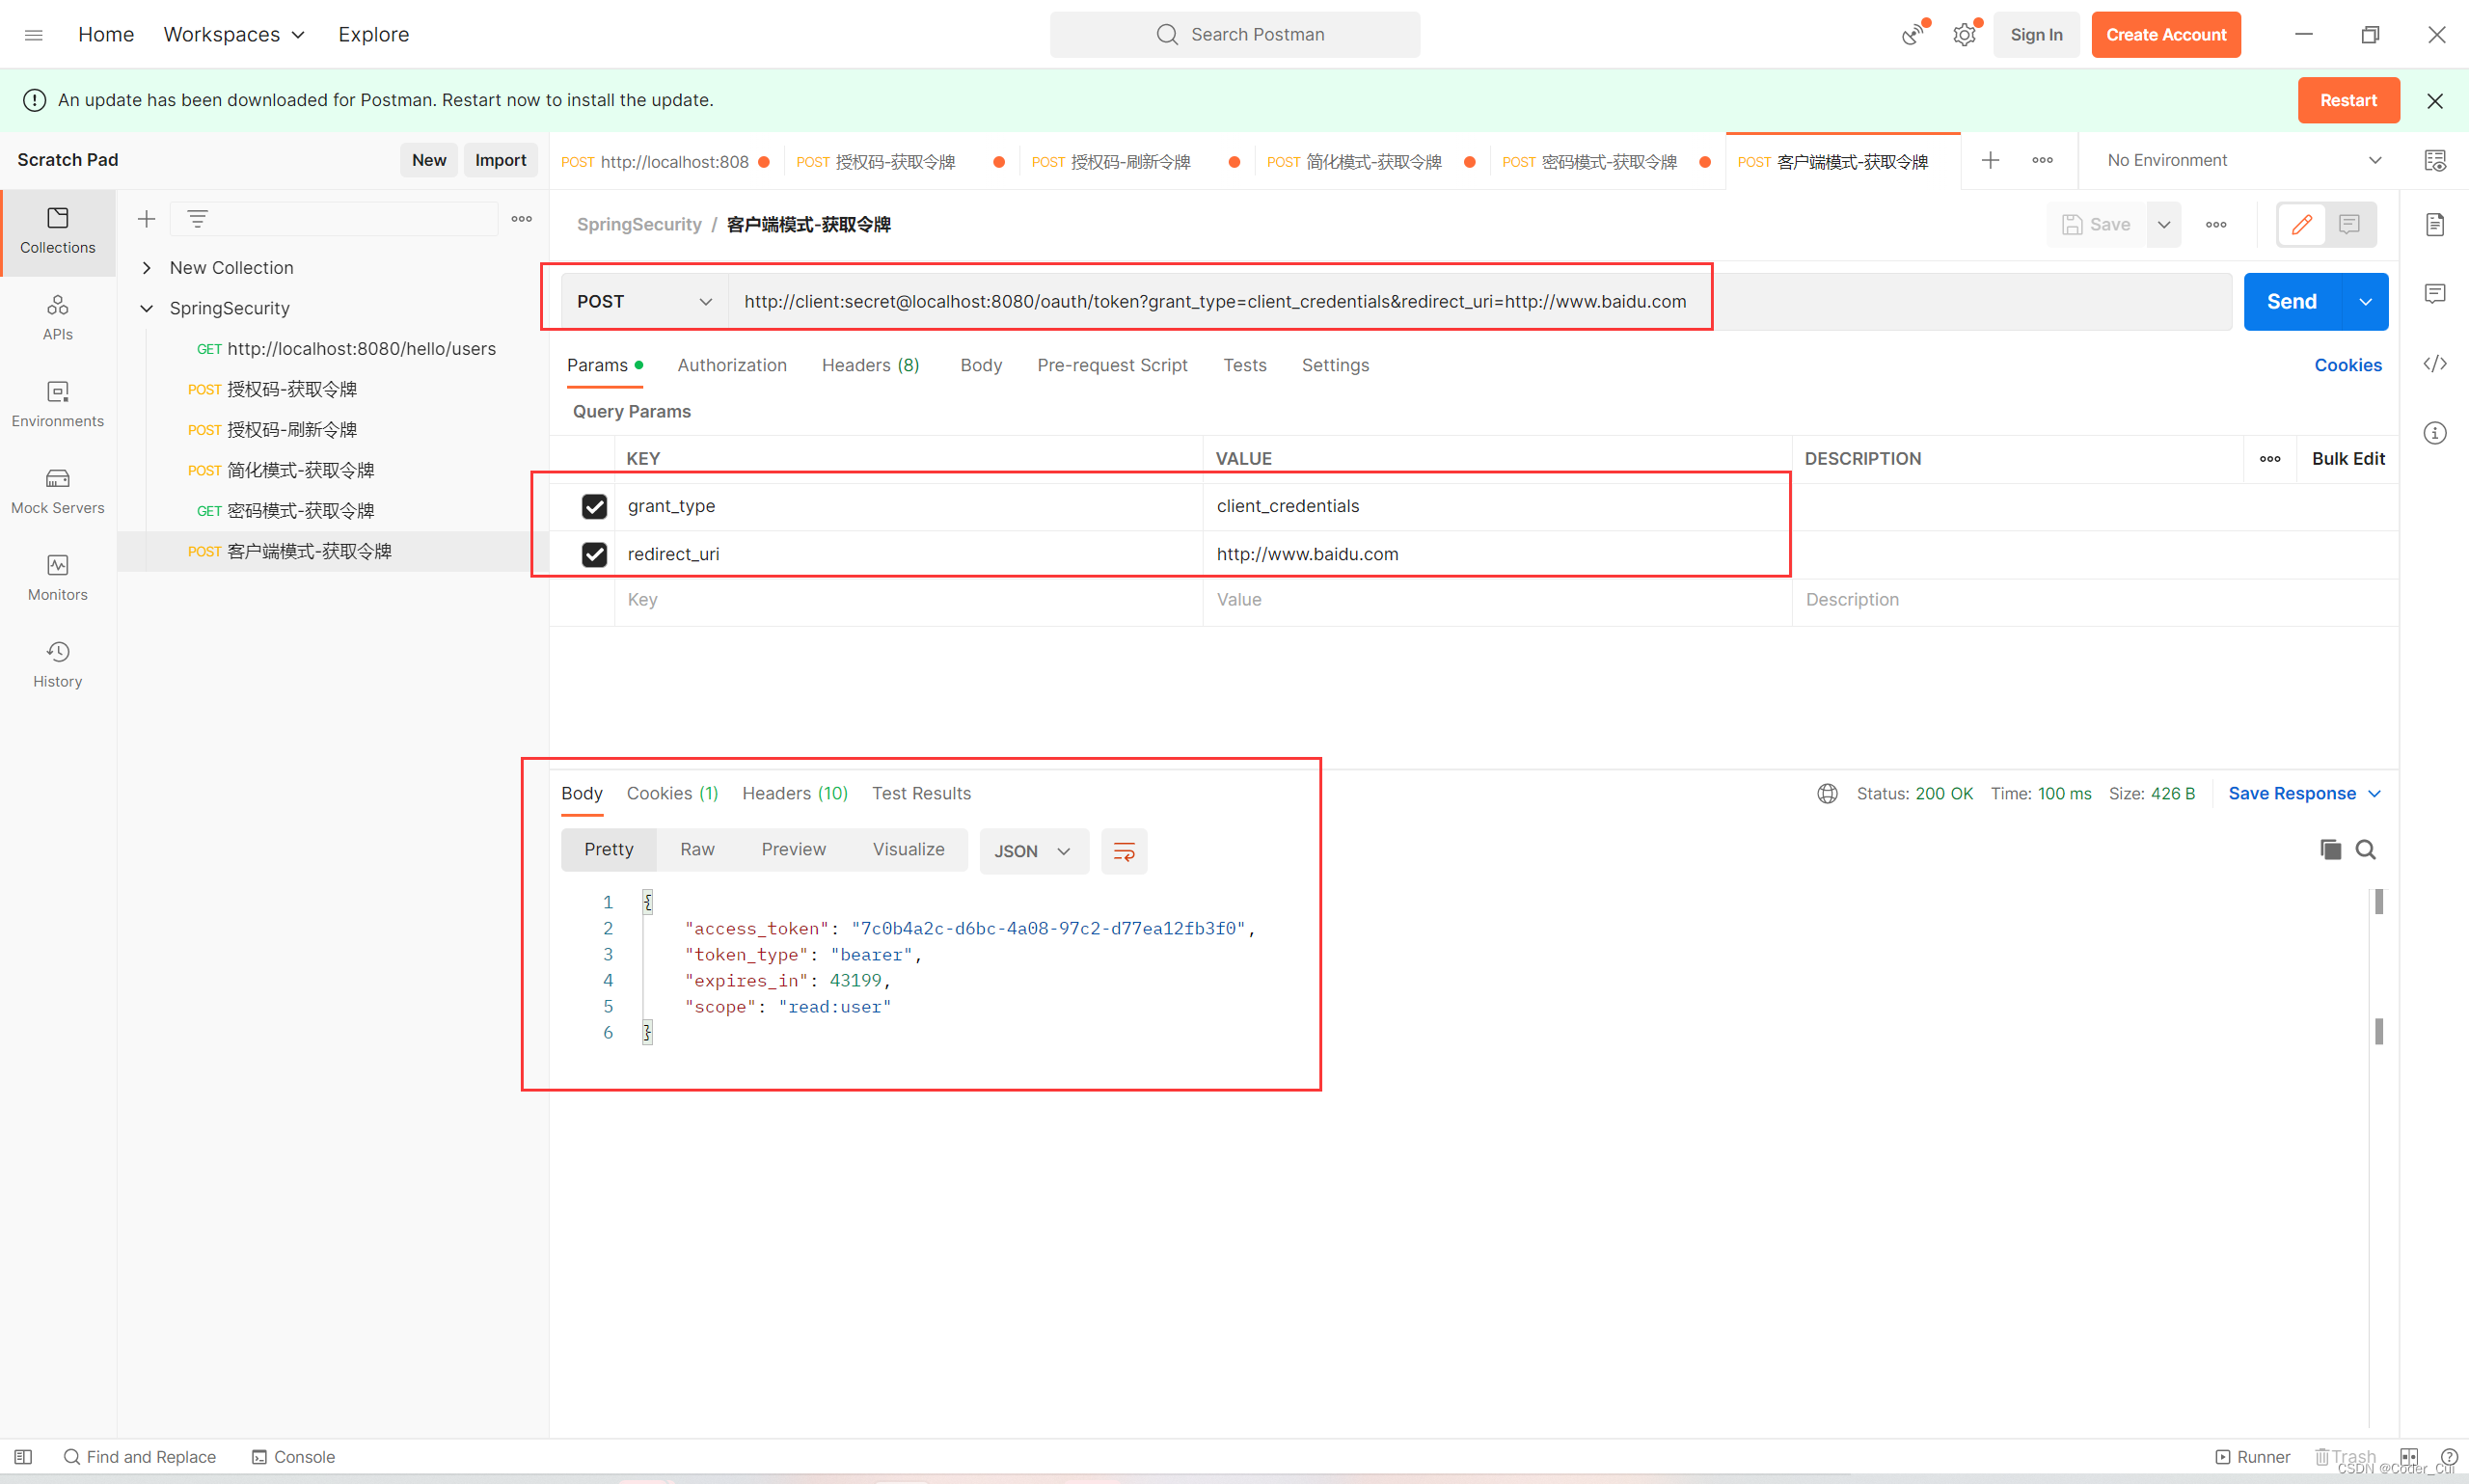
-
客户端模式:
6.3.2 基于数据库客户端和令牌存储
视频链接:80.基于JDBC 的客户端、令牌存储_哔哩哔哩_bilibili
在上面的案例中,TokenStore的默认实现为InMemoryTokenStore,即内存存储,对于Client信息,ClientDetailsService 接口负责从存储仓库中读取数据,在上面的案例中默认使用的也是InMemoryClientDetailsService 实现类。如果要想使用数据库存储,只要提供这些接口的实现类即可,而框架已经为我们写好JdbcTokenStore和 JdbcClientDetailsService
建表:
 https://github.com/spring-projects/spring-security-oauth/blob/master/spring-security-oauth2/src/test/resources/schema.sql
 # 注意: 要用BLOB替换语句中的LONGVARBINARY类型,否则无法识别
建表语句如下:
SET NAMES utf8mb4;
SET FOREIGN_KEY_CHECKS = 0;
-- ----------------------------
-- Table structure for clientdetails
-- ----------------------------
DROP TABLE IF EXISTS `clientdetails`;
CREATE TABLE `clientdetails` (
`appId` varchar(256) NOT NULL,
`resourceIds` varchar(256) DEFAULT NULL,
`appSecret` varchar(256) DEFAULT NULL,
`scope` varchar(256) DEFAULT NULL,
`grantTypes` varchar(256) DEFAULT NULL,
`redirectUrl` varchar(256) DEFAULT NULL,
`authorities` varchar(256) DEFAULT NULL,
`access_token_validity` int(11) DEFAULT NULL,
`refresh_token_validity` int(11) DEFAULT NULL,
`additionalInformation` varchar(4096) DEFAULT NULL,
`autoApproveScopes` varchar(256) DEFAULT NULL,
PRIMARY KEY (`appId`)
) ENGINE=InnoDB DEFAULT CHARSET=utf8mb4;
-- ----------------------------
-- Table structure for oauth_access_token
-- ----------------------------
DROP TABLE IF EXISTS `oauth_access_token`;
CREATE TABLE `oauth_access_token` (
`token_id` varchar(256) DEFAULT NULL,
`token` blob,
`authentication_id` varchar(256) NOT NULL,
`user_name` varchar(256) DEFAULT NULL,
`client_id` varchar(256) DEFAULT NULL,
`authentication` blob,
`refresh_token` varchar(256) DEFAULT NULL,
PRIMARY KEY (`authentication_id`)
) ENGINE=InnoDB DEFAULT CHARSET=utf8mb4;
-- ----------------------------
-- Table structure for oauth_approvals
-- ----------------------------
DROP TABLE IF EXISTS `oauth_approvals`;
CREATE TABLE `oauth_approvals` (
`userId` varchar(256) DEFAULT NULL,
`clientId` varchar(256) DEFAULT NULL,
`scope` varchar(256) DEFAULT NULL,
`status` varchar(10) DEFAULT NULL,
`expiresAt` timestamp NOT NULL DEFAULT CURRENT_TIMESTAMP ON UPDATE CURRENT_TIMESTAMP,
`lastModifiedAt` date DEFAULT NULL
) ENGINE=InnoDB DEFAULT CHARSET=utf8mb4;
-- ----------------------------
-- Table structure for oauth_client_details
-- ----------------------------
DROP TABLE IF EXISTS `oauth_client_details`;
CREATE TABLE `oauth_client_details` (
`client_id` varchar(256) NOT NULL,
`resource_ids` varchar(256) DEFAULT NULL,
`client_secret` varchar(256) DEFAULT NULL,
`scope` varchar(256) DEFAULT NULL,
`authorized_grant_types` varchar(256) DEFAULT NULL,
`web_server_redirect_uri` varchar(256) DEFAULT NULL,
`authorities` varchar(256) DEFAULT NULL,
`access_token_validity` int(11) DEFAULT NULL,
`refresh_token_validity` int(11) DEFAULT NULL,
`additional_information` varchar(4096) DEFAULT NULL,
`autoapprove` varchar(256) DEFAULT NULL,
PRIMARY KEY (`client_id`)
) ENGINE=InnoDB DEFAULT CHARSET=utf8mb4;
-- ----------------------------
-- Table structure for oauth_client_token
-- ----------------------------
DROP TABLE IF EXISTS `oauth_client_token`;
CREATE TABLE `oauth_client_token` (
`token_id` varchar(256) DEFAULT NULL,
`token` blob,
`authentication_id` varchar(256) NOT NULL,
`user_name` varchar(256) DEFAULT NULL,
`client_id` varchar(256) DEFAULT NULL,
PRIMARY KEY (`authentication_id`)
) ENGINE=InnoDB DEFAULT CHARSET=utf8mb4;
-- ----------------------------
-- Table structure for oauth_code
-- ----------------------------
DROP TABLE IF EXISTS `oauth_code`;
CREATE TABLE `oauth_code` (
`code` varchar(256) DEFAULT NULL,
`authentication` blob
) ENGINE=InnoDB DEFAULT CHARSET=utf8mb4;
-- ----------------------------
-- Table structure for oauth_refresh_token
-- ----------------------------
DROP TABLE IF EXISTS `oauth_refresh_token`;
CREATE TABLE `oauth_refresh_token` (
`token_id` varchar(256) DEFAULT NULL,
`token` blob,
`authentication` blob
) ENGINE=InnoDB DEFAULT CHARSET=utf8mb4;
SET FOREIGN_KEY_CHECKS = 1;
-- 写入客户端信息
INSERT INTO `oauth_client_details` VALUES ('client', NULL, '$2a$10$QCsINtuRfP8kM112xRVdvuI58MrefLlEP2mM0kzB5KZCPhnOf4392', 'read', 'authorization_code,refresh_token', 'http://www.baidu.com', NULL, NULL, NULL, NULL, NULL);
引入依赖
 <dependency>
     <groupId>mysql</groupId>
     <artifactId>mysql-connector-java</artifactId>
     <scope>runtime</scope>
 </dependency>
 <dependency>
     <groupId>org.springframework.boot</groupId>
     <artifactId>spring-boot-starter-jdbc</artifactId>
 </dependency>
编写配置文件
 spring.datasource.driver-class-name=com.mysql.cj.jdbc.Driver
 spring.datasource.url=jdbc:mysql://localhost:3306/oauth?characterEncoding=UTF-8&useSSL=false&serverTimezone=Asia/Shanghai
 spring.datasource.username=root
 spring.datasource.password=root
编写数据库信息实现
package com.study.config;
import org.springframework.beans.factory.annotation.Autowired;
import org.springframework.context.annotation.Bean;
import org.springframework.context.annotation.Configuration;
import org.springframework.security.authentication.AuthenticationManager;
import org.springframework.security.crypto.password.PasswordEncoder;
import org.springframework.security.oauth2.config.annotation.configurers.ClientDetailsServiceConfigurer;
import org.springframework.security.oauth2.config.annotation.web.configuration.AuthorizationServerConfigurerAdapter;
import org.springframework.security.oauth2.config.annotation.web.configuration.EnableAuthorizationServer;
import org.springframework.security.oauth2.config.annotation.web.configurers.AuthorizationServerEndpointsConfigurer;
import org.springframework.security.oauth2.provider.ClientDetailsService;
import org.springframework.security.oauth2.provider.client.JdbcClientDetailsService;
import org.springframework.security.oauth2.provider.token.DefaultTokenServices;
import org.springframework.security.oauth2.provider.token.TokenStore;
import org.springframework.security.oauth2.provider.token.store.JdbcTokenStore;
import javax.sql.DataSource;
import java.util.concurrent.TimeUnit;
/**
* @ClassName JdbcAuthorizationServerConfig
* @Description TODO
* @Author Jiangnan Cui
* @Date 2023/3/12 15:24
* @Version 1.0
*/
@Configuration
@EnableAuthorizationServer
public class JdbcAuthorizationServer extends AuthorizationServerConfigurerAdapter {
private final AuthenticationManager authenticationManager;
private final PasswordEncoder passwordEncoder;
private final DataSource dataSource;
@Autowired
public JdbcAuthorizationServer(AuthenticationManager authenticationManager, PasswordEncoder passwordEncoder, DataSource dataSource) {
this.authenticationManager = authenticationManager;
this.passwordEncoder = passwordEncoder;
this.dataSource = dataSource;
}
/**
* 声明TokenStore采用JdbcTokenStore的方式实现
*/
@Bean
public TokenStore tokenStore() {
return new JdbcTokenStore(dataSource);
}
/**
* 声明ClientDetailsService的实现方式为JdbcClientDetailsService
*/
@Bean
public ClientDetailsService clientDetails() {
JdbcClientDetailsService jdbcClientDetailsService = new JdbcClientDetailsService(dataSource);
// 使用加密方式
jdbcClientDetailsService.setPasswordEncoder(passwordEncoder);
return jdbcClientDetailsService;
}
/**
* 配置使用数据库实现
*/
@Override
public void configure(AuthorizationServerEndpointsConfigurer endpoints) throws Exception {
endpoints.authenticationManager(authenticationManager);//认证管理器
endpoints.tokenStore(tokenStore());//配置令牌存储为数据库存储
// 配置TokenServices参数
DefaultTokenServices tokenServices = new DefaultTokenServices();//修改默认令牌生成服务
tokenServices.setTokenStore(endpoints.getTokenStore());//基于数据库令牌生成
tokenServices.setSupportRefreshToken(true);//是否支持刷新令牌
tokenServices.setReuseRefreshToken(true);//是否重复使用刷新令牌(直到过期)
tokenServices.setClientDetailsService(endpoints.getClientDetailsService());//设置客户端信息
tokenServices.setTokenEnhancer(endpoints.getTokenEnhancer());//用来控制令牌存储增强策略
//访问令牌的默认有效期(以秒为单位)。过期的令牌为零或负数。
tokenServices.setAccessTokenValiditySeconds((int) TimeUnit.DAYS.toSeconds(30)); // 30天
//刷新令牌的有效性(以秒为单位)。如果小于或等于零,则令牌将不会过期
tokenServices.setRefreshTokenValiditySeconds((int) TimeUnit.DAYS.toSeconds(3)); //3天
endpoints.tokenServices(tokenServices);//使用配置令牌服务
}
/**
* 配置客户端
*
* @param clients
* @throws Exception
*/
@Override
public void configure(ClientDetailsServiceConfigurer clients) throws Exception {
//使用jdbc方式存储
clients.withClientDetails(clientDetails());
}
}
启动测试:
1.http://localhost:8080/login、root-123登录
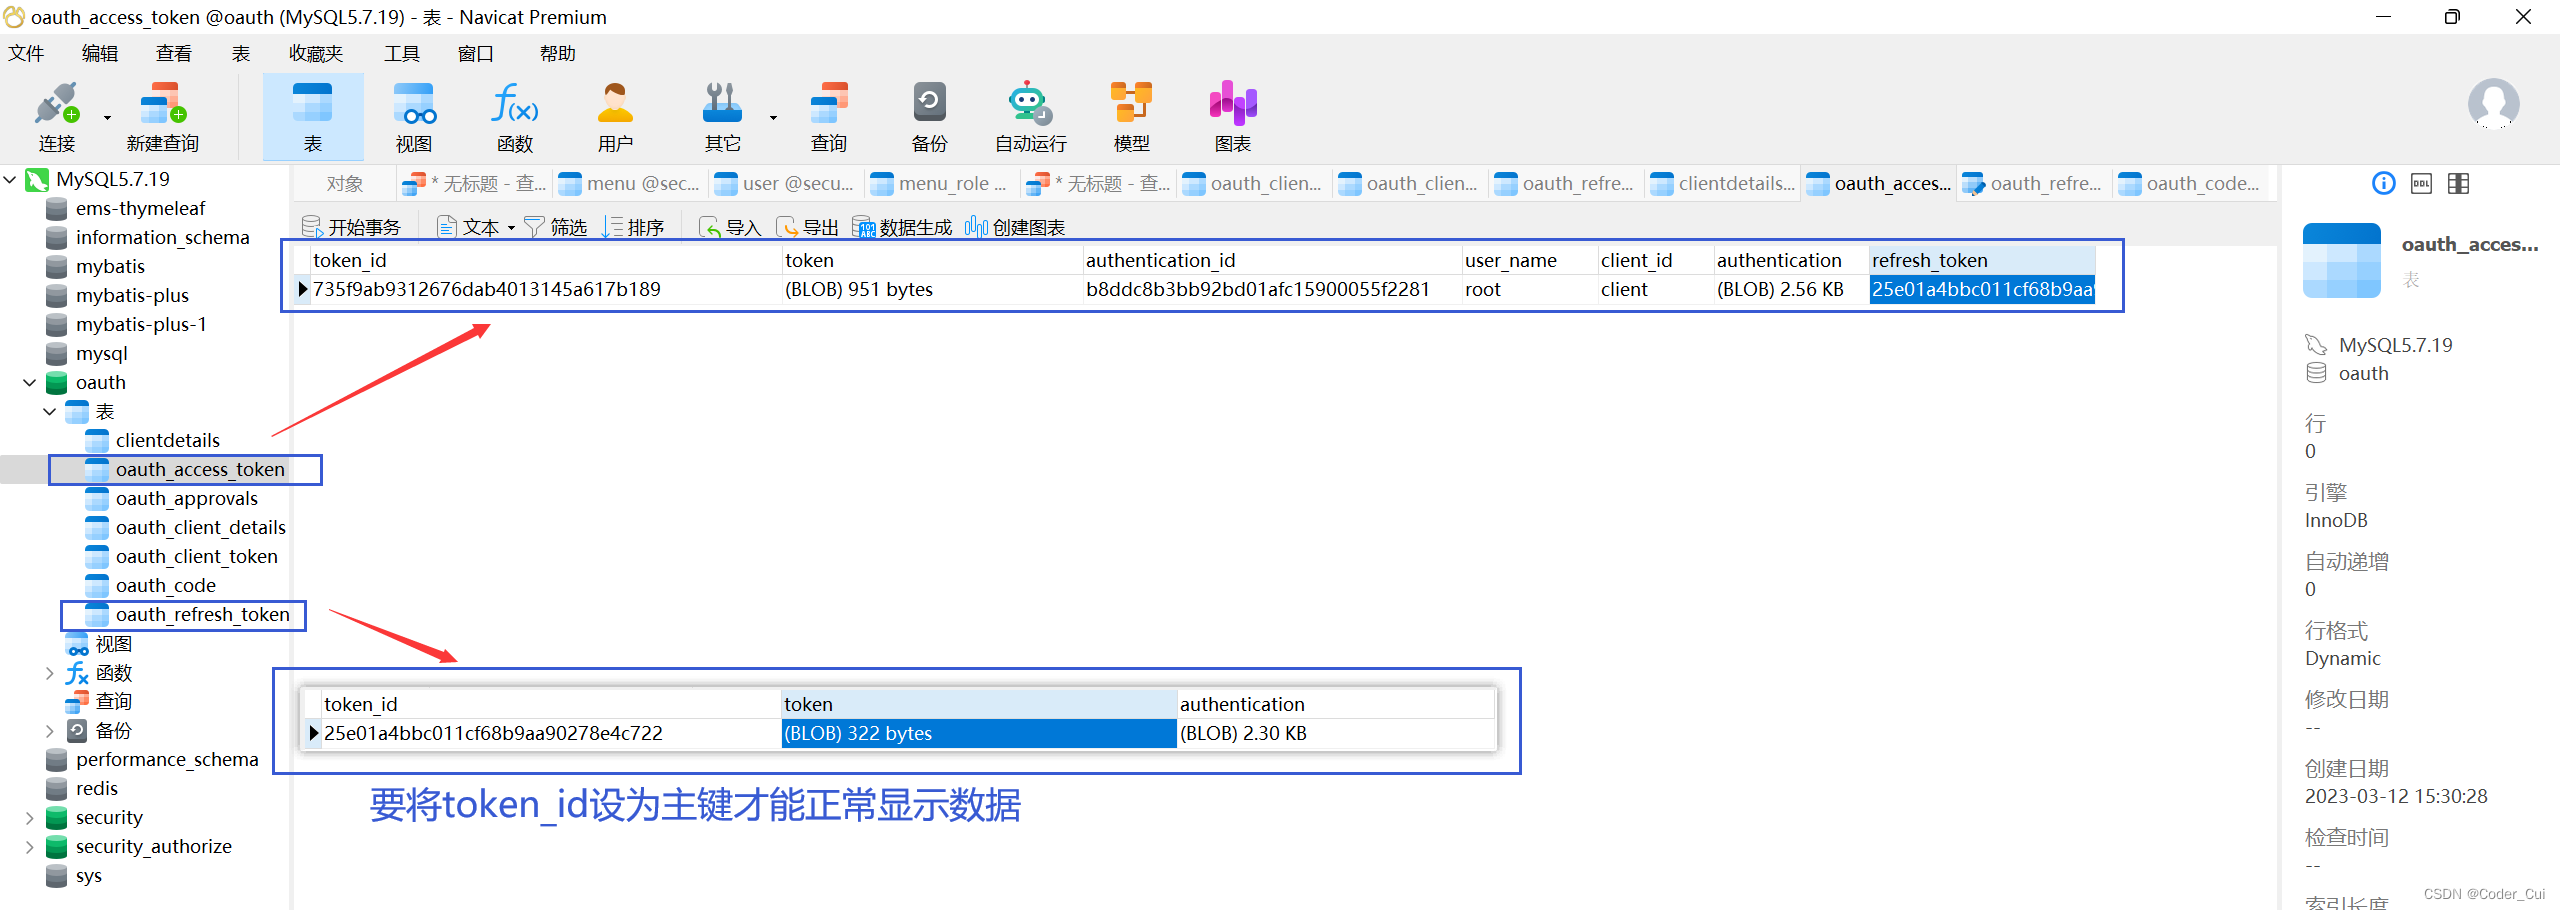
发现数据库中已经存储相关的令牌。
6.4 资源服务器搭建
视频链接:81.资源服务器搭建以及使用_哔哩哔哩_bilibili
引入依赖
<properties>
<java.version>1.8</java.version>
<project.build.sourceEncoding>UTF-8</project.build.sourceEncoding>
<project.reporting.outputEncoding>UTF-8</project.reporting.outputEncoding>
<spring-boot.version>2.2.5.RELEASE</spring-boot.version>
<spring-cloud.version>Hoxton.SR9</spring-cloud.version>
</properties>
<dependencies>
<dependency>
<groupId>org.springframework.boot</groupId>
<artifactId>spring-boot-starter-security</artifactId>
</dependency>
<dependency>
<groupId>org.springframework.boot</groupId>
<artifactId>spring-boot-starter-web</artifactId>
</dependency>
<dependency>
<groupId>org.springframework.cloud</groupId>
<artifactId>spring-cloud-starter-oauth2</artifactId>
</dependency>
<dependency>
<groupId>org.springframework.security</groupId>
<artifactId>spring-security-oauth2-resource-server</artifactId>
</dependency>
<dependency>
<groupId>mysql</groupId>
<artifactId>mysql-connector-java</artifactId>
<scope>runtime</scope>
</dependency>
<dependency>
<groupId>org.springframework.boot</groupId>
<artifactId>spring-boot-starter-jdbc</artifactId>
</dependency>
<dependency>
<groupId>org.springframework.boot</groupId>
<artifactId>spring-boot-starter-test</artifactId>
<scope>test</scope>
<exclusions>
<exclusion>
<groupId>org.junit.vintage</groupId>
<artifactId>junit-vintage-engine</artifactId>
</exclusion>
</exclusions>
</dependency>
<dependency>
<groupId>org.springframework.security</groupId>
<artifactId>spring-security-test</artifactId>
<scope>test</scope>
</dependency>
</dependencies>
<dependencyManagement>
<dependencies>
<dependency>
<groupId>org.springframework.cloud</groupId>
<artifactId>spring-cloud-dependencies</artifactId>
<version>${spring-cloud.version}</version>
<type>pom</type>
<scope>import</scope>
</dependency>
<dependency>
<groupId>org.springframework.boot</groupId>
<artifactId>spring-boot-dependencies</artifactId>
<version>${spring-boot.version}</version>
<type>pom</type>
<scope>import</scope>
</dependency>
</dependencies>
</dependencyManagement>
实际pom.xml:
<?xml version="1.0" encoding="UTF-8"?>
<project xmlns:xsi="http://www.w3.org/2001/XMLSchema-instance" xmlns="http://maven.apache.org/POM/4.0.0"
xsi:schemaLocation="http://maven.apache.org/POM/4.0.0 https://maven.apache.org/xsd/maven-4.0.0.xsd">
<modelVersion>4.0.0</modelVersion>
<parent>
<groupId>org.springframework.boot</groupId>
<artifactId>spring-boot-starter-parent</artifactId>
<version>2.2.5.RELEASE</version>
<relativePath/> <!-- lookup parent from repository -->
</parent>
<groupId>com.study</groupId>
<artifactId>spring-security-resource-server</artifactId>
<version>0.0.1-SNAPSHOT</version>
<name>spring-security-resource-server</name>
<description>spring-security-resource-server</description>
<properties>
<java.version>1.8</java.version>
<project.build.sourceEncoding>UTF-8</project.build.sourceEncoding>
<project.reporting.outputEncoding>UTF-8</project.reporting.outputEncoding>
<spring-boot.version>2.2.5.RELEASE</spring-boot.version>
<spring-cloud.version>Hoxton.SR9</spring-cloud.version>
</properties>
<dependencies>
<dependency>
<groupId>org.springframework.boot</groupId>
<artifactId>spring-boot-starter-security</artifactId>
</dependency>
<dependency>
<groupId>org.springframework.boot</groupId>
<artifactId>spring-boot-starter-web</artifactId>
</dependency>
<dependency>
<groupId>org.springframework.cloud</groupId>
<artifactId>spring-cloud-starter-oauth2</artifactId>
</dependency>
<dependency>
<groupId>org.springframework.security</groupId>
<artifactId>spring-security-oauth2-resource-server</artifactId>
</dependency>
<dependency>
<groupId>mysql</groupId>
<artifactId>mysql-connector-java</artifactId>
<scope>runtime</scope>
</dependency>
<dependency>
<groupId>org.springframework.boot</groupId>
<artifactId>spring-boot-starter-jdbc</artifactId>
</dependency>
<dependency>
<groupId>org.springframework.boot</groupId>
<artifactId>spring-boot-starter-test</artifactId>
<scope>test</scope>
<exclusions>
<exclusion>
<groupId>org.junit.vintage</groupId>
<artifactId>junit-vintage-engine</artifactId>
</exclusion>
</exclusions>
</dependency>
<dependency>
<groupId>org.springframework.security</groupId>
<artifactId>spring-security-test</artifactId>
<scope>test</scope>
</dependency>
</dependencies>
<dependencyManagement>
<dependencies>
<dependency>
<groupId>org.springframework.cloud</groupId>
<artifactId>spring-cloud-dependencies</artifactId>
<version>${spring-cloud.version}</version>
<type>pom</type>
<scope>import</scope>
</dependency>
<dependency>
<groupId>org.springframework.boot</groupId>
<artifactId>spring-boot-dependencies</artifactId>
<version>${spring-boot.version}</version>
<type>pom</type>
<scope>import</scope>
</dependency>
</dependencies>
</dependencyManagement>
<build>
<plugins>
<plugin>
<groupId>org.springframework.boot</groupId>
<artifactId>spring-boot-maven-plugin</artifactId>
</plugin>
</plugins>
</build>
</project>
创建资源
package com.study.controller;
import org.springframework.web.bind.annotation.GetMapping;
import org.springframework.web.bind.annotation.RestController;
/**
* @ClassName HelloController
* @Description TODO
* @Author Jiangnan Cui
* @Date 2023/3/12 16:29
* @Version 1.0
*/
@RestController
public class HelloController {
@GetMapping("/hello")
public String hello() {
String hello = "Hello, resource server!";
System.out.println(hello);
return hello;
}
}
编写资源服务器配置类
package com.study.config;
import org.springframework.beans.factory.annotation.Autowired;
import org.springframework.context.annotation.Bean;
import org.springframework.context.annotation.Configuration;
import org.springframework.security.oauth2.config.annotation.web.configuration.EnableResourceServer;
import org.springframework.security.oauth2.config.annotation.web.configuration.ResourceServerConfigurerAdapter;
import org.springframework.security.oauth2.config.annotation.web.configurers.ResourceServerSecurityConfigurer;
import org.springframework.security.oauth2.provider.token.TokenStore;
import org.springframework.security.oauth2.provider.token.store.JdbcTokenStore;
import javax.sql.DataSource;
/**
* @ClassName ResourveServerConfig
* @Description TODO
* @Author Jiangnan Cui
* @Date 2023/3/12 16:32
* @Version 1.0
*/
@Configuration
// 开启Oauth资源服务器
@EnableResourceServer
public class ResourceServerConfig extends ResourceServerConfigurerAdapter {
private final DataSource dataSource;
@Autowired
public ResourceServerConfig(DataSource dataSource) {
this.dataSource = dataSource;
}
@Override
public void configure(ResourceServerSecurityConfigurer resources) throws Exception {
resources.tokenStore(tokenStore());
}
@Bean
public TokenStore tokenStore() {
return new JdbcTokenStore(dataSource);
}
}
编写配置文件
 # 应用服务 WEB 访问端口
 server.port=8081
 spring.datasource.driver-class-name=com.mysql.cj.jdbc.Driver
 spring.datasource.url=jdbc:mysql://localhost:3306/oauth?characterEncoding=UTF-8&useSSL=false&serverTimezone=Asia/Shanghai
 spring.datasource.username=root
 spring.datasource.password=root
 logging.level.org.springframework.jdbc.core=debug
启动授权服务器与资源服务器:
1.授权服务器
1.1 http://localhost:8080/login、root-123登录
1.3 授权码模式获取令牌:http://client:secret@localhost:8080/oauth/token?grant_type=authorization_code&code=xXD1zr&redirect_uri=http://www.baidu.com
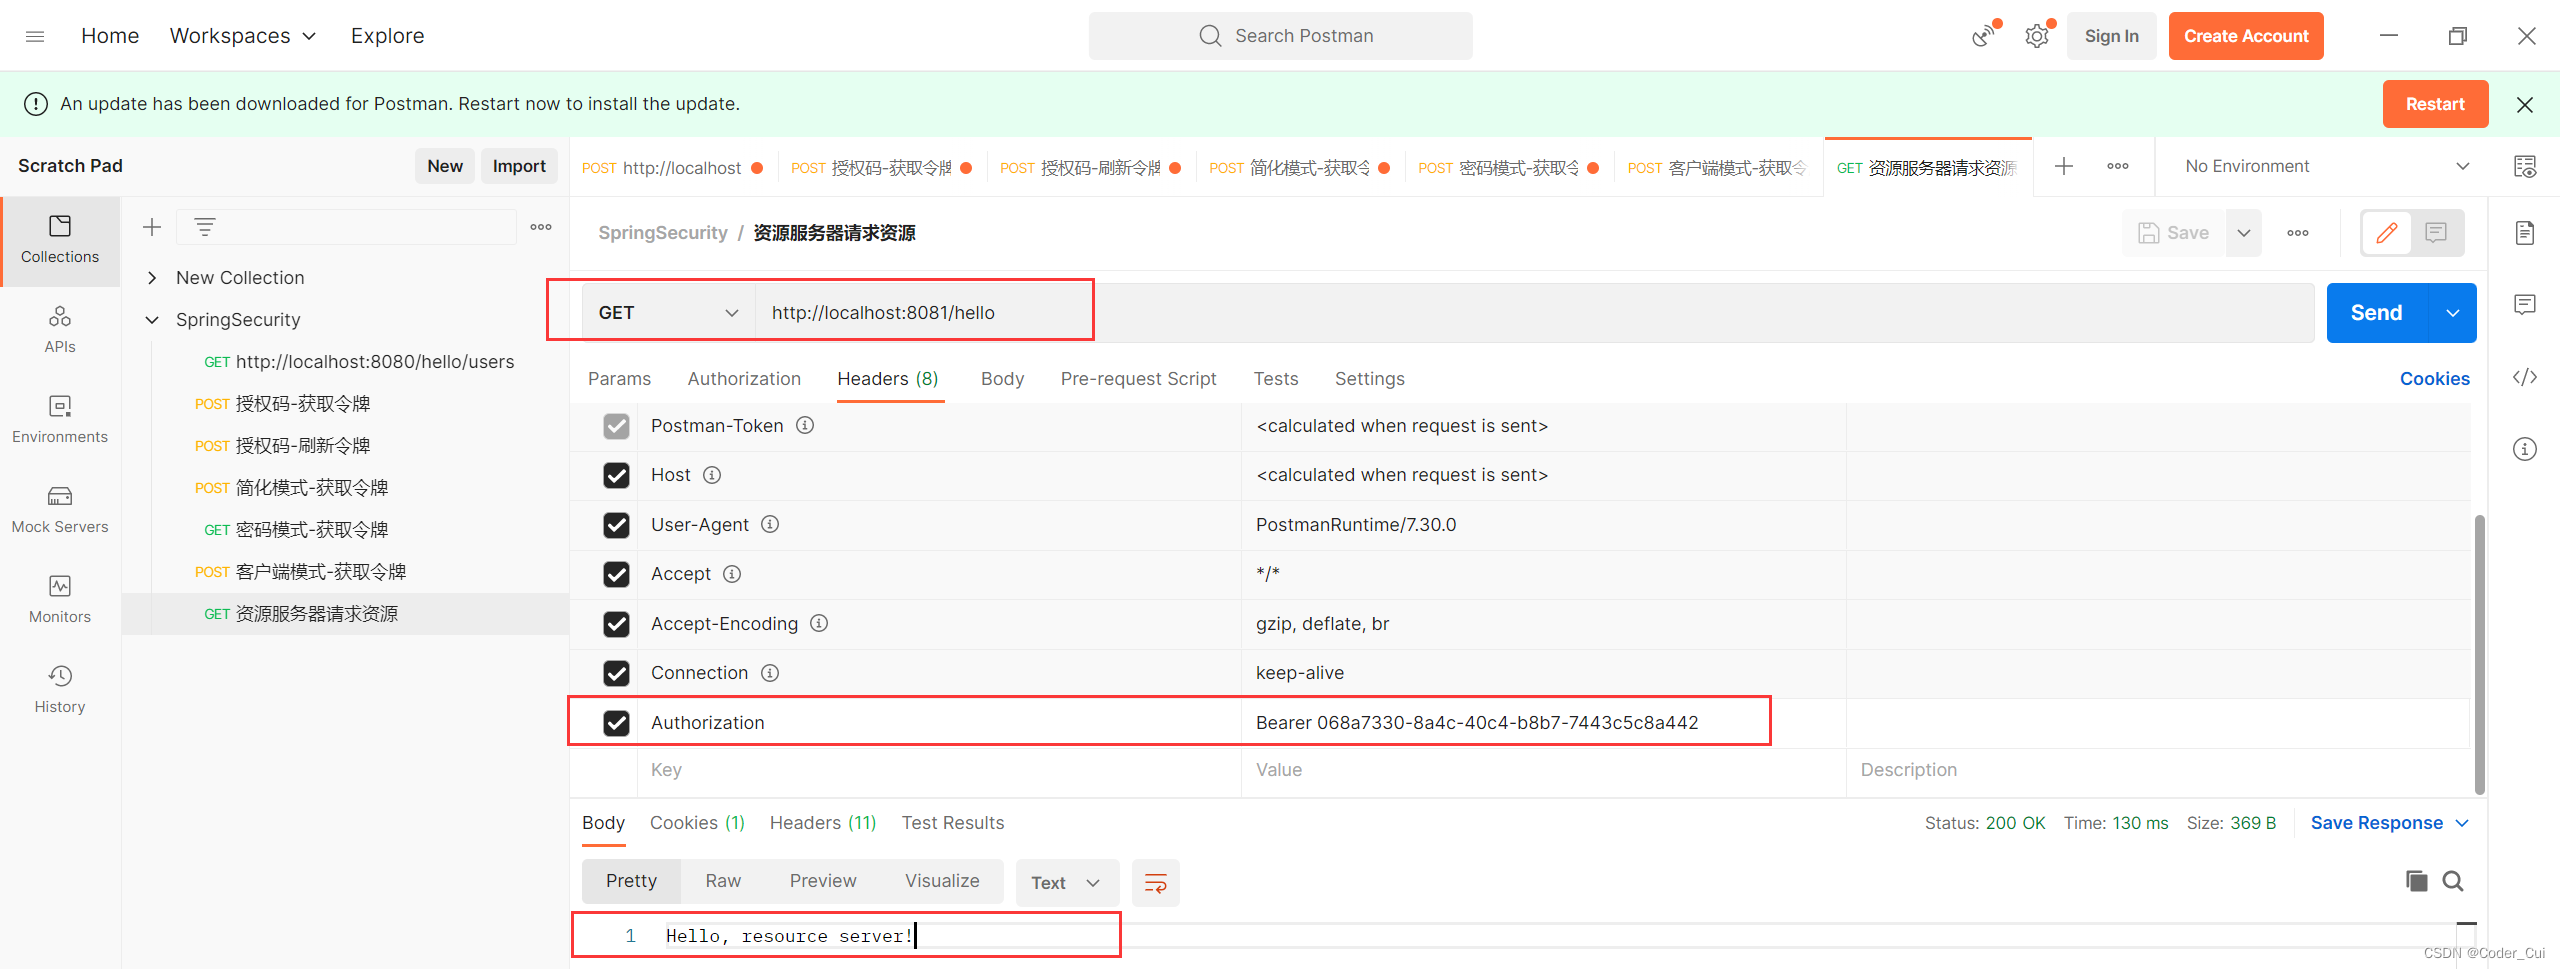
2.资源服务器
携带授权服务器生成地令牌访问:curl -H "Authorization:Bearer dffa62d2-1078-457e-8a2b-4bd46fae0f47" http://localhost:8081/hello
6.5 使用 JWT
视频链接:81.资源服务器搭建以及使用_哔哩哔哩_bilibili
6.5.1 授权服务器颁发 JWT 令牌
配置颁发 JWT 令牌
package com.study.config;
import org.springframework.beans.factory.annotation.Autowired;
import org.springframework.context.annotation.Bean;
import org.springframework.context.annotation.Configuration;
import org.springframework.security.authentication.AuthenticationManager;
import org.springframework.security.crypto.password.PasswordEncoder;
import org.springframework.security.oauth2.config.annotation.configurers.ClientDetailsServiceConfigurer;
import org.springframework.security.oauth2.config.annotation.web.configuration.AuthorizationServerConfigurerAdapter;
import org.springframework.security.oauth2.config.annotation.web.configuration.EnableAuthorizationServer;
import org.springframework.security.oauth2.config.annotation.web.configurers.AuthorizationServerEndpointsConfigurer;
import org.springframework.security.oauth2.provider.ClientDetailsService;
import org.springframework.security.oauth2.provider.client.JdbcClientDetailsService;
import org.springframework.security.oauth2.provider.token.TokenStore;
import org.springframework.security.oauth2.provider.token.store.JwtAccessTokenConverter;
import org.springframework.security.oauth2.provider.token.store.JwtTokenStore;
import javax.sql.DataSource;
/**
* @ClassName JwtAuthorizationServerConfig
* @Description TODO
* @Author Jiangnan Cui
* @Date 2023/3/12 15:24
* @Version 1.0
*/
@Configuration
@EnableAuthorizationServer
public class JwtAuthorizationServerConfig extends AuthorizationServerConfigurerAdapter {
private final PasswordEncoder passwordEncoder;
private final AuthenticationManager authenticationManager;
private final DataSource dataSource;
@Autowired
public JwtAuthorizationServerConfig(PasswordEncoder passwordEncoder, AuthenticationManager authenticationManager, DataSource dataSource) {
this.passwordEncoder = passwordEncoder;
this.authenticationManager = authenticationManager;
this.dataSource = dataSource;
}
/**
* 配置使用 jwt 方式颁发令牌,同时配置 jwt 转换器
*
* @param endpoints
* @throws Exception
*/
@Override
public void configure(AuthorizationServerEndpointsConfigurer endpoints) throws Exception {
endpoints.tokenStore(tokenStore())
.accessTokenConverter(jwtAccessTokenConverter())
.authenticationManager(authenticationManager);
}
/**
* 使用JWT方式生成令牌
*
* @return
*/
@Bean
public TokenStore tokenStore() {
return new JwtTokenStore(jwtAccessTokenConverter());
}
/**
* 使用同一个密钥来编码JWT中的OAuth2令牌
*
* @return
*/
@Bean
public JwtAccessTokenConverter jwtAccessTokenConverter() {
JwtAccessTokenConverter converter = new JwtAccessTokenConverter();
// 可以采用属性注入方式 生产中建议加密
converter.setSigningKey("123");
return converter;
}
/**
* 声明ClientDetails实现
*
* @return
*/
@Bean
public ClientDetailsService clientDetails() {
JdbcClientDetailsService jdbcClientDetailsService = new JdbcClientDetailsService(dataSource);
jdbcClientDetailsService.setPasswordEncoder(passwordEncoder);
return jdbcClientDetailsService;
}
/**
* 使用数据库方式客户端存储
*
* @param clients
* @throws Exception
*/
@Override
public void configure(ClientDetailsServiceConfigurer clients) throws Exception {
clients.withClientDetails(clientDetails());
}
}
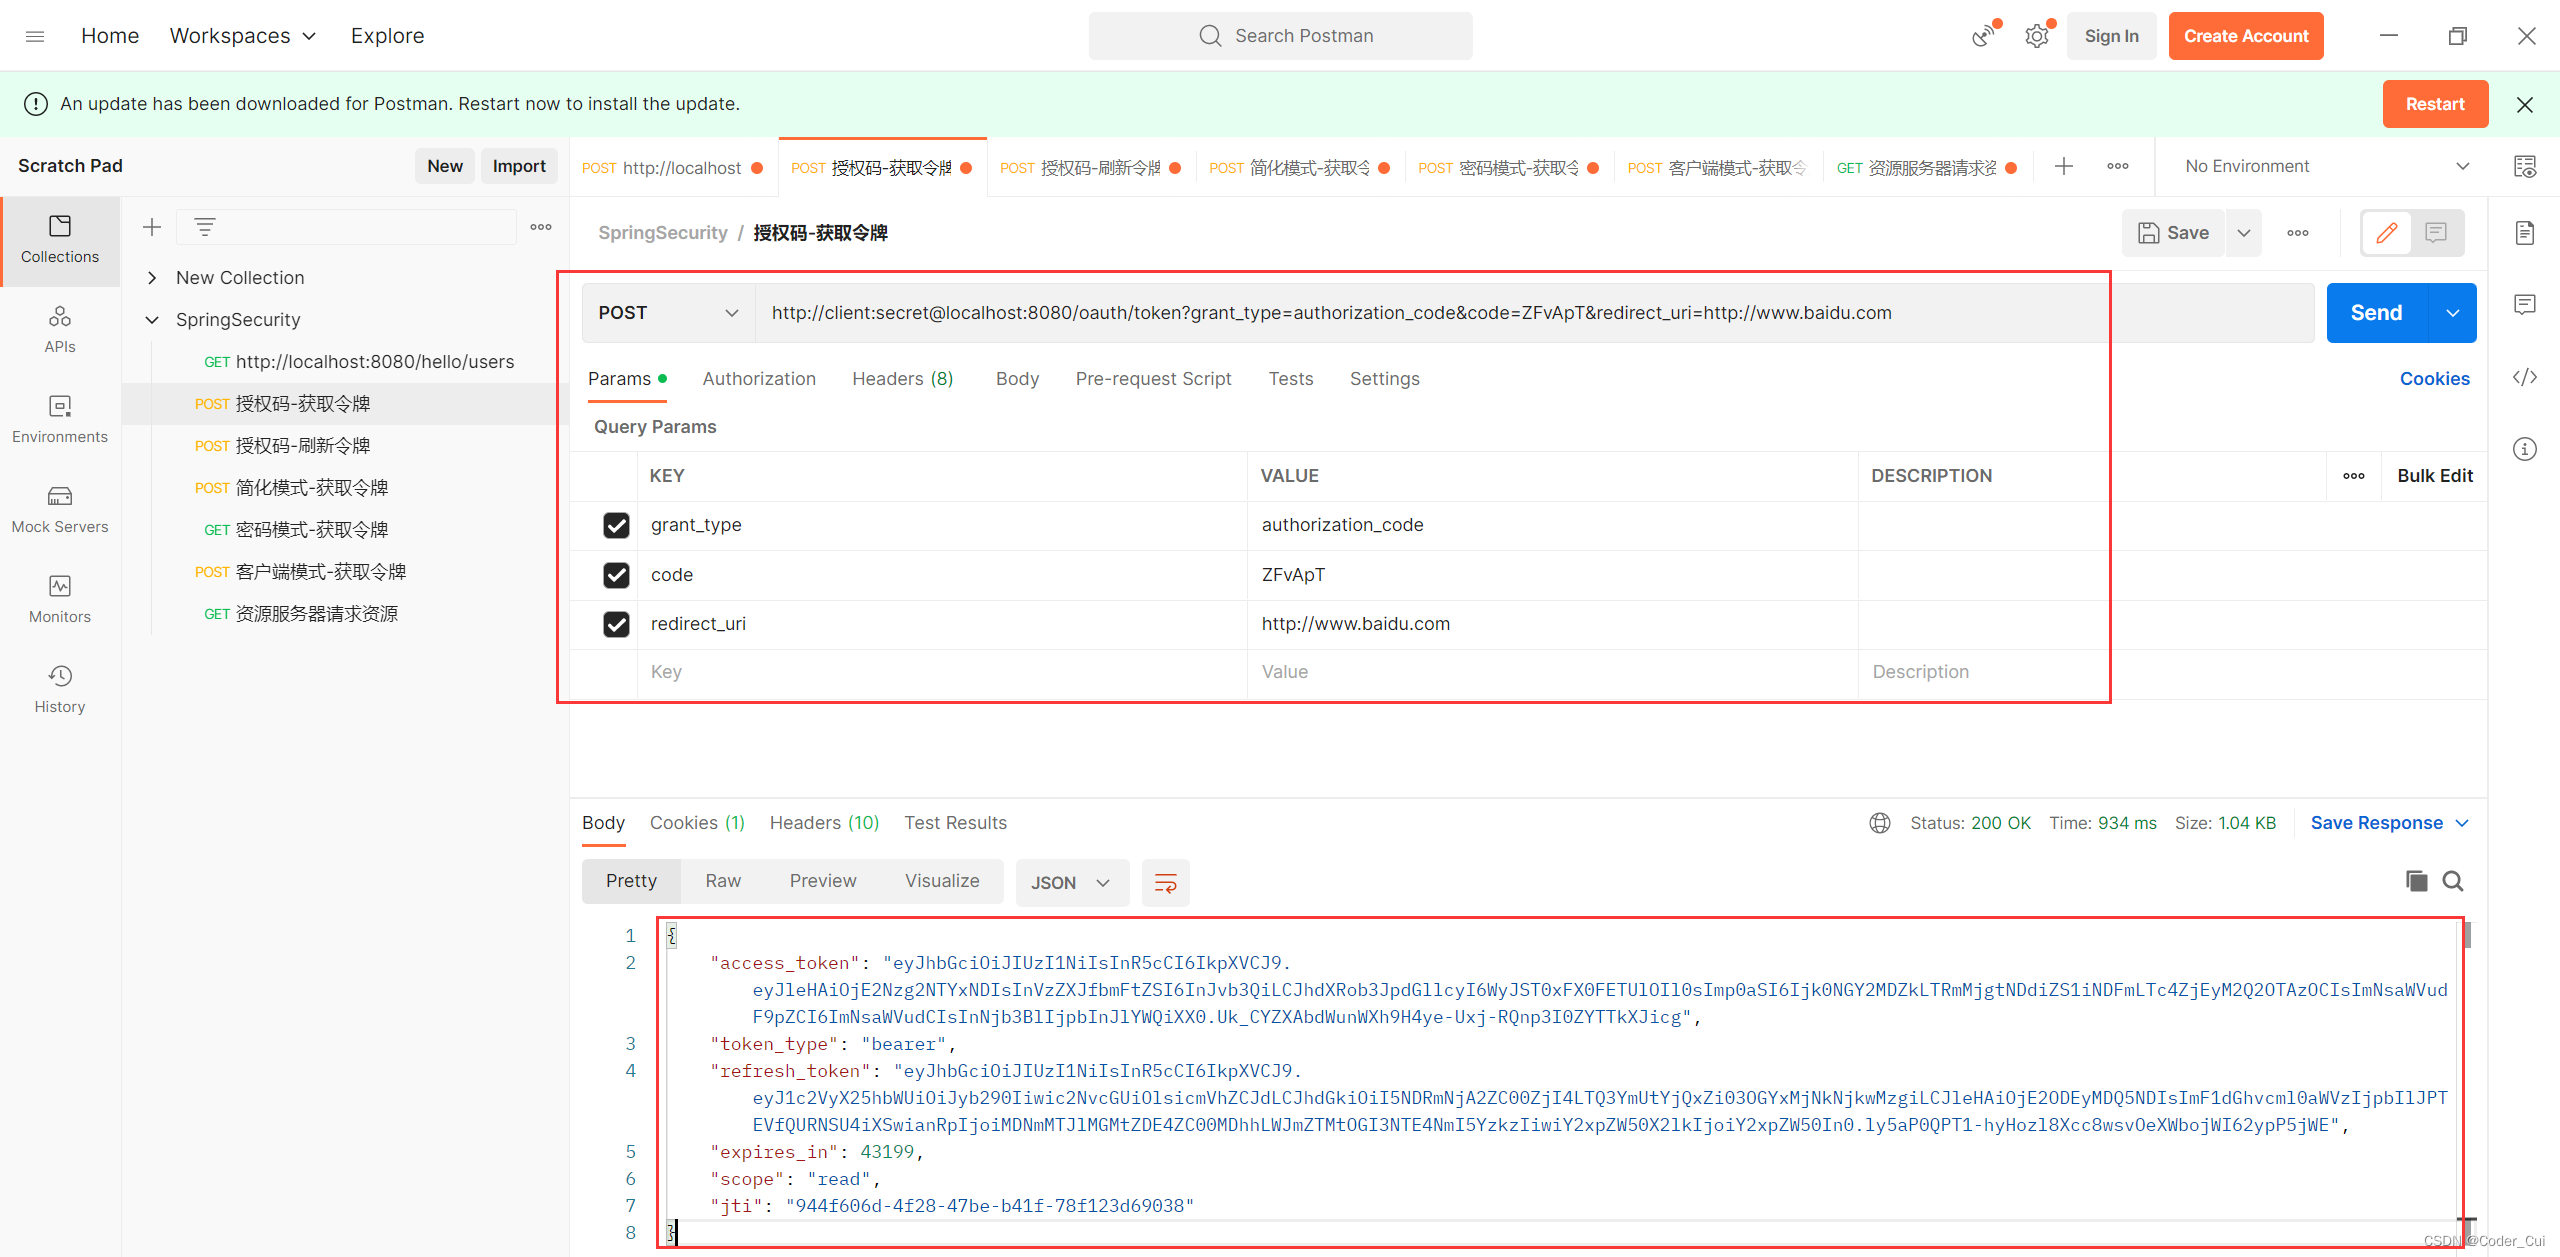
启动服务,根据授权码获取令牌:
1.1 http://localhost:8080/login、root-123登录
1.3 授权码模式获取令牌:http://client:secret@localhost:8080/oauth/token?grant_type=authorization_code&code=xXD1zr&redirect_uri=http://www.baidu.com

6.5.2 使用 JWT 令牌资源服务器
配置资源服务器解析jwt
package com.study.config;
import org.springframework.context.annotation.Bean;
import org.springframework.context.annotation.Configuration;
import org.springframework.security.oauth2.config.annotation.web.configuration.EnableResourceServer;
import org.springframework.security.oauth2.config.annotation.web.configuration.ResourceServerConfigurerAdapter;
import org.springframework.security.oauth2.config.annotation.web.configurers.ResourceServerSecurityConfigurer;
import org.springframework.security.oauth2.provider.token.TokenStore;
import org.springframework.security.oauth2.provider.token.store.JwtAccessTokenConverter;
import org.springframework.security.oauth2.provider.token.store.JwtTokenStore;
/**
* @ClassName JwtResourceServerConfig
* @Description TODO
* @Author Jiangnan Cui
* @Date 2023/3/12 17:13
* @Version 1.0
*/
@Configuration
@EnableResourceServer
public class JwtResourceServerConfig extends ResourceServerConfigurerAdapter {
@Override
public void configure(ResourceServerSecurityConfigurer resources) throws Exception {
resources.tokenStore(tokenStore());
}
@Bean
public TokenStore tokenStore() {
return new JwtTokenStore(jwtAccessTokenConverter());
}
@Bean
public JwtAccessTokenConverter jwtAccessTokenConverter() {
JwtAccessTokenConverter jwtAccessTokenConverter = new JwtAccessTokenConverter();
jwtAccessTokenConverter.setSigningKey("123");
return jwtAccessTokenConverter;
}
}
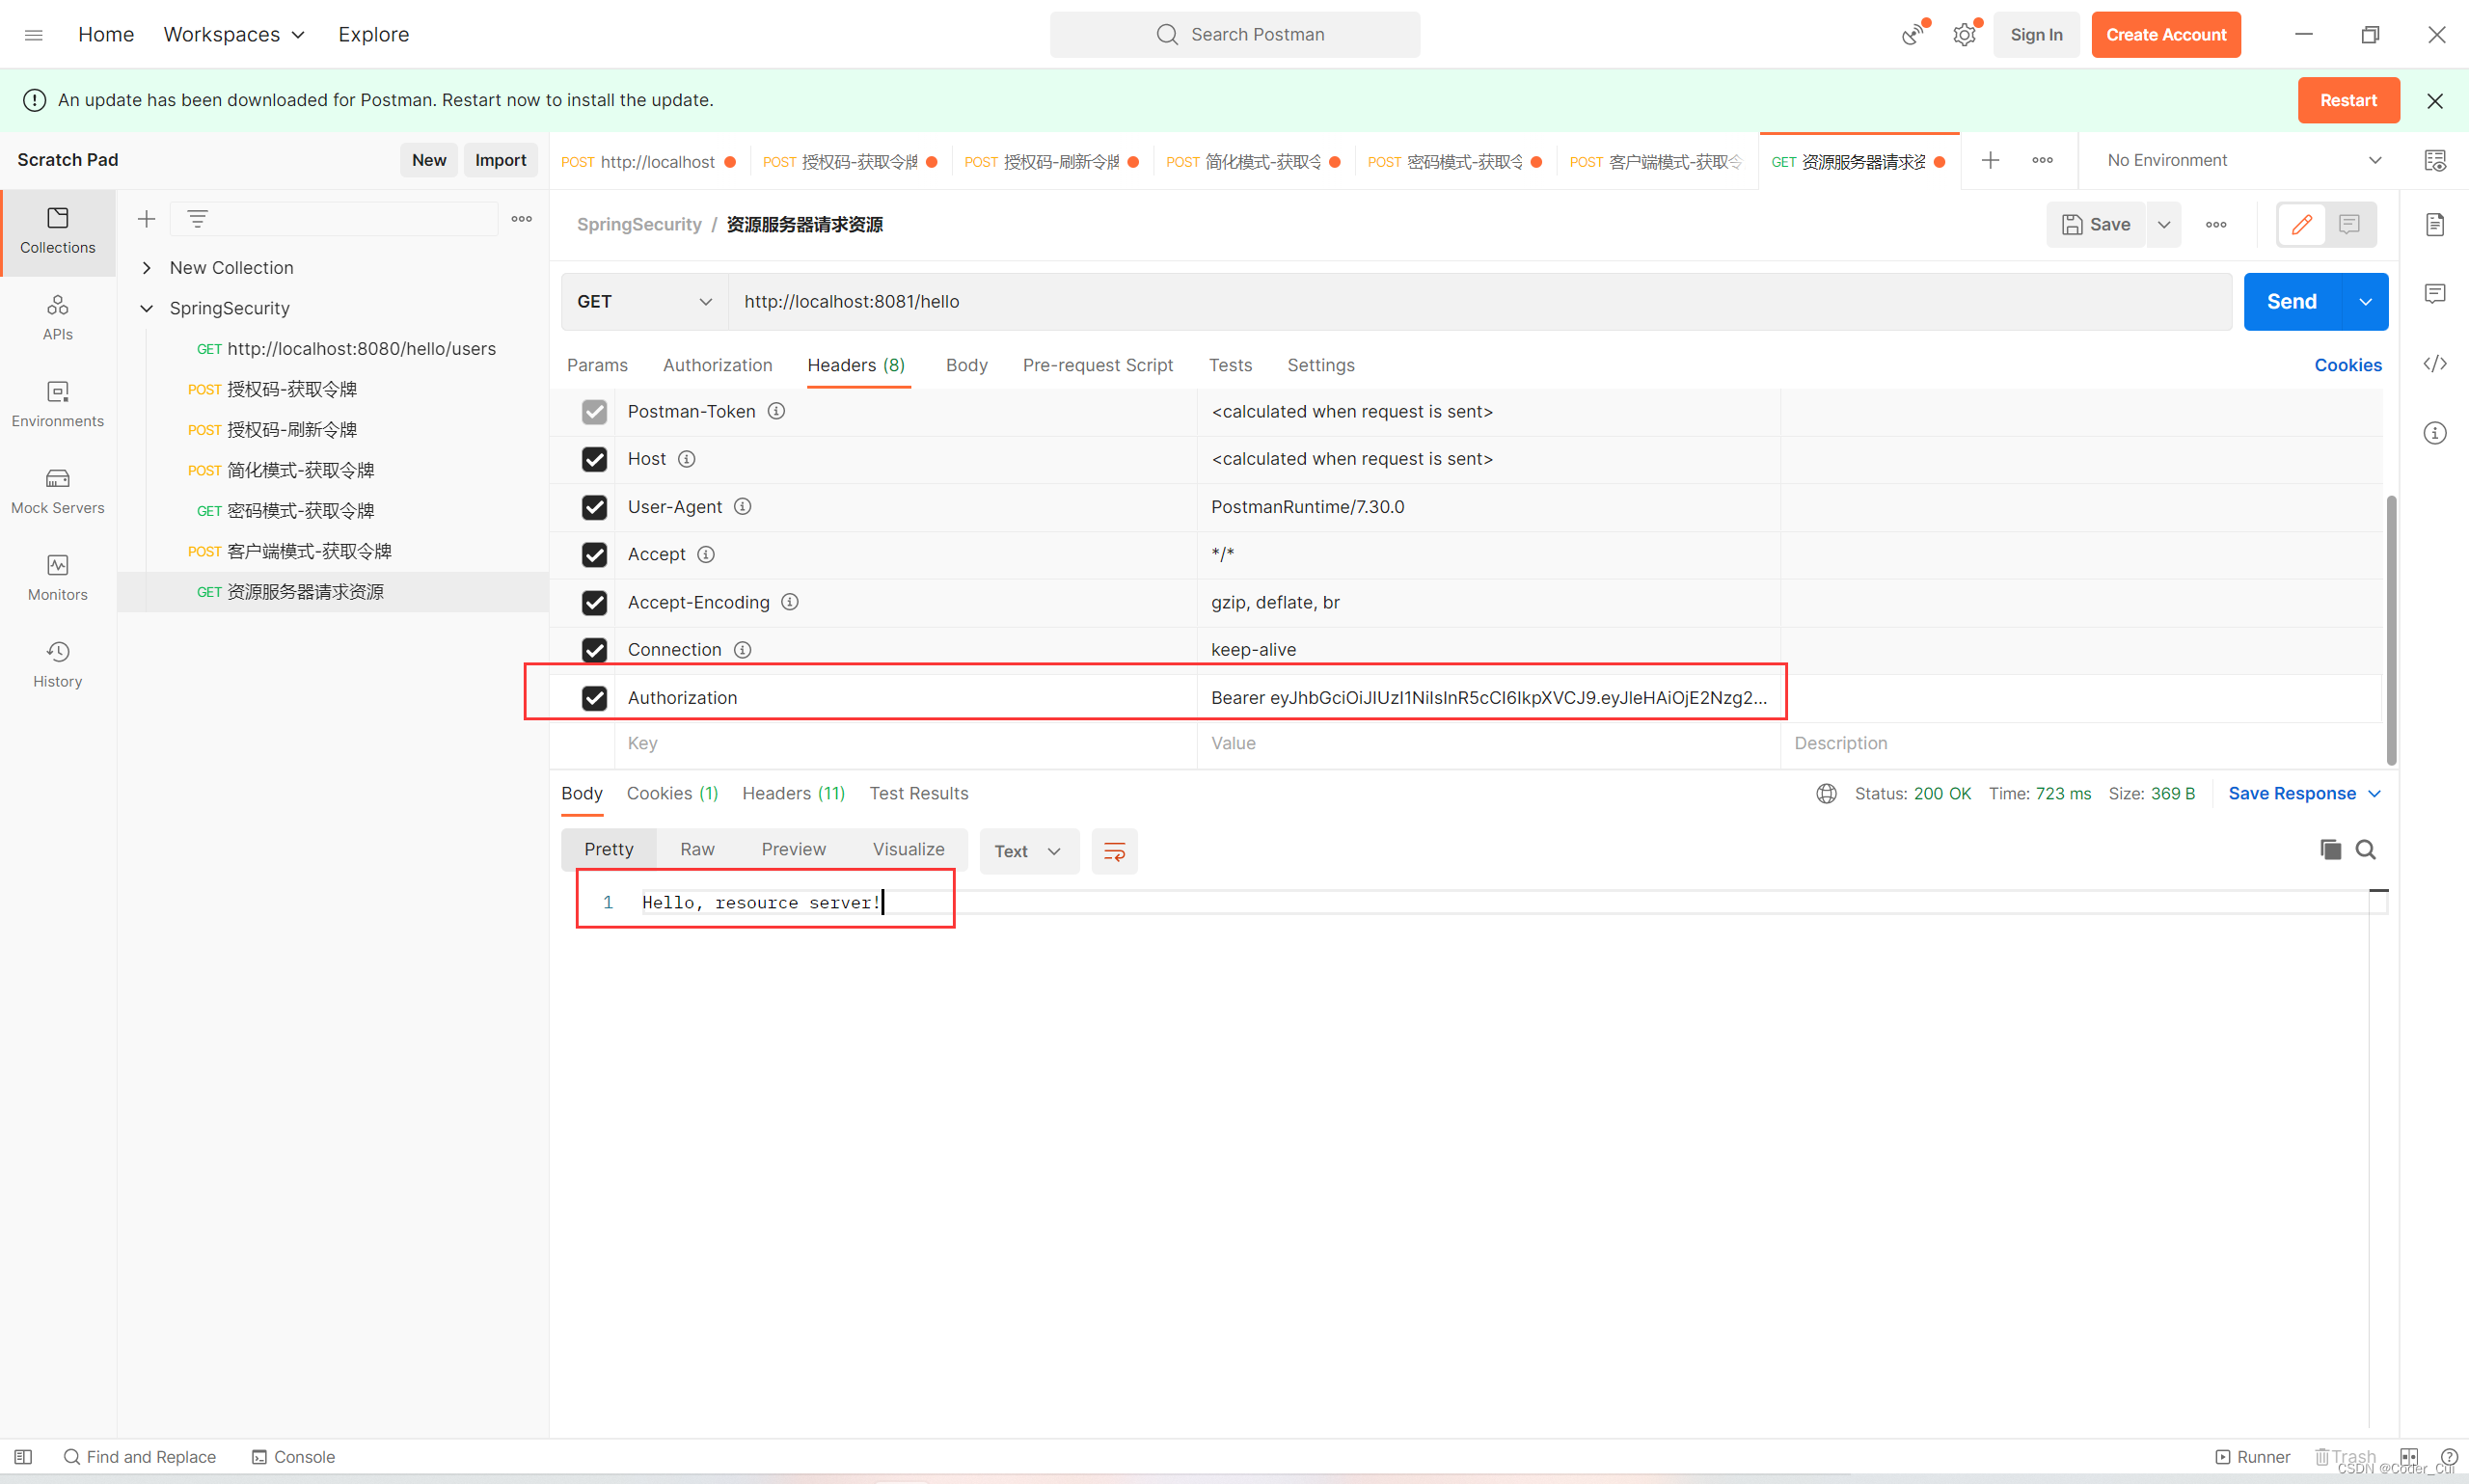
启动测试,通过 jwt 令牌访问资源:
携带授权服务器生成地令牌访问:curl -H "Authorization:Bearer eyJhbGciOiJIUzI1NiIsInR5cCI6IkpXVCJ9.eyJleHAiOjE2Nzg2NTYxNDIsInVzZXJfbmFtZSI6InJvb3QiLCJhdXRob3JpdGllcyI6WyJST0xFX0FETUlOIl0sImp0aSI6Ijk0NGY2MDZkLTRmMjgtNDdiZS1iNDFmLTc4ZjEyM2Q2OTAzOCIsImNsaWVudF9pZCI6ImNsaWVudCIsInNjb3BlIjpbInJlYWQiXX0.Uk_CYZXAbdWunWXh9H4ye-Uxj-RQnp3I0ZYTTkXJicg" http://localhost:8081/hello
6.6 整体项目结构目录

【完结】


 397
397

 被折叠的 条评论
为什么被折叠?
被折叠的 条评论
为什么被折叠?
 到【灌水乐园】发言


