


实验环境:
三台centos主机
一、实现本地端口转发转发
1、在telnet服务器主机上安装telnet服务,并启动
[root@centos7 ~]# yum install telnet-server -y
[root@centos7 ~]# systemctl start telnet.socket
[root@centos7 ~]# ss -ntl | grep 23
LISTEN     0      128         :::23                      :::*
2、在本地主机上使用ssh服务输入如下命令。
ssh -L localport:remotehost:remotehostport sshserver
localport:本地没有使用的端口
remotehost:要连接的远程主机
remotehostport:远程主机的端口
sshserver:中间的ssh服务器
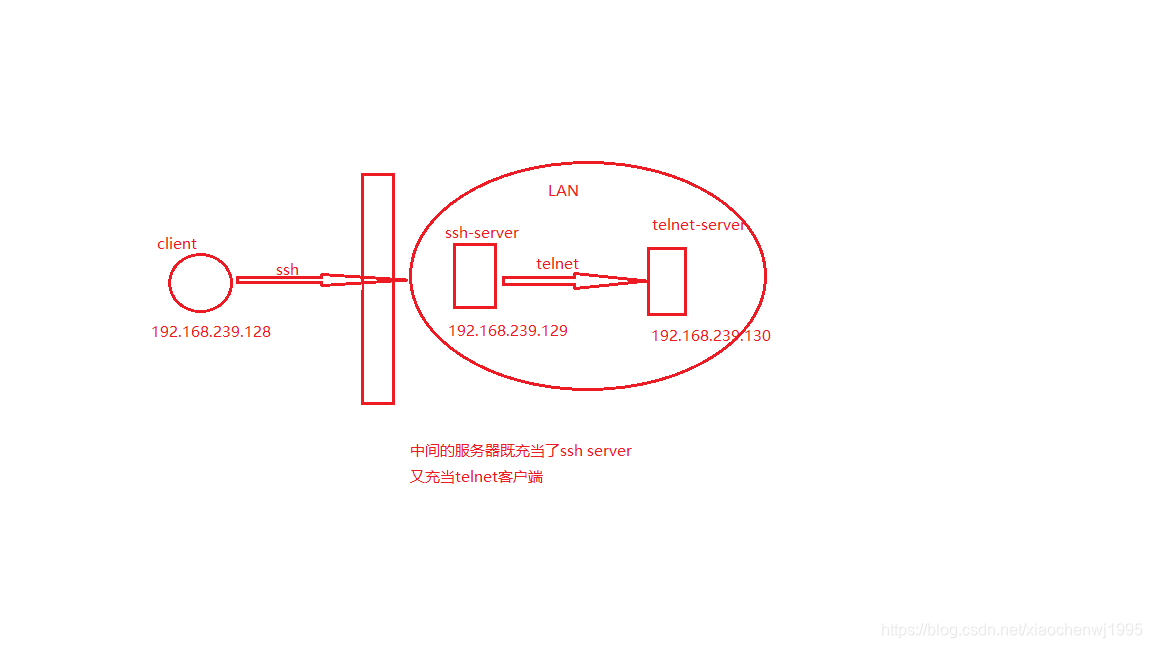
示例:通过ssh隧道连接远程的telnet服务器。
在本地客户端上
[root@centos7 ~]# ssh -L 9527:192.168.239.130:23  192.168.239.129
Last login: Sun Oct 27 22:52:11 2019 from 192.168.239.128
[root@centos6 ~]#      //这时已经连接上了ssh服务器
这时开启一个新窗口,然后telnet 127.0.0.1 9527就可以连接远程的telnet服务器了。
[root@centos7 ~]# telnet 127.0.0.1 9527
Trying 127.0.0.1...
Connected to 127.0.0.1.
Escape character is '^]'.

Kernel 3.10.0-693.el7.x86_64 on an x86_64
centos7 login: cwj
Password:
Last login: Sun Oct 27 22:53:00 from ::ffff:192.168.239.128
[cwj@centos7 ~]$ ls
公共  模板  视频  图片  文档  下载  音乐  桌面
ens33: flags=4163<UP,BROADCAST,RUNNING,MULTICAST>  mtu 1500
        inet 192.168.239.130  netmask 255.255.255.0  broadcast 192.168.239.255
        inet6 fe80::20c:29ff:fe65:a88f  prefixlen 64  scopeid 0x20<link>
        ether 00:0c:29:65:a8:8f  txqueuelen 1000  (Ethernet)
        RX packets 4375  bytes 1399426 (1.3 MiB)
        RX errors 0  dropped 0  overruns 0  frame 0
        TX packets 1378  bytes 162975 (159.1 KiB)
        TX errors 0  dropped 0 overruns 0  carrier 0  collisions 0
实现原理:当访问本机的9527的端口时,被加密后转发到sshsrv的ssh服务,再解密被转发到telnetsrv:23,此时中间的sshsrv即充当了ssh服务器,又充当了telnet的客户端。
二、实现远程端口转发

-R sshserverport:remotehost:remotehostport sshserver
示例:
ssh –R 9527:telnetsrv:23 –N sshsrv
1、在内网的主机上,此时这里的sshsrv是外部的主机。
[root@centos6 ~]# ssh -R 9527:192.168.239.130:23  192.168.239.128
Last login: Sun Oct 27 22:56:40 2019 from 192.168.239.1
[root@centos7 ~]#
2、在外部的主机上telnet 127.0.0.1 9527。
[root@centos7 ~]# telnet 127.0.0.1 9527
Trying 127.0.0.1...
Connected to 127.0.0.1.
Escape character is '^]'.

Kernel 3.10.0-693.el7.x86_64 on an x86_64
centos7 login: cwj
Password:
Last login: Sun Oct 27 23:02:32 from ::ffff:192.168.239.129
[cwj@centos7 ~]$ ifconfig
ens33: flags=4163<UP,BROADCAST,RUNNING,MULTICAST>  mtu 1500
        inet 192.168.239.130  netmask 255.255.255.0  broadcast 192.168.239.255
        inet6 fe80::20c:29ff:fe65:a88f  prefixlen 64  scopeid 0x20<link>
        ether 00:0c:29:65:a8:8f  txqueuelen 1000  (Ethernet)
        RX packets 4469  bytes 1406096 (1.3 MiB)
        RX errors 0  dropped 0  overruns 0  frame 0
        TX packets 1454  bytes 171439 (167.4 KiB)
        TX errors 0  dropped 0 overruns 0  carrier 0  collisions 0
实现原理:让sshsrv侦听9527端口的访问,如有访问,就加密后通过ssh服务转发请求到本机ssh客户端,再由本机解密后转发到telnetsrv:23
三、实现动态端口转发。
当使用firefox浏览器访问访问外部网络时时,就使用本机的1514端口做为代理,把firefox浏览器的访问请求转发到sshserver上,由sshserver替之访问。
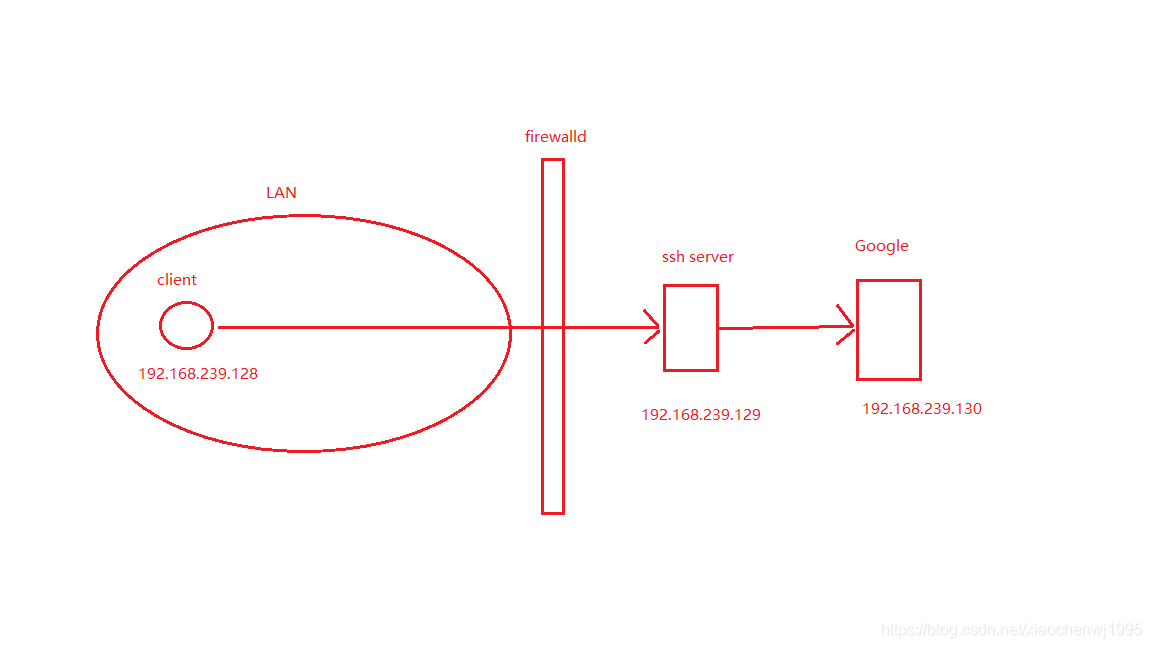
1、在192.168.239.147主机模拟Google网址。
[root@centos7 ~]# yum info httpd
[root@centos7 ~]# cd /var/www/html/
[root@centos7 html]# echo www.google.com > index.html
[root@centos7 html]# cat index.html
www.google.com
[root@centos7 html]# systemctl start httpd
先使用iptables规则拒绝客户端主机的访问
[root@centos7 httpd]# iptables -A INPUT -s 192.168.239.128 -j REJECT
[root@centos7 httpd]# iptables -vnL
Chain INPUT (policy ACCEPT 53 packets, 4268 bytes)
 pkts bytes target     prot opt in     out     source               destination
    0     0 REJECT     all  --  *      *       192.168.239.128      0.0.0.0/0            reject-with icmp-port-unreachable

Chain FORWARD (policy ACCEPT 0 packets, 0 bytes)
 pkts bytes target     prot opt in     out     source               destination

Chain OUTPUT (policy ACCEPT 42 packets, 4536 bytes)
 pkts bytes target     prot opt in     out     source               destination
这样客户端就无法直接访问了。
[root@centos7 ~]# curl 192.168.239.130
curl: (7) Failed connect to 192.168.239.130:80; 拒绝连接
2、在客户端192.168.239.128主机上。
ssh -D 1514 root@sshserver
[root@centos7 ~]# ssh -D 1514 root@192.168.239.129
Last login: Thu Oct 31 22:10:30 2019 from 192.168.239.1
[root@centos6 ~]# ss -nt
State       Recv-Q Send-Q                                                             Local Address:Port                                                               Peer Address:Port
ESTAB       0      0                                                                192.168.239.129:22                                                                192.168.239.1:50440
ESTAB       0      0                                                                192.168.239.129:22                                                              192.168.239.128:44624
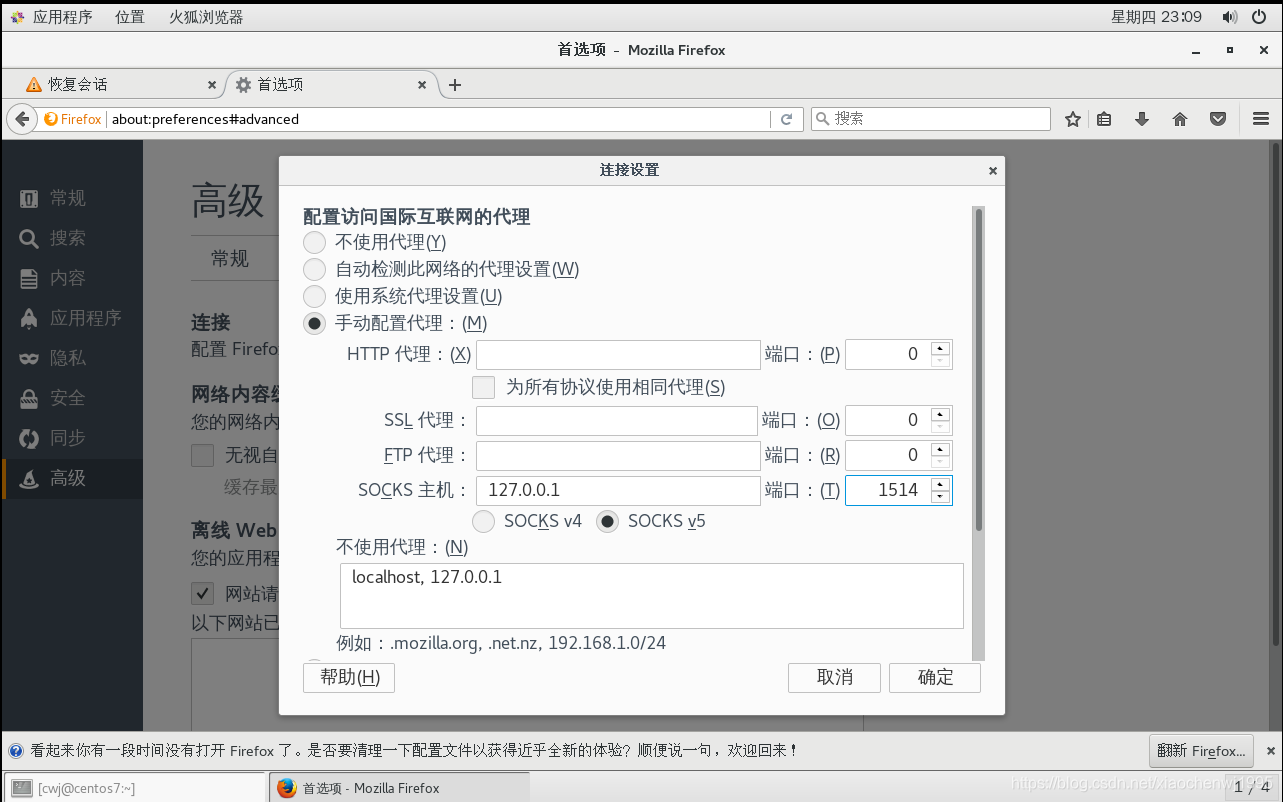
然后打开Firefox浏览器,设置代理socket proxy:127.0.0.1:1514。
3、访问
用浏览器访问

命令行方式,这时得新开启一个会话
[root@centos7 ~]# curl --socks5 127.0.0.1:1514 192.168.239.130
www.google.com
同时在后端的130主机上可以看到连接情况,是中间的ssh server从当代理客户端访问的。
[root@centos7 httpd]# ss -nt
State       Recv-Q Send-Q                                                Local Address:Port                                                               Peer Address:Port
ESTAB       0      52                                                  192.168.239.130:22                                                                192.168.239.1:50441
ESTAB       0      0                                            ::ffff:192.168.239.130:80                                                       ::ffff:192.168.239.129:55894


 2576
2576

 被折叠的 条评论
为什么被折叠?
被折叠的 条评论
为什么被折叠?
 到【灌水乐园】发言


