


 本文详细介绍了如何配置MySQL的主主复制,实现一主两从的高可用架构,并通过MHA进行故障转移管理。同时,讲解了Mycat的安装和配置,实现数据库的读写分离,提高系统性能。
Mysql主主复制
- 编辑主配置文件
[root@test01 data01]# cat /etc/my.cnf
[mysqld]
user=mysql
basedir=/aplication/mysql
datadir=/data01/mysql/data
socket=/tmp/mysql.sock
server_id=6
port=3306
log_bin=mysql_bin
log-error=error.log
#######主主配置加的#####
auto_increment_increment=2  #步进值auto_imcrement。一般有n台主MySQL就填n
auto_increment_offset=1   ##起始值。一般填第n台主MySQL。
#########################
[mysql]
socket=/tmp/mysql.sock
- 配置从服务器配置文件
[root@test01 data01]# cat /data01/3307/my.cnf
[mysqld]
basedir=/aplication/mysql
datadir=/data01/3307/data
socket=/data01/3307/mysql.sock
log_error=/data01/3307/mysql.log
port=3307
server_id=7
#######主主配置加的#####
auto-increment-offset=2
auto-increment-increment=2
- 重启数据库
[root@test01 system]# systemctl status mysqld3307.service
● mysqld3307.service - MySQL Server
   Loaded: loaded (/etc/systemd/system/mysqld3307.service; disabled; vendor preset: disabled)
   Active: active (running) since Sun 2021-12-12 17:30:37 CST; 6s ago
     Docs: man:mysqld(8)
           http://dev.mysql.com/doc/refman/en/using-systemd.html
 Main PID: 18178 (mysqld)
   CGroup: /system.slice/mysqld3307.service
           └─18178 /aplication/mysql/bin/mysqld --defaults-file=/data01/3307/my.cnf

Dec 12 17:30:37 test01 systemd[1]: Started MySQL Server.
Dec 12 17:30:37 test01 systemd[1]: Starting MySQL Server...
[root@test01 system]# /etc/init.d/mysqld restart
Shutting down MySQL.............. SUCCESS!
Starting MySQL..2021-12-12T09:31:12.716964Z mysqld_safe A mysqld process already exists
 SUCCESS!
- 从库设置一个授权账户
[root@test01 data]# mysql -S /data01/3307/mysql.sock -u root -p1
mysql: [Warning] Using a password on the command line interface can be insecure.
Welcome to the MySQL monitor.  Commands end with ; or \g.
Your MySQL connection id is 4
Server version: 5.7.26-log MySQL Community Server (GPL)

Copyright (c) 2000, 2019, Oracle and/or its affiliates. All rights reserved.

Oracle is a registered trademark of Oracle Corporation and/or its
affiliates. Other names may be trademarks of their respective
owners.

Type 'help;' or '\h' for help. Type '\c' to clear the current input statement.

mysql> GRANT REPLICATION SLAVE ON *.* TO 'sally1'@'%' IDENTIFIED BY '123456'; FLUSH PRIVILEGES
Query OK, 0 rows affected, 1 warning (0.12 sec)

    -> ;
Query OK, 0 rows affected (0.00 sec)
- 主库配置从库信息
mysql> CHANGE MASTER TO
    ->   MASTER_HOST='192.168.184.128',
    ->   MASTER_USER='sally1',
    ->   MASTER_PASSWORD='123456',
    ->   MASTER_PORT=3307,
    ->   MASTER_LOG_FILE='mysql_bin.000002',
    ->   MASTER_LOG_POS=601,
    ->   MASTER_CONNECT_RETRY=10;
Query OK, 0 rows affected, 2 warnings (0.13 sec)
mysql> start slave;
Query OK, 0 rows affected (0.12 sec)
mysql> show slave status\G
一主两从
- 写主库配置文件并创建一个用户
[root@localhost ~]# cat /etc/my.cnf
[mysqld]
user=mysql
basedir=/aplication/mysql
datadir=/data/mysql/data
socket=/tmp/mysql.sock
server_id=6
port=3306
log_bin=mysql_bin
[root@localhost ~]# mysql -uroot -p123
mysql> grant replication slave on *.* to repl@'%' identified by '123';
Query OK, 0 rows affected, 1 warning (0.00 sec)
- 从库测试连接
[root@localhost data]# mysql -h 192.168.168.129 -P 3306 -urepl -p123
mysql: [Warning] Using a password on the command line interface can be insecure.
Welcome to the MySQL monitor.  Commands end with ; or \g.
Your MySQL connection id is 7
Server version: 5.7.26-log MySQL Community Server (GPL)

Copyright (c) 2000, 2019, Oracle and/or its affiliates. All rights reserved.

Oracle is a registered trademark of Oracle Corporation and/or its
affiliates. Other names may be trademarks of their respective
owners.

Type 'help;' or '\h' for help. Type '\c' to clear the current input statement.

mysql> quit
Bye
- 从库配置文件
第一台从库
[root@localhost data]# cat /etc/my.cnf
[mysqld]
user=mysql
basedir=/aplication/mysql
datadir=/data/mysql/data
socket=/tmp/mysql.sock
server_id=7  #server_id要不一致
port=3306
log_bin=mysql_bin
第二台从库
[root@localhost ~]# cat /etc/my.cnf
[mysqld]
user=mysql
basedir=/aplication/mysql
datadir=/data/mysql/data
socket=/tmp/mysql.sock
server_id=8
port=3306
log_bin=mysql_bin
- 启用主从
第一台从库
mysql> CHANGE MASTER TO
    ->   MASTER_HOST='192.168.168.129',
    ->   MASTER_USER='repl',
    ->   MASTER_PASSWORD='123',
    ->   MASTER_PORT=3306,
    ->   MASTER_LOG_FILE='mysql_bin.000003',
    ->   MASTER_LOG_POS=1052,
    ->   MASTER_CONNECT_RETRY=10;
Query OK, 0 rows affected, 2 warnings (0.02 sec)

mysql> start slave;
Query OK, 0 rows affected (0.00 sec)
第二台从库
mysql> CHANGE MASTER TO
    ->   MASTER_HOST='192.168.168.129',
    ->   MASTER_USER='repl',
    ->   MASTER_PASSWORD='123',
    ->   MASTER_PORT=3306,
    ->   MASTER_LOG_FILE='mysql_bin.000003',
    ->   MASTER_LOG_POS=1052,
    ->   MASTER_CONNECT_RETRY=10;
Query OK, 0 rows affected, 2 warnings (0.01 sec)

mysql> start slave;
Query OK, 0 rows affected (0.00 sec)
- 查看主从状态
第一台从库
mysql> show slave status \G
*************************** 1. row ***************************
               Slave_IO_State: Waiting for master to send event
                  Master_Host: 192.168.168.129
                  Master_User: repl
                  Master_Port: 3306
                Connect_Retry: 10
              Master_Log_File: mysql_bin.000003
          Read_Master_Log_Pos: 1052
               Relay_Log_File: localhost-relay-bin.000003
                Relay_Log_Pos: 320
        Relay_Master_Log_File: mysql_bin.000003
             Slave_IO_Running: Yes
            Slave_SQL_Running: Yes
第二台从库
mysql> show slave status \G
*************************** 1. row ***************************
               Slave_IO_State: Waiting for master to send event
                  Master_Host: 192.168.168.129
                  Master_User: repl
                  Master_Port: 3306
                Connect_Retry: 10
              Master_Log_File: mysql_bin.000003
          Read_Master_Log_Pos: 1052
               Relay_Log_File: localhost-relay-bin.000003
                Relay_Log_Pos: 320
        Relay_Master_Log_File: mysql_bin.000003
             Slave_IO_Running: Yes
            Slave_SQL_Running: Yes
mysql MHA高可用
- 三台主机相互做信任保证每台主机都可以和另外两台做通讯
- 三台主机配置关键程序软连接
ln -s /aplication/mysql/bin/mysqlbinlog /usr/bin/mysqlbinlog
ln -s /aplication/mysql/bin/mysql /usr/bin/mysql
- 在三台机器上上分别安装mha4mysql-node
#安装依赖包
yum install -y epel-release perl-DBD-MySQL
#下载并安装mha4mysql-node
wget https://github.com/linyue515/mysql-master-ha/raw/master/mha4mysql-node-0.57-0.el7.noarch.rpm
rpm -ivh mha4mysql-node-0.57-0.el7.noarch.rpm
- 在主库中创建mha需要的用户
grant all privileges on *.* to mha@'192.168.168.%' identified by 'mha';
grant all on *.* to rep@"%" identified by "rep";
- 在管理节点上安装manager节点
我这边用的是第二台从库
#下载epel源
wget -O /etc/yum.repos.d/epel.repo http://mirrors.aliyun.com/repo/epel-7.repo
yum makecache
#安装manager依赖
yum install -y perl-Config-Tiny perl-Log-Dispatch perl-Parallel-ForkManager
#安装mha4mysql-mangere
wget https://github.com/linyue515/mysql-master-ha/raw/master/mha4mysql-manager-0.57-0.el7.noarch.rpm
rpm -ivh mha4mysql-manager-0.57-0.el7.noarch.rpm
- 编写配置文件
#创建配置文件目录
 mkdir -p /etc/mha
#创建日志目录
 mkdir -p /var/log/mha/app1
#编辑mha配置文件
[root@localhost ~]# cat /etc/mha/app1.cnf
[server default]
manager_log=/var/log/mha/app1/manager
manager_workdir=/var/log/mha/app1
master_binlog_dir=/data/mysql/data
user=mha
password=mha
ping_interval=2
repl_password=rep
repl_user=rep
ssh_user=root
[server1]
hostname=192.168.168.129
port=3306
[server2]
hostname=192.168.168.130
port=3306
[server3]
hostname=192.168.168.131
port=3306
- 检查并开启MHA
#检查
masterha_check_ssh --conf=/etc/mha/app1.cnf
masterha_check_repl --conf=/etc/mha/app1.cnf
#开启
nohup masterha_manager --conf=/etc/mha/app1.cnf --remove_dead_master_conf --ignore_last_failover < /dev/null> /var/log/mha/app1/manager.log 2>&1 &
- 配置VIP功能
#修改脚本内容
vi  /usr/local/bin/master_ip_failover
my $vip = '192.168.168.132/24';  #写一个没有得IP地址
my $key = '1';
my $ssh_start_vip = "/sbin/ifconfig ens33:$key $vip"; #修改自己网卡
my $ssh_stop_vip = "/sbin/ifconfig ens33:$key down";#修改自己网卡
#更改manager配置文件
vi /etc/mha/app1.cnf
添加:
master_ip_failover_script=/usr/local/bin/master_ip_failover
注意:
[root@db03 ~]# dos2unix /usr/local/bin/master_ip_failover
dos2unix: converting file /usr/local/bin/master_ip_failover to Unix format ...
[root@db03 ~]# chmod +x /usr/local/bin/master_ip_failover
- 手工在主库上绑定vip,注意一定要和配置文件中的ethN一致
ifconfig ens33:1 192.168.168.132/24
- 重启MHA
mycat读写分离
- 下载Mycat
官网:http://www.mycat.org.cn/mycat1.html
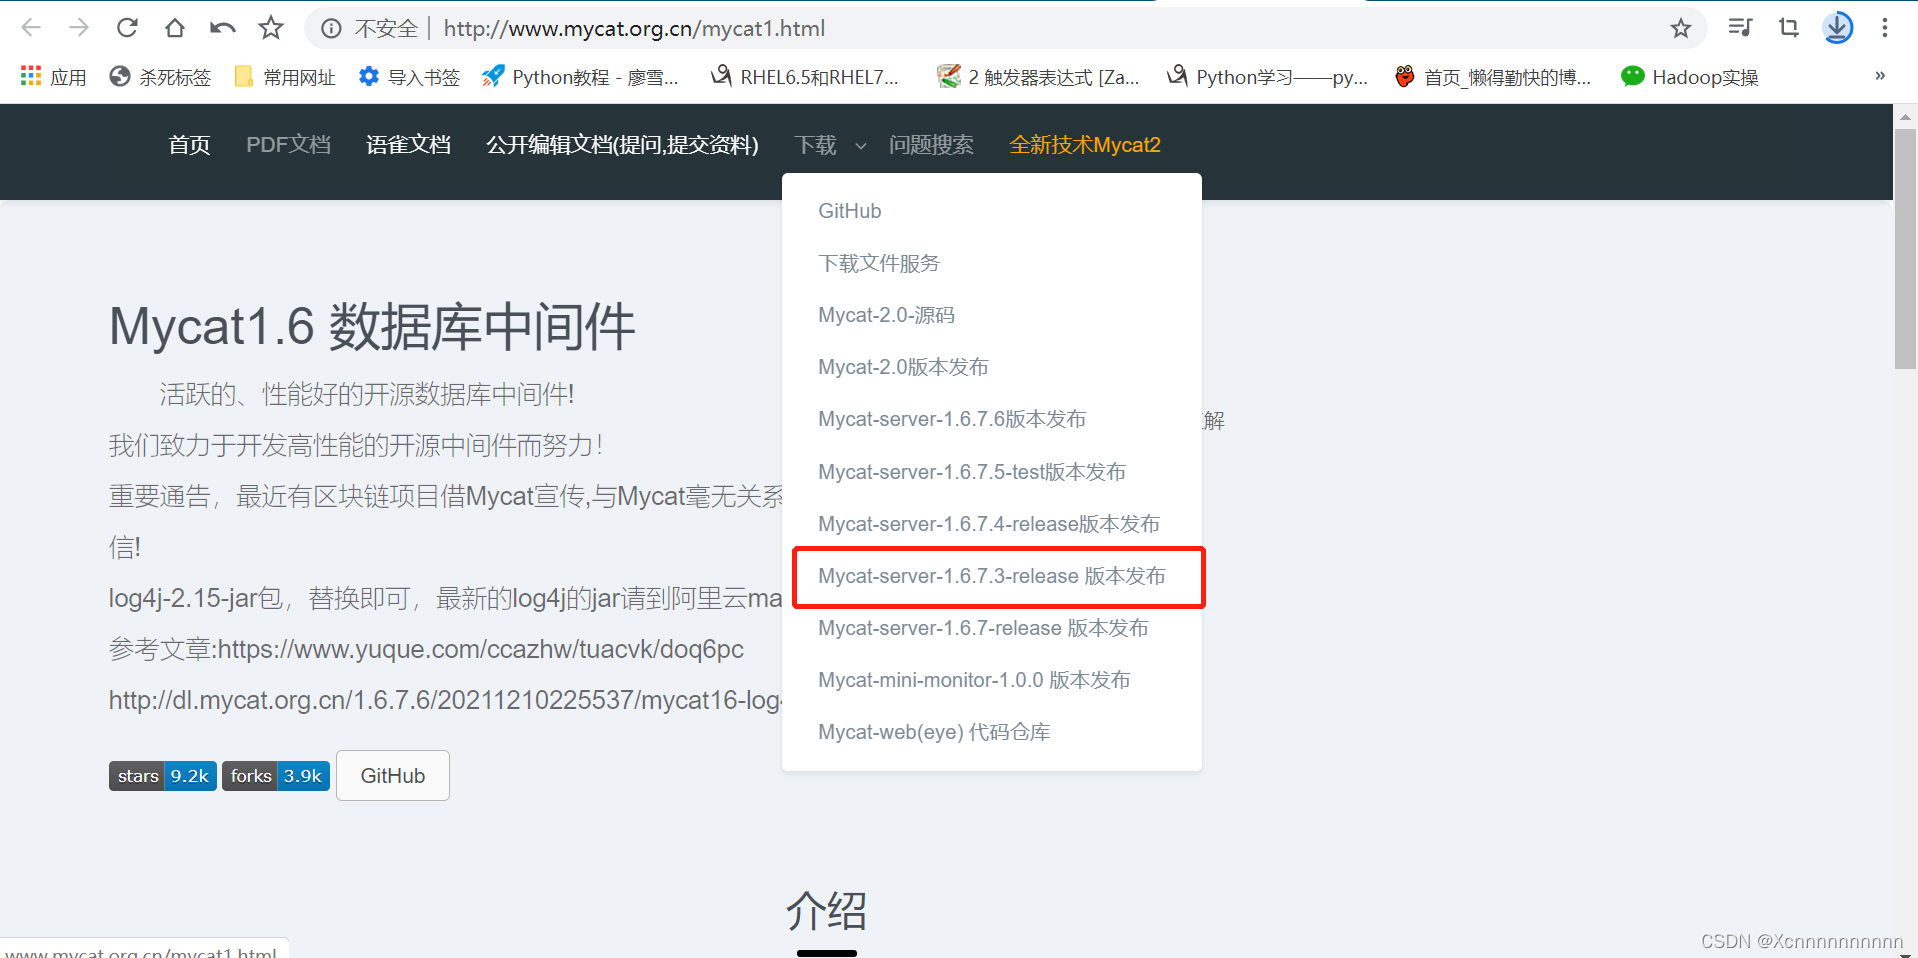
- 解压Mycat文件
tar -xzvf Mycat-server-1.6.7.3-release-20190828135747-linux.tar.gz
- 安装java
yum install java-1.8.0* -y

[root@localhost bin]# java -version
openjdk version "1.8.0_161"
OpenJDK Runtime Environment (build 1.8.0_161-b14)
OpenJDK 64-Bit Server VM (build 25.161-b14, mixed mode)
- 启动mycat
[root@localhost bin]# ./mycat start
Starting Mycat-server...
[root@localhost bin]# ps aux|grep mycat
root       2424  0.0  0.0  17860   756 ?        Sl   22:53   0:00 /root/mycat/bin/./wrapper-linux-x86-64 /root/mycat/conf/wrapper.conf wrapper.syslog.ident=mycat wrapper.pidfile=/root/mycat/logs/mycat.pid wrapper.daemonize=TRUE wrapper.lockfile=/var/lock/subsys/mycat
root       2426 21.6 10.8 6284088 202084 ?      Sl   22:53   0:01 java -DMYCAT_HOME=. -server -XX:MaxPermSize=64M -XX:+AggressiveOpts -XX:MaxDirectMemorySize=2G -Dcom.sun.management.jmxremote -Dcom.sun.management.jmxremote.port=1984 -Dcom.sun.management.jmxremote.authenticate=false -Dcom.sun.management.jmxremote.ssl=false -Xmx4G -Xms1G -Djava.library.path=lib -classpath lib/wrapper.jar:conf:lib/asm-4.0.jar:lib/commons-collections-3.2.1.jar:lib/commons-lang-2.6.jar:lib/curator-client-2.11.0.jar:lib/curator-framework-2.11.0.jar:lib/curator-recipes-2.11.0.jar:lib/disruptor-3.3.4.jar:lib/dom4j-1.6.1.jar:lib/druid-1.0.26.jar:lib/ehcache-core-2.6.11.jar:lib/fastjson-1.2.58.jar:lib/guava-19.0.jar:lib/hamcrest-core-1.3.jar:lib/hamcrest-library-1.3.jar:lib/jline-0.9.94.jar:lib/joda-time-2.9.3.jar:lib/jsr305-2.0.3.jar:lib/kryo-2.10.jar:lib/leveldb-0.7.jar:lib/leveldb-api-0.7.jar:lib/libwrapper-linux-ppc-64.so:lib/libwrapper-linux-x86-32.so:lib/libwrapper-linux-x86-64.so:lib/log4j-1.2-api-2.5.jar:lib/log4j-1.2.17.jar:lib/log4j-api-2.5.jar:lib/log4j-core-2.5.jar:lib/log4j-slf4j-impl-2.5.jar:lib/mapdb-1.0.7.jar:lib/minlog-1.2.jar:lib/mongo-java-driver-2.11.4.jar:lib/Mycat-server-1.6.7.3-release.jar:lib/mysql-binlog-connector-java-0.16.1.jar:lib/mysql-connector-java-5.1.35.jar:lib/netty-3.7.0.Final.jar:lib/netty-buffer-4.1.9.Final.jar:lib/netty-common-4.1.9.Final.jar:lib/objenesis-1.2.jar:lib/reflectasm-1.03.jar:lib/sequoiadb-driver-1.12.jar:lib/slf4j-api-1.6.1.jar:lib/univocity-parsers-2.2.1.jar:lib/velocity-1.7.jar:lib/wrapper.jar:lib/zookeeper-3.4.6.jar -Dwrapper.key=YYNJgXaRKdVEZQWG -Dwrapper.port=32000 -Dwrapper.jvm.port.min=31000 -Dwrapper.jvm.port.max=31999 -Dwrapper.pid=2424 -Dwrapper.version=3.2.3 -Dwrapper.native_library=wrapper -Dwrapper.service=TRUE -Dwrapper.cpu.timeout=10 -Dwrapper.jvmid=1 org.tanukisoftware.wrapper.WrapperSimpleApp io.mycat.MycatStartup start
- 修改mycat配置文件
schema.xml
schema name=“TESTDB” checkSQLschema=“false” sqlMaxLimit=“100” dataNode=“sh1”
一个schema库,对应server里的配置和下面实际数据的关联,有一个库就写几个
dataNode name=“sh1” dataHost=“localhost” database= “world”
sh1对应上面的 dataNode,dataHost本机主机名,database实际的数据库
writeHost host=“db1” url=“192.168.168.130:3306” user=“root” password=“123”
写的mysql的信息
readHost host=“db2” url=“192.168.168.129:3306” user=“root” password=“123”
读的mysql的信息
<?xml version="1.0"?>
<!DOCTYPE mycat:schema SYSTEM "schema.dtd">
<mycat:schema xmlns:mycat="http://io.mycat/">
<schema name="TESTDB" checkSQLschema="false" sqlMaxLimit="100" dataNode="sh1">
</schema>
        <dataNode name="sh1" dataHost="localhost" database= "world" />
        <dataHost name="localhost" maxCon="1000" minCon="10" balance="1"  writeType="0" dbType="mysql"  dbDriver="native" switchType="1">
                <heartbeat>select user()</heartbeat>
        <writeHost host="db1" url="192.168.168.130:3306" user="root" password="123">
                        <readHost host="db2" url="192.168.168.129:3306" user="root" password="123" />
        </writeHost>
        </dataHost>
</mycat:schema>
server.xml
<user name=“xcn”>
<property name=“password”>123456
<property name=“schemas”>TESTDB
</user>
配置Mycat登录用户面密码和管理的库
[root@localhost conf]# cat server.xml
<?xml version="1.0" encoding="UTF-8"?>
<!-- - - Licensed under the Apache License, Version 2.0 (the "License");
     	- you may not use this file except in compliance with the License. - You
	may obtain a copy of the License at - - http://www.apache.org/licenses/LICENSE-2.0
	- - Unless required by applicable law or agreed to in writing, software -
	distributed under the License is distributed on an "AS IS" BASIS, - WITHOUT
	WARRANTIES OR CONDITIONS OF ANY KIND, either express or implied. - See the
	License for the specific language governing permissions and - limitations
	under the License. -->
<!DOCTYPE mycat:server SYSTEM "server.dtd">
<mycat:server xmlns:mycat="http://io.mycat/">
	<system>
	<property name="useSqlStat">0</property>  <!-- 1为开启实时统计、0为关闭 -->
	<property name="useGlobleTableCheck">0</property>  <!-- 1为开启全加班一致性检测、0为关闭 -->

		<property name="sequnceHandlerType">2</property>
      <!--  <property name="useCompression">1</property>--> <!--1为开启mysql压缩协议-->
        <!--  <property name="fakeMySQLVersion">5.6.20</property>--> <!--设置模拟的MySQL版本号-->
	<property name="processorBufferChunk">5012</property>

	<property name="processors">16</property>
	<property name="processorExecutor">16</property>

		<!--默认为type 0: DirectByteBufferPool | type 1 ByteBufferArena-->
		<property name="processorBufferPoolType">0</property>
		<!--默认是65535 64K 用于sql解析时最大文本长度 -->
		<!--<property name="maxStringLiteralLength">65535</property>-->
		<!--<property name="sequnceHandlerType">0</property>-->
		<!--<property name="backSocketNoDelay">1</property>-->
		<!--<property name="frontSocketNoDelay">1</property>-->
		<!--<property name="processorExecutor">16</property>-->
		<!--
		     			<property name="serverPort">8066</property> <property name="managerPort">9066</property>
			<property name="idleTimeout">300000</property> <property name="bindIp">0.0.0.0</property>
			<property name="frontWriteQueueSize">4096</property> <property name="processors">32</property> -->
		<!--分布式事务开关,0为不过滤分布式事务,1为过滤分布式事务(如果分布式事务内只涉及全局表,则不过滤),2为不过滤分布式事务,但是记录分布式事务日志-->
		<property name="handleDistributedTransactions">0</property>

			<!--
			     			off heap for merge/order/group/limit      1开启   0关闭
		-->
		<property name="useOffHeapForMerge">1</property>

		<!--
		     			单位为m
		-->
		<property name="memoryPageSize">1m</property>

		<!--
		     			单位为k
		-->
		<property name="spillsFileBufferSize">1k</property>

		<property name="useStreamOutput">0</property>

		<!--
		     			单位为m
		-->
		<property name="systemReserveMemorySize">384m</property>


		<!--是否采用zookeeper协调切换  -->
		<property name="useZKSwitch">true</property>


	</system>

	<!-- 全局SQL防火墙设置 -->
	<!--
	     	<firewall>
	   <whitehost>
	      <host host="127.0.0.1" user="mycat"/>
	      <host host="127.0.0.2" user="mycat"/>
	   </whitehost>
       <blacklist check="false">
       </blacklist>
	</firewall>
	-->


	<user name="xcn">
		<property name="password">123456</property>
		<property name="schemas">TESTDB</property>
	</user>


</mycat:server>
- 启动mycat,测试查看
[root@localhost bin]# mysql -uxcn -p123456 -h 127.0.0.1 -P 8066
mysql: [Warning] Using a password on the command line interface can be insecure.
Welcome to the MySQL monitor.  Commands end with ; or \g.
Your MySQL connection id is 5
Server version: 5.6.29-mycat-1.6.7.3-release-20190828215749 MyCat Server (OpenCloudDB)

Copyright (c) 2000, 2019, Oracle and/or its affiliates. All rights reserved.

Oracle is a registered trademark of Oracle Corporation and/or its
affiliates. Other names may be trademarks of their respective
owners.

Type 'help;' or '\h' for help. Type '\c' to clear the current input statement.

mysql> show variables like 'server_id';
+---------------+-------+
| Variable_name | Value |
+---------------+-------+
| server_id     | 6     |
+---------------+-------+
1 row in set (0.02 sec)

mysql> begin;
Query OK, 0 rows affected (0.00 sec)

mysql> show variables like 'server_id';
+---------------+-------+
| Variable_name | Value |
+---------------+-------+
| server_id     | 7     |
+---------------+-------+
1 row in set (0.00 sec)


 399
399

 被折叠的 条评论
为什么被折叠?
被折叠的 条评论
为什么被折叠?
 到【灌水乐园】发言


