


综合架构-网站服务(nginx)
常用网站服务软件
- 处理静态资源的服务
apache软件:http://apache.org/
nginx软件:http://nginx.org/ - 处理同台资源的服务
PHP:php.net 适合终端浏览器进行访问
Tomcat:利用移动端查看网页
PYTHON
nginx服务的软件特点
- 支持高并发、占用资源少
- 具有多种功能
- 网站web服务功能
- 网站负载均衡功能
- 网站缓存服务
- 在多种系统平台都可以进行部署
- nginx实现网络通讯时使用的时一部网络IO模型:epoll模型(apache — select模型)
epoll模型和select模型的区别
| epoll模型 | select模型 | |
|---|---|---|
| 性能 | 随着连接数的只能加性能急剧下降。处理成千 | 随着连接数的增加,性能基本上没有下 |
| 连接数 | 有限制 | 无限制 |
| 内在处理机制 | 线性轮询 | 回调callback |
| 开发复杂性 | 低 | 中 |
nginx软件的安装部署过程
nginx安装的几个方式
- yum安装软件
- 使用官方yum源进行安装 安装的时最新版本 软件目录结构比较标准(推荐)
- 使用非官方yum源进行安装 安装的不是最新版本 软件目录结构会发生变化
- 编译安装软件
- 从官网上下载nginx tar包
[root@192 ~]# wget http://nginx.org/download/nginx-1.20.1.tar.gz
PS:解决软件的依赖 pcre-devel openssl-devel
- 解压软件并进入软件目录
- 编译安装
1、进行配置操作
./configure
- -prefix=PATH 指定安装路径
- -user=USER 设置一个虚拟用户端粒worker进程
- -group=GROUP 设置一个虚拟用户组管理worker进程
2、进行软件的编译过程
make 编译
PS:编译就是将语言翻译成系统认识的语言
3、编译安装
make install
使用官方yum源进行安装
- 更新nginx官方yum源,在官网找到yum源的配置
http://nginx.org/en/linux_packages.html#RHEL-CentOS
[root@192 ~]# cat /etc/yum.repos.d/nginx.repo
[nginx-mainline]
name=nginx mainline repo
baseurl=http://nginx.org/packages/mainline/centos/$releasever/$basearch/
gpgcheck=1
enabled=1
gpgkey=https://nginx.org/keys/nginx_signing.key
module_hotfixes=true
- 用yum进行安装
[root@192 ~]# yum install nginx
Loaded plugins: product-id, search-disabled-repos, subscription-manager
This system is not registered with an entitlement server. You can use subscription-manager to register.
Resolving Dependencies
--> Running transaction check
---> Package nginx.x86_64 1:1.21.3-1.el7.ngx will be installed
--> Finished Dependency Resolution

Dependencies Resolved

============================================================================================================================================================================================
 Package                                Arch                                    Version                                               Repository                                       Size
============================================================================================================================================================================================
Installing:
 nginx                                  x86_64                                  1:1.21.3-1.el7.ngx                                    nginx-mainline                                  792 k

Transaction Summary
============================================================================================================================================================================================
Install  1 Package

Total download size: 792 k
Installed size: 2.8 M
Is this ok [y/d/N]: y
Downloading packages:
warning: /var/cache/yum/x86_64/7Server/nginx-mainline/packages/nginx-1.21.3-1.el7.ngx.x86_64.rpm: Header V4 RSA/SHA1 Signature, key ID 7bd9bf62: NOKEY    ] 156 kB/s | 720 kB  00:00:00 ETA
Public key for nginx-1.21.3-1.el7.ngx.x86_64.rpm is not installed
nginx-1.21.3-1.el7.ngx.x86_64.rpm                                                                                                                                    | 792 kB  00:00:04
Retrieving key from https://nginx.org/keys/nginx_signing.key
Importing GPG key 0x7BD9BF62:
 Userid     : "nginx signing key <signing-key@nginx.com>"
 Fingerprint: 573b fd6b 3d8f bc64 1079 a6ab abf5 bd82 7bd9 bf62
 From       : https://nginx.org/keys/nginx_signing.key
Is this ok [y/N]: y
Running transaction check
Running transaction test
Transaction test succeeded
Running transaction
  Installing : 1:nginx-1.21.3-1.el7.ngx.x86_64                                                                                                                                          1/1
----------------------------------------------------------------------

Thanks for using nginx!

Please find the official documentation for nginx here:
* https://nginx.org/en/docs/

Please subscribe to nginx-announce mailing list to get
the most important news about nginx:
* https://nginx.org/en/support.html

Commercial subscriptions for nginx are available on:
* https://nginx.com/products/

----------------------------------------------------------------------
  Verifying  : 1:nginx-1.21.3-1.el7.ngx.x86_64                                                                                                                                          1/1

Installed:
  nginx.x86_64 1:1.21.3-1.el7.ngx

Complete!
- 启动nginx服务,检查安装是否正确
[root@192 ~]# systemctl start nginx
[root@192 ~]# systemctl enable nginx
Created symlink from /etc/systemd/system/multi-user.target.wants/nginx.service to /usr/lib/systemd/system/nginx.service.
[root@192 ~]# systemctl status nginx
● nginx.service - nginx - high performance web server
   Loaded: loaded (/usr/lib/systemd/system/nginx.service; enabled; vendor preset: disabled)
   Active: active (running) since Sun 2021-10-24 21:24:04 CST; 17s ago
     Docs: http://nginx.org/en/docs/
 Main PID: 1626 (nginx)
   CGroup: /system.slice/nginx.service
           ├─1626 nginx: master process /usr/sbin/nginx -c /etc/nginx/nginx.conf
           └─1627 nginx: worker process

Oct 24 21:24:04 192.168.168.128 systemd[1]: Starting nginx - high performance web server...
Oct 24 21:24:04 192.168.168.128 systemd[1]: PID file /var/run/nginx.pid not readable (yet?) after start.
Oct 24 21:24:04 192.168.168.128 systemd[1]: Started nginx - high performance web server.
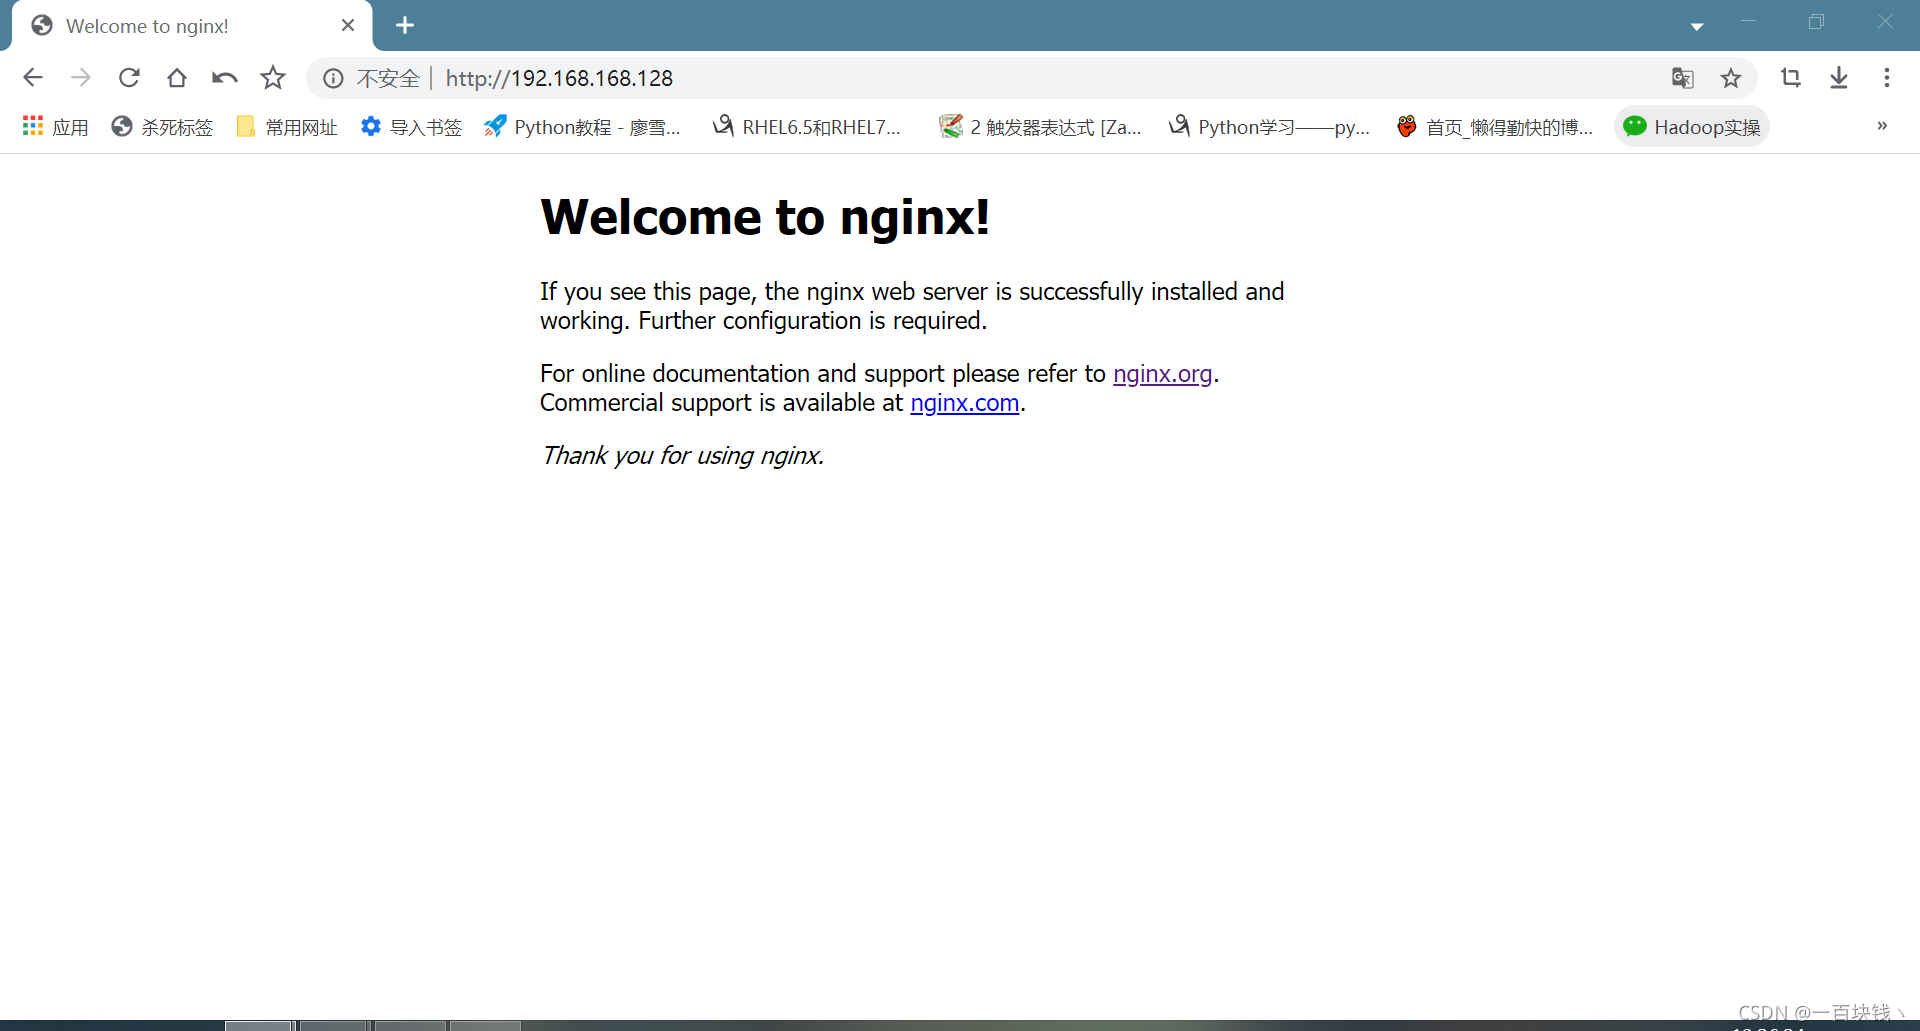
- 测试访问nginx
在浏览器中输入你的IP地址
nginx主要目录
- /etc/nginx
配置文件 - /var/log/nginx
日志文件 - /usr/bin/nginx
命令文件 - /usr/share/nginx/html
站点目录
什么时站点目录:用来存放用户访问网站的数据例如图片、音频的一个规范的目录
如果没有站点目录有什么问题:网站资源会十分混乱
nginx服务的配置文件
- /etc/nginx/nginx.conf ----主配置文件
[root@192 ~]# cat /etc/nginx/nginx.conf |grep -v "^$"
#配置文件主区域配置
user  nginx;  #定义worker进程管理的用户
#PS:nginx的进程
#master process:主进程,管理服务是否能够正常运行
#worker process:工作进程,处理用户的访问请求,上面的就是定义他的管理用户
worker_processes  auto;  #定义有几个worker进程 ==CPU核数/核数的两倍
error_log  /var/log/nginx/error.log notice;  #定义错误日志
pid        /var/run/nginx.pid;  #定义PID文件路径信息

#配置文件事件区域
events {
    worker_connections  1024;  #一个worker进程可以同时接收1024个访问请求
}

#配置http区域
http {
    include       /etc/nginx/mime.types;  #加载一个配置文件
    default_type  application/octet-stream;  #指定默认识别文件类型
    log_format  main  '$remote_addr - $remote_user [$time_local] "$request" '
                      '$status $body_bytes_sent "$http_referer" '
                      '"$http_user_agent" "$http_x_forwarded_for"';
                      #定义日志的格式
    access_log  /var/log/nginx/access.log  main;  #指定日志路径
    sendfile        on;
    #tcp_nopush     on;
    keepalive_timeout  65;  #定义超时时间
    #gzip  on;
    include /etc/nginx/conf.d/*.conf;  #加载一个配置文件
}
- /etc/nginx/nginx.d/default ----扩展配置(虚拟主机配置文件)
[root@192 ~]# cat /etc/nginx/conf.d/default.conf |egrep -v "^$|#"
#server区域信息(配置一个网站)
server {
listen 80; #指定监听的端口
server_name localhost; #指定网站域名
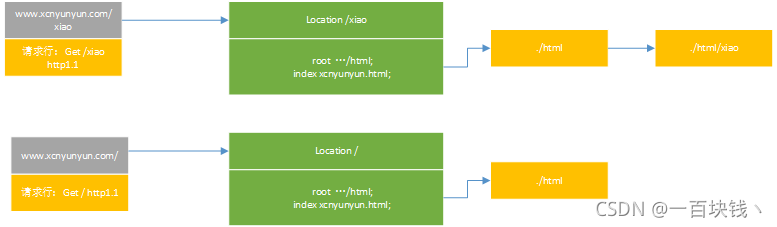
location / {
root /usr/share/nginx/html; #定义站点目录的位置
index index.html index.htm; #定义首页文件
}
error_page 500 502 503 504 /50x.html; #优雅显示页面信息
location = /50x.html {
root /usr/share/nginx/html;
}
}
nginx服务的企业应用
利用nginx服务搭建一个网站
- 编写虚拟主机配置文化
cd /etc/nginx/conf.d/
vim www.conf
[root@test01 yum.repos.d]# cd /etc/nginx/conf.d/
[root@test01 conf.d]# ls
default.conf
[root@test01 conf.d]# vim www.conf
[root@test01 conf.d]# cat www.conf
server {
   listen        80;
   server_name   www.xcnyunyun.com;
   location  / {
     root  /usr/share/nginx/html;
     index xcnyunyun.html;
   }


}
- 获取开发人员编写的网站代码
先写一个测试的html文件
[root@test01 conf.d]# cd /usr/share/nginx/html
[root@test01 html]# ls
50x.html  index.html
[root@test01 html]# vim xcnyunyun.html
[root@test01 html]# cat xcnyunyun.html
<!DOCTYPE html>
<html>
	<head>
		<title>HelloWorld</title>
	</head>
	<body>
		HelloWorld!
	</body>
</html>
- 重启nginx服务
两种方法:
systemctl reload nginx
nginx -s reload
nginx命令参数
-t:检查测试配置文件语法
-s:控制服务停止或者重新启动
[root@test01 html]# systemctl reload nginx
Job for nginx.service invalid.
- 编写DNS配置信息
真实域名:在阿里云上进行DNS解析记录配置
模拟域名:在windows的hosts文件总进行配置
C:\Windows\System32\drivers\etc\hosts
5.测试访问
http://www.xcnyunyun.com/
访问过程原理(www.conf中的location部分)
利用nginx服务搭建一个多网站
- 创建多个虚拟主机
[root@test01 conf.d]# cat www.conf
server {
   listen        80;
   server_name   www.xcnyunyun.com;
   location  / {
     root  /html/www;
     index index.html;
   }


}
[root@test01 conf.d]# cat bbs.conf
server {
   listen        80;
   server_name   bbs.xcnyunyun.com;
   location  / {
     root  /html/bbs;
     index index.html;
   }


}
[root@test01 conf.d]# cat blog.conf
server {
   listen        80;
   server_name   blog.xcnyunyun.com;
   location  / {
     root  /html/blog;
     index index.html;
   }


}
- 创建站点目录和目录中首页文件
[root@test01 conf.d]# cd /html/
[root@test01 html]# mkdir {www,bbs,bog}
[root@test01 html]# for name in {www,bbs,bog};do echo "$name" > /html/$name/index.html  ;done
[root@test01 html]# for name in {www,bbs,bog};do cat /html/$name/index.html  ;done
www
bbs
bog
[root@test01 html]# systemctl reload nginx
- 编写hosts解析文件
192.168.184.128 www.xcnyunyun.com bbs.xcnyunyun.com blog.xcnyunyun.com - 测试访问


企业中虚拟主机访问方式
- 基于域名的方式进行访问
- 基于地址的方式进行访问:
[root@test01 conf.d]# tail ../nginx.conf

    sendfile        on;
    #tcp_nopush     on;

    keepalive_timeout  65;

    #gzip  on;

    include /etc/nginx/conf.d/*.conf;
}
[root@test01 conf.d]# cat /etc/nginx/conf.d/*.conf
server {
   listen        80;
   server_name   bbs.xcnyunyun.com;
   location  / {
     root  /html/bbs;
     index index.html;
   }


}
server {
   listen        80;
   server_name   blog.xcnyunyun.com;
   location  / {
     root  /html/blog;
     index index.html;
   }


}
在主配置文件中include /etc/nginx/conf.d/.conf,cat /etc/nginx/conf.d/.conf中出现的第一个域名,就是IP访问默认的访问的域名,如果想指定在主配置文件中include /etc/nginx/conf.d/*.conf前面加上一行
[root@test01 conf.d]# cat ../nginx.conf

user  nginx;
worker_processes  auto;

error_log  /var/log/nginx/error.log notice;
pid        /var/run/nginx.pid;


events {
    worker_connections  1024;
}


http {
    include       /etc/nginx/mime.types;
    default_type  application/octet-stream;

    log_format  main  '$remote_addr - $remote_user [$time_local] "$request" '
                      '$status $body_bytes_sent "$http_referer" '
                      '"$http_user_agent" "$http_x_forwarded_for"';

    access_log  /var/log/nginx/access.log  main;

    sendfile        on;
    #tcp_nopush     on;

    keepalive_timeout  65;

    #gzip  on;
    include /etc/nginx/conf.d/www.conf;
    include /etc/nginx/conf.d/*.conf;
}
- 基于端口的方式进行访问
- 网站页面的访问原理:
- 将域名解析
- 建立TCP链接
- 根据应用层HTTP协议发出请求
- 没有相同域名的server主机,会满足端口要求的第一个主机
企业中网站的安全访问配置
根据用户访问的地址进行控制
nginx访问模块:ngx_http_access_module
官方文档:http://nginx.org/en/docs/http/ngx_http_access_module.html#deny
[root@test01 www]# mkdir av
[root@test01 www]# cd av/
[root@test01 av]# echo 11111 > 1.html
[root@test01 av]# cd
[root@test01 ~]# curl www.xcnyunyun.com
www
[root@test01 ~]# curl www.xcnyunyun.com/av/1.html
11111
[root@test01 ~]# vim /etc/nginx/conf.d/www.conf
[root@test01 ~]#
[root@test01 ~]# cat /etc/nginx/conf.d/www.conf
server {
   listen        80;
   server_name   www.xcnyunyun.com;
   location  / {
     root  /html/www;
     index index.html;
   }
   location  /av {
     deny   192.168.0.0/24;
   }


}
[root@test01 ~]# nginx -t
nginx: [warn] conflicting server name "www.xcnyunyun.com" on 0.0.0.0:80, ignored
nginx: the configuration file /etc/nginx/nginx.conf syntax is ok
nginx: configuration file /etc/nginx/nginx.conf test is successful
[root@test01 ~]# systemctl reload nginx
[root@test01 ~]#
[root@test01 ~]# curl www.xcnyunyun.com
www
[root@test01 ~]# curl www.xcnyunyun.com/av/1.html
<html>
<head><title>404 Not Found</title></head>
<body>
<center><h1>404 Not Found</h1></center>
<hr><center>nginx/1.21.3</center>
</body>
</html>
根据用户访问进行认证
nginx认证模块:Module ngx_http_auth_basic_module
官方文档:http://nginx.org/en/docs/http/ngx_http_auth_basic_module.html
配置举例:
location / {
auth_basic “closed site”; - -开启认证功能
auth_basic_user_file conf/htpasswd; - -加载用户密码文件
}
- 编写虚拟主机配置文件
[root@test01 ~]# cat /etc/nginx/conf.d/www.conf
server {
   listen        80;
   server_name   www.xcnyunyun.com;
   location  / {
     root  /html/www;
     index index.html;
     auth_basic           "xcnyunyun";
     auth_basic_user_file passwd/htpasswd;
   }
   location  /av {
     deny   192.168.0.0/24;
   }


}
- 创建密码文件
[root@test01 passwd]# pwd
/etc/nginx/passwd
[root@test01 passwd]# htpasswd -c ./htpasswd xcn
New password:
Re-type new password:
Adding password for user xcn
[root@test01 passwd]# htpasswd -bc ./htpasswd yy 123456
[root@test01 passwd]# systemctl reload nginx
3、测试

nginx的企业实践应用
利用nginx服务搭建网站文件共享服务器
- 编写配置文件
nginx认证模块:ngx_http_autoindex_module
[root@test01 ~]# cd /html/
[root@test01 html]# ls
bbs  bog  www
[root@test01 html]# cd www/
[root@test01 www]# ls
av  index.html
[root@test01 www]# mkdir centos{6,7,8}
[root@test01 www]# echo xxxxxx > centos6/111.txt
[root@test01 www]# echo xxxxxx > centos7/111.txt
[root@test01 www]# echo xxxxxx > centos8/111.txt
[root@test01 conf.d]# cat www.conf
server {
   listen        80;
   server_name   www.xcnyunyun.com;
   location  / {
     root  /html/www;
     index index.html;
     autoindex on;
   }
}
[root@test01 conf.d]# vim www.conf
[root@test01 conf.d]# cat www.conf
server {
   listen        80;
   server_name   www.xcnyunyun.com;
   location  / {
     root  /html/www;
     #index index.html;
     autoindex on;  #开启nginx站点目录索引功能
   }
}
[root@test01 conf.d]# systemctl reload nginx
Job for nginx.service invalid.
[root@test01 conf.d]# systemctl restart nginx
[root@test01 www]# mv index.html index.html_bak20211027
- 测试页面

PS:- 注意一定要在配置文件中注释首页文件,使nginx找不到首页文件并且要把首页文件给重命名才会生效。
- 媒体资源类型文件资源作用(mime.types文件),文件中有的扩展名信息资源,进行访问时会直接看到数据信.,文件中没有的扩展名信息资源,访问会直接下载资源。
- 网站页面目录数据中,中文乱码,使用ngx_http_charset_module模块
在www.conf 的location中添加charset utf-8;即可
利用nginx服务搭配配置文件别名功能
- 编写配置文件
在server_name后面再加一行
[root@test01 conf.d]# cat www.conf
server {
   listen        80;
   server_name   www.xcnyunyun.com xy.com;
   location  / {
     root  /html/www;
     #index index.html;
     autoindex on;
   }
}
- 配置解析信息
192.168.184.128 www.xcnyunyun.com bbs.xcnyunyun.com blog.xcnyunyun.com xy.com
作用:
- 编写网站访问测试
- 定位要访问的网站服务器
利用nginx状态模块功能对网站进行监控
状态模块:ngx_http_stub_status_module
- 编写配置文件
[root@test01 conf.d]# cat /etc/nginx/conf.d/state.conf
server {
   listen    80;
   server_name  state.xy.com;
   stub_status;
}
- 重启nginx服务,并编写解析文件
[root@test01 conf.d]# systemctl reload nginx
192.168.184.128 www.xcnyunyun.com bbs.xcnyunyun.com blog.xcnyunyun.com xy.com state.xy.com
- 测试
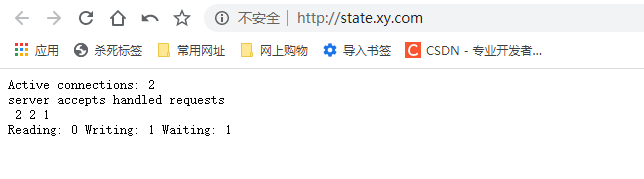
显示的内容的意思:
Active connections: 激活的连接数信息,就是有多少个用户
accepts:发送的连接数汇总(总和)
handled:处理的连接数汇总(总和)
requests:总计的请求数量 HTTP协议请求
Reading: nginx读取请求报文的数量
Writing: nginx服务响应报文信息数量
Waiting: nignx队列机制,要处理(读取或者响应报文进行保存)
nginx日志功能配置
访问日志:/var/log/nginx/access.log
- 官方文档模块:ngx_http_log_module
定义日志内容格式:
log_format main '$remote_addr - $remote_user [$time_local] “$request” ’
'$status $body_bytes_sent “$http_referer” ’
‘"$http_user_agent" “$http_x_forwarded_for”’;
remote_addr:显示用户访问源IP地址信息
remote_user:显示认证的用户名信息
time_local:显示访问网站的时间
request:请求报文的请求行信息
status:用户访问网站状态码信息
body_bytes_sent:显示响应的数据尺寸信息,也就是访问时传输的大小
http_referer:记录调用网站资源的连接地址信息(防止用户盗链)
http_user_agent:记录用户使用什么客户端软件进行访问页面的
http_x_forwarded_for:负载均衡的时候再说
调用日志格式:
access_log /var/log/nginx/access.log main;
错误日志:/var/log/nginx/error.log
- 官方文档配置方法:http://nginx.org/en/docs/ngx_core_module.html#error_log
Syntax: error_log file [level];
Default: error_log logs/error.log error;
Context: main, http, mail, stream, server, location - 错误级别:
debug:调试级别,服务运行的状态信息和错误信息详细显示
info:信息级别,显示重要的运行信息和错误信息
notice:通知级别,更加重要的信息进行通知说明
warn:警告级别,可能出现了一些错误信息,但不影响服务运行
error:错误级别,服务运行已经出现了错误,需要进行纠正
crit,:严重错误级别,必须进行修改调整
alert:严重警告级别,必须进行错误修改调整
emerg:灾难级别,服务已经不能正常运行
nginx服务location作用说明
- 模块说明:ngx_http_core_module
location进行匹配(uri)
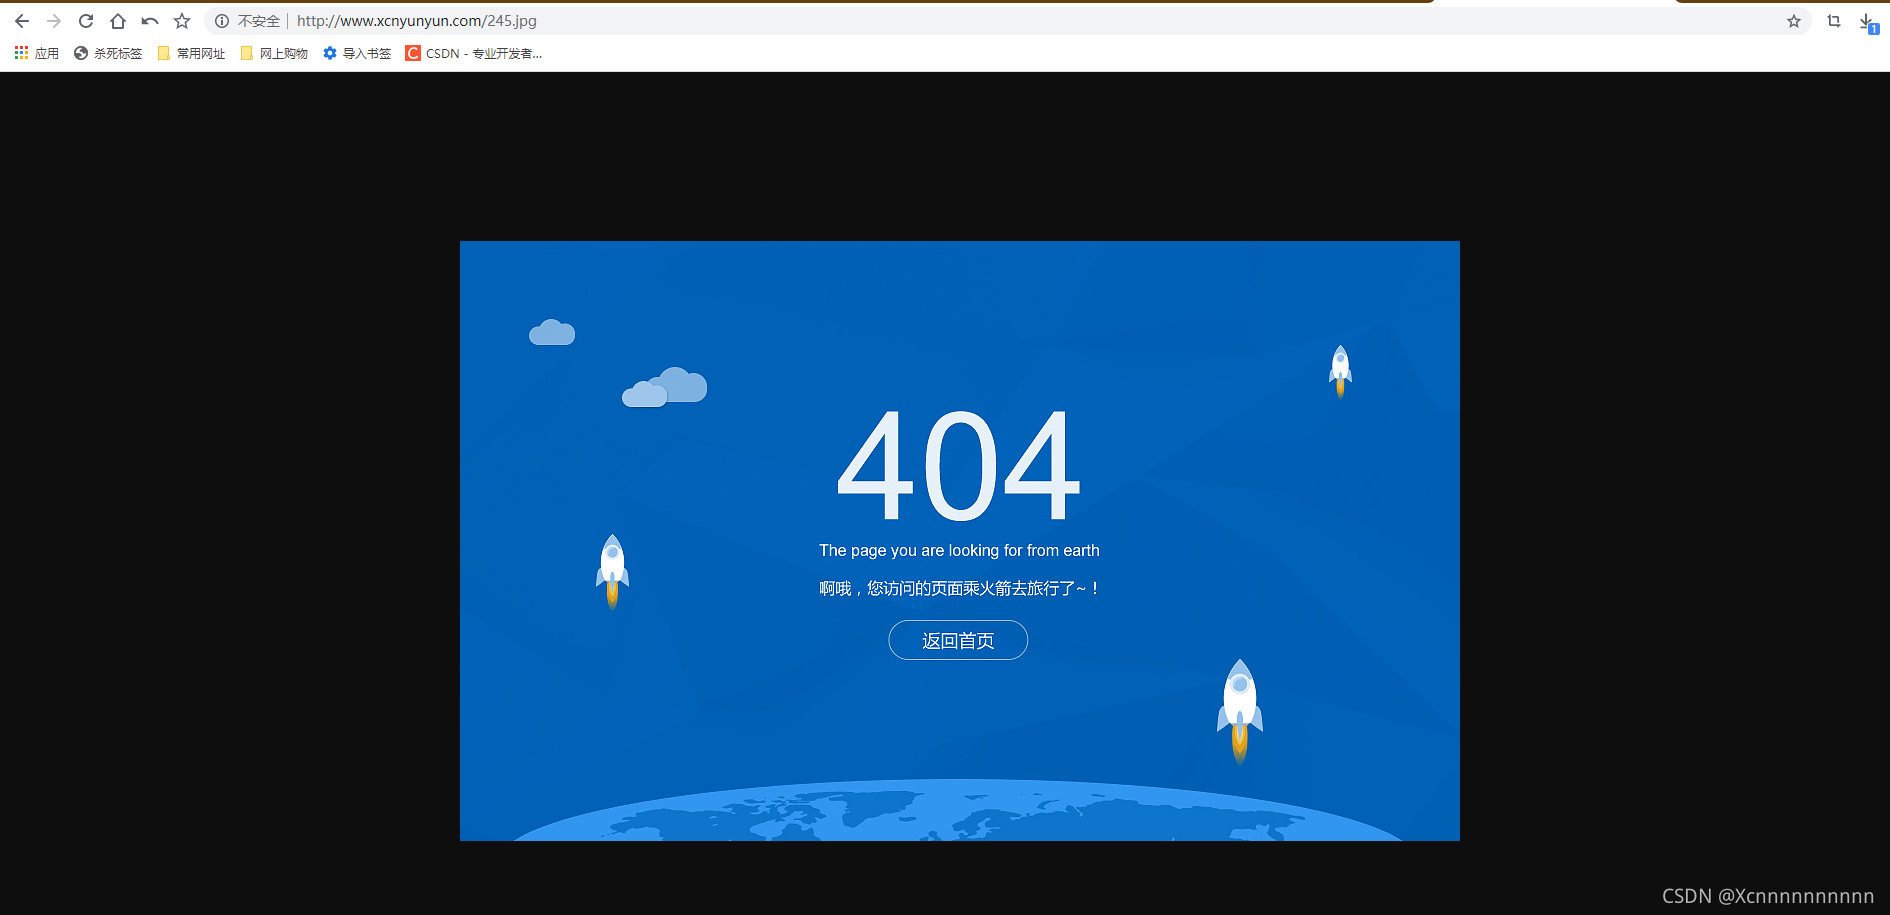
错误界面优雅显示
location  /xcn {
    root /html/www;
    error_page 404 /xxx.jpg
}
实际配置
[root@test01 www]# cat /etc/nginx/conf.d/www.conf
server {
   listen        80;
   server_name   www.xcnyunyun.com xy.com;
   location  / {
     root  /html/www;
     #index index.html;
     autoindex on;
     error_page 404 /xxx.jpg;
   }
}
测试访问
-
location详细配置:
Syntax: location [ = | ~ | ~* | ^~ ] uri { … }
location @name { … }
Default: —
Context: server, location- location = / {
[ configuration A ]
}
精确匹配 优先级01 最高 - location / {
[ configuration B ]
}
默认匹配 优先级04 最低 - location /documents/ {
[ configuration C ]
}
按照目录进行匹配 - location ^~ /images/ {
[ configuration D ]
}
优先匹配 优先级02 - location ~* .(gif|jpg|jpeg)$ {
[ configuration E ]
}
不区分大小写进行匹配 优先级03
- location = / {
利用nginx实现页面跳转功能
- 利用rewrite模块实现跳转功能:ngx_http_rewrite_module
Syntax: rewrite regex replacement [flag]; rewite 匹配的正则信息 替换成什么信息
Default: —
Context: server, location, if
例子:
rewrite ^/(.) http://www.xcnyunyun.com/$1 permanent;
/(.*):是url,(,)是uri
$1:是匹配前面的uri
跳转方式:
永久跳转:permanent 301
临时跳转:redirect 302
实际例子:
server {
   listen        80;
   server_name   www.xcnyunyun.com xy.com;
   rewrite ^/(.*)  http://www.xcnyunyun.com/$1 permanent;
   location  / {
     root  /html/www;
     #index index.html;
     autoindex on;
     error_page 404 /xxx.jpg;
   }
}
PS:这样配置会出现无限跳转,因为但输入xy.com他会跳转成www.xcnyunyun.com,之后会再次进去server,会对www.xcnyunyun.com跳转成www.xcnyunyun.com,无限循环
- 出现无限跳转如何解决
- 利用不同的server区块配置打破循环
[root@test01 www]# cat /etc/nginx/conf.d/www.conf
server {
   server_name       xy.com;
   rewrite ^/(.*)  http://www.xcnyunyun.com/$1 permanent;
}
server {
   listen        80;
   server_name   www.xcnyunyun.com;
   location  / {
     root  /html/www;
     #index index.html;
     autoindex on;
     error_page 404 /xxx.jpg;
   }
}
- 利用if判断实现打破循环
[root@test01 www]# cat /etc/nginx/conf.d/www.conf
server {
   listen        80;
   server_name   www.xcnyunyun.com xy.com;
   if ($host ~* "^xy.com$") {
       rewrite ^/(.*)  http://www.xcnyunyun.com/$1 permanent;
   }
   location  / {
     root  /html/www;
     #index index.html;
     autoindex on;
     error_page 404 /xxx.jpg;
   }
}


 401
401

 被折叠的 条评论
为什么被折叠?
被折叠的 条评论
为什么被折叠?
 到【灌水乐园】发言


