


一、GUI简介
GUI,图形用户界面。可以将计算机的功能直观的呈现出来。所以GUI需要操作系统和硬件的支持,GUI编程往往要处理移植性问题,Java的GUI编程相对有比较好的的可移植性。
-
三要素:组件、容器、事件。
-
组件:具有一定的功能模块,提供了公用的接口以便外部使用,有良好的可复用性;
-
容器(窗体),是特殊的组件,容器中可以放置其他组件,并通过布局管理器,管理容器中的各组件的位置;
-
事件:组件触发的动作事件,Java中不同事件由不同监听器处理,组件是事件源,而监听器主要用来监听来自指定事件源产生的动作事件。
-
-
Java的GUI功能主要集中在awt和swing两个包中。awt是GUI底层包。swing包是高层的封装,更容易移植。swing包中有很多swing组件
二、Swing简介
1.Swing组件
Swing组件是用java实现的轻量级(light- weight)组件,没有本地代码,不依赖操作系统的支持,其包含AWT可视化组件的替代组件。
Swing组件独立于本地窗口系统。
Swing组件是基于AWT构建的。
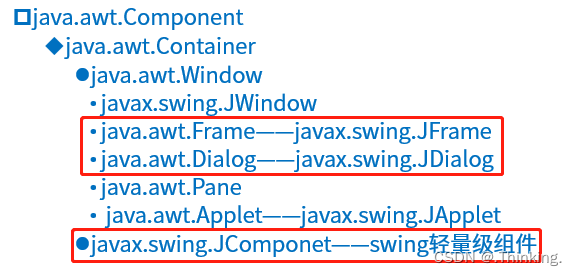
2.Swing的类层次结构
在javax.swing包中,定义了两种类型的组件:
- 顶层容器(JFrame,JDialog)
- 轻量级组件
swing组件绝大部分都是AWT的Container类的直接子类和间接子类。所以swing组件大部分也都是容器。
类层次结构图:
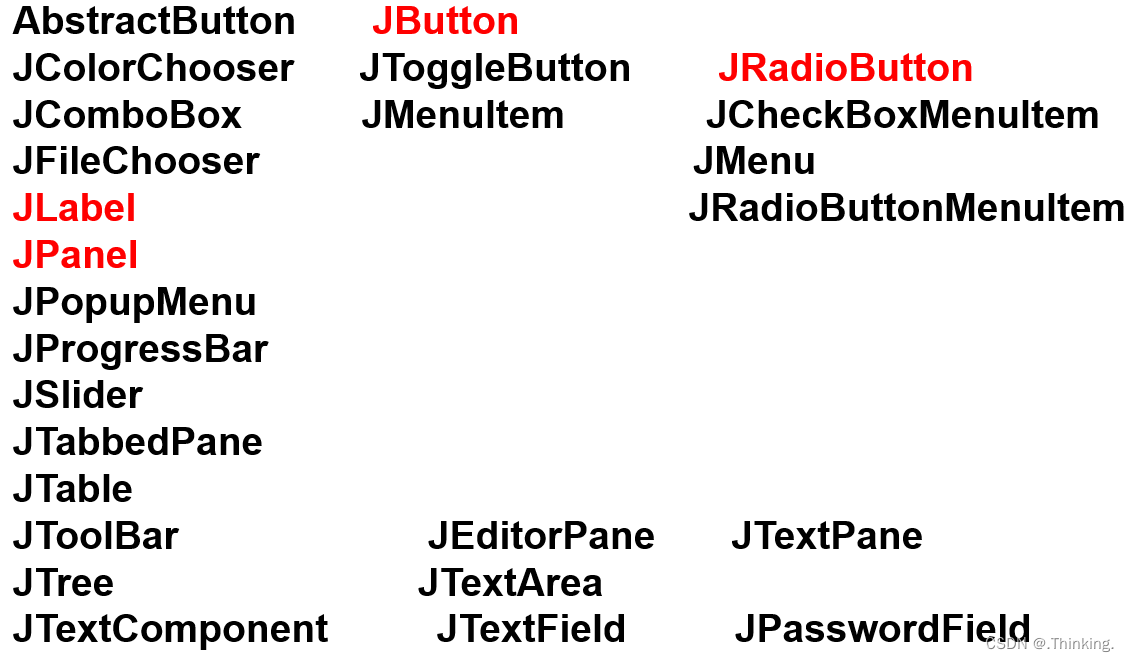
3.轻组件JComponent类结构(组件)
JComponent类是所有轻量组件的父类; JComponent类是java.awt包中容器类Container类的子类,因此所有的轻量组件也都是容器 :
顶层容器
- JFrame ,JDialog, JApplet,JWindow
普通容器(中间容器)
- JPanel ,JScrollPane(滚动窗格),JSplitPane(分割窗体),JTabbedPane,JOptionPane
基本控件(实现人机交互的组件)
- JButton,JTextField,JLabel ,JTextArea,JComboBox。
Swing组件除了AbstractButton类之外都以J开头。
三、swing容器及组件使用
1.顶层容器
JFrame类继承java.awt创建的Frame类(窗体,也是重量容器),所以JFrame类及其子类创建的对象实体,是窗体(也 叫swing窗体),也是重量容器。
JFrame创建的swing窗体含有一个 内容面板的容器,不能直接将组件加到窗体中,应该加到内容面板中。
获取内容面板:可以通过swing窗体调用getContentPane() 方法,然后再设置内容面板的布局(默认是 BorderLayout布局)
特性:
- 默认不可视;
- 默认宽高为0;
- 不能相互嵌套。
注: 在swing窗体的内容面板中尽量不要既有重量容器又有轻量组件,最好只使用轻量组件,否则可能会出现预想不到的问题。
package cn.gok;

import javax.swing.JFrame;

public class Demo01 {

	public static void main(String[] args) {
		JFrame jframe = new JFrame();
		// 设置变体
		jframe.setTitle("这个是我第一个java窗体");
		// 设置窗体大小
		jframe.setSize(800,800);
		//设置关闭模式  退出应用程序
		jframe.setDefaultCloseOperation(JFrame.EXIT_ON_CLOSE);
		//null表示居中显示在屏幕的中间
		jframe.setLocationRelativeTo(null);
		//设置是否可以改变窗体大小
		jframe.setResizable(false);
		//设置窗体是否可见
		jframe.setVisible(true);

	}

}
设置窗体是否可见一般放在最后,也就是前面的标题、大小等等都设置好了,再设置课间。
2.中间容器
Jpanel,是JComponet的子类,因此JPanel是轻量级组件, 且JPanel可以容纳其它组件;我们称JPanel为中间容器,或者叫面板。
特性:
- 需要加入顶层容器中才可见(JFrame/JDialog)
- 默认可见 默认布局:Flowlayout;
- 可以相互嵌套;
package cn.gok;

import javax.swing.JFrame;
import javax.swing.JPanel;

public class TestJPanel extends JPanel{

	public static void main(String[] args) {
		JFrame jframe = new JFrame();
		// 设置变体
		jframe.setTitle("这个是我第一个java窗体");
		// 设置窗体大小
		jframe.setSize(800,800);
		//设置关闭模式  退出应用程序
		jframe.setDefaultCloseOperation(JFrame.EXIT_ON_CLOSE);
		//null表示居中显示在屏幕的中间
		jframe.setLocationRelativeTo(null);
		//设置是否可以改变窗体大小
		jframe.setResizable(false);


		// 创建中间容器
		TestJPanel tp = new TestJPanel();
		//将中间容器添加到JFrame中
		jframe.add(tp);


		//设置窗体是否可见
		jframe.setVisible(true);

	}

}
可以通过继承JFrame或者继承JPanel来创建一个窗体,继承JFrame,则窗体是顶层容器,需要将JPanel放入该窗体,继承JPanel,则窗体是中间容器,需要将该窗体放入顶层容器。
JFrame就好比画板一样,JPanel就好比画纸,各大组件就好比花花草草,将画纸放在画板上,然后在画纸里面绘制花花草草,也就是必须将JPanel放在JFrame中,然后在JPanel中绘制组件。
// 创建按钮
JButton button1 = new JButton("按钮1");
JButton button2 = new JButton("按钮2");
// 将按钮直接添加到顶层容器(JFrame)
jframe.add(button1);
jframe.add(button2);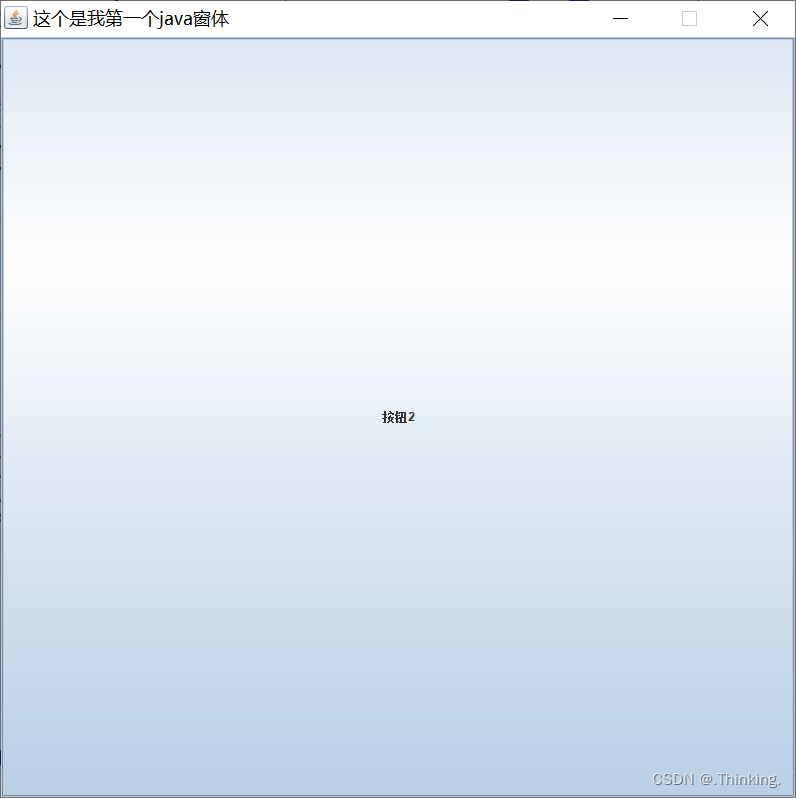
会发现直接将组件添加到顶层容器(JFrame)中,组件会占据整个面板,而且后添加的会覆盖前面的。
// 创建按钮
JButton button1 = new JButton("按钮1");
JButton button2 = new JButton("按钮2");

// 创建中间容器
TestJPanel tp = new TestJPanel();
//将中间容器添加到JFrame中
jframe.add(tp);

// 将按钮添加到中间容器中
tp.add(button1);
tp.add(button2);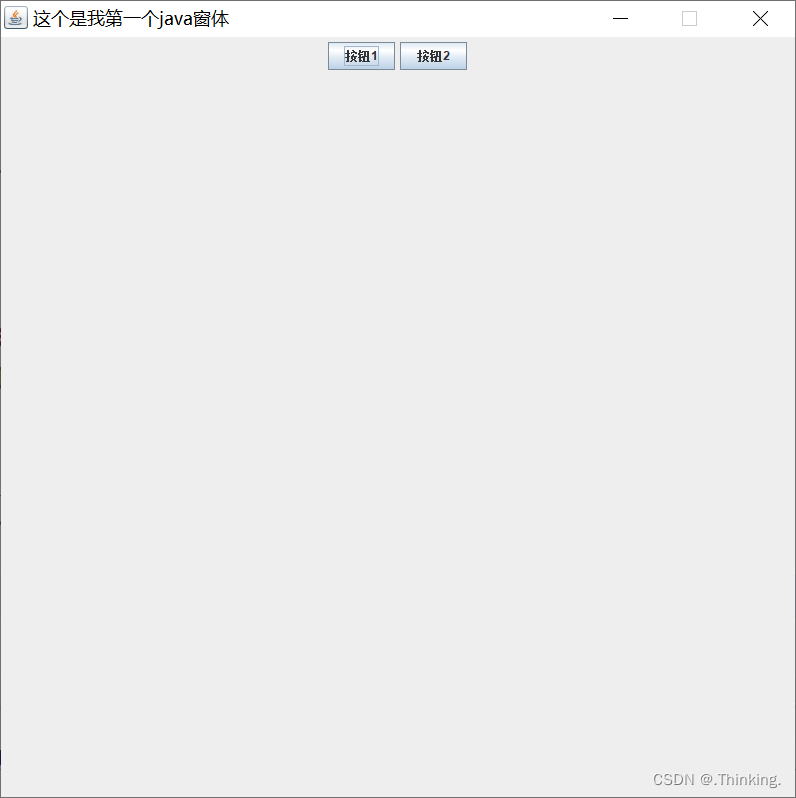
先将中间容器放在顶层容器,再将组件放在中间容器,就可以避免该问题。
3.基本组件
JButton 生成按钮
- 构造函数: public JButton(); public JButton(String tag);
- 设置/获取按钮内容 public void setText(String tag); public String getText();
JTextField 生成单行文本框
- 构造函数 public JTextField(); public JTextField(int cols);
- 存/取文本框内容public void setText(String tag); public String getText();
JTextArea 生成多行文本框
- 构造函数 public JTextArea (); public JTextArea (int rows, int cols); public JTextArea (String text, int rows, int cols);
- 存/取文本框内容public void setText(String tag); public String getText(); public void append(String str);
JLable 生成标签
- 构造函数 public JLabel(); public JLabel(String tag);
- 存取public void setText(String tag); public String getText();
通用方法 :
所有swing组件都具有设置图标颜色字体大小边框的功能:
- setIcon(Icon icon); //设置其上显示的图标.
- setBackground(Color c); //设置背景色.
- setForeground(Color c); //设置其上文字颜色.
- setFont(Font font); //设置字体.
- setPreferredSize(Dimension ds); //设置大小.
- setBorder(Border bd); //设置边框.
- setEnable(boolean b); //是否可用.
- setEditable(boolean b); //是否可编辑
相关类:
- Icon / ImageIcon //图标相关类
- Icon icon1=new ImageIcon(“图片路径”);
- Color //颜色相关类
- Color color1=new Color(255,0,0); //红色
- Font //字体相关类
- Font font1=new Font(“隶书”, Font.BOLD,16);
- Dimension //大小相关类
- Dimension dim1=new Dimension(宽,高)
        // 创建按钮
		JButton button1 = new JButton("按钮1");
		JButton button2 = new JButton("按钮2");
		// 创建文本框
		JTextField textField = new JTextField("文本框");
		// 创建标签
		JLabel label = new JLabel("标签");
		// 创建文本域
		JTextArea textArea = new JTextArea("文本域");

		// 设置按钮字体颜色
		button1.setForeground(new Color(255,0,0));
		// 设置文本框字体
		textField.setFont(new Font("楷体", Font.BOLD, 16));
		// 设置文本框大小
		textField.setPreferredSize(new Dimension(100,50));

		// 创建中间容器
		TestJPanel tp = new TestJPanel();
		//将中间容器添加到JFrame中
		jframe.add(tp);

		// 将按钮添加到中间容器中
		tp.add(button1);
		tp.add(button2);
		tp.add(textField);
		tp.add(label);
		tp.add(textArea);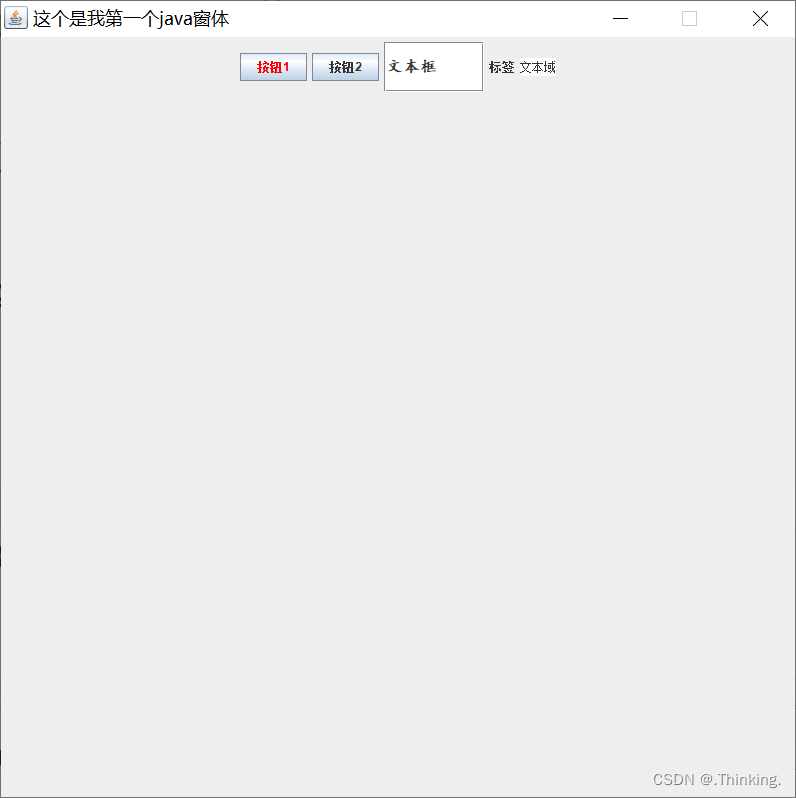
四、绘制图像
public void paint(Graphics g) {
// TODO Auto-generated method stub
super.paint(g);
}
    @Override
	public void paint(Graphics g) {
		// TODO Auto-generated method stub
		super.paint(g);
		// 设置画笔颜色,字体等等
		g.setColor(Color.RED);
		g.setFont(new Font("宋体", Font.ITALIC, 25));
		//绘制背景图片【放在最前面绘制】
		Image imageBG = new ImageIcon("image/background.jpg").getImage();
		g.drawImage(imageBG, 0, 0, this);
		g.drawLine(10, 10, 50, 50);//绘制直线
		g.drawRect(50, 50, 100, 80);//绘制矩形
		g.fillRect(50, 50, 100, 80);
		g.drawArc(10, 150, 50, 80, 0, 360);	//绘制圆形
		g.setFont(new Font("隶书", Font.BOLD, 36));	//绘制字符串
		g.drawString("游戏结束....",60, 160);
		Image image = new ImageIcon("image/assisent1_1.png").getImage();
		g.drawImage(image, 200, 200, this);
		Image image2 = new ImageIcon("image/assisent1_1.png").getImage();
		g.drawImage(image2, 248, 200, this);
	}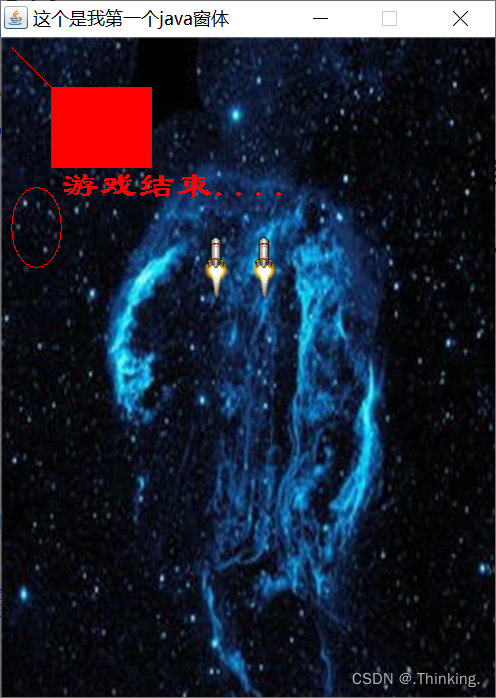
总结:
- 工具类Graphics
- 在背景图片上再绘制图片
- 绘制字符串等功能 音频、图片等都属于静态资源,可以在类中定义静态变量,并在静态块中赋予他们初始值,以便类加载时就能首先将静态资源先缓存起来,之后功能调用和使用可以优化系统的加载
- 画纸JPanel必须存在于画板JFrame中,才能使用,而组件则在画纸中使用。
- 画板JFrame若不设置的话则默认不可见,所以当新建JFrame对象实体需要进行设置。
五、事件处理
1.事件处理基本概念
正常情况,组件(事件源)都不处理自己的事件,而是将事件处理委托给外部实体(监听器),这种事件处理模型称为 事 件的授权处理模型 。不同的事件可以交由不同类型的监听器去处理。
事件处理过程,涉及三类对象:
- Event -事件,用户对界面操作在java语言上的描述,以类的形式出现,例如键盘操作对应的事件类是KeyEvent。
- Event Source -事件源,事件发生的场所,通常就是各个组件,例如按钮JButton。
- Event handler -事件处理者,接收事件对象并对其进行处理 事件处理过程,
涉及三种角色:
- 事件源
- 监听器
- 处理事件的接口(适配器)
实现事件处理步骤:
- 找到事件源(按钮、文本框等组件)
- 创建监听器对象(需要实现相应接口的类) -->或者说实现监听器的适配器
- 为事件源注册监听器对象 --> 事件源(组件).add...Listener(适配器)
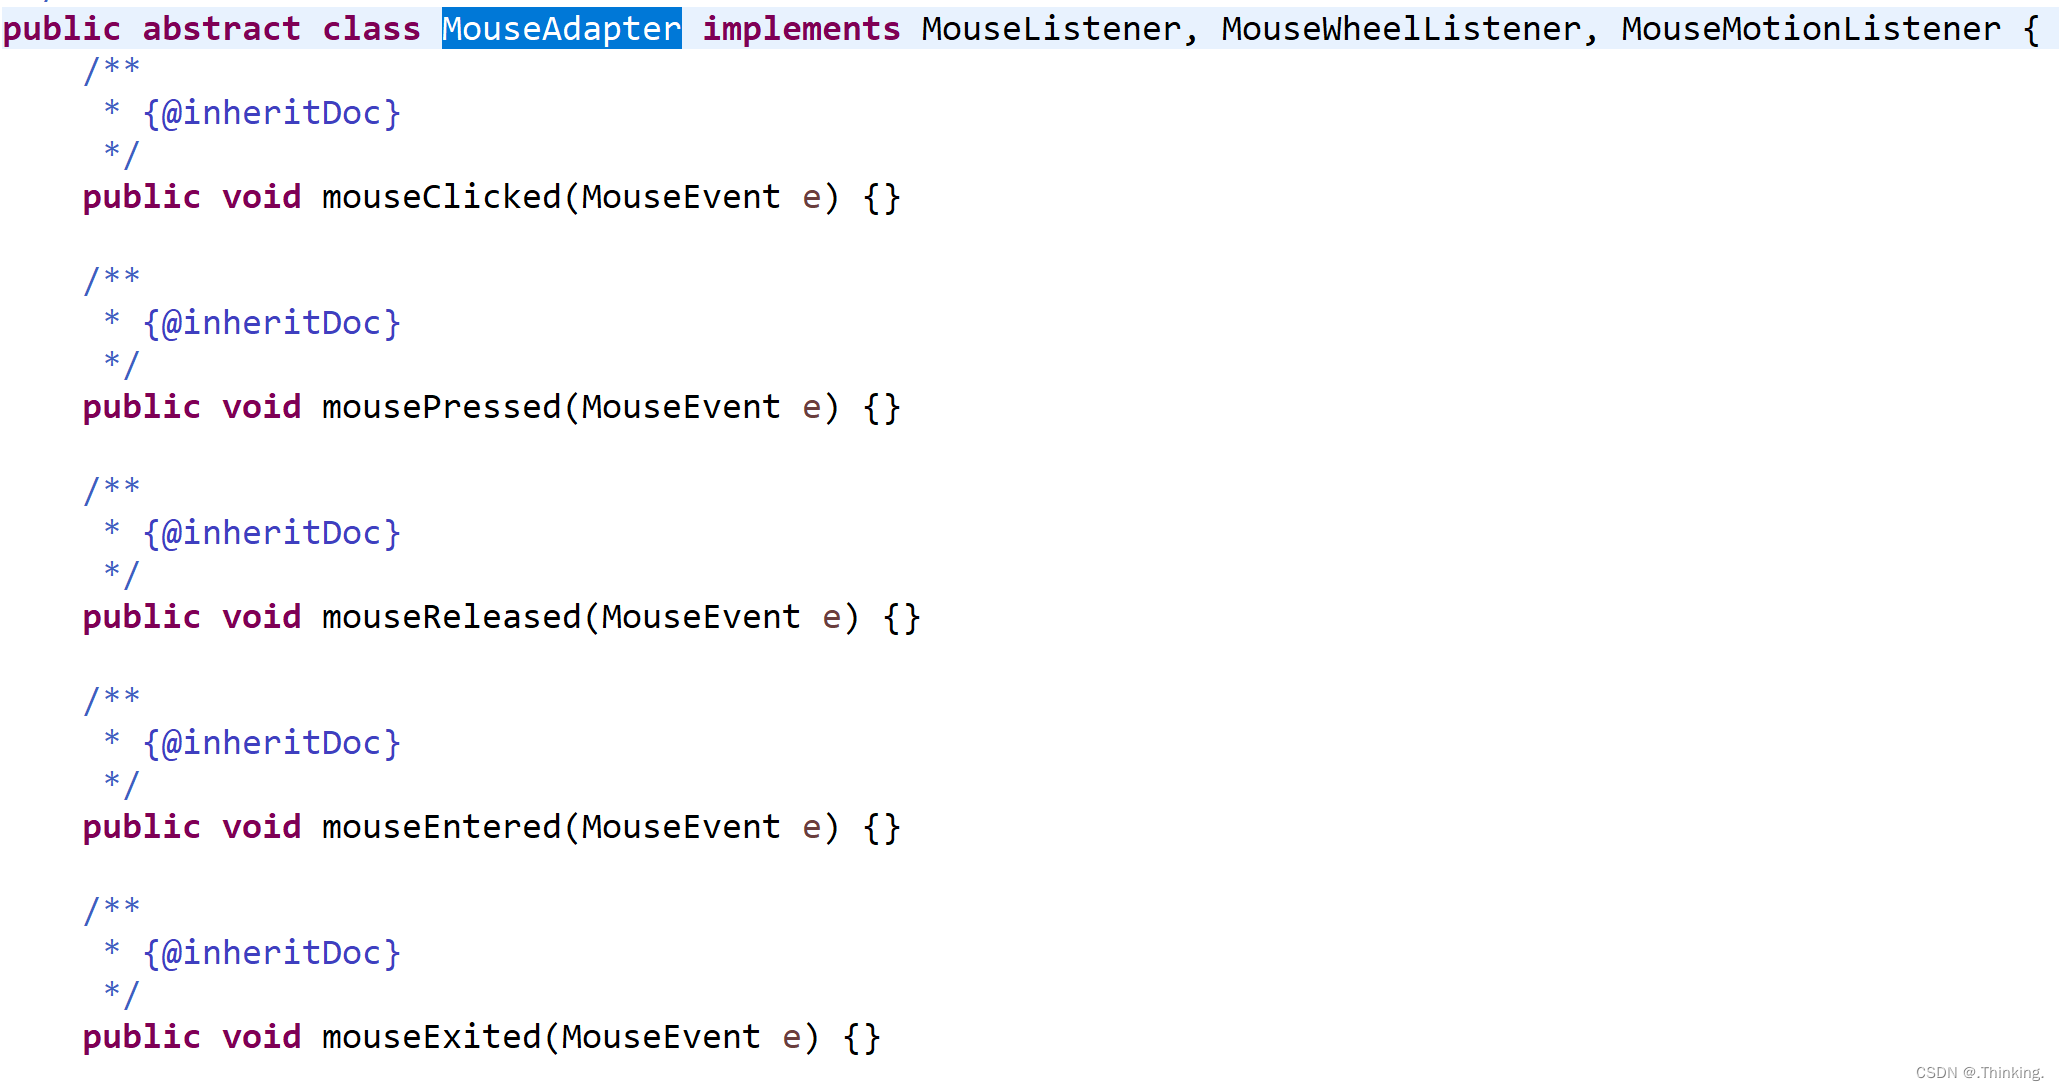
事件实现方式(适配器Adapter)
- 在java事件处理中,当处理事件的接口中多于一个方法时,系统就会提供相应的实现类(这个是抽象的),这样的实现类我 们称为适配器类。
- 用内部类实现事件处理,一般监视器类我们可以内部类或匿名类实现.
- 用外部类实现事件处理
package cn.gok;

import java.awt.event.ActionEvent;
import java.awt.event.ActionListener;
import javax.swing.JButton;
import javax.swing.JFrame;
import javax.swing.JPanel;
import javax.swing.JTextField;

public class Demo03 extends JFrame{

	public Demo03() {

		// 设置变体
		this.setTitle("这个是我第一个java窗体");
		// 设置窗体大小
		this.setSize(800,800);
		//设置关闭模式  退出应用程序
		this.setDefaultCloseOperation(JFrame.EXIT_ON_CLOSE);
		//null表示居中显示在屏幕的中间
		this.setLocationRelativeTo(null);
		//设置是否可以改变窗体大小
		this.setResizable(false);

		// 添加中间容器
		this.body();

		//设置窗体是否可见
		this.setVisible(true);

	}

	public void body() {
		JPanel jPanel = new JPanel();

		JButton button1 = new JButton("按钮1");
		JButton button2 = new JButton("按钮2");
		JTextField textField = new JTextField(10);

		// 创建监听事件
		MyActionListener actionListener = new MyActionListener(textField);
		// 给按钮绑定监听事件
		button1.addActionListener(actionListener);
		button2.addActionListener(actionListener);

		jPanel.add(button1);
		jPanel.add(button2);
		jPanel.add(textField);


		this.add(jPanel);

	}

	public static void main(String[] args) {
		new Demo03();
	}


	// 内部类
	class MyActionListener implements ActionListener{
		JTextField field;

		public MyActionListener(JTextField field) {
			this.field = field;
		}

		@Override
		public void actionPerformed(ActionEvent e) {
			// 获取事件源
			Object obj = e.getSource();
			// 判断是否是按钮事件源
			if(obj instanceof JButton) {
				JButton button = (JButton)obj;
				// 获取按钮文本
				String text = button.getText();
				// 给文本框设置文本
				field.setText(text);
			}
		}
	}
}
2.鼠标处理事件
Java种有两个不同接口处理:
- MouseListener 可处理事件(MouseEvent):--> 对应适配器 MouseAdapter
        // 采用匿名内部类添加鼠标事件
		jLabel.addMouseListener(new MouseListener() {

			@Override
			public void mouseReleased(MouseEvent e) {
				System.out.println("鼠标释放事件");

			}

			@Override
			public void mousePressed(MouseEvent e) {
				System.out.println("鼠标按压事件");

			}

			@Override
			public void mouseExited(MouseEvent e) {
				System.out.println("鼠标移出事件");

			}

			@Override
			public void mouseEntered(MouseEvent e) {
				System.out.println("鼠标进入事件");

			}

			@Override
			public void mouseClicked(MouseEvent e) {
				System.out.println("鼠标点击事件");

			}
		});
通过 组件名.addMouseListener 的方法,为组件绑定鼠标添加事件。
package cn.gok;

import java.awt.event.MouseEvent;
import java.awt.event.MouseListener;

import javax.swing.Icon;
import javax.swing.ImageIcon;
import javax.swing.JFrame;
import javax.swing.JLabel;
import javax.swing.JPanel;

public class Demo04 extends JPanel{

	public Demo04() {
		JLabel jLabel = new JLabel();
		Icon icon1 = new ImageIcon("image/serverstart.gif");
		Icon icon2 = new ImageIcon("image/serverstop.gif");
		jLabel.setIcon(icon1);
		this.add(jLabel);

		// 采用匿名内部类添加鼠标事件
		jLabel.addMouseListener(new MouseListener() {

			@Override
			public void mouseReleased(MouseEvent e) {
				System.out.println("鼠标释放事件");

			}

			@Override
			public void mousePressed(MouseEvent e) {
				System.out.println("鼠标按压事件");

			}

			@Override
			public void mouseExited(MouseEvent e) {
				System.out.println("鼠标移出事件");
				jLabel.setIcon(icon1);

			}

			@Override
			public void mouseEntered(MouseEvent e) {
				System.out.println("鼠标进入事件");
				jLabel.setIcon(icon2);

			}

			@Override
			public void mouseClicked(MouseEvent e) {
				System.out.println("鼠标点击事件");

			}
		});

		this.init();
	}

	public void init() {
		JFrame jframe = new JFrame();
		// 设置变体
		jframe.setTitle("这个是我第一个java窗体");
		// 设置窗体大小
		jframe.setSize(500,500);
		//设置关闭模式  退出应用程序
		jframe.setDefaultCloseOperation(JFrame.EXIT_ON_CLOSE);
		//null表示居中显示在屏幕的中间
		jframe.setLocationRelativeTo(null);
		//设置是否可以改变窗体大小
		jframe.setResizable(false);

		// 中间容器添加到顶层容器
		jframe.add(this);

		//设置窗体是否可见
		jframe.setVisible(true);
	}

	public static void main(String[] args) {
		new Demo04();
	}

}
- MouseMotionListener可处理事件(MouseEvent):--> 对应适配器 MouseMotionAdapter
- 鼠标按键在组件上按下并拖动 --> mouseDragged
- 光标移动到组件上 但无按键按下 --> mouseMoved
- 获取鼠标相关信息的方法
- int getClickCount(); //返回鼠标单击次数
- Point getPoint(); //返回事件相对于源组件的x,y坐标
- int getX(); /int getY(); //获取x或y的坐标
- void translatePoint(int x, int y); //将事件的坐标平移到新位置,其中x,y为原坐标的偏移量。
    jLabel.addMouseMotionListener(new MouseMotionListener() {

			@Override
			public void mouseMoved(MouseEvent e) {
				System.out.println("鼠标移动事件");
				System.out.println(e.getPoint());
			}

			@Override
			public void mouseDragged(MouseEvent e) {
				System.out.println("鼠标拖动事件");
				System.out.println(e.getX()+","+e.getY());
			}
		});
移动事件:鼠标进入组件,不需要按下,移动鼠标即可触发。
拖动事件:鼠标进入组件,需要按下不放才可触发。
通过MouseAdapter指定(重写)选择想要哪个鼠标监听事件。
    MouseAdapter adapter = new MouseAdapter() {
			@Override
			public void mouseClicked(MouseEvent e) {
				System.out.println("鼠标点击");
			}

			@Override
			public void mouseMoved(MouseEvent e) {
				System.out.println("鼠标移动");
			}
		};
		// 两种都需要绑定
		jLabel.addMouseListener(adapter);
		jLabel.addMouseMotionListener(adapter);
MouseAdapter中若包含了以上两种的鼠标监听事件,则两种都需要绑定给组件,否则不起作用。
六、定时任务组件
javax.swing.Timer //在指定延迟之后激发一个或多个操作事件,实现定时功能。
- void start();;//开始Timercancel()
- void stop();//停止Timercancel();
package cn.gok;

import java.awt.Dimension;
import java.awt.event.ActionEvent;
import java.awt.event.ActionListener;
import java.awt.event.MouseAdapter;
import java.awt.event.MouseEvent;

import javax.swing.JButton;
import javax.swing.JFrame;
import javax.swing.JPanel;
import javax.swing.JTextField;
import javax.swing.Timer;

public class Demo05 extends JPanel{

	int num = 0;

	public Demo05() {

		JButton button1 = new JButton("开始");
		JButton button2 = new JButton("结束");
		// 禁用按钮2
		button2.setEnabled(false);
		JTextField field = new JTextField("0");
		field.setPreferredSize(new Dimension(100,30));


		// 定时器
		Timer timer = new Timer(1000, new ActionListener() {

			@Override
			public void actionPerformed(ActionEvent e) {
				field.setText(num+"");
				num++;
			}
		});


		MouseAdapter adapter = new MouseAdapter() {
			@Override
			public void mouseClicked(MouseEvent e) {
				Object obj = e.getSource();
				if(obj instanceof JButton) {
					JButton button = (JButton)obj;
					String text = button.getText();
					if("开始".equals(text)) {
						// 禁用按钮1
						button1.setEnabled(false);
						// 启动按钮2
						button2.setEnabled(true);
						// 开启定时器
						timer.start();
					}else if("结束".equals(text)) {

						// 文本框设置为0
						num = 0;
						field.setText(num+"");
						// 禁用按钮2
						button2.setEnabled(false);
						// 启动按钮1
						button1.setEnabled(true);
						// 关闭定时器
						timer.stop();

					}

				}
			}
		};

		button1.addMouseListener(adapter);
		button2.addMouseListener(adapter);

		this.add(button1);
		this.add(button2);
		this.add(field);


		this.init();
	}

	public void init() {
		JFrame jframe = new JFrame();
		// 设置变体
		jframe.setTitle("这个是我第一个java窗体");
		// 设置窗体大小
		jframe.setSize(500,500);
		//设置关闭模式  退出应用程序
		jframe.setDefaultCloseOperation(JFrame.EXIT_ON_CLOSE);
		//null表示居中显示在屏幕的中间
		jframe.setLocationRelativeTo(null);
		//设置是否可以改变窗体大小
		jframe.setResizable(false);

		// 中间容器添加到顶层容器
		jframe.add(this);

		//设置窗体是否可见
		jframe.setVisible(true);
	}

	public static void main(String[] args) {


		new Demo05();
	}

}
总结:
上面基本上已经将Java中关于Swing的一些常用操作介绍完了,接着试试做一个小小的项目看看吧。下面是关于飞机大战项目的效果和源码。

项目源码:https://download.youkuaiyun.com/download/x_q_x_/87261275


 3092
3092

 被折叠的 条评论
为什么被折叠?
被折叠的 条评论
为什么被折叠?
 到【灌水乐园】发言


