


 本文详细剖析了Android视图从加载布局文件到绘制的全过程,包括Activity启动流程、setContentView方法解析、View的测量、布局及绘制流程。通过源码分析,深入理解Android视图绘制机制。
前言
源码分析基于api27即android8.1版本。
网上翻阅了很多篇view的绘制流程文章,基本全流程介绍的很少,或者中间有很大的断档不好衔接。
本文从源码角度,每个方法的调用和跳转说的比较详细。
文章比较长,因为是看源码,比较枯燥,可以分几次阅读。
文章的意义:帮助自己和他人,从源码的角度梳理流程。读者可以跟着文章的流程,自己也走一遍源码。看源码的作用我觉得主要是帮助我们更加深入的理解android的各个类和方法,提高我们对设计模式的理解,包括源码的书写规范,常用api的用法等,都是值得学习和借鉴的。
View绘制流程的源码分析
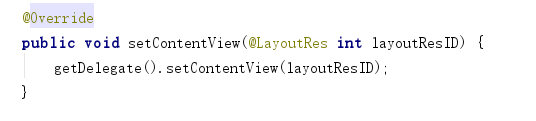
- 说起view的绘制那我们就要从加载布局文件开始,那么我们就从activity的setContentView 开始分析。ctrl+鼠标左键进入setContentView 方法,跳转到AppCompatActivity的setContentView 方法,如下图:
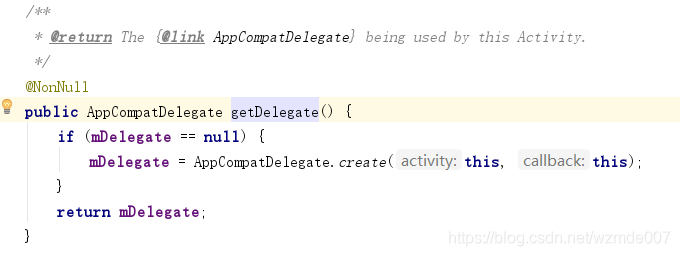
- 那么我们看下getDelegate()方法是返回的哪个对象,然后到相应的类中找setContentView方法即可。点击进入getDelegate()方法,如下图:
- 这个方法里嵌套着create方法,看create方法返回的什么,点击进入create方法如下图:

- 话不多说,继续点击进入create方法,如下图:
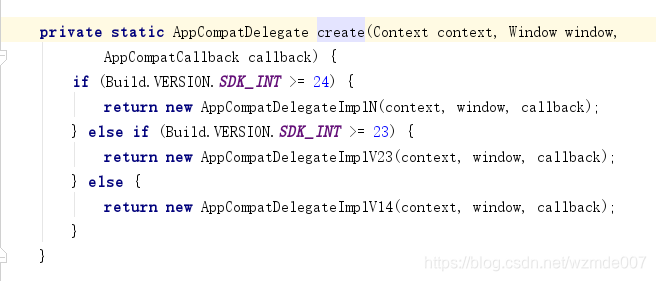
- 在这我们可以看到,系统根据sdk版本的不同,会返回不同的对象,共三种情况,通过分析发现,三个对象有如下关系:
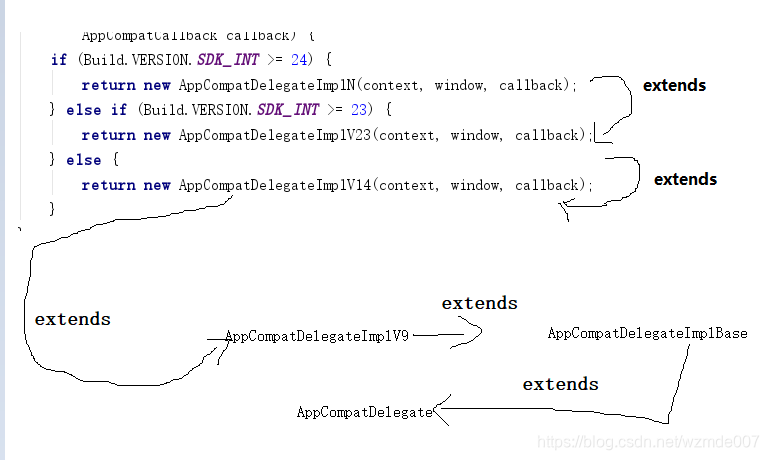
- 我们可以看到,对应不同的版本系统做了不同的处理,但是最后三个对象都继承自AppCompatDelegateImplV9,然后AppCompatDelegateImplV9继承AppCompatDelegateImplBase。
- 这个继承体系中,只有AppCompatDelegateImplV9类中重写了AppCompatDelegate的setContentView方法,那么我们可以由此得出结论。上边第二条的getDelegate()方法调用的setContentView方法就是AppCompatDelegateImplV9类中的setContentView方法,那么我们看下这个类中的setContentView方法,
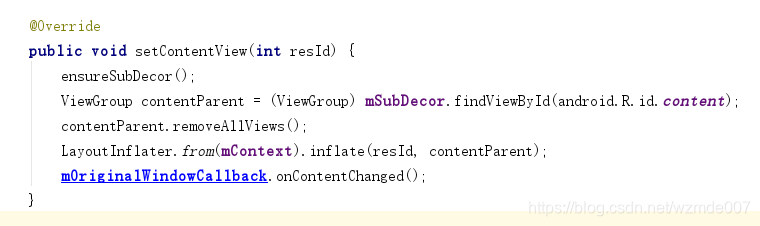
-
setContentView方法只有5行代码,第一行调用的是ensureSubDecor()方法,从字面意思也可以理解,就是确定是否创建subDecor对象,没有就创建一个新的。第二行:通过subDecor对象获取它布局内id为content的元素,其实就是Framelayout(后边会说)。第三行:清除subDecor对象的所有子view,第四行,将我们在activity中传入的layout布局,填充到id为content的FrameLayout布局中。第五行:触发回调方法,activity生命周期中的onContentChanged方法被触发。
-
通过上边的分析,其实条理很清晰,就是当我们在activity的onCreate方法中写下setContentView这行代码后。我们启动这个activity就会执行上边的流程。那么上边说的是一个大致流程,我们详细分析下,subDecor对象的创建。也就是分析第7点中的第一行代码。ensureSubDecor()方法,点击去方法如下图:
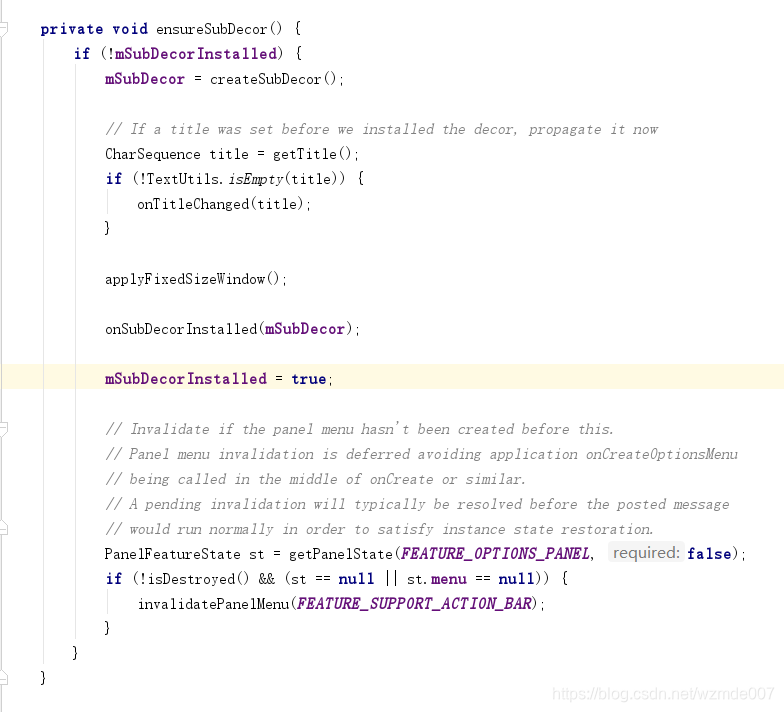
-
在这个方法里我们主要看mSubDecor = createSubDecor()这句代码,顾名思义,就是创建subDecor对象的方法,进入createSubDecor()方法。如图:
-
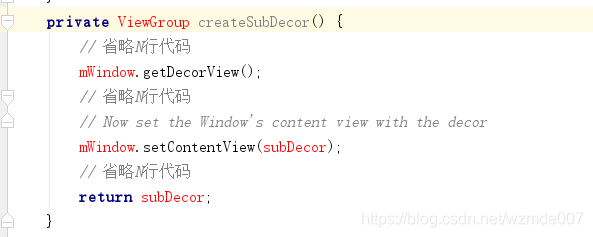
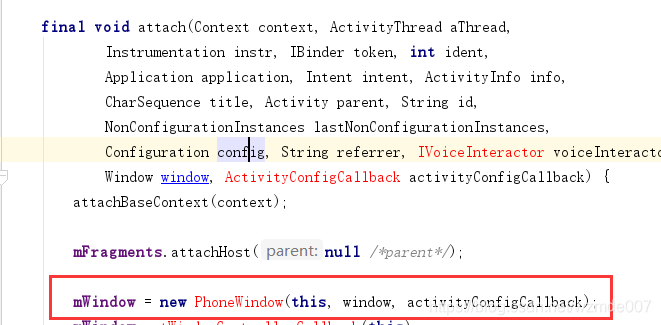
createSubDecor()方法中的代码比较多,其实多数都是一些细节的处理,如样式,tietlebar等内容。我们可以忽略。我们只看关键代码,mWindow.getDecorView();和mWindow.setContentView(subDecor);不难发现,这两个方法调用都是通过mWindow对象来调用的。那么mWindow对象是哪个类呢?我们可以回看第3点的方法中参数activity.getWindow(),因为mWindow对象是从那传过来的。点击进入getWindow()方法,发现是在activity类中的attach方法里定义的。如图:
-
由此我们知道,mWindow对象其实就是PhoneWindow类的实例,它是在activity的attach方法中创建的。那么我们就可以去PhoneWindow类中看下mWindow.getDecorView();和mWindow.setContentView(subDecor)方法了。直接点击这个类是跳转不了的。我们需要去sdk源码中找到PhoneWindow这个类。
-
我们还是回到第10点,按照方法里的顺序,分别看下getDecorView()和setContentView()方法,首先看下getDecorView()方法。如图:
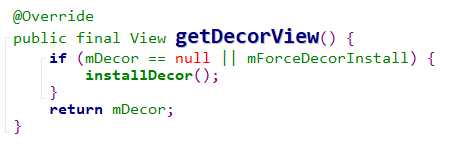
-
不难看出这里调用的installDecor()方法,点击进入如图:
-
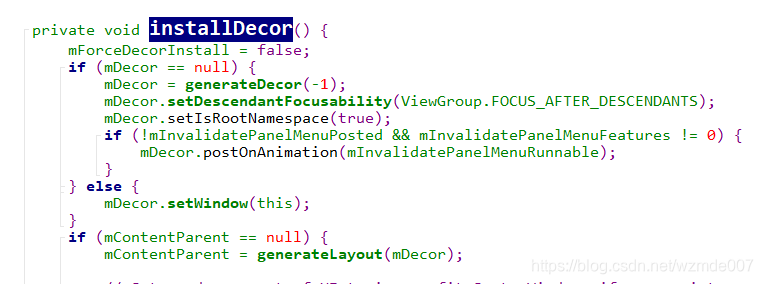
在installDecor()方法中,generateDecor方法产生Decor对象,点击进入如图:
protected DecorView generateDecor(int featureId) { // System process doesn't have application context and in that case we need to directly use // the context we have. Otherwise we want the application context, so we don't cling to the // activity. Context context; if (mUseDecorContext) { Context applicationContext = getContext().getApplicationContext(); if (applicationContext == null) { context = getContext(); } else { context = new DecorContext(applicationContext, getContext().getResources()); if (mTheme != -1) { context.setTheme(mTheme); } } } else { context = getContext(); } return new DecorView(context, featureId, this, getAttributes()); } -
我们可以看到最后return的DecorView。进入DecorView我们发现它是继承FrameLayout,到这里我们可以简单的理解为第14点的第一句generateDecor方法,其实就是创建了一个DecorView对象初始化了一些参数。
-
那么我们继续看第14点installDecor()方法中的代码,generateDecor()方法后边的几句都是处理一些细节问题,我们略过,直接看截图的最后一句,mContentParent = generateLayout(mDecor);话不多说,进入generateLayout方法,如下:
    protected ViewGroup generateLayout(DecorView decor) {
        //很多代码作者替你消化了,略过。。。。。。。。。。。
        // Inflate the window decor.
        int layoutResource;
        int features = getLocalFeatures();
        // System.out.println("Features: 0x" + Integer.toHexString(features));
        if ((features & (1 << FEATURE_SWIPE_TO_DISMISS)) != 0) {
            layoutResource = R.layout.screen_swipe_dismiss;
            setCloseOnSwipeEnabled(true);
        } else if ((features & ((1 << FEATURE_LEFT_ICON) | (1 << FEATURE_RIGHT_ICON))) != 0) {
            if (mIsFloating) {
                TypedValue res = new TypedValue();
                getContext().getTheme().resolveAttribute(
                        R.attr.dialogTitleIconsDecorLayout, res, true);
                layoutResource = res.resourceId;
            } else {
                layoutResource = R.layout.screen_title_icons;
            }
            // XXX Remove this once action bar supports these features.
            removeFeature(FEATURE_ACTION_BAR);
            // System.out.println("Title Icons!");
        } else if ((features & ((1 << FEATURE_PROGRESS) | (1 << FEATURE_INDETERMINATE_PROGRESS))) != 0
                && (features & (1 << FEATURE_ACTION_BAR)) == 0) {
            // Special case for a window with only a progress bar (and title).
            // XXX Need to have a no-title version of embedded windows.
            layoutResource = R.layout.screen_progress;
            // System.out.println("Progress!");
        } else if ((features & (1 << FEATURE_CUSTOM_TITLE)) != 0) {
            // Special case for a window with a custom title.
            // If the window is floating, we need a dialog layout
            if (mIsFloating) {
                TypedValue res = new TypedValue();
                getContext().getTheme().resolveAttribute(
                        R.attr.dialogCustomTitleDecorLayout, res, true);
                layoutResource = res.resourceId;
            } else {
                layoutResource = R.layout.screen_custom_title;
            }
            // XXX Remove this once action bar supports these features.
            removeFeature(FEATURE_ACTION_BAR);
        } else if ((features & (1 << FEATURE_NO_TITLE)) == 0) {
            // If no other features and not embedded, only need a title.
            // If the window is floating, we need a dialog layout
            if (mIsFloating) {
                TypedValue res = new TypedValue();
                getContext().getTheme().resolveAttribute(
                        R.attr.dialogTitleDecorLayout, res, true);
                layoutResource = res.resourceId;
            } else if ((features & (1 << FEATURE_ACTION_BAR)) != 0) {
                layoutResource = a.getResourceId(
                        R.styleable.Window_windowActionBarFullscreenDecorLayout,
                        R.layout.screen_action_bar);
            } else {
                layoutResource = R.layout.screen_title;
            }
            // System.out.println("Title!");
        } else if ((features & (1 << FEATURE_ACTION_MODE_OVERLAY)) != 0) {
            layoutResource = R.layout.screen_simple_overlay_action_mode;
        } else {
            // Embedded, so no decoration is needed.
            layoutResource = R.layout.screen_simple;
            // System.out.println("Simple!");
        }

        mDecor.startChanging();
        mDecor.onResourcesLoaded(mLayoutInflater, layoutResource);

        ViewGroup contentParent = (ViewGroup)findViewById(ID_ANDROID_CONTENT);
        //很多代码略过。。。。。。。。。。。。
        return contentParent;
    }
上边的代码已经是精简的代码。只挑出了有用的一部分,主要看这里是如何加载布局的,通过多个if判断,根据不同的features加载不同的layout,我们看到最后的else里,加载的是screen_simple文件。在源码里我们找到这个文件,我的路径是在:androidstudioSDK\platforms\android-27\data\res\layout。源码如下:
<?xml version="1.0" encoding="utf-8"?>
<!--
/* //device/apps/common/assets/res/layout/screen_simple.xml
**
** Copyright 2006, The Android Open Source Project
**
** Licensed under the Apache License, Version 2.0 (the "License");
** you may not use this file except in compliance with the License.
** You may obtain a copy of the License at
**
**     http://www.apache.org/licenses/LICENSE-2.0
**
** Unless required by applicable law or agreed to in writing, software
** distributed under the License is distributed on an "AS IS" BASIS,
** WITHOUT WARRANTIES OR CONDITIONS OF ANY KIND, either express or implied.
** See the License for the specific language governing permissions and
** limitations under the License.
*/

This is an optimized layout for a screen, with the minimum set of features
enabled.
-->

<LinearLayout xmlns:android="http://schemas.android.com/apk/res/android"
    android:layout_width="match_parent"
    android:layout_height="match_parent"
    android:fitsSystemWindows="true"
    android:orientation="vertical">
    <ViewStub android:id="@+id/action_mode_bar_stub"
              android:inflatedId="@+id/action_mode_bar"
              android:layout="@layout/action_mode_bar"
              android:layout_width="match_parent"
              android:layout_height="wrap_content"
              android:theme="?attr/actionBarTheme" />
    <FrameLayout
         android:id="@android:id/content"
         android:layout_width="match_parent"
         android:layout_height="match_parent"
         android:foregroundInsidePadding="false"
         android:foregroundGravity="fill_horizontal|top"
         android:foreground="?android:attr/windowContentOverlay" />
</LinearLayout>
可以看到是一个LinearLayout包含一个ViewStub和FrameLayout布局,其中ViewStub就是titlebar,FrameLayout就是我们activity中加载的布局文件填充的地方。
我们可以这样理解,DecorView就是上边这个布局文件的容器,布局文件中的FrameLayout部分是我们写布局时放入的容器。
到此,我们就把第14点分析完了,也就是第10点的mWindow.getDecorView();它的作用就是初始化DecorView容器。 -
接下来,我们看下第10点的下一句mWindow.setContentView(subDecor);也就是将DecorView对象传入到PhoneWindow的setContentView方法。我们看下PhoneWindow的setContentView方法代码:
    @Override
    public void setContentView(View view, ViewGroup.LayoutParams params) {
        // Note: FEATURE_CONTENT_TRANSITIONS may be set in the process of installing the window
        // decor, when theme attributes and the like are crystalized. Do not check the feature
        // before this happens.
        if (mContentParent == null) {
            installDecor();
        } else if (!hasFeature(FEATURE_CONTENT_TRANSITIONS)) {
            mContentParent.removeAllViews();
        }

        if (hasFeature(FEATURE_CONTENT_TRANSITIONS)) {
            view.setLayoutParams(params);
            final Scene newScene = new Scene(mContentParent, view);
            transitionTo(newScene);
        } else {
            mContentParent.addView(view, params);
        }
        mContentParent.requestApplyInsets();
        final Callback cb = getCallback();
        if (cb != null && !isDestroyed()) {
            cb.onContentChanged();
        }
        mContentParentExplicitlySet = true;
    }
方法里没有多少代码,主要做的事情就是将DecorView与安卓底层提供的布局相结合。
-
至此,我们回看第7,8点,就非常清晰了。
我们在重新梳理一边,加载布局文件,setContentView方法做了什么?
首先创建和初始化DecorView对象,
然后根据用户配置初始化DecorView容器的布局文件。
然后将DecorView与系统底层显示做关联,
然后通过DecorView对象findviewById(R.id.content)获取FrameLayout对象,
然后通过FrameLayout对象inflate我们在activity中传过去的布局id,
最后回调activity中的onContentChanged方法。
写到这为止,我们只是捋顺了setContentView的整个过程。还没开始view的绘制。 -
接下来我们简要说下activity的启动流程,因为view的绘制跟activity的生命周期密不可分,我们就顺带回顾下, 启动流程源码比较复杂,这块就借鉴前人经验,用一张图来概括。
Activity管理的核心是AcitivityManagerService,是一个独立的进程;
ActiveThread是每一个应用程序所在进程的主线程,循环的消息处理;
ActiveThread与AcitivityManagerService的通信是属于进程间通信,使用binder机制
一个应用程序中所有Activity只有一个ActivityThread属于一个Process。
activity的启动是以startActivity方法开始的,下图就是从这个方法开始,概述了大致过程,到最后我们可以发现,是调用的ActivityThread类中的scheduleLaunchActivity方法来控制activity的生命周期变化,那么我们这块就从这个方法开始分析。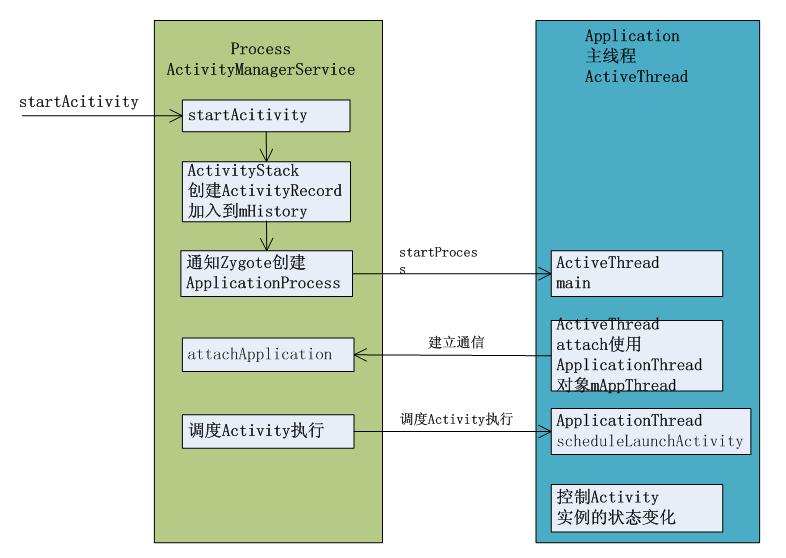
-
scheduleLaunchActivity方法内容如下:
   // we use token to identify this activity without having to send the
        // activity itself back to the activity manager. (matters more with ipc)
        @Override
        public final void scheduleLaunchActivity(Intent intent, IBinder token, int ident,
                ActivityInfo info, Configuration curConfig, Configuration overrideConfig,
                CompatibilityInfo compatInfo, String referrer, IVoiceInteractor voiceInteractor,
                int procState, Bundle state, PersistableBundle persistentState,
                List<ResultInfo> pendingResults, List<ReferrerIntent> pendingNewIntents,
                boolean notResumed, boolean isForward, ProfilerInfo profilerInfo) {

            updateProcessState(procState, false);

            ActivityClientRecord r = new ActivityClientRecord();

            r.token = token;
            r.ident = ident;
            r.intent = intent;
            r.referrer = referrer;
            r.voiceInteractor = voiceInteractor;
            r.activityInfo = info;
            r.compatInfo = compatInfo;
            r.state = state;
            r.persistentState = persistentState;

            r.pendingResults = pendingResults;
            r.pendingIntents = pendingNewIntents;

            r.startsNotResumed = notResumed;
            r.isForward = isForward;

            r.profilerInfo = profilerInfo;

            r.overrideConfig = overrideConfig;
            updatePendingConfiguration(curConfig);

            sendMessage(H.LAUNCH_ACTIVITY, r);
        }
该方法中代码也不多,第一行updateProcessState修改进程的状态,不是重点,接下来创建了一个ActivityClientRecord对象,ActivityClientRecord是在ActivityThread类中定义的静态内部类。主要用于存储一堆变量信息来打包进行传递。接下来初始化了需要传递的参数,最后调用sendMessage方法将ActivityClientRecord信息传递出去。
-
接下来看下sendMessage方法:
   private void sendMessage(int what, Object obj, int arg1, int arg2, int seq) {
        if (DEBUG_MESSAGES) Slog.v(
                TAG, "SCHEDULE " + mH.codeToString(what) + " arg1=" + arg1 + " arg2=" + arg2 +
                        "seq= " + seq);
        Message msg = Message.obtain();
        msg.what = what;
        SomeArgs args = SomeArgs.obtain();
        args.arg1 = obj;
        args.argi1 = arg1;
        args.argi2 = arg2;
        args.argi3 = seq;
        msg.obj = args;
        mH.sendMessage(msg);
    }
这个方法其实很简单,就是将传递过来的ActivityClientRecord信息封装到Message信息里,然后调用mH的sendMessage方法将信息发出去,mH是ActivityThread类中定义的Handler对象,到这里大家应该熟悉了,就跟我们在activity中定义了一个Handler类似,因为scheduleLaunchActivity方法是在子线程中执行的,所以需要通过Handler来向UI线程发消息。
-
既然是Handler发的消息,我们就去它的handleMessage方法中看接受消息后执行什么操作:
  switch (msg.what) {
                case LAUNCH_ACTIVITY: {
                    Trace.traceBegin(Trace.TRACE_TAG_ACTIVITY_MANAGER, "activityStart");
                    final ActivityClientRecord r = (ActivityClientRecord) msg.obj;

                    r.packageInfo = getPackageInfoNoCheck(
                            r.activityInfo.applicationInfo, r.compatInfo);
                    handleLaunchActivity(r, null, "LAUNCH_ACTIVITY");
                    Trace.traceEnd(Trace.TRACE_TAG_ACTIVITY_MANAGER);
                } break;
可以看到,接到消息后调用了handlelaunchActivity方法,继续进入方法:
 private void handleLaunchActivity(ActivityClientRecord r, Intent customIntent, String reason) {
        // If we are getting ready to gc after going to the background, well
        // we are back active so skip it.
        unscheduleGcIdler();
        mSomeActivitiesChanged = true;

        if (r.profilerInfo != null) {
            mProfiler.setProfiler(r.profilerInfo);
            mProfiler.startProfiling();
        }

        // Make sure we are running with the most recent config.
        handleConfigurationChanged(null, null);

        if (localLOGV) Slog.v(
            TAG, "Handling launch of " + r);

        // Initialize before creating the activity
        if (!ThreadedRenderer.sRendererDisabled) {
            GraphicsEnvironment.earlyInitEGL();
        }
        WindowManagerGlobal.initialize();

        Activity a = performLaunchActivity(r, customIntent);

        if (a != null) {
            r.createdConfig = new Configuration(mConfiguration);
            reportSizeConfigurations(r);
            Bundle oldState = r.state;
            handleResumeActivity(r.token, false, r.isForward,
                    !r.activity.mFinished && !r.startsNotResumed, r.lastProcessedSeq, reason);

            if (!r.activity.mFinished && r.startsNotResumed) {
                // The activity manager actually wants this one to start out paused, because it
                // needs to be visible but isn't in the foreground. We accomplish this by going
                // through the normal startup (because activities expect to go through onResume()
                // the first time they run, before their window is displayed), and then pausing it.
                // However, in this case we do -not- need to do the full pause cycle (of freezing
                // and such) because the activity manager assumes it can just retain the current
                // state it has.
                performPauseActivityIfNeeded(r, reason);

                // We need to keep around the original state, in case we need to be created again.
                // But we only do this for pre-Honeycomb apps, which always save their state when
                // pausing, so we can not have them save their state when restarting from a paused
                // state. For HC and later, we want to (and can) let the state be saved as the
                // normal part of stopping the activity.
                if (r.isPreHoneycomb()) {
                    r.state = oldState;
                }
            }
        } else {
            // If there was an error, for any reason, tell the activity manager to stop us.
            try {
                ActivityManager.getService()
                    .finishActivity(r.token, Activity.RESULT_CANCELED, null,
                            Activity.DONT_FINISH_TASK_WITH_ACTIVITY);
            } catch (RemoteException ex) {
                throw ex.rethrowFromSystemServer();
            }
        }
    }
我们挑重点看,忽略一些细节,这个方法里首先执行了performLaunchActivity(r, customIntent)方法,如下
 private Activity performLaunchActivity(ActivityClientRecord r, Intent customIntent) {
        // System.out.println("##### [" + System.currentTimeMillis() + "] ActivityThread.performLaunchActivity(" + r + ")");

        ActivityInfo aInfo = r.activityInfo;
        if (r.packageInfo == null) {
            r.packageInfo = getPackageInfo(aInfo.applicationInfo, r.compatInfo,
                    Context.CONTEXT_INCLUDE_CODE);
        }

        ComponentName component = r.intent.getComponent();
        if (component == null) {
            component = r.intent.resolveActivity(
                mInitialApplication.getPackageManager());
            r.intent.setComponent(component);
        }

        if (r.activityInfo.targetActivity != null) {
            component = new ComponentName(r.activityInfo.packageName,
                    r.activityInfo.targetActivity);
        }

        ContextImpl appContext = createBaseContextForActivity(r);
        Activity activity = null;
        try {
            java.lang.ClassLoader cl = appContext.getClassLoader();
            activity = mInstrumentation.newActivity(
                    cl, component.getClassName(), r.intent);
            StrictMode.incrementExpectedActivityCount(activity.getClass());
            r.intent.setExtrasClassLoader(cl);
            r.intent.prepareToEnterProcess();
            if (r.state != null) {
                r.state.setClassLoader(cl);
            }
        } catch (Exception e) {
            if (!mInstrumentation.onException(activity, e)) {
                throw new RuntimeException(
                    "Unable to instantiate activity " + component
                    + ": " + e.toString(), e);
            }
        }

        try {
            Application app = r.packageInfo.makeApplication(false, mInstrumentation);

            if (localLOGV) Slog.v(TAG, "Performing launch of " + r);
            if (localLOGV) Slog.v(
                    TAG, r + ": app=" + app
                    + ", appName=" + app.getPackageName()
                    + ", pkg=" + r.packageInfo.getPackageName()
                    + ", comp=" + r.intent.getComponent().toShortString()
                    + ", dir=" + r.packageInfo.getAppDir());

            if (activity != null) {
                CharSequence title = r.activityInfo.loadLabel(appContext.getPackageManager());
                Configuration config = new Configuration(mCompatConfiguration);
                if (r.overrideConfig != null) {
                    config.updateFrom(r.overrideConfig);
                }
                if (DEBUG_CONFIGURATION) Slog.v(TAG, "Launching activity "
                        + r.activityInfo.name + " with config " + config);
                Window window = null;
                if (r.mPendingRemoveWindow != null && r.mPreserveWindow) {
                    window = r.mPendingRemoveWindow;
                    r.mPendingRemoveWindow = null;
                    r.mPendingRemoveWindowManager = null;
                }
                appContext.setOuterContext(activity);
                activity.attach(appContext, this, getInstrumentation(), r.token,
                        r.ident, app, r.intent, r.activityInfo, title, r.parent,
                        r.embeddedID, r.lastNonConfigurationInstances, config,
                        r.referrer, r.voiceInteractor, window, r.configCallback);

                if (customIntent != null) {
                    activity.mIntent = customIntent;
                }
                r.lastNonConfigurationInstances = null;
                checkAndBlockForNetworkAccess();
                activity.mStartedActivity = false;
                int theme = r.activityInfo.getThemeResource();
                if (theme != 0) {
                    activity.setTheme(theme);
                }

                activity.mCalled = false;
                if (r.isPersistable()) {
                    mInstrumentation.callActivityOnCreate(activity, r.state, r.persistentState);
                } else {
                    mInstrumentation.callActivityOnCreate(activity, r.state);
                }
                if (!activity.mCalled) {
                    throw new SuperNotCalledException(
                        "Activity " + r.intent.getComponent().toShortString() +
                        " did not call through to super.onCreate()");
                }
                r.activity = activity;
                r.stopped = true;
                if (!r.activity.mFinished) {
                    activity.performStart();
                    r.stopped = false;
                }
                if (!r.activity.mFinished) {
                    if (r.isPersistable()) {
                        if (r.state != null || r.persistentState != null) {
                            mInstrumentation.callActivityOnRestoreInstanceState(activity, r.state,
                                    r.persistentState);
                        }
                    } else if (r.state != null) {
                        mInstrumentation.callActivityOnRestoreInstanceState(activity, r.state);
                    }
                }
                if (!r.activity.mFinished) {
                    activity.mCalled = false;
                    if (r.isPersistable()) {
                        mInstrumentation.callActivityOnPostCreate(activity, r.state,
                                r.persistentState);
                    } else {
                        mInstrumentation.callActivityOnPostCreate(activity, r.state);
                    }
                    if (!activity.mCalled) {
                        throw new SuperNotCalledException(
                            "Activity " + r.intent.getComponent().toShortString() +
                            " did not call through to super.onPostCreate()");
                    }
                }
            }
            r.paused = true;

            mActivities.put(r.token, r);

        } catch (SuperNotCalledException e) {
            throw e;

        } catch (Exception e) {
            if (!mInstrumentation.onException(activity, e)) {
                throw new RuntimeException(
                    "Unable to start activity " + component
                    + ": " + e.toString(), e);
            }
        }

        return activity;
    }
代码比较长,简略说下,就是分别调用了activity的attach,oncreate,onstart方法。
attach方法中初始化了PhoneWindow对象,
onCreate方法中初始化DecorView对象,关联了现有布局。 -
回过头看执行完performLaunchActivity(r, customIntent)方法后,接着执行了handleResumeActivity()方法,从语义也可以猜出,这个方法里调用了activity的onResume方法。先看下方法源码:
final void handleResumeActivity(IBinder token,
            boolean clearHide, boolean isForward, boolean reallyResume, int seq, String reason) {
        ActivityClientRecord r = mActivities.get(token);
        if (!checkAndUpdateLifecycleSeq(seq, r, "resumeActivity")) {
            return;
        }

        // If we are getting ready to gc after going to the background, well
        // we are back active so skip it.
        unscheduleGcIdler();
        mSomeActivitiesChanged = true;

        // TODO Push resumeArgs into the activity for consideration
        r = performResumeActivity(token, clearHide, reason);

        if (r != null) {
            final Activity a = r.activity;

            if (localLOGV) Slog.v(
                TAG, "Resume " + r + " started activity: " +
                a.mStartedActivity + ", hideForNow: " + r.hideForNow
                + ", finished: " + a.mFinished);

            final int forwardBit = isForward ?
                    WindowManager.LayoutParams.SOFT_INPUT_IS_FORWARD_NAVIGATION : 0;

            // If the window hasn't yet been added to the window manager,
            // and this guy didn't finish itself or start another activity,
            // then go ahead and add the window.
            boolean willBeVisible = !a.mStartedActivity;
            if (!willBeVisible) {
                try {
                    willBeVisible = ActivityManager.getService().willActivityBeVisible(
                            a.getActivityToken());
                } catch (RemoteException e) {
                    throw e.rethrowFromSystemServer();
                }
            }
            if (r.window == null && !a.mFinished && willBeVisible) {
                r.window = r.activity.getWindow();
                View decor = r.window.getDecorView();
                decor.setVisibility(View.INVISIBLE);
                ViewManager wm = a.getWindowManager();
                WindowManager.LayoutParams l = r.window.getAttributes();
                a.mDecor = decor;
                l.type = WindowManager.LayoutParams.TYPE_BASE_APPLICATION;
                l.softInputMode |= forwardBit;
                if (r.mPreserveWindow) {
                    a.mWindowAdded = true;
                    r.mPreserveWindow = false;
                    // Normally the ViewRoot sets up callbacks with the Activity
                    // in addView->ViewRootImpl#setView. If we are instead reusing
                    // the decor view we have to notify the view root that the
                    // callbacks may have changed.
                    ViewRootImpl impl = decor.getViewRootImpl();
                    if (impl != null) {
                        impl.notifyChildRebuilt();
                    }
                }
                if (a.mVisibleFromClient) {
                    if (!a.mWindowAdded) {
                        a.mWindowAdded = true;
                        wm.addView(decor, l);
                    } else {
                        // The activity will get a callback for this {@link LayoutParams} change
                        // earlier. However, at that time the decor will not be set (this is set
                        // in this method), so no action will be taken. This call ensures the
                        // callback occurs with the decor set.
                        a.onWindowAttributesChanged(l);
                    }
                }

            // If the window has already been added, but during resume
            // we started another activity, then don't yet make the
            // window visible.
            } else if (!willBeVisible) {
                if (localLOGV) Slog.v(
                    TAG, "Launch " + r + " mStartedActivity set");
                r.hideForNow = true;
            }

            // Get rid of anything left hanging around.
            cleanUpPendingRemoveWindows(r, false /* force */);

            // The window is now visible if it has been added, we are not
            // simply finishing, and we are not starting another activity.
            if (!r.activity.mFinished && willBeVisible
                    && r.activity.mDecor != null && !r.hideForNow) {
                if (r.newConfig != null) {
                    performConfigurationChangedForActivity(r, r.newConfig);
                    if (DEBUG_CONFIGURATION) Slog.v(TAG, "Resuming activity "
                            + r.activityInfo.name + " with newConfig " + r.activity.mCurrentConfig);
                    r.newConfig = null;
                }
                if (localLOGV) Slog.v(TAG, "Resuming " + r + " with isForward="
                        + isForward);
                WindowManager.LayoutParams l = r.window.getAttributes();
                if ((l.softInputMode
                        & WindowManager.LayoutParams.SOFT_INPUT_IS_FORWARD_NAVIGATION)
                        != forwardBit) {
                    l.softInputMode = (l.softInputMode
                            & (~WindowManager.LayoutParams.SOFT_INPUT_IS_FORWARD_NAVIGATION))
                            | forwardBit;
                    if (r.activity.mVisibleFromClient) {
                        ViewManager wm = a.getWindowManager();
                        View decor = r.window.getDecorView();
                        wm.updateViewLayout(decor, l);
                    }
                }

                r.activity.mVisibleFromServer = true;
                mNumVisibleActivities++;
                if (r.activity.mVisibleFromClient) {
                    r.activity.makeVisible();
                }
            }

            if (!r.onlyLocalRequest) {
                r.nextIdle = mNewActivities;
                mNewActivities = r;
                if (localLOGV) Slog.v(
                    TAG, "Scheduling idle handler for " + r);
                Looper.myQueue().addIdleHandler(new Idler());
            }
            r.onlyLocalRequest = false;

            // Tell the activity manager we have resumed.
            if (reallyResume) {
                try {
                    ActivityManager.getService().activityResumed(token);
                } catch (RemoteException ex) {
                    throw ex.rethrowFromSystemServer();
                }
            }

        } else {
            // If an exception was thrown when trying to resume, then
            // just end this activity.
            try {
                ActivityManager.getService()
                    .finishActivity(token, Activity.RESULT_CANCELED, null,
                            Activity.DONT_FINISH_TASK_WITH_ACTIVITY);
            } catch (RemoteException ex) {
                throw ex.rethrowFromSystemServer();
            }
        }
    }
很长哈,还是按顺序挑重点说:
首先调用performResumeActivity(token, clearHide, reason)方法,这个方法里便调用了activity的onResume方法,
接着执行这段代码 r.activity.makeVisible();我们看下makeVisble里边的代码:void makeVisible() { if (!mWindowAdded) { ViewManager wm = getWindowManager(); wm.addView(mDecor, getWindow().getAttributes()); mWindowAdded = true; } mDecor.setVisibility(View.VISIBLE); }这里边的wm对象调用了addView方法,直接点击addView方法会跳到接口方法,这不是我们想要的,所以看下wm到底是哪个实例,点击 getWindowManager()方法发现只return mWindowManager对象,找这个对象赋值的地方,mWindowManager = mWindow.getWindowManager();我们知道mWindow是上边第11点里说的PhoneWindow对象,那我们去PhoneWindow类里找下getWindowManager方法,没有找到,那就去它的父类Window类里,发现该方法返回mWindowManager对象,找到赋值的地方:
mWindowManager = ((WindowManagerImpl)wm).createLocalWindowManager(this);跳转到这个方法里如下:public WindowManagerImpl createLocalWindowManager(Window parentWindow) { return new WindowManagerImpl(mContext, parentWindow); }由此我们可以知道,addView是WindowManagerImpl的方法。方法如下:
 @Override
    public void addView(@NonNull View view, @NonNull ViewGroup.LayoutParams params) {
        applyDefaultToken(params);
        mGlobal.addView(view, params, mContext.getDisplay(), mParentWindow);
    }
继续看下这个方法里WindowManagerGlobal类的addView方法代码。。。。。如下:
public void addView(View view, ViewGroup.LayoutParams params,
            Display display, Window parentWindow) {
        if (view == null) {
            throw new IllegalArgumentException("view must not be null");
        }
        if (display == null) {
            throw new IllegalArgumentException("display must not be null");
        }
        if (!(params instanceof WindowManager.LayoutParams)) {
            throw new IllegalArgumentException("Params must be WindowManager.LayoutParams");
        }

        final WindowManager.LayoutParams wparams = (WindowManager.LayoutParams) params;
        if (parentWindow != null) {
            parentWindow.adjustLayoutParamsForSubWindow(wparams);
        } else {
            // If there's no parent, then hardware acceleration for this view is
            // set from the application's hardware acceleration setting.
            final Context context = view.getContext();
            if (context != null
                    && (context.getApplicationInfo().flags
                            & ApplicationInfo.FLAG_HARDWARE_ACCELERATED) != 0) {
                wparams.flags |= WindowManager.LayoutParams.FLAG_HARDWARE_ACCELERATED;
            }
        }

        ViewRootImpl root;
        View panelParentView = null;

        synchronized (mLock) {
            // Start watching for system property changes.
            if (mSystemPropertyUpdater == null) {
                mSystemPropertyUpdater = new Runnable() {
                    @Override public void run() {
                        synchronized (mLock) {
                            for (int i = mRoots.size() - 1; i >= 0; --i) {
                                mRoots.get(i).loadSystemProperties();
                            }
                        }
                    }
                };
                SystemProperties.addChangeCallback(mSystemPropertyUpdater);
            }

            int index = findViewLocked(view, false);
            if (index >= 0) {
                if (mDyingViews.contains(view)) {
                    // Don't wait for MSG_DIE to make it's way through root's queue.
                    mRoots.get(index).doDie();
                } else {
                    throw new IllegalStateException("View " + view
                            + " has already been added to the window manager.");
                }
                // The previous removeView() had not completed executing. Now it has.
            }

            // If this is a panel window, then find the window it is being
            // attached to for future reference.
            if (wparams.type >= WindowManager.LayoutParams.FIRST_SUB_WINDOW &&
                    wparams.type <= WindowManager.LayoutParams.LAST_SUB_WINDOW) {
                final int count = mViews.size();
                for (int i = 0; i < count; i++) {
                    if (mRoots.get(i).mWindow.asBinder() == wparams.token) {
                        panelParentView = mViews.get(i);
                    }
                }
            }

            root = new ViewRootImpl(view.getContext(), display);

            view.setLayoutParams(wparams);

            mViews.add(view);
            mRoots.add(root);
            mParams.add(wparams);

            // do this last because it fires off messages to start doing things
            try {
                root.setView(view, wparams, panelParentView);
            } catch (RuntimeException e) {
                // BadTokenException or InvalidDisplayException, clean up.
                if (index >= 0) {
                    removeViewLocked(index, true);
                }
                throw e;
            }
        }
    }
这个方法里主要是实例化了ViewRootImpl对象,并将相应的view,ViewRootImpl对象,params的相应实例存放到集合中,最后调用ViewRootImpl对象的setView方法。
概括这几点:
WindowManager的addView的过程,WindowManager是个接口,它的实现类是WindowManagerImpl类,而WindowManagerImpl又把相关逻辑交给了WindowManagerGlobal处理。WindowManagerGlobal是个单例类,它在进程中只存在一个实例,是它内部的addView方法最终创建了我们的核心类ViewRootImpl。调用ViewRootImpl的setView方法。
由于代码太多,篇幅太长,下边的代码,尽量精简,我们看下setView方法:public void setView(View view, WindowManager.LayoutParams attrs, View panelParentView) { synchronized (this) { //N行代码 requestLayout(); //N行代码 } }setView方法里的代码非常多,我们只看重点,requestLayout()方法如下:
    @Override
    public void requestLayout() {
        if (!mHandlingLayoutInLayoutRequest) {
            checkThread();
            mLayoutRequested = true;
            scheduleTraversals();
        }
    }
方法进入一个if判断,第一行,检查调用当前方法的线程和ViewRootImpl定义的线程是不是一个线程,如果不是一个线程则抛出异常,接着调用scheduleTraversals()方法。
  void scheduleTraversals() {
        if (!mTraversalScheduled) {
            mTraversalScheduled = true;
            mTraversalBarrier = mHandler.getLooper().getQueue().postSyncBarrier();
            mChoreographer.postCallback(
                    Choreographer.CALLBACK_TRAVERSAL, mTraversalRunnable, null);
            if (!mUnbufferedInputDispatch) {
                scheduleConsumeBatchedInput();
            }
            notifyRendererOfFramePending();
            pokeDrawLockIfNeeded();
        }
    }
方法里我们主要看这句
 mChoreographer.postCallback(
                    Choreographer.CALLBACK_TRAVERSAL, mTraversalRunnable, null);
这个方法主要作用就是触发传过来mTraversalRunnable的任务的run方法。找到mTraversalRunnable定义的类TraversalRunnable,查看该类的run方法:
    @Override
        public void run() {
            doTraversal();
        }
继续进入doTraversal();方法:
    void doTraversal() {
        if (mTraversalScheduled) {
            mTraversalScheduled = false;
            mHandler.getLooper().getQueue().removeSyncBarrier(mTraversalBarrier);

            if (mProfile) {
                Debug.startMethodTracing("ViewAncestor");
            }

            performTraversals();

            if (mProfile) {
                Debug.stopMethodTracing();
                mProfile = false;
            }
        }
    }
这里边就有我们熟悉的performTraversals();方法了。他是view绘制流程的开始。代码如下:
private void performTraversals() {

    // 省略N行代码
    //1.测量
    performMeasure(childWidthMeasureSpec,childHeightMeasureSpec);
     // 省略N行代码
    //2.布局
     performLayout(lp, mWidth, mHeight);
     // 省略N行代码
     //3.绘制
     performDraw();
}
这个方法里的代码非常长,我们只摘抄了三个重要方法,代表着view的三个主要流程。测量、布局、绘制。
到此,我们从activity的启动到view真正开始绘制的全流程,跟着源码走了一遍。概括如下:
1.首先startActivity方法通过一系列的事件,最后调用scheduleLaunchActivity方法,因为过程比较复杂,这块不再详细分析,
参看第20点的图
2.scheduleLaunchActivity方法通过sendMessage方法给当前类中的Handler发消息。
3.当前类中(ActivityThread类)的Handler接收到消息,执行handlelaunchActivity方法。
4.handlelaunchActivity方法中先调用了performLaunchActivity方法后调用了handleResumeActivity方法;
5.performLaunchActivity方法触发了activity的attach方法(实例了PhoneWindow对象),接着触发了onCreate方
法(初始化了DecorView对象,关联了我们创建的布局文件),onStart方法。
6.performResumeActivity方法调用了activity的onResume方法,
接着执行r.activity.makeVisible()
7.r.activity.makeVisible调用WindowManagerImpl类的addView方法。
8.addview方法调用WindowManagerImpl类的setView方法。
9.setView方法调用requestLayout方法,
10.requestLayout方法调用scheduleTraversals方法。
11.scheduleTraversals方法调用TraversalRunnable类的run方法。
12.TraversalRunnable类的run方法调用doTraversal()方法,这个方法接着调用performTraversals()方法;
13.performTraversals()方法里顺序执行performMeasure、performLayout、performDraw方法,分别代表view的
测量、布局、绘制。 -
View的测量:performMeasure方法,
    private void performMeasure(int childWidthMeasureSpec, int childHeightMeasureSpec) {
        if (mView == null) {
            return;
        }
        Trace.traceBegin(Trace.TRACE_TAG_VIEW, "measure");
        try {
            mView.measure(childWidthMeasureSpec, childHeightMeasureSpec);
        } finally {
            Trace.traceEnd(Trace.TRACE_TAG_VIEW);
        }
    }
方法很简单,其实就一句话,调用了mView.measure方法。这里边我们可以注意到系统使用Trace类监控measure的性能。mView是传过来的DecorView,我们去DecorView类中找measure方法,发现没有,那就去父类找,FrameLayout里没有,ViewGroup里没有,最后在View类里找到了定义的地方,如下:
    /**
     * <p>
     * This is called to find out how big a view should be. The parent
     * supplies constraint information in the width and height parameters.
     * </p>
     *
     * <p>
     * The actual measurement work of a view is performed in
     * {@link #onMeasure(int, int)}, called by this method. Therefore, only
     * {@link #onMeasure(int, int)} can and must be overridden by subclasses.
     * </p>
     *
     *
     * @param widthMeasureSpec Horizontal space requirements as imposed by the
     *        parent
     * @param heightMeasureSpec Vertical space requirements as imposed by the
     *        parent
     *
     * @see #onMeasure(int, int)
     */
    public final void measure(int widthMeasureSpec, int heightMeasureSpec) {
        //判断布局边缘是否有光边或者说阴影等效果?然后做出对应处理,不太重要的逻辑
        boolean optical = isLayoutModeOptical(this);
        if (optical != isLayoutModeOptical(mParent)) {
            Insets insets = getOpticalInsets();
            int oWidth  = insets.left + insets.right;
            int oHeight = insets.top  + insets.bottom;
            widthMeasureSpec  = MeasureSpec.adjust(widthMeasureSpec,  optical ? -oWidth  : oWidth);
            heightMeasureSpec = MeasureSpec.adjust(heightMeasureSpec, optical ? -oHeight : oHeight);
        }
        //压缩参数,或者理解为优化参数体积
        // Suppress sign extension for the low bytes
        long key = (long) widthMeasureSpec << 32 | (long) heightMeasureSpec & 0xffffffffL;
        if (mMeasureCache == null) mMeasureCache = new LongSparseLongArray(2);

        final boolean forceLayout = (mPrivateFlags & PFLAG_FORCE_LAYOUT) == PFLAG_FORCE_LAYOUT;
        //对于api23以上版本做了一些优化,23以下版本还是使用原来代码
        // Optimize layout by avoiding an extra EXACTLY pass when the view is
        // already measured as the correct size. In API 23 and below, this
        // extra pass is required to make LinearLayout re-distribute weight.
        final boolean specChanged = widthMeasureSpec != mOldWidthMeasureSpec
                || heightMeasureSpec != mOldHeightMeasureSpec;
        final boolean isSpecExactly = MeasureSpec.getMode(widthMeasureSpec) == MeasureSpec.EXACTLY
                && MeasureSpec.getMode(heightMeasureSpec) == MeasureSpec.EXACTLY;
        final boolean matchesSpecSize = getMeasuredWidth() == MeasureSpec.getSize(widthMeasureSpec)
                && getMeasuredHeight() == MeasureSpec.getSize(heightMeasureSpec);
        final boolean needsLayout = specChanged
                && (sAlwaysRemeasureExactly || !isSpecExactly || !matchesSpecSize);

        if (forceLayout || needsLayout) {
            // first clears the measured dimension flag
            mPrivateFlags &= ~PFLAG_MEASURED_DIMENSION_SET;
            //解析Rtl属性,不太重要
            resolveRtlPropertiesIfNeeded();

            int cacheIndex = forceLayout ? -1 : mMeasureCache.indexOfKey(key);
            //这块做了判断,如果有缓存的话,直接使用缓存,设定测量好的尺寸。
            //如果没有缓存,就调用onMeasure方法测量一边。
            if (cacheIndex < 0 || sIgnoreMeasureCache) {
                // measure ourselves, this should set the measured dimension flag back
                onMeasure(widthMeasureSpec, heightMeasureSpec);
                mPrivateFlags3 &= ~PFLAG3_MEASURE_NEEDED_BEFORE_LAYOUT;
            } else {
                long value = mMeasureCache.valueAt(cacheIndex);
                // Casting a long to int drops the high 32 bits, no mask needed
                setMeasuredDimensionRaw((int) (value >> 32), (int) value);
                mPrivateFlags3 |= PFLAG3_MEASURE_NEEDED_BEFORE_LAYOUT;
            }

            // flag not set, setMeasuredDimension() was not invoked, we raise
            // an exception to warn the developer
            if ((mPrivateFlags & PFLAG_MEASURED_DIMENSION_SET) != PFLAG_MEASURED_DIMENSION_SET) {
                throw new IllegalStateException("View with id " + getId() + ": "
                        + getClass().getName() + "#onMeasure() did not set the"
                        + " measured dimension by calling"
                        + " setMeasuredDimension()");
            }

            mPrivateFlags |= PFLAG_LAYOUT_REQUIRED;
        }

        mOldWidthMeasureSpec = widthMeasureSpec;
        mOldHeightMeasureSpec = heightMeasureSpec;
        //把最后一边的测量结果存入缓存。方便下次调用。
        mMeasureCache.put(key, ((long) mMeasuredWidth) << 32 |
                (long) mMeasuredHeight & 0xffffffffL); // suppress sign extension
    }
方法里很多地方用到了MeasureSpec类,这里大概说下。
MeasureSpec封装了从父级传递给子级的布局要求。每个MeasureSpec代表宽度或高度的要求。
MeasureSpec实现为32位的int,由size和mode组成,高2位代表mode,低30位代表size,它通过将mode和size打包成一个int值来减少对象内存分配,并提供打包和解包的方法。
mode分类:
UNSPECIFIED:父容器不对View有任何限制,给它想要的任何尺寸。一般用于系统内部,表示一种测量状态。EXACTLY:父容器已经检测出view的精确大小,这时候view的大小就是size所指定的值。它对应于LayoutParams中的match_parent和具体数值两种模式。
AT_MOST:父容器指定了一个可用大小,即size,子view的大小不能大于这个值,具体值要看vew的实现。它对应于LayoutParams中的wrap_content。
当我们自己写自定义view的时候,就要根据MeasureSpec参数来设置自定义view的宽高。
接着上边说,mView.measure方法,mView就是DecorView,DecorView没有重写View的measure(也不能重写,因为该方法被定义为final)measure方法如上,许多地方都写了注释,其实做的事可以概括以下:
就是看下当前view是否之前测量过是否有缓存,如果有的话,就直接按照缓存的值设定测量尺寸,
如果没有缓存就调用onMeasure方法测量一遍,然后在按照这个尺寸设置测量尺寸。最后再存入缓存,方便下次再重复测量。
过程很简单,接着我们分析下细节看下DecorView的onMeasure方法:@Override protected void onMeasure(int widthMeasureSpec, int heightMeasureSpec) { final DisplayMetrics metrics = getContext().getResources().getDisplayMetrics(); final boolean isPortrait = getResources().getConfiguration().orientation == ORIENTATION_PORTRAIT; final int widthMode = getMode(widthMeasureSpec); final int heightMode = getMode(heightMeasureSpec); boolean fixedWidth = false; mApplyFloatingHorizontalInsets = false; if (widthMode == AT_MOST) { final TypedValue tvw = isPortrait ? mWindow.mFixedWidthMinor : mWindow.mFixedWidthMajor; if (tvw != null && tvw.type != TypedValue.TYPE_NULL) { final int w; if (tvw.type == TypedValue.TYPE_DIMENSION) { w = (int) tvw.getDimension(metrics); } else if (tvw.type == TypedValue.TYPE_FRACTION) { w = (int) tvw.getFraction(metrics.widthPixels, metrics.widthPixels); } else { w = 0; } if (DEBUG_MEASURE) Log.d(mLogTag, "Fixed width: " + w); final int widthSize = MeasureSpec.getSize(widthMeasureSpec); if (w > 0) { widthMeasureSpec = MeasureSpec.makeMeasureSpec( Math.min(w, widthSize), EXACTLY); fixedWidth = true; } else { widthMeasureSpec = MeasureSpec.makeMeasureSpec( widthSize - mFloatingInsets.left - mFloatingInsets.right, AT_MOST); mApplyFloatingHorizontalInsets = true; } } } mApplyFloatingVerticalInsets = false; if (heightMode == AT_MOST) { final TypedValue tvh = isPortrait ? mWindow.mFixedHeightMajor : mWindow.mFixedHeightMinor; if (tvh != null && tvh.type != TypedValue.TYPE_NULL) { final int h; if (tvh.type == TypedValue.TYPE_DIMENSION) { h = (int) tvh.getDimension(metrics); } else if (tvh.type == TypedValue.TYPE_FRACTION) { h = (int) tvh.getFraction(metrics.heightPixels, metrics.heightPixels); } else { h = 0; } if (DEBUG_MEASURE) Log.d(mLogTag, "Fixed height: " + h); final int heightSize = MeasureSpec.getSize(heightMeasureSpec); if (h > 0) { heightMeasureSpec = MeasureSpec.makeMeasureSpec( Math.min(h, heightSize), EXACTLY); } else if ((mWindow.getAttributes().flags & FLAG_LAYOUT_IN_SCREEN) == 0) { heightMeasureSpec = MeasureSpec.makeMeasureSpec( heightSize - mFloatingInsets.top - mFloatingInsets.bottom, AT_MOST); mApplyFloatingVerticalInsets = true; } } } getOutsets(mOutsets); if (mOutsets.top > 0 || mOutsets.bottom > 0) { int mode = MeasureSpec.getMode(heightMeasureSpec); if (mode != MeasureSpec.UNSPECIFIED) { int height = MeasureSpec.getSize(heightMeasureSpec); heightMeasureSpec = MeasureSpec.makeMeasureSpec( height + mOutsets.top + mOutsets.bottom, mode); } } if (mOutsets.left > 0 || mOutsets.right > 0) { int mode = MeasureSpec.getMode(widthMeasureSpec); if (mode != MeasureSpec.UNSPECIFIED) { int width = MeasureSpec.getSize(widthMeasureSpec); widthMeasureSpec = MeasureSpec.makeMeasureSpec( width + mOutsets.left + mOutsets.right, mode); } } super.onMeasure(widthMeasureSpec, heightMeasureSpec); int width = getMeasuredWidth(); boolean measure = false; widthMeasureSpec = MeasureSpec.makeMeasureSpec(width, EXACTLY); if (!fixedWidth && widthMode == AT_MOST) { final TypedValue tv = isPortrait ? mWindow.mMinWidthMinor : mWindow.mMinWidthMajor; if (tv.type != TypedValue.TYPE_NULL) { final int min; if (tv.type == TypedValue.TYPE_DIMENSION) { min = (int)tv.getDimension(metrics); } else if (tv.type == TypedValue.TYPE_FRACTION) { min = (int)tv.getFraction(mAvailableWidth, mAvailableWidth); } else { min = 0; } if (DEBUG_MEASURE) Log.d(mLogTag, "Adjust for min width: " + min + ", value::" + tv.coerceToString() + ", mAvailableWidth=" + mAvailableWidth); if (width < min) { widthMeasureSpec = MeasureSpec.makeMeasureSpec(min, EXACTLY); measure = true; } } } // TODO: Support height? if (measure) { super.onMeasure(widthMeasureSpec, heightMeasureSpec); } }虽然代码很长,但是不用害怕,其实概括起来做的事情很简单,就是通过传过来父view的MeasureSpec参数,来确定自己的MeasureSpec参数,然后再调用FrameLayout的onMeasure方法将自己的MeasureSpec参数传递过去。我们看下FrameLayout的onMeasure方法做了什么:
 @Override
    protected void onMeasure(int widthMeasureSpec, int heightMeasureSpec) {
        int count = getChildCount();

        final boolean measureMatchParentChildren =
                MeasureSpec.getMode(widthMeasureSpec) != MeasureSpec.EXACTLY ||
                MeasureSpec.getMode(heightMeasureSpec) != MeasureSpec.EXACTLY;
        mMatchParentChildren.clear();

        int maxHeight = 0;
        int maxWidth = 0;
        int childState = 0;

        for (int i = 0; i < count; i++) {
            final View child = getChildAt(i);
            if (mMeasureAllChildren || child.getVisibility() != GONE) {
                measureChildWithMargins(child, widthMeasureSpec, 0, heightMeasureSpec, 0);
                final LayoutParams lp = (LayoutParams) child.getLayoutParams();
                maxWidth = Math.max(maxWidth,
                        child.getMeasuredWidth() + lp.leftMargin + lp.rightMargin);
                maxHeight = Math.max(maxHeight,
                        child.getMeasuredHeight() + lp.topMargin + lp.bottomMargin);
                childState = combineMeasuredStates(childState, child.getMeasuredState());
                if (measureMatchParentChildren) {
                    if (lp.width == LayoutParams.MATCH_PARENT ||
                            lp.height == LayoutParams.MATCH_PARENT) {
                        mMatchParentChildren.add(child);
                    }
                }
            }
        }

        // Account for padding too
        maxWidth += getPaddingLeftWithForeground() + getPaddingRightWithForeground();
        maxHeight += getPaddingTopWithForeground() + getPaddingBottomWithForeground();

        // Check against our minimum height and width
        maxHeight = Math.max(maxHeight, getSuggestedMinimumHeight());
        maxWidth = Math.max(maxWidth, getSuggestedMinimumWidth());

        // Check against our foreground's minimum height and width
        final Drawable drawable = getForeground();
        if (drawable != null) {
            maxHeight = Math.max(maxHeight, drawable.getMinimumHeight());
            maxWidth = Math.max(maxWidth, drawable.getMinimumWidth());
        }

        setMeasuredDimension(resolveSizeAndState(maxWidth, widthMeasureSpec, childState),
                resolveSizeAndState(maxHeight, heightMeasureSpec,
                        childState << MEASURED_HEIGHT_STATE_SHIFT));

        count = mMatchParentChildren.size();
        if (count > 1) {
            for (int i = 0; i < count; i++) {
                final View child = mMatchParentChildren.get(i);
                final MarginLayoutParams lp = (MarginLayoutParams) child.getLayoutParams();

                final int childWidthMeasureSpec;
                if (lp.width == LayoutParams.MATCH_PARENT) {
                    final int width = Math.max(0, getMeasuredWidth()
                            - getPaddingLeftWithForeground() - getPaddingRightWithForeground()
                            - lp.leftMargin - lp.rightMargin);
                    childWidthMeasureSpec = MeasureSpec.makeMeasureSpec(
                            width, MeasureSpec.EXACTLY);
                } else {
                    childWidthMeasureSpec = getChildMeasureSpec(widthMeasureSpec,
                            getPaddingLeftWithForeground() + getPaddingRightWithForeground() +
                            lp.leftMargin + lp.rightMargin,
                            lp.width);
                }

                final int childHeightMeasureSpec;
                if (lp.height == LayoutParams.MATCH_PARENT) {
                    final int height = Math.max(0, getMeasuredHeight()
                            - getPaddingTopWithForeground() - getPaddingBottomWithForeground()
                            - lp.topMargin - lp.bottomMargin);
                    childHeightMeasureSpec = MeasureSpec.makeMeasureSpec(
                            height, MeasureSpec.EXACTLY);
                } else {
                    childHeightMeasureSpec = getChildMeasureSpec(heightMeasureSpec,
                            getPaddingTopWithForeground() + getPaddingBottomWithForeground() +
                            lp.topMargin + lp.bottomMargin,
                            lp.height);
                }

                child.measure(childWidthMeasureSpec, childHeightMeasureSpec);
            }
        }
    }
代码很多,我们概括下这个方法做了什么:
首先获取当前view有多少子view,然后根据数量循环测量子view,根据子view的测量结果,在做相应处理。最后设定当前view的测量尺寸。
到这里view的测量就基本说完了。看着代码一堆,其实逻辑很简单。还有很多细节是需要我们自己看源码认真体会的。 -
Layout的代码和逻辑跟Measure大同小异,这块就不说了。
-
接着说下performDraw方法,这块就不列出代码了,因为很长,但是重点就一句话,我们概括以下流程:
performDraw方法里调用ViewRootImpl类的draw方法,在draw方法里调用drawSoftware方法,在drawSoftware方法里调用 mView.draw(canvas)方法,我们知道mView是DecorView,所以去DecorView类里找draw方法,没有找到,最后在View类里找到了该方法,如下:/** * Manually render this view (and all of its children) to the given Canvas. * The view must have already done a full layout before this function is * called. When implementing a view, implement * {@link #onDraw(android.graphics.Canvas)} instead of overriding this method. * If you do need to override this method, call the superclass version. * * @param canvas The Canvas to which the View is rendered. */ @CallSuper public void draw(Canvas canvas) { final int privateFlags = mPrivateFlags; final boolean dirtyOpaque = (privateFlags & PFLAG_DIRTY_MASK) == PFLAG_DIRTY_OPAQUE && (mAttachInfo == null || !mAttachInfo.mIgnoreDirtyState); mPrivateFlags = (privateFlags & ~PFLAG_DIRTY_MASK) | PFLAG_DRAWN; /* * Draw traversal performs several drawing steps which must be executed * in the appropriate order: * * 1. Draw the background * 2. If necessary, save the canvas' layers to prepare for fading * 3. Draw view's content * 4. Draw children * 5. If necessary, draw the fading edges and restore layers * 6. Draw decorations (scrollbars for instance) */ // Step 1, draw the background, if needed int saveCount; if (!dirtyOpaque) { drawBackground(canvas); } // skip step 2 & 5 if possible (common case) final int viewFlags = mViewFlags; boolean horizontalEdges = (viewFlags & FADING_EDGE_HORIZONTAL) != 0; boolean verticalEdges = (viewFlags & FADING_EDGE_VERTICAL) != 0; if (!verticalEdges && !horizontalEdges) { // Step 3, draw the content if (!dirtyOpaque) onDraw(canvas); // Step 4, draw the children dispatchDraw(canvas); drawAutofilledHighlight(canvas); // Overlay is part of the content and draws beneath Foreground if (mOverlay != null && !mOverlay.isEmpty()) { mOverlay.getOverlayView().dispatchDraw(canvas); } // Step 6, draw decorations (foreground, scrollbars) onDrawForeground(canvas); // Step 7, draw the default focus highlight drawDefaultFocusHighlight(canvas); if (debugDraw()) { debugDrawFocus(canvas); } // we're done... return; } /* * Here we do the full fledged routine... * (this is an uncommon case where speed matters less, * this is why we repeat some of the tests that have been * done above) */ boolean drawTop = false; boolean drawBottom = false; boolean drawLeft = false; boolean drawRight = false; float topFadeStrength = 0.0f; float bottomFadeStrength = 0.0f; float leftFadeStrength = 0.0f; float rightFadeStrength = 0.0f; // Step 2, save the canvas' layers int paddingLeft = mPaddingLeft; final boolean offsetRequired = isPaddingOffsetRequired(); if (offsetRequired) { paddingLeft += getLeftPaddingOffset(); } int left = mScrollX + paddingLeft; int right = left + mRight - mLeft - mPaddingRight - paddingLeft; int top = mScrollY + getFadeTop(offsetRequired); int bottom = top + getFadeHeight(offsetRequired); if (offsetRequired) { right += getRightPaddingOffset(); bottom += getBottomPaddingOffset(); } final ScrollabilityCache scrollabilityCache = mScrollCache; final float fadeHeight = scrollabilityCache.fadingEdgeLength; int length = (int) fadeHeight; // clip the fade length if top and bottom fades overlap // overlapping fades produce odd-looking artifacts if (verticalEdges && (top + length > bottom - length)) { length = (bottom - top) / 2; } // also clip horizontal fades if necessary if (horizontalEdges && (left + length > right - length)) { length = (right - left) / 2; } if (verticalEdges) { topFadeStrength = Math.max(0.0f, Math.min(1.0f, getTopFadingEdgeStrength())); drawTop = topFadeStrength * fadeHeight > 1.0f; bottomFadeStrength = Math.max(0.0f, Math.min(1.0f, getBottomFadingEdgeStrength())); drawBottom = bottomFadeStrength * fadeHeight > 1.0f; } if (horizontalEdges) { leftFadeStrength = Math.max(0.0f, Math.min(1.0f, getLeftFadingEdgeStrength())); drawLeft = leftFadeStrength * fadeHeight > 1.0f; rightFadeStrength = Math.max(0.0f, Math.min(1.0f, getRightFadingEdgeStrength())); drawRight = rightFadeStrength * fadeHeight > 1.0f; } saveCount = canvas.getSaveCount(); int solidColor = getSolidColor(); if (solidColor == 0) { final int flags = Canvas.HAS_ALPHA_LAYER_SAVE_FLAG; if (drawTop) { canvas.saveLayer(left, top, right, top + length, null, flags); } if (drawBottom) { canvas.saveLayer(left, bottom - length, right, bottom, null, flags); } if (drawLeft) { canvas.saveLayer(left, top, left + length, bottom, null, flags); } if (drawRight) { canvas.saveLayer(right - length, top, right, bottom, null, flags); } } else { scrollabilityCache.setFadeColor(solidColor); } // Step 3, draw the content if (!dirtyOpaque) onDraw(canvas); // Step 4, draw the children dispatchDraw(canvas); // Step 5, draw the fade effect and restore layers final Paint p = scrollabilityCache.paint; final Matrix matrix = scrollabilityCache.matrix; final Shader fade = scrollabilityCache.shader; if (drawTop) { matrix.setScale(1, fadeHeight * topFadeStrength); matrix.postTranslate(left, top); fade.setLocalMatrix(matrix); p.setShader(fade); canvas.drawRect(left, top, right, top + length, p); } if (drawBottom) { matrix.setScale(1, fadeHeight * bottomFadeStrength); matrix.postRotate(180); matrix.postTranslate(left, bottom); fade.setLocalMatrix(matrix); p.setShader(fade); canvas.drawRect(left, bottom - length, right, bottom, p); } if (drawLeft) { matrix.setScale(1, fadeHeight * leftFadeStrength); matrix.postRotate(-90); matrix.postTranslate(left, top); fade.setLocalMatrix(matrix); p.setShader(fade); canvas.drawRect(left, top, left + length, bottom, p); } if (drawRight) { matrix.setScale(1, fadeHeight * rightFadeStrength); matrix.postRotate(90); matrix.postTranslate(right, top); fade.setLocalMatrix(matrix); p.setShader(fade); canvas.drawRect(right - length, top, right, bottom, p); } canvas.restoreToCount(saveCount); drawAutofilledHighlight(canvas); // Overlay is part of the content and draws beneath Foreground if (mOverlay != null && !mOverlay.isEmpty()) { mOverlay.getOverlayView().dispatchDraw(canvas); } // Step 6, draw decorations (foreground, scrollbars) onDrawForeground(canvas); if (debugDraw()) { debugDrawFocus(canvas); }这里就是主要的绘制流程,其实原作者已经用英文说的比较详细,这块我们翻译下这个方法的流程:
      /*
         * Draw traversal performs several drawing steps which must be executed
         * in the appropriate order:
         *
         *      1. Draw the background
         *      2. If necessary, save the canvas' layers to prepare for fading
         *      3. Draw view's content
         *      4. Draw children
         *      5. If necessary, draw the fading edges and restore layers
         *      6. Draw decorations (scrollbars for instance)
         */
翻译:
绘制背景;
如果必要的话,保存画布层级为渐变做准备;
绘制自己;
绘制孩子们;
如果条件允许的话,绘制渐变边缘和层架;
绘制装饰(滚动条);
到此,performdraw的流程完毕。
总结
通过小一周的时间,自己用业余时间略了一遍源码,许多细节的地方文章没有写,更注重一个整体的全流程。我们可以在这个流程基础上,自己过一遍源码,遇到细节不懂的地方,再针对性的研究,网上有许多这方面的讲解。
完成了一个全流程的梳理,心里好舒服~


 1069
1069

 被折叠的 条评论
为什么被折叠?
被折叠的 条评论
为什么被折叠?
 到【灌水乐园】发言


