


 本文详细介绍了MySQL主从复制的工作原理、过程和配置,包括二进制日志文件的作用,主从复制的IO线程与SQL线程交互,以及具体的配置步骤。此外,还探讨了GTID主从复制和半同步复制的实现与测试。
主从复制
1.工作原理
MySQL数据库自身提供的主从复制功能可以方便的实现数据的多处自动备份,实现数据库的拓展。多个数据备份不仅可以加强数据的安全性,通过实现读写分离还能进一步提升数据库的负载性能。
多个数据库间主从复制与读写分离模型

在一主多从的数据库体系中,多个从服务器采用异步的方式更新主数据库的变化,业务服务器在执行写或者相关修改数据库的操作是在主服务器上进行的,读操作则是在各从服务器上进行。如果配置了多个从服务器或者多个主服务器又涉及到相应的负载均衡问题。
Mysql主从复制的实现原理图:
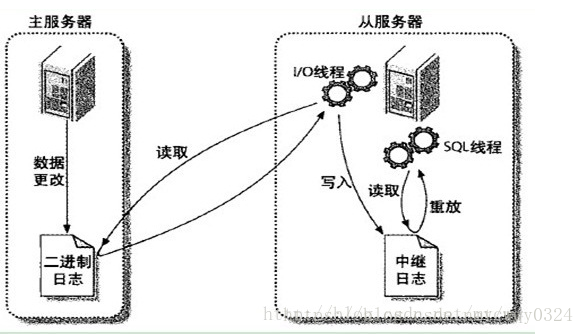
MySQL之间数据复制的基础是二进制日志文件(binary log file)。一台MySQL数据库一旦启用二进制日志后,其作为master,它的数据库中所有操作都会以“事件”的方式记录在二进制日志中,其他数据库作为slave通过一个I/O线程与主服务器保持通信,并监控master的二进制日志文件的变化,如果发现master二进制日志文件发生变化,则会把变化复制到自己的中继日志中,然后slave的一个SQL线程会把相关的“事件”执行到自己的数据库中,以此实现从数据库和主数据库的一致性,也就实现了主从复制。
2.工作过程
1)在Slave 服务器上执行start slave命令开启主从复制开关,开始进行主从复制。
2)此时,Slave服务器的IO线程会通过在master上已经授权的复制用户权限请求连接master服务器,并请求从执行binlog日志文件的指定位置(日志文件名和位置是在配置主从复制服务时执行change master命令指定的)之后开始发送binlog日志内容。
3)Master服务器接收到来自Slave服务器的IO线程的请求后,其上负责复制的IO线程会根据Slave服务器的IO线程请求的信息分批读取指定binlog日志文件指定位置之后的binlog日志信息,然后返回给Slave端的IO线程。返回的信息中除了binlog日志内容外,还有在Master服务器端记录的IO线程。返回的信息中除了binlog中的下一个指定更新位置。
4)当Slave服务器的IO线程获取到Master服务器上IO线程发送的日志内容、日志文件及位置点后,会将binlog日志内容依次写到Slave端自身的Relay Log(即中继日志)文件(Mysql-relay-bin.xxx)的最末端,并将新的binlog文件名和位置记录到master-info文件中,以便下一次读取master端新binlog日志时能告诉Master服务器从新binlog日志的指定文件及位置开始读取新的binlog日志内容。
5)Slave服务器端的SQL线程会实时检测本地Relay Log中IO线程新增的日志内容,然后及时把Relay LOG
文件中的内容解析成sql语句,并在自身Slave服务器上按解析SQL语句的位置顺序执行应用这样sql语句,并在relay-log.info中记录当前应用中继日志的文件名和位置点。
3.实现MySQL主从复制需要进行的配置:
主服务器:
    开启二进制日志
    配置唯一的server-id
    获得master二进制日志文件名及位置
    创建一个用于slave和master通信的用户账号
从服务器:
    配置唯一的server-id
    使用master分配的用户账号读取master二进制日志
    启用slave服务
4.知识点
3个线程,主库IO,从库IO和SQL及作用
master.info(从库)作用
relay-log 作用
异步复制
binlog作用(如果需要级联需要开启Binlog)
5.小结
主从复制是异步的逻辑的SQL语句级的复制;
复制时,主库有一个I/O线程,从库有两个线程,I/O和SQL线程;
实现主从复制的必要条件是主库要开启记录binlog功能;
作为复制的所有Mysql节点的server-id都不能相同;
binlog文件只记录对数据库有更改的SQL语句(来自主库内容的变更),不记录任何查询(select,show)语句。
二、mysql主从复制配置
实验环境:
Linux系统版本:Redhat 6.5版本
系统防火墙关闭:selinux=disabled
server5:172.25.8.5(Master)
server6:172.25.8.6(Slave)
实验步骤:
1.Master数据库的搭建
<1>下载并解压mysql安装包mysql-5.7.17-1.el6.x86_64.rpm-bundle.tar
[root@server5 ~]# tar xf mysql-5.7.17-1.el6.x86_64.rpm-bundle.tar<2>安装mysql的5个模块插件并开启服务
[root@server5 ~]# yum install mysql-community-client-5.7.17-1.el6.x86_64.rpm mysql-community-common-5.7.17-1.el6.x86_64.rpm  mysql-community-libs-5.7.17-1.el6.x86_64.rpm mysql-community-libs-compat-5.7.17-1.el6.x86_64.rpm mysql-community-server-5.7.17-1.el6.x86_64.rpm -y
[root@server5 ~]# /etc/init.d/mysqld start
<3>查找mysql数据库原始密码
[root@server5 ~]# grep password /var/log/mysqld.log
<4>mysql数据库安全初始化
[root@server5 ~]# mysql_secure_installation

Securing the MySQL server deployment.

Enter password for user root:

The existing password for the user account root has expired. Please set a new password.

New password:

Re-enter new password:

VALIDATE PASSWORD PLUGIN can be used to test passwords
and improve security. It checks the strength of password
and allows the users to set only those passwords which are
secure enough. Would you like to setup VALIDATE PASSWORD plugin?

Press y|Y for Yes, any other key for No:
Using existing password for root.
Change the password for root ? ((Press y|Y for Yes, any other key for No) :

 ... skipping.
By default, a MySQL installation has an anonymous user,
allowing anyone to log into MySQL without having to have
a user account created for them. This is intended only for
testing, and to make the installation go a bit smoother.
You should remove them before moving into a production
environment.

Remove anonymous users? (Press y|Y for Yes, any other key for No) : y
Success.


Normally, root should only be allowed to connect from
'localhost'. This ensures that someone cannot guess at
the root password from the network.

Disallow root login remotely? (Press y|Y for Yes, any other key for No) : y
Success.

By default, MySQL comes with a database named 'test' that
anyone can access. This is also intended only for testing,
and should be removed before moving into a production
environment.


Remove test database and access to it? (Press y|Y for Yes, any other key for No) :

 ... skipping.
Reloading the privilege tables will ensure that all changes
made so far will take effect immediately.

Reload privilege tables now? (Press y|Y for Yes, any other key for No) : y
Success.

All done!
注意:mysql数据库安全初始化过程中,首先输入原始密码,再设定新密码,新密码设定要求:字母大小写+特殊字符+数字且必须超过8位,例如:zmy_0808
<5>修改配置文件并重新开启数据库服务
[root@server5 ~]# vim /etc/my.cnf
 29 server-id=1                 #服务器标识,主从id取值不能相同
 30 log-bin=mysql-bin           #二进制日志
 [root@server5 ~]# /etc/init.d/mysqld restart
 Starting mysqld:                                           [  OK  ]
<6>登陆数据库
[root@server5 ~]# mysql -p
<7>授权
授权slave以repl身份从172.25.8.0/24网段登陆,对任何数据库的任何表进行操作,密码” zmy_0808 “
mysql> grant replication slave on *.* to repl@'172.25.8.%' identified by 'zmy_0808';
Query OK, 0 rows affected, 1 warning (0.12 sec)
授权后,master状态pos值为446

2.Slave数据库的搭建
<1>下载并解压mysql安装包mysql-5.7.17-1.el6.x86_64.rpm-bundle.tar
<2>安装mysql的5个模块插件并开启mysql服务
<3>查找mysql数据库原始密码
<4>mysql数据库安全初始化
<5>修改配置文件并重新开启数据库服务
[root@server6 ~]# vim /etc/my.cnf
 29 server-id=2             ##服务器默认id,不能与mater相同
[root@server6 ~]# /etc/init.d/mysqld restart
Starting mysqld:                                           [  OK  ]
<6>登陆数据库并与master建立认证
mysql> change master to master_host='172.25.8.5',master_user='repl',master_password='zmy_0808',master_log_file='mysql-bin.000001',master_log_pos=446;
Query OK, 0 rows affected, 2 warnings (0.73 sec)
注意: file和pos为Master中授权后的数值

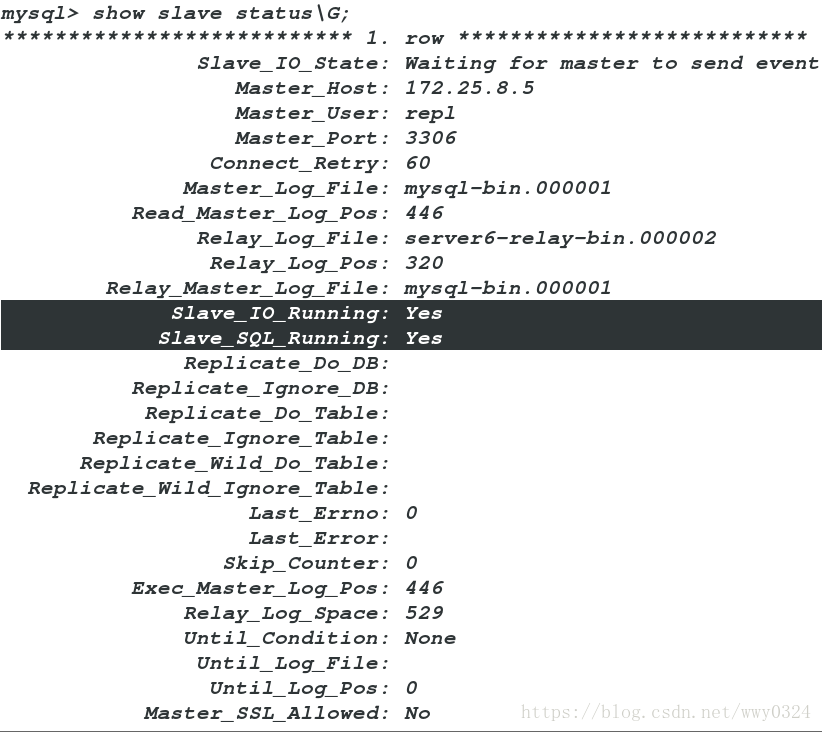
<7>开启slave,并查看slave状态
mysql> start slave;
mysql> show slave status\G;
Slave的IO线程以repl身份拷贝(多线程)Master的log-bin到自己的relay-log,Slave的sql线程(单线程)读取relay-log,并在自身Slave服务器上按解析SQL语句的位置顺序执行sql语句,完成与Master同样的操作从而达到复制。
3.测试:
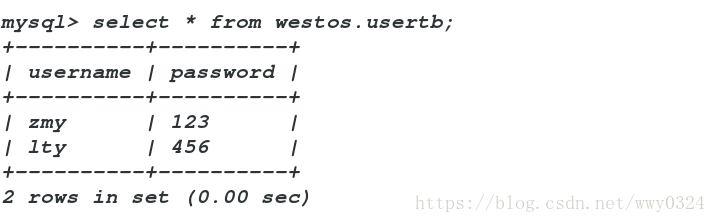
<1>Master建立westos数据库并创建usertb表格,插入表格内容
mysql> create database westos;
Query OK, 1 row affected (0.37 sec)

mysql> use westos;
Database changed
mysql> create table usertb(
    -> username varchar(20) not null,
    -> password varchar(25)not null);
Query OK, 0 rows affected (0.94 sec)

mysql> insert into usertb values('zmy',123);
Query OK, 1 row affected (0.27 sec)

mysql> insert into usertb values('lty',456);
Query OK, 1 row affected (0.19 sec)
查看Master的westos.usertb表格信息
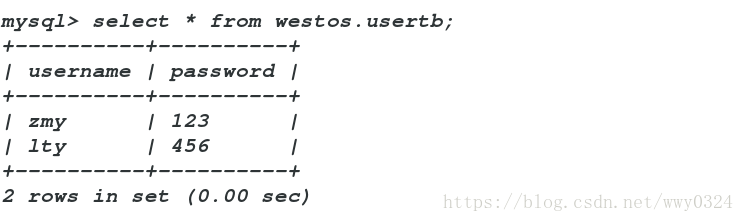
<2>Slave登陆数据库,查看westos.usertb表格内容,Slave自动同步
三、GTID主从复制
实验步骤:
1.Master
<1>修改配置文件并重新开启服务
[root@server5 ~]# vim /etc/my.cnf
 29 server-id=1
 30 log-bin=mysql-bin
 31
 32 gtid_mode=ON           ##开启gtid模块
 33 enforce-gtid-consistency=true
 [root@server5 ~]# /etc/init.d/mysqld restart
<2>进入数据库,查看file和POS

2.Slave
<1>修改配置文件并重新开启服务
[root@server6 ~]# vim /etc/my.cnf
 29 server-id=2
 31 gtid_mode=ON
 32 enforce-gtid-consistency=true

[root@server5 ~]# /etc/init.d/mysqld restart
<2>基于GTID的复制
mysql> stop slave;
Query OK, 0 rows affected (0.09 sec)

mysql> change master to master_host='172.25.8.5',master_user='repl',master_password='zmy_0808',MASTER_AUTO_POSITION = 1;
Query OK, 0 rows affected, 2 warnings (0.37 sec)
<3>开启Slave,并查看其进程状态
mysql> start slave;
mysql> show slave status\G;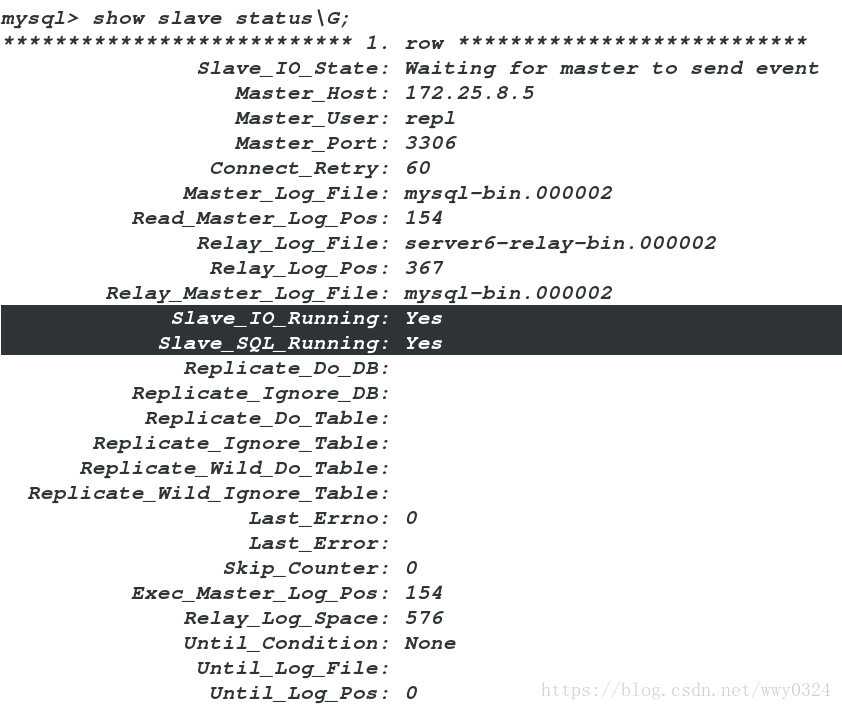
测试:Master数据库表中插入信息,Slave数据库表格内容复制
Master
mysql> insert into westos.usertb values('jcl',789);
Query OK, 1 row affected (0.15 sec)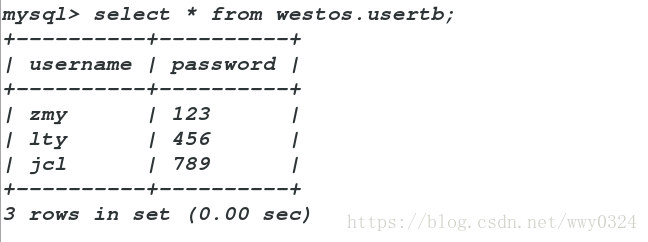
Slave

四、半同步复制
在主库
mysql> install plugin rpl_semi_sync_master soname 'semisync_master.so';
Query OK, 0 rows affected (0.11 sec)

mysql> set global rpl_semi_sync_master_enabled=1;
Query OK, 0 rows affected (0.00 sec)

mysql> show variables like 'rpl%';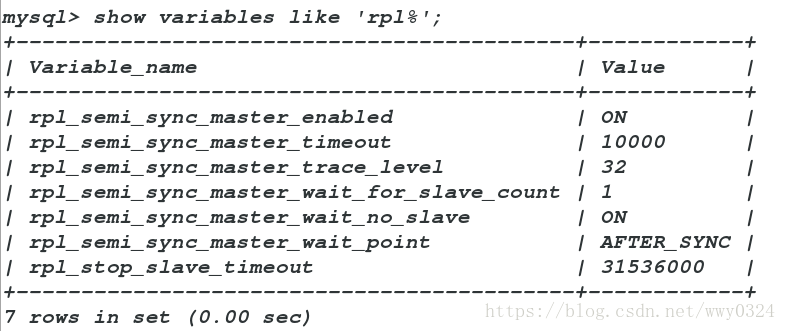
mysql> show status like 'rpl%';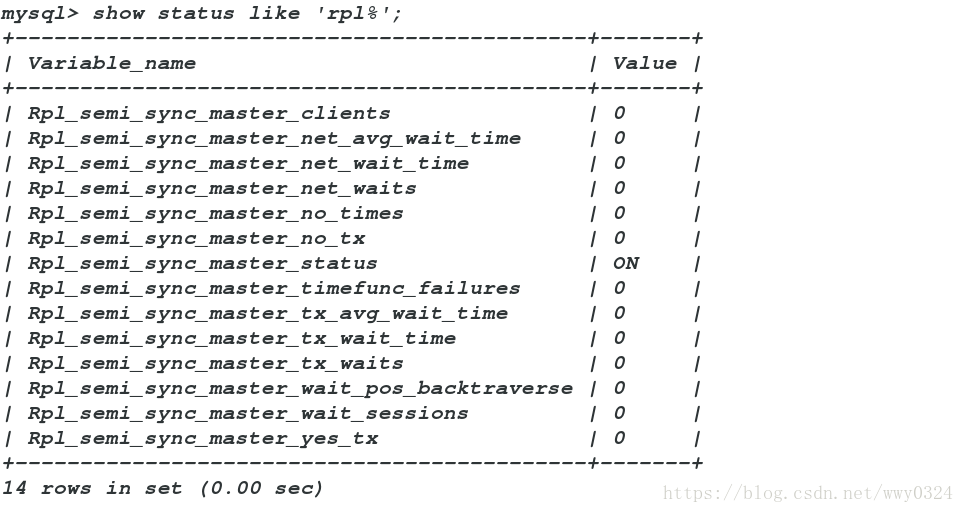
在从库
mysql> select * from mysql.gtid_executed;
mysql> install plugin rpl_semi_sync_slave soname 'semisync_slave.so';
Query OK, 0 rows affected (0.38 sec)

mysql> show variables like 'rpl%';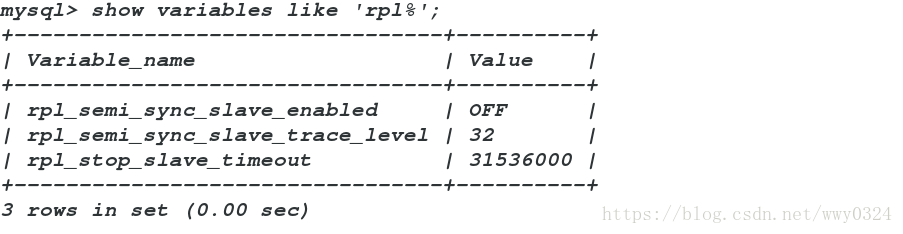
mysql> set global rpl_semi_sync_slave_enabled=1;
Query OK, 0 rows affected (0.00 sec)

mysql> show variables like 'rpl%';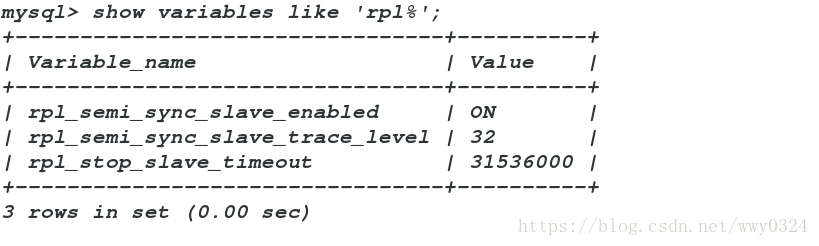
mysql> show status like 'rpl%';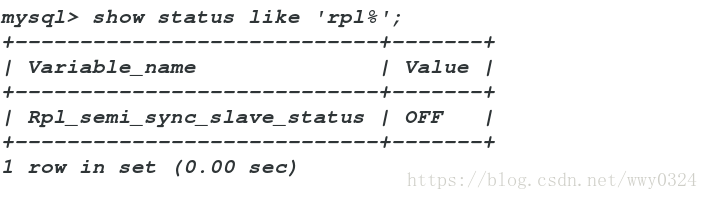
mysql> stop slave io_thread;
Query OK, 0 rows affected (0.04 sec)

mysql> start slave io_thread;
Query OK, 0 rows affected (0.00 sec)

mysql> show status like 'rpl%';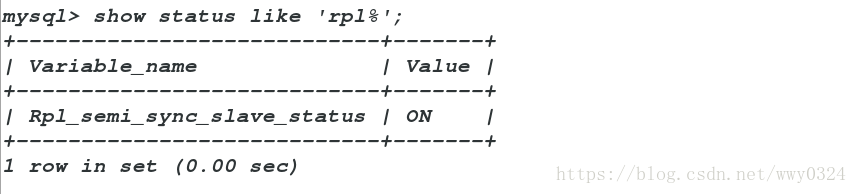
测试:
在主库
mysql> insert into westos.usertb values ('jdz','890');
Query OK, 1 row affected (0.14 sec)

mysql> show status like 'rpl%';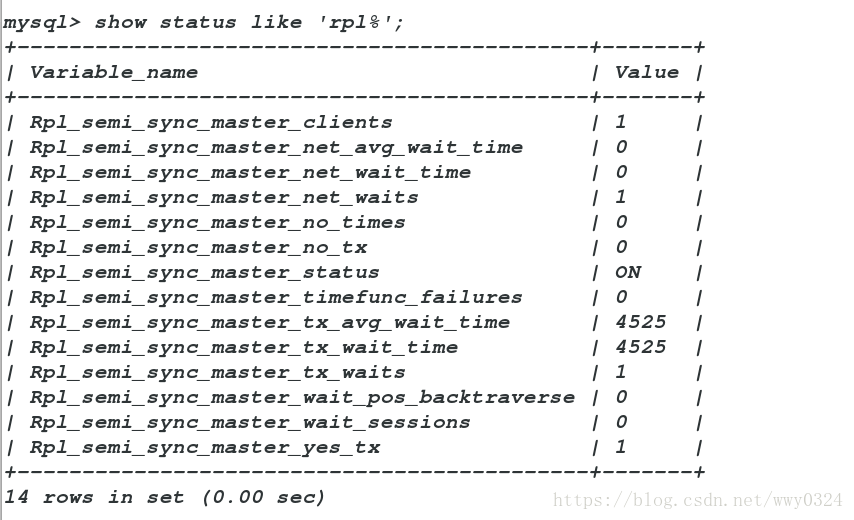
在从库:
mysql> stop slave io_thread;
Query OK, 0 rows affected (0.08 sec)
在主库:
mysql> insert into westos.usertb values ('wty','345');
Query OK, 1 row affected (10.18 sec)

mysql> show status like 'rpl%';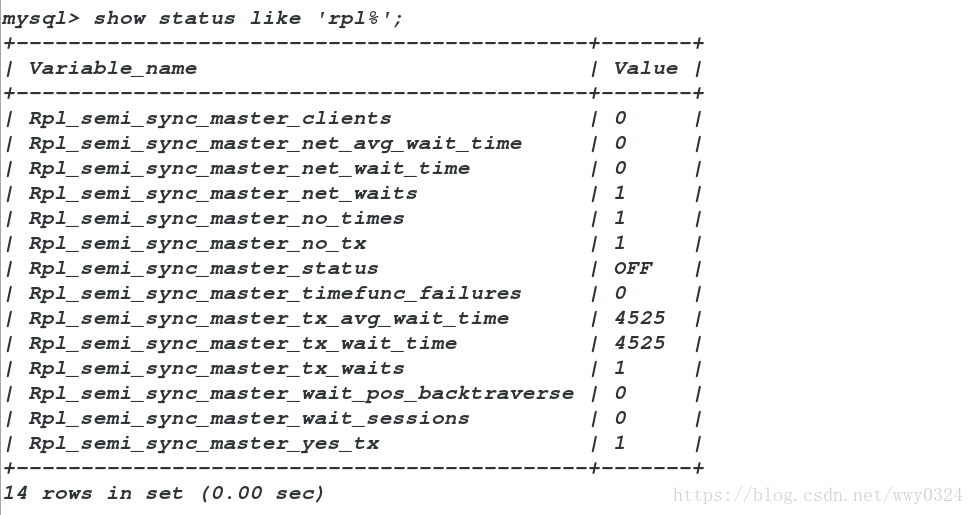


 3202
3202

 被折叠的 条评论
为什么被折叠?
被折叠的 条评论
为什么被折叠?
 到【灌水乐园】发言


