


目录
一.GCC
1.安装依赖
sudo apt install make gcc flex bison libncurses-dev libelf-dev libssl-dev2.建立文件结构

3.git克隆linux内核源码,指令中的$KERNEL换成文件保存路径
git clone --branch v6.2 git://git.kernel.org/pub/scm/linux/kernel/git/torvalds/linux.git $KERNEL如果服务器下载缓慢,可以在先开梯子在本地下,然后发给服务器:
linux局域网下文件传输-优快云博客 https://blog.youkuaiyun.com/wu2tian/article/details/141211442解压命令:
tar -xf 文件名4.进入linux文件夹生成默认的配置文件
cd linux
make defconfig
make kvm_guest.config
5.对linux文件夹中.config文件进行编辑,使所需的配置选项能够发挥作用(显示所有文件ls -a)
注意:这些指令要去文件里查找并修改,直接复制进去会报错,这些命令应该是以注释如“CONFIG_KCOV is not set”形式存在的,因此需要将该注释转换即可。部分不存在的需要手动添加,但注意不要添加在末尾,应添加在中间。
# Coverage collection.

CONFIG_KCOV=y

# Debug info for symbolization.

CONFIG_DEBUG_INFO_DWARF4=y

# Memory bug detector

CONFIG_KASAN=y

CONFIG_KASAN_INLINE=y

# Required for Debian Stretch and later

CONFIG_CONFIGFS_FS=y

CONFIG_SECURITYFS=y

# 这两行若没加,最终启动syzkaller后可能没办法连接到虚拟机

CONFIG_CMDLINE_BOOL=y

CONFIG_CMDLINE="net.ifnames=0"
6. 重新生成配置文件
make olddefconfig7.编译内核
make -j`nproc`![]()
编译内核成功后,可在~/puzzing/linux目录下可找/到vmlinux文件,在~/puzzing/linux/arch/x86/boot 目录下可找到bzImage文件
三、生成Image
1.安装debootstrap
#测试Linux内核时,只有内核没有办法运行,还需要发行版外环境的支持,所以需 要使用debootstrap来生成一个小型的Linux发行版用于测试
sudo apt install debootstrap#生成Debian Bullseyes Linux image
#回到一开始建立的IMAGE文件夹下
cd IMAGE/

wget https://raw.githubusercontent.com/google/syzkaller/master/tools/create-image.sh -O   create-image.sh

chmod +x create-image.sh

./create-image.sh
#完成后在IMAGE文件夹下会生成bullseyes.img文件
问题1: ./create-image.sh卡进度
报错:I: Keyring file not available at /usr/share/keyrings/debian-archive-keyring.gpg; switching to https mirror Index of /debian
解决:根据报错手动安装
sudo apt install debian-archive-keyring问题2:./create-image.sh进程缓慢,换源后找不到资源
解决:复制github上历史版本的create-image.sh解决,在运行./create-image.sh前先换源
我用的creat-image.sh放在网盘里了:
链接: https://pan.baidu.com/s/1qeLOTpHpjPdTwt6lc08f7Q?pwd=1234 提取码: 1234
sed -i -e 's~sudo debootstrap .*~\0 https://mirrors.tuna.tsinghua.edu.cn/debian/~' create-image.sh四、QEMU
1.安装:
sudo apt install qemu-system-x862.验证:确保kernel boots和sshd启动
输入root登录:(注意指令格式,\后要留有空格)
注意:里面的几个路径要改成自己的,如果按照我开头的文件结构建的目录可以直接copy
sudo qemu-system-x86_64 \

    -m 2G \

    -smp 2 \

    -kernel ~/fuzzing/linux/arch/x86/boot/bzImage \

    -append "console=ttyS0 root=/dev/sda earlyprintk=serial net.ifnames=0" \

    -drive file=~/fuzzing/IMAGE/bullseye.img,format=raw \

    -net user,host=10.0.2.10,hostfwd=tcp:127.0.0.1:10021-:22 \

    -net nic,model=e1000 \

    -enable-kvm \

    -nographic \

    -pidfile vm.pid \

    2>&1 | tee vm.log
3.新开一个终端,可通过以下命令连接到QEMU虚拟机
ssh -i ~/fuzzing/IMAGE/bullseye.id_rsa -p 10021 -o "StrictHostKeyChecking no" root@localhost
4.退出:
五、Syzkaller
1.Go: syzkaller是以go语言写的,在build syzkaller时需要Go 1.20+(可将go直接安装在fuzzing目录下,此时$GOROOT即为~/fuzzing/go)
wget https://dl.google.com/go/go1.21.4.linux-amd64.tar.gz

tar -xf go1.21.4.linux-amd64.tar.gz

export GOROOT=`pwd`/go

export PATH=$GOROOT/bin:$PATH
2.进入fuzzing文件夹,下载安装syzkaller
git clone https://github.com/google/syzkaller

cd syzkaller

Make报错:compile: version "go1.21.4" does not match go tool version "go1.22.4"
Makefile:47: *** syz-make failed. Stop.
解决:使用go管理工具gvm
bash<<(curl-sSLhttps://raw.githubusercontent.com/moovweb/gvm/master/binscripts/gv m-installer)

source ~/.gvm/scripts/gvm

gvm install go1.22.4

gvm use go1.22.4 
3.新建syz-manager配置文件my.cfg,文件内容如下(注意改路径,jivic是我的用户名),将该文件放置在syzkaller目录下
{

    "target": "linux/amd64",

    "http": "127.0.0.1:56741",

    "workdir": "/home/jivic/fuzzing/syzkaller/workdir",

    "kernel_obj": "/home/jivic/fuzzing/linux",

    "image": "/home/jivic/fuzzing/IMAGE/bullseye.img",

    "sshkey": "/home/jivic/fuzzing/IMAGE/bullseye.id_rsa",

    "syzkaller": "/home/jivic/fuzzing/syzkaller",

    "procs": 8,

    "type": "qemu",

    "vm": {

        "count": 4,

        "kernel": "/home/jivic/fuzzing/linux/arch/x86/boot/bzImage",

        "cpu": 2,

        "mem": 2048

    }

}
4.在syzkaller目录下新建workdir文件夹,并回在syzkaller目录下运行syzkaller manager
mkdir workdir
./bin/syz-manager -config=my.cfg
5.运行一段时间后在my.cfg指定的IP和端口查看结果,如下:
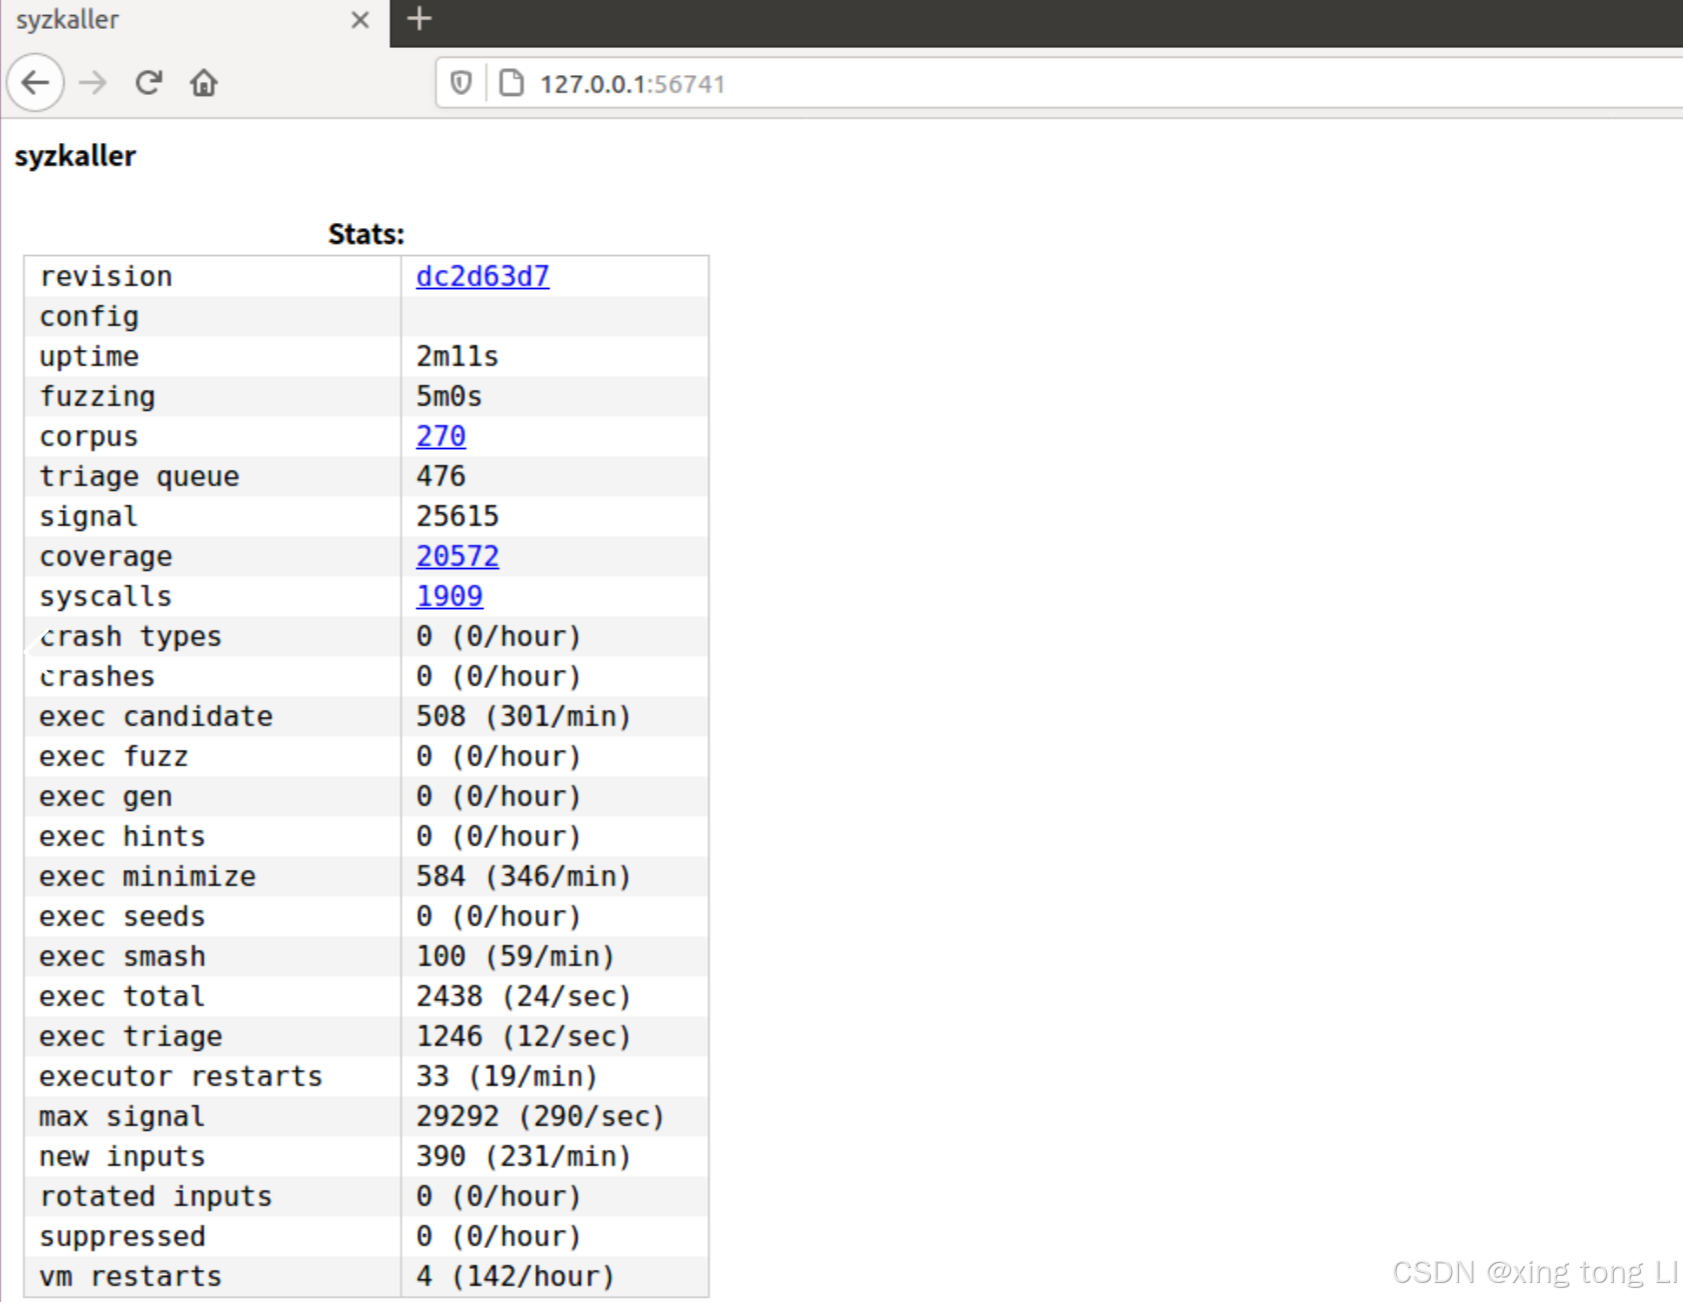
如果你使用的服务器跑的话,你可以把my.cfg中的127.0.0.1改成0.0.0.0 , 127.0.0.1是本地回环。
然后用 {ip}:{端口} 访问,在访问之前,别忘记开放服务器的端口


 523
523

 被折叠的 条评论
为什么被折叠?
被折叠的 条评论
为什么被折叠?
 到【灌水乐园】发言


