


 本文介绍MyBatis-Plus的集成与使用方法,包括快速搭建环境、常见CRUD操作及高级特性,如分页、逻辑删除等。
文章目录
MyBatis-Plus——MyBatis-Plus概述与集成
1、MyBatis-Plus概述
MyBatis-Plus 是什么
MyBatis-Plus(简称MP)是一个 MyBatis的增强工具,在 MyBatis的基础上只做增强( 提供了一些高效、有用、开箱即用的功能)不做改变,为简化开发、提高效率而生。

那么它是怎么增强的呢?其实就是它已经封装好了一些crud方法,我们不需要再写xml了,直接调用这些方法就行,就类似于JPA和 tk-mapper。
特征
- 与 MyBatis 完全兼容
- 启动时自动配置
- 用于操作数据库的开箱即用接口
- 强大而灵活的 where 条件包装器
- 多种策略生成主键
- Lambda 风格的 API
- 全能且高度可定制的代码生成器
- 自动分页操作
- SQL注入防御
- 支持活动记录
- 支持可插拔自定义接口
- 内置许多有用的扩展
代码及文档发布地址
官网:https://baomidou.com/
代码发布地址:
-
GitHub:https://github.com/baomidou/mybatis-plus
-
Gitee:https://gitee.com/baomidou/mybatis-plus
文档地址:https://baomidou.com/pages/24112f/
2、集成MyBatis-Plus
1、准备测试表
建表语句:
DROP TABLE IF EXISTS user;

CREATE TABLE user
(
    id BIGINT(20) NOT NULL COMMENT '主键ID',
    name VARCHAR(30) NULL DEFAULT NULL COMMENT '姓名',
    age INT(11) NULL DEFAULT NULL COMMENT '年龄',
    email VARCHAR(50) NULL DEFAULT NULL COMMENT '邮箱',
    PRIMARY KEY (id)
);
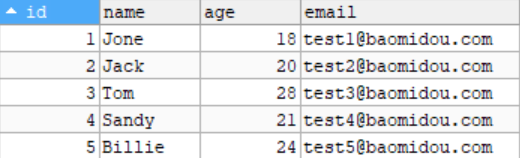
插入数据:
INSERT INTO user (id, name, age, email) VALUES
(1, 'Jone', 18, 'test1@baomidou.com'),
(2, 'Jack', 20, 'test2@baomidou.com'),
(3, 'Tom', 28, 'test3@baomidou.com'),
(4, 'Sandy', 21, 'test4@baomidou.com'),
(5, 'Billie', 24, 'test5@baomidou.com');
2、初始化一个Spring Boot项目
3、导入依赖
        <dependency>
            <groupId>org.projectlombok</groupId>
            <artifactId>lombok</artifactId>
            <optional>true</optional>
        </dependency>

        <dependency>
            <groupId>mysql</groupId>
            <artifactId>mysql-connector-java</artifactId>
        </dependency>

        <dependency>
            <groupId>com.baomidou</groupId>
            <artifactId>mybatis-plus-boot-starter</artifactId>
            <version>3.0.5</version>
        </dependency>
注意:引入 MyBatis-Plus 之后请不要再次引入 MyBatis 以及 MyBatis-Spring,以避免因版本差异导致的问题。
4、连接数据库配置文件
spring.datasource.username=root
spring.datasource.password=密码
spring.datasource.url=jdbc:mysql://localhost:3306/mybatis_plus?useSSl=false&useUnicode=true&characterEncoding=utf-8&serverTimezone=UTC
spring.datasource.driver-class-name=com.mysql.cj.jdbc.Driver
5、编写实体类
@Data
@AllArgsConstructor
@NoArgsConstructor
public class User {
    private Long id;
    private String name;
    private Integer age;
    private String email;
}
6、编写 Mapper 类
//Mapper类继承该接口后,无需编写 mapper.xml 文件,即可获得CRUD功能
//这个 Mapper 支持 id 泛型
@Mapper
public interface UserMapper extends BaseMapper<User> {
}
7、配置扫描路径
在主启动类上配置mapper的扫描路径
@MapperScan("com.haoming.mapper")
@SpringBootApplication
public class MyBatisPlusApplication {

    public static void main(String[] args) {
        SpringApplication.run(MyBatisPlusApplication.class, args);
    }

}
2.2、查询测试
单个查询及查询所有:
@SpringBootTest
class MyBatisPlusApplicationTests {

    @Autowired
    private UserMapper userMapper;

    @Test
    void contextLoads() {
        //查询id为1的用户
        System.out.println(userMapper.selectById(1));
        System.out.println();
        //查询所有的用户 selectList()方法的参数为MP内置的条件封装器Wrapper,所以不填写就是无任何条件
        List<User> userList = userMapper.selectList(null);
        userList.forEach(System.out::println);
    }

}
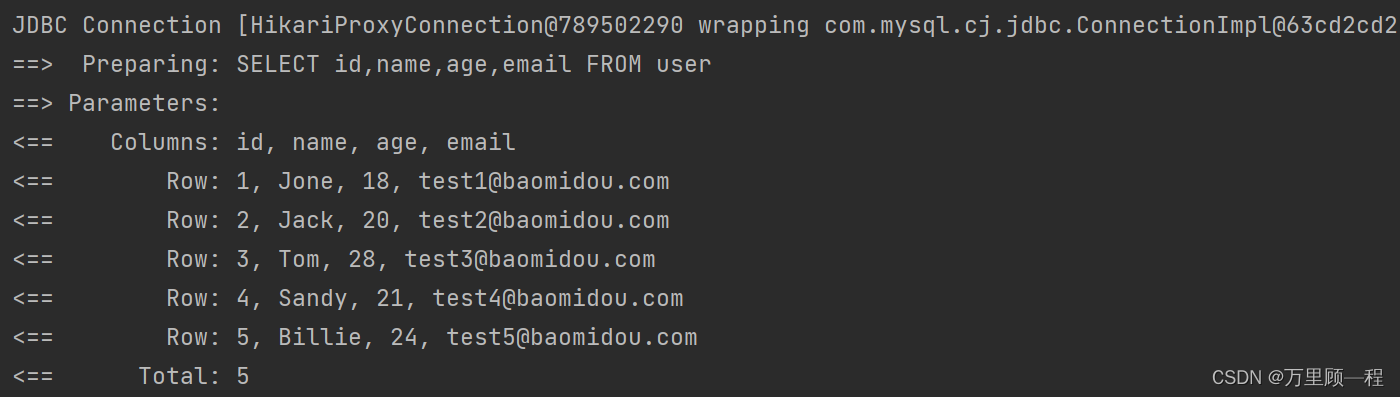
控制台输出:
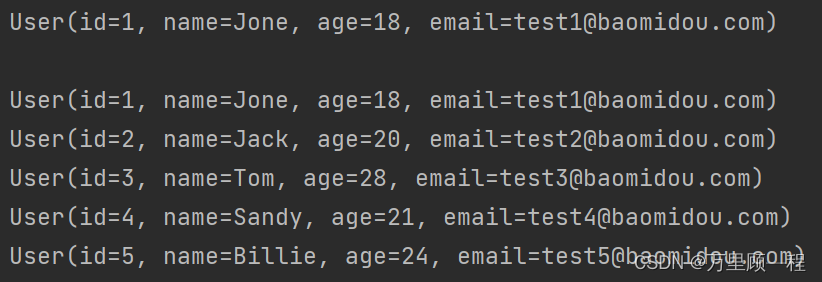
通过以上几个简单的步骤,我们就实现了 User 表的 CRUD 功能,甚至连 XML 文件都不用编写!
从以上步骤中,我们可以看到集成 MyBatis-Plus 非常的简单,只需要引入MP的依赖,编写Mapper,并配置 mapper 扫描路径即可。
但 MyBatis-Plus 的强大远不止这些功能。
查询多个用户信息:
selectBatchIds(),参数需要一个list集合
@Test
void test2(){
    List<User> userList = userMapper.selectBatchIds(Arrays.asList(11, 12));
    userList.forEach(System.out::println);
}

条件查询:selectByMap,参数需要一个map集合,更复杂的查询条件会使用Wrapper条件查询器封装。
@Test
void test3(){
    HashMap<String, Object> map = new HashMap<>();
    map.put("name","shenming");
    map.put("age","10");
    List<User> users = userMapper.selectByMap(map);
    users.forEach(System.out::println);
}
**分页查询:**MP内置了分页插件 PaginationInnerInterceptor
1、配置文件里面配置分页插件
@Bean
public PaginationInterceptor paginationInnerInterceptor(){
    return new PaginationInterceptor();
}
2、测试分页插件
@Test
void testPage(){
    //参数:当前页数,页面大小
    Page<User> userPage = new Page<>(1,5);
    userMapper.selectPage(userPage, null);
    userPage.getRecords().forEach(System.out::println);

    //page对象的其他方法:
    //userPagegetTotal() 获得总数据条数
    //userPage.getCurrent() 获得当前页数
    //userPage.getSize() 当前页显示多少条数据
}
查看控制台的日志输出:
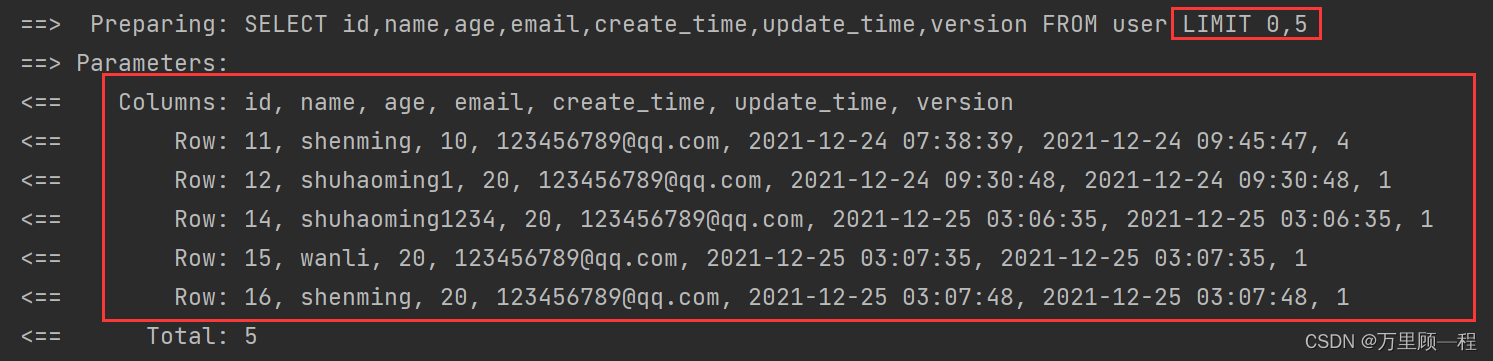
数据分页成功,本质上还是使用的limit分页实现。
2.3、插入测试和雪花算法
    @Test
    void insertTest(){
        User user = new User();
        user.setAge(3);
        user.setId(10L);//如果不指定id,MP会自动帮我们生成id
        user.setName("haoming");
        user.setEmail("123456@qq.com");
        int insert = userMapper.insert(user);
        System.out.println(insert);//受影响的行数
    }
数据插入成功

不指定id插入数据:
    @Test
    void insertTest(){
        User user = new User();
        user.setAge(4);
        user.setName("shuhaoming");
        user.setEmail("123456789@qq.com");
        int insert = userMapper.insert(user);
        System.out.println(insert);
    }
}

这里使用的主键生成策略是:雪花算法,还有其他的主键生成策略,比如数据库自增、UUID、UUID的变种 UUID to Int64、Redis生成ID、zookeeper生成唯一ID。
雪花算法是Twitter开源的分布式ID生成算法,结果是一个long型的ID。其核心思想是:使用41bit作为毫秒数,10bit作为机器的ID(5个bit是数据中心,5个bit的机器ID),12bit作为毫秒内的流水号(意味着每个节点在每毫秒可以产生 4096 个 ID),最后还有一个符号位,永远是0。雪花算法支持的TPS可以达到419万左右(2^22*1000)。
2.4、修改测试
@Test
void update(){
    User user = new User();
    user.setId(10L);
    user.setName("shuhaoming");
    //根据id修改用户,但是参数是一个对象
    userMapper.updateById(user);
}
2.5、逻辑删除和物理删除
基本删除
@Test
void deleteTest(){
    //根据id批量删除
    userMapper.deleteBatchIds(Arrays.asList(12,11,14));

    //根据条件删除
    Map<String,Object> map = new HashMap<>();
    map.put("name","wanli");
    userMapper.deleteByMap(map);

    //根据id删除
    userMapper.deleteById(11);
}
逻辑删除和物理删除
物理删除:物理删除就是真正的从数据库中做删除操作了。对应的SQL语句:delete from 表名 where 条件;执行该语句,即为将数据库中该信息进行彻底删除,无法恢复。
逻辑删除:逻辑删除的本质是修改操作,所谓的逻辑删除其实并不是真正的删除,而是在表中将对应的是否删除标识(is_delete)或者说是状态字段(status)做修改操作。比如0是未删除,1是删除。在逻辑上数据是被删除的,但数据本身依然存在库中。对应的SQL语句:update 表名 set is_delete = 1 where id = 1;语句表示,在该表中将id为1的信息进行逻辑删除,那么客户端进行查询id为1的信息,服务器就不会提供信息。倘若想继续为客户端提供该信息,可将 is_delete 更改为 0 。
回收站的原理,其实就是利用了逻辑删除,对于删除文件进入回收站的本质只是在操作系统的帮助下对文件加上了 某个标记,资源管理器中对含有这种标记的文件不会显示。当从回收站恢复的时候只是移除了加上的标记而已,而清空回收站就是进行了物理删除。而商城网站,如淘宝,京东…会大量使用逻辑删除进行操作数据库。
测试逻辑删除
1、user 表中新增 deleted 字段

2、实体类中维护新添加的字段
@TableLogic
private Integer deleted;
3、配置逻辑删除
配置类:
@Bean
public ISqlInjector sqlInjector(){
    return new LogicSqlInjector();
}
配置文件:
# 逻辑已删除值(默认为 1)
mybatis-plus.global-config.db-config.logic-delete-value=1
# 逻辑未删除值(默认为 0)
mybatis-plus.global-config.db-config.logic-not-delete-value=0
4、测试
删除user表中id为17的用户:
userMapper.deleteById(17L);
查看控制台日志输出:

虽然我们执行的是删除语句,但执行的却是修改操作
查看user表:

id为17的用户数据还在,但是删除标识deleted变为1了,表示被逻辑删除了。
再查询id为17的用户,看是否能查到数据:
System.out.println(userMapper.selectById(17L));

结果是查不到,因为查询语句自动帮我们拼接了 deleted=0这个条件,过滤了所有deleted=1的用户记录。
3、配置日志输出
配置文件添加:
mybatis-plus.configuration.log-impl=org.apache.ibatis.logging.stdout.StdOutImpl
再启动上面的测试代码,查看控制台的日志输出:


 2124
2124

 被折叠的 条评论
为什么被折叠?
被折叠的 条评论
为什么被折叠?
 到【灌水乐园】发言


