 ESP8266 mDNS 示例


 本文介绍了一个ESP8266 mDNS响应器示例项目,通过该示例可以实现通过mDNS协议访问ESP8266设备。文章详细展示了如何设置ESP8266板载WiFi连接,启动mDNS响应器以及通过HTTP服务器处理客户端请求。
例子:
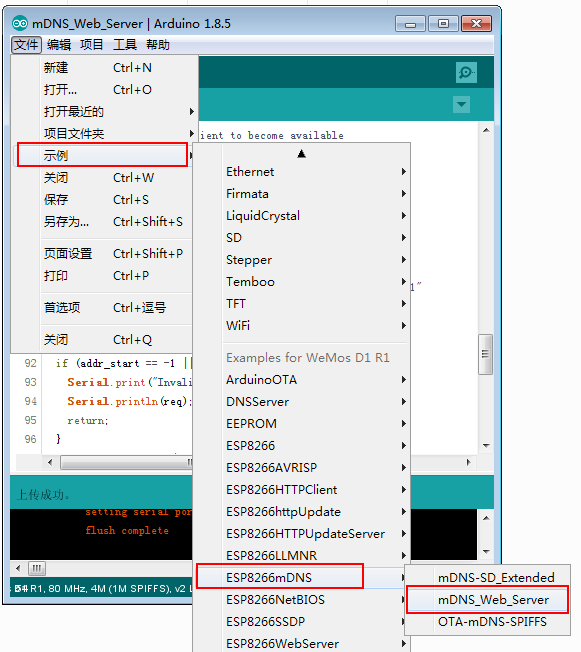
代码如下:
/*
ESP8266 mDNS responder sample
This is an example of an HTTP server that is accessible
via http://esp8266.local URL thanks to mDNS responder.
Instructions:
- Update WiFi SSID and password as necessary.
- Flash the sketch to the ESP8266 board
- Install host software:
- For Linux, install Avahi (http://avahi.org/).
- For Windows, install Bonjour (http://www.apple.com/support/bonjour/).
- For Mac OSX and iOS support is built in through Bonjour already.
- Point your browser to http://esp8266.local, you should see a response.
*/
#include <ESP8266WiFi.h>
#include <ESP8266mDNS.h>
#include <WiFiClient.h>
const char* ssid = "HelloWifi";
const char* password = "123ab";
// TCP server at port 80 will respond to HTTP requests
WiFiServer server(80);
void setup(void)
{
Serial.begin(115200);
// Connect to WiFi network
WiFi.mode(WIFI_STA);
WiFi.begin(ssid, password);
Serial.println("");
// Wait for connection
while (WiFi.status() != WL_CONNECTED) {
delay(500);
Serial.print(".");
}
Serial.println("");
Serial.print("Connected to ");
Serial.println(ssid);
Serial.print("IP address: ");
Serial.println(WiFi.localIP());
// Set up mDNS responder:
// - first argument is the domain name, in this example
// the fully-qualified domain name is "esp8266.local"
// - second argument is the IP address to advertise
// we send our IP address on the WiFi network
if (!MDNS.begin("esp8266")) {
Serial.println("Error setting up MDNS responder!");
while(1) {
delay(1000);
}
}
Serial.println("mDNS responder started");
// Start TCP (HTTP) server
server.begin();
Serial.println("TCP server started");
// Add service to MDNS-SD
MDNS.addService("http", "tcp", 80);
}
void loop(void)
{
// Check if a client has connected
WiFiClient client = server.available();
if (!client) {
return;
}
Serial.println("");
Serial.println("New client");
// Wait for data from client to become available
while(client.connected() && !client.available()){
delay(1);
}
// Read the first line of HTTP request
String req = client.readStringUntil('\r');
// First line of HTTP request looks like "GET /path HTTP/1.1"
// Retrieve the "/path" part by finding the spaces
int addr_start = req.indexOf(' ');
int addr_end = req.indexOf(' ', addr_start + 1);
if (addr_start == -1 || addr_end == -1) {
Serial.print("Invalid request: ");
Serial.println(req);
return;
}
req = req.substring(addr_start + 1, addr_end);
Serial.print("Request: ");
Serial.println(req);
client.flush();
String s;
if (req == "/")
{
IPAddress ip = WiFi.localIP();
String ipStr = String(ip[0]) + '.' + String(ip[1]) + '.' + String(ip[2]) + '.' + String(ip[3]);
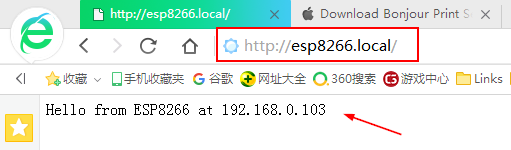
s = "HTTP/1.1 200 OK\r\nContent-Type: text/html\r\n\r\n<!DOCTYPE HTML>\r\n<html>Hello from ESP8266 at ";
s += ipStr;
s += "</html>\r\n\r\n";
Serial.println("Sending 200");
}
else
{
s = "HTTP/1.1 404 Not Found\r\n\r\n";
Serial.println("Sending 404");
}
client.print(s);
Serial.println("Done with client");
}log:
SDK:2.2.1(cfd48f3)/Core:2.4.1/lwIP:2.0.3(STABLE-2_0_3_RELEASE/glue:arduino-2.4.1)
scandone

scandone
state: 0 -> 2 (b0)
state: 2 -> 3 (0)
state: 3 -> 5 (10)
add 0
aid 3

connected with HelloWifi, channel 1
dhcp client start...
cnt
.....ip:192.168.0.103,mask:255.255.255.0,gw:192.168.0.1
.
Connected to HelloWifi
IP address: 192.168.0.103
mDNS responder started
TCP server started
pm open,type:2 0

New client
Request: /favicon.ico
Sending 404
Done with client

New client
Request: /
Sending 200
Done with client

New client
Request: /favicon.ico
Sending 404
Done with client

New client
Invalid request:
win7下面 需要提前安装
BonjourPSSetup.exe
Bonjour Print Services (Windows)
下载地址:
https://support.apple.com/kb/DL999?locale=zh_CN
Bonjour Print Services(Windows 版)可让您使用 Bonjour 打印机向导在 Windows 电脑上找到并配置启用 Bonjour 的打印机。
请使用 Windows Update 确保您的电脑上安装有最新版本的 Service Pack。
对打印机的要求
Bonjour Print Services 适用于:
Wi-Fi 或以太网上的网络打印机
通过 Mac 或 AirPort 基站共享的 USB 打印机
对防火墙的要求
Bonjour 联网协议通过 UDP 端口 5353 收发网络数据包。Bonjour 安装器会在受支持的系统上安装时相应配置 Windows 防火墙,但是如果您启用了单独的“个人防火墙”,则需要确保 UDP 端口 5353 已打开,以便 Bonjour 能正常工作。
更新内容
此安装包会在“\Program Files\Bonjour Print Services”中安装 Bonjour 打印机向导,并在桌面上创建快捷方式。
运行效果:


 2万+
2万+

 被折叠的 条评论
为什么被折叠?
被折叠的 条评论
为什么被折叠?
 到【灌水乐园】发言


