


maven-surefire-plugin
就是在maven的生命周期的测试阶段,通过插件来执行JUnit或者TestNG的测试用例
| msg | link | |
|---|---|---|
| maven maven-jar-plugin maven-assembly-plugin的区别 | link | |
| maven maven-antrun-plugin 的作用 | link | |
| link | ||
| link | ||
| link | ||
| link | ||
| link | ||
| link | ||
| link | ||
| link | ||
| link | ||
| link |
nuxus 上传
## 打包排除resources里的东西

```sql
 <resources>
            <resource>
                <directory>${project.basedir}/src/main/resources</directory>
                <filtering>true</filtering>
                <excludes>
                    <exclude>**</exclude>
                </excludes>
            </resource>
        </resources>
总结
- 1setting中的server中的id必须和pom中distributionManagement的id匹配,才能deploy成功
- 2 mirror本质是对你配置的repository的拦截器;具体看下面的mirror图
- 3当自己使用的时候,建议用阿里的mirror,公司使用,还是陪着repository好一点;
server是上传你的jar包用的(deplment)、mirror、 repositories是下载jar包用的;
distributionManagement
在 Maven 项目中,distributionManagement 标签用于配置项目发布的相关信息,其中包括两个重要的子标签:snapshotRepository 和 repository。它们分别用于定义快照版本和正式版本的发布位置。
snapshotRepository
snapshotRepository 子标签用于配置项目快照版本(SNAPSHOT)的发布位置。快照版本是指那些在开发过程中不断变化的版本,通常用于尚未正式发布的开发版本。Maven 允许这些快照版本频繁发布和更新。
如果配置了snapshotRepository又配置了repository,那么进行发布操作,maven会两个仓库都发布吗
在 Maven 中,当你配置了 snapshotRepository 和 repository,并进行发布操作时,Maven 根据版本号的类型(SNAPSHOT 或非 SNAPSHOT)决定发布到哪个仓库。
通常在开发过程中会频繁发布 SNAPSHOT 版本到 snapshotRepository,而在准备发布正式版本时会先通过 mvn release:prepare 和 mvn release:perform 完成版本发布,这将确保版本号从 SNAPSHOT 转为正式版本,并发布到 repository。
行为总结
jie dian config
- pom
<distributionManagement>
            <snapshotRepository>
                <id>jiedian-snapshot</id>
                <name>jiedian-snapshot</name>
                <url>https://maven.int.jiediankeji.com/content/repositories/snapshots/</url>
            </snapshotRepository>
    </distributionManagement>
- setting
<servers>
        <server>
            <id>jiedian-snapshot</id>
            <username>deployment</username>
            <password>4cde205bf83f333a7765bd38368e4bbd</password>
        </server>
    </servers>
- profile
<profile>
            <id>default</id>
            <activation>
                <activeByDefault>true</activeByDefault>
                <jdk>11</jdk>
            </activation>
            <repositories>
                <repository>
                    <id>jiedian-releases</id>
                    <name>jiedian-releases</name>
                    <url>https://maven.int.jiediankeji.com/content/repositories/releases/</url>
                    <releases>
                        <enabled>true</enabled>
                    </releases>
                    <snapshots>
                        <enabled>false</enabled>
                    </snapshots>
                    <layout>default</layout>
                </repository>
                <repository>
                    <id>jiedian-snapshot</id>
                    <name>jiedian-snapshot</name>
                    <url>https://maven.int.jiediankeji.com/content/repositories/snapshots/</url>
                    <releases>
                        <enabled>false</enabled>
                    </releases>
                    <snapshots>
                        <enabled>true</enabled>
                    </snapshots>
                    <layout>default</layout>
                </repository>
            </repositories>
        </profile>
  </profiles>
setting
重要参考
link
setting of profile
profile元素由activation、repositories、pluginRepositories和properties四个元素组成。当一个profile在settings.xml中是处于活动状态并且在pom.xml中定义了一个相同id的profile时,settings.xml中的profile会覆盖pom.xml中的profile
<profiles>
        <!--根据环境参数来调整的构件的配置-->
        <profile>
            <id>jdk-11</id>
            <!--当所有的约束条件都满足的时候就会激活这个profile。-->
            <activation>
                <!--当其值为true的时候表示如果没有其他的profile处于激活状态的时候,该profile将自动被激活。-->
                <activeByDefault>false</activeByDefault>
                <!--当匹配的jdk被检测到,profile被激活。例如,1.4激活JDK1.4,1.4.0_2,而!1.4激活所有版本不是以1.4开头的JDK。
 这里的版本还可以用一个范围来表示,如
<jdk>[1.4,1.7)</jdk>表示1.4、1.5和1.6满足;
<jdk>[1.4,1.7]</jdk>表示1.4、1.5、1.6和1.7满足;-->
                <jdk>1.5</jdk>
                <!--表示当操作系统满足条件的时候激活。-->
                <os>
                    <!--激活profile的操作系统的名字 -->
                    <name>Windows XP</name>
                    <!--激活profile的操作系统所属家族(如 'windows')  -->
                    <family>Windows</family>
                    <!--激活profile的操作系统体系结构  -->
                    <arch>x86</arch>
                    <!--激活profile的操作系统版本-->
                    <version>5.1.2600</version>
                </os>
                <!--property是键值对的形式,表示当Maven检测到了这样一个键值对的时候就激活该profile。如果值字段是空的,那么存在属性名称字段就会激活profile,否则按区分大小写方式匹配属性值字段-->
                <property>
                    <!--这个时候如果要激活该profile的话,可以在调用Maven指令的时候加上参数mavenVersion并指定其值为>2.0.3,如:mvn compile –DmavenVersion=>2.0.3-->
                    <name>mavenVersion</name>
                    <!--激活profile的属性的值 -->
                    <value>2.0.3</value>
                </property>
                <!--表示当文件存在或不存在的时候激活,exists表示存在,missing表示不存在。如下面的例子表示当文件hello/world不存在的时候激活该profile。-->
                <file>
                    <!--如果指定的文件存在,则激活profile。 -->
                    <exists>${basedir}/file2.properties</exists>
                    <!--如果指定的文件不存在,则激活profile。-->
                    <missing>${basedir}/file1.properties</missing>
                </file>
            </activation>
            <!--用于定义远程仓库的,当该profile是激活状态的时候,这里面定义的远程仓库将作为当前pom的远程仓库。 -->
            <repositories>
                <repository>
                    <id>jdk14</id>
                    <name>Repository for JDK 1.4 builds</name>
                    <url>http://www.myhost.com/maven/jdk14</url>
                    <layout>default</layout>
                    <snapshotPolicy>always</snapshotPolicy>
                </repository>
            </repositories>
        </profile>
        <profile>
            <id>env-dev</id>
            <activation>
                <property>
                    <name>target-env</name>
                    <value>dev</value>
                </property>
            </activation>
            <properties>
                <tomcatPath>/path/to/tomcat/instance</tomcatPath>
            </properties>
        </profile>
        <profile>
            <id>nexusProfile</id>
            <!--远程仓库列表,它是Maven用来填充构建系统本地仓库所使用的一组远程项目。 -->
            <repositories>
                <!--包含需要连接到远程仓库的信息 -->
                <repository>
                    <!--远程仓库唯一标识-->
                    <id>nexusProfile</id>
                    <!--远程仓库名称 -->
                    <name>nexus repository</name>
                    <!--用于定位和排序构件的仓库布局类型-可以是default(默认)或者legacy(遗留)。Maven 2为其仓库提供了一个默认的布局;然而,Maven 1.x有一种不同的布局。我们可以使用该元素指定布局是default(默认)还是legacy(遗留)。 -->
                    <layout>default</layout>
                    <!--远程仓库URL,按protocol://hostname/path形式
		  -->
                    <url>http://196.160.1.211:8081/nexus/content/groups/public/</url>
                    <!--如何处理远程仓库里发布版本的下载-->
                    <releases>
                        <!--true或者false表示该仓库是否为下载某种类型构件(发布版,快照版)开启。  -->
                        <enabled>true</enabled>
                        <!--该元素指定更新发生的频率。Maven会比较本地POM和远程POM的时间戳。这里的选项是:always(一直),daily(默认,每日),interval:X(这里X是以分钟为单位的时间间隔),或者never(从不)。 -->
                        <updatePolicy>always</updatePolicy>
                        <!--当Maven验证构件校验文件失败时该怎么做-ignore(忽略),fail(失败),或者warn(警告)。-->
                        <checksumPolicy>warn</checksumPolicy>
                    </releases>
                    <!--如何处理远程仓库里快照版本的下载。有了releases和snapshots这两组配置,POM就可以在每个单独的仓库中,为每种类型的构件采取不同的策略。例如,可能有人会决定只为开发目的开启对快照版本下载的支持。参见repositories/repository/releases元素-->
                    <snapshots>
                        <enabled>true</enabled>
                    </snapshots>
                </repository>
            </repositories>
        </profile>
        <profile>
            <id>centralProfile</id>
            <repositories>
                <repository>
                    <id>central</id>
                    <name>Central Repository</name>
                    <!-- 虚拟的URL形式,指向镜像的URL,因为所有的镜像都是用的是nexus,这里的central实际上指向的是http://repos.d.xxx.com/nexus/content/groups/public -->
                    <url>https://repo.maven.apache.org/maven2</url>
                    <layout>default</layout>
                    <snapshots>
                        <enabled>true</enabled>
                    </snapshots>
                </repository>
            </repositories>
        </profile>
    </profiles>
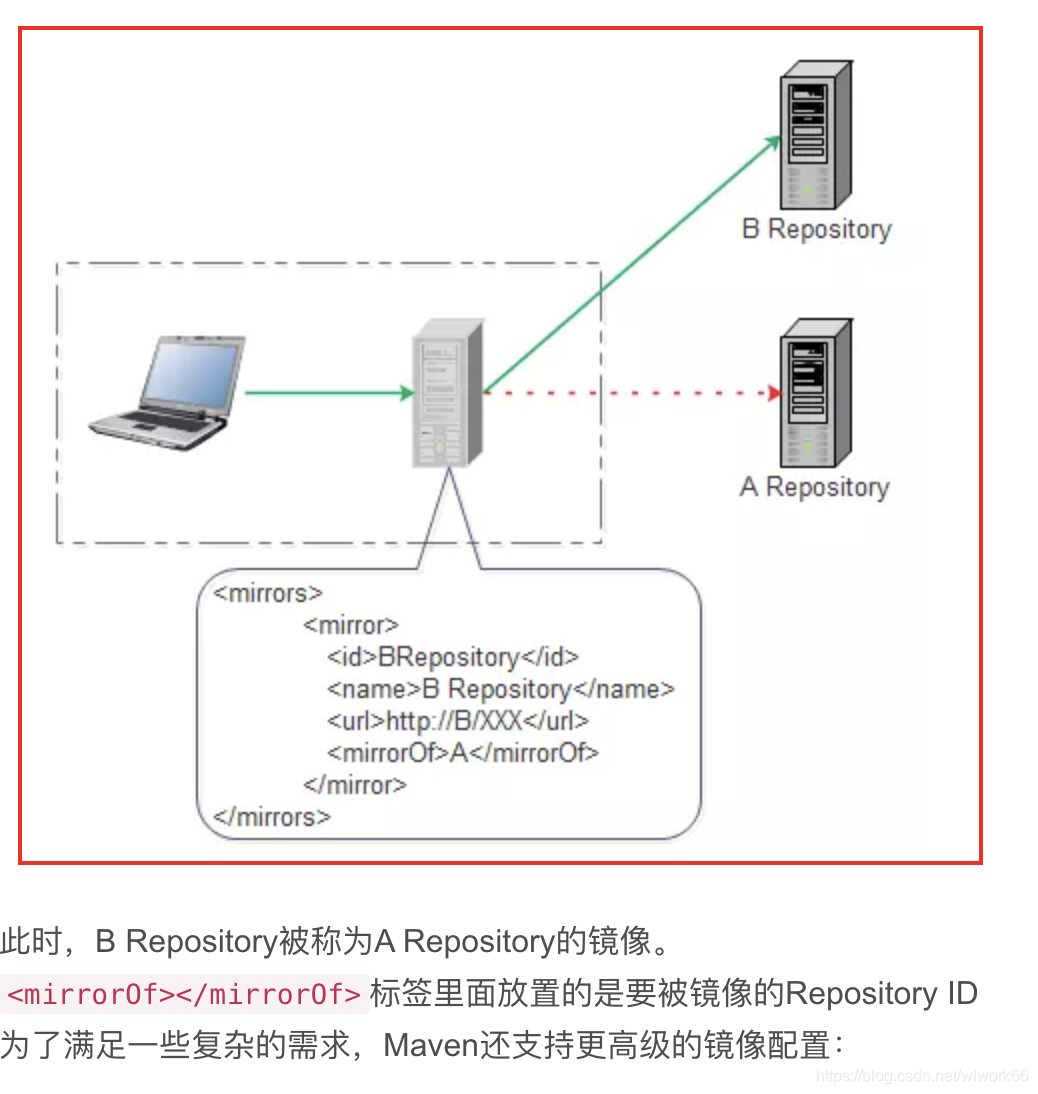
setting of mirror
用于定义一系列的远程仓库的镜像。我们可以在pom中定义一个下载工件的时候所使用的远程仓库。但是有时候这个远程仓库会比较忙,所以这个时候人们就想着给它创建镜像以缓解远程仓库的压力,也就是说会把对远程仓库的请求转换到对其镜像地址的请求。每个远程仓库都会有一个id,这样我们就可以创建自己的mirror来关联到该仓库,那么以后需要从远程仓库下载工件的时候Maven就可以从我们定义好的mirror站点来下载,这可以很好的缓解我们远程仓库的压力。在我们定义的mirror中每个远程仓库都只能有一个mirror与它关联,也就是说你不能同时配置多个mirror的mirrorOf指向同一个repositoryId
    <mirrors>
        <mirror>
            <!--该镜像的唯一标识符。id用来区分不同的mirror元素。 -->
            <id>mirrorId</id>
            <!-- 用来表示该mirror是关联的哪一个仓库,其值为其关联仓库的id。当要同时关联多个仓库时,这多个仓库之间可以用逗号隔开;当要关联所有的仓库时,可以使用“*”表示;当要关联除某一个仓库以外的其他所有仓库时,可以表示为“*,!repositoryId”;当要关联不是localhost或用file请求的仓库时,可以表示为“external:*”。-->
            <mirrorOf>repositoryId</mirrorOf>
            <!--镜像名称 -->
            <name>Human Readable Name for this Mirror.</name>
            <!--该镜像的URL。构建系统会优先考虑使用该URL,而非使用默认的服务器URL。 -->
            <url>http://196.160.1.211:8081/nexus/content/groups/public/</url>
        </mirror>
    </mirrors>
mirror相当于一个拦截器,它会拦截maven对remote repository的相关请求,把请求里的remote repository地址,重定向到mirror里配置的地址。
setting of sever
<!--表示当需要连接到一个私有服务器的时候需要的认证信息 。-->
    <servers>
        <!--服务器元素包含配置服务器时需要的信息
  发布的服务器,发布的位置在POM中配置,以ID为关联,有很多公用的信息需要配置在POM文件里,最佳实践是定义一个公司级别的root pom -
	-->
        <server>
            <!--这是server的id(注意不是用户登陆的id),该id与distributionManagement中repository元素的id相匹配。-->
            <id>frame-releases</id>
            <!--鉴权用户名。鉴权用户名和鉴权密码表示服务器认证所需要的登录名和密码。 -->
            <username>admin</username>
            <password>admin123</password>
        </server>
        <server>
            <id>siteServer</id>
            <!--鉴权时使用的私钥位置。和前两个元素类似,私钥位置和私钥密码指定了一个私钥的路径(默认是${user.home}/.ssh/id_dsa)以及如果需要的话,一个密语。将来passphrase和password元素可能会被提取到外部,但目前它们必须在settings.xml文件以纯文本的形式声明。 -->
            <privateKey>/path/to/private/key</privateKey>
            <!--鉴权时使用的私钥密码。-->
            <passphrase>optional; leave empty if not used.</passphrase>
            <!--文件被创建时的权限。如果在部署的时候会创建一个仓库文件或者目录,这时候就可以使用权限(permission)。这两个元素合法的值是一个三位数字,其对应了unix文件系统的权限,如664,或者775。 -->
            <filePermissions>664</filePermissions>
            <!--目录被创建时的权限。 -->
            <directoryPermissions>775</directoryPermissions>
        </server>
    </servers>
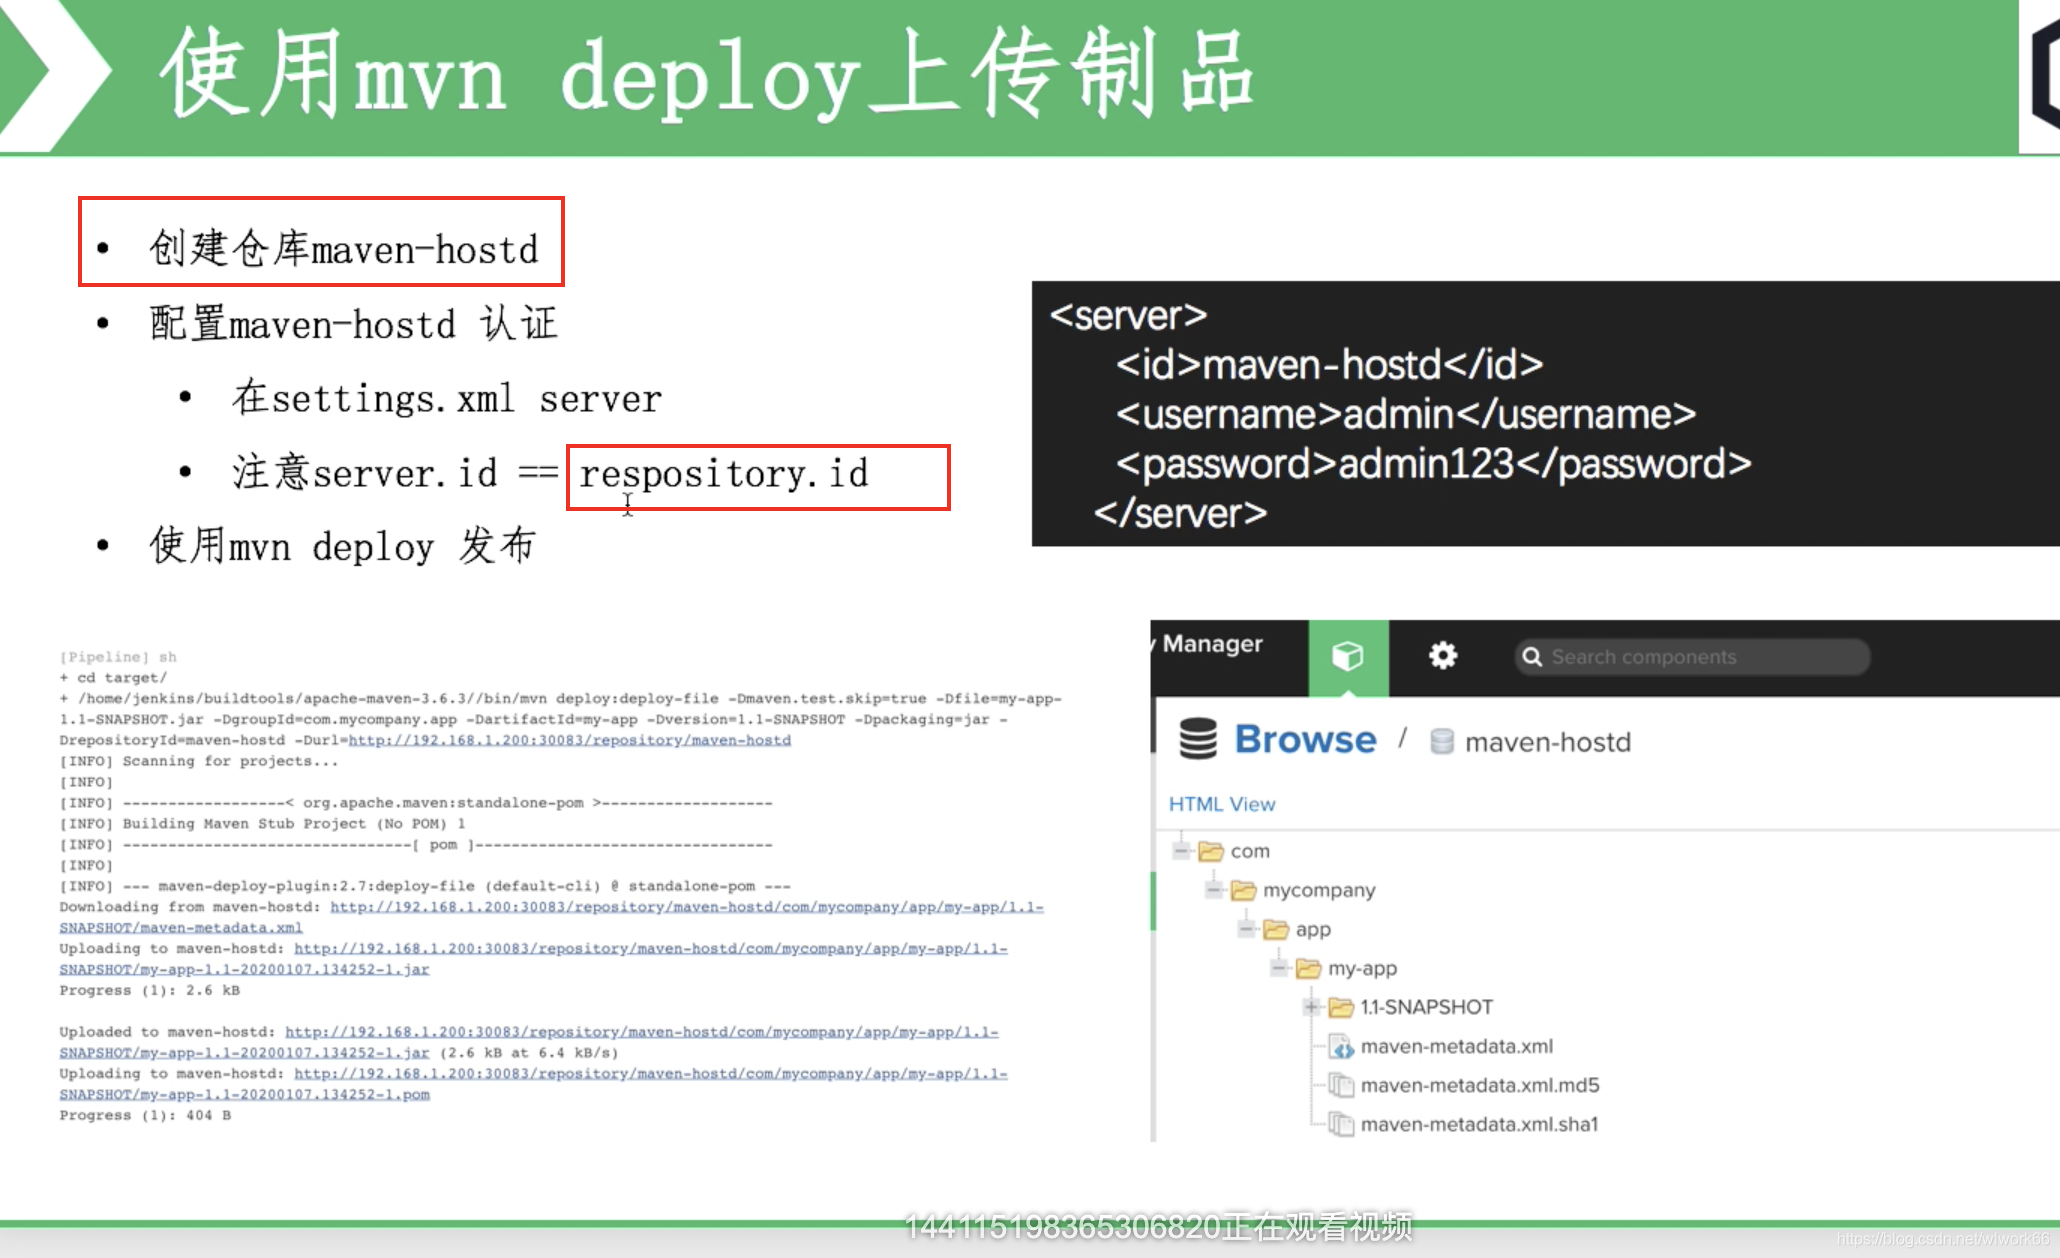
your sever id & repository id
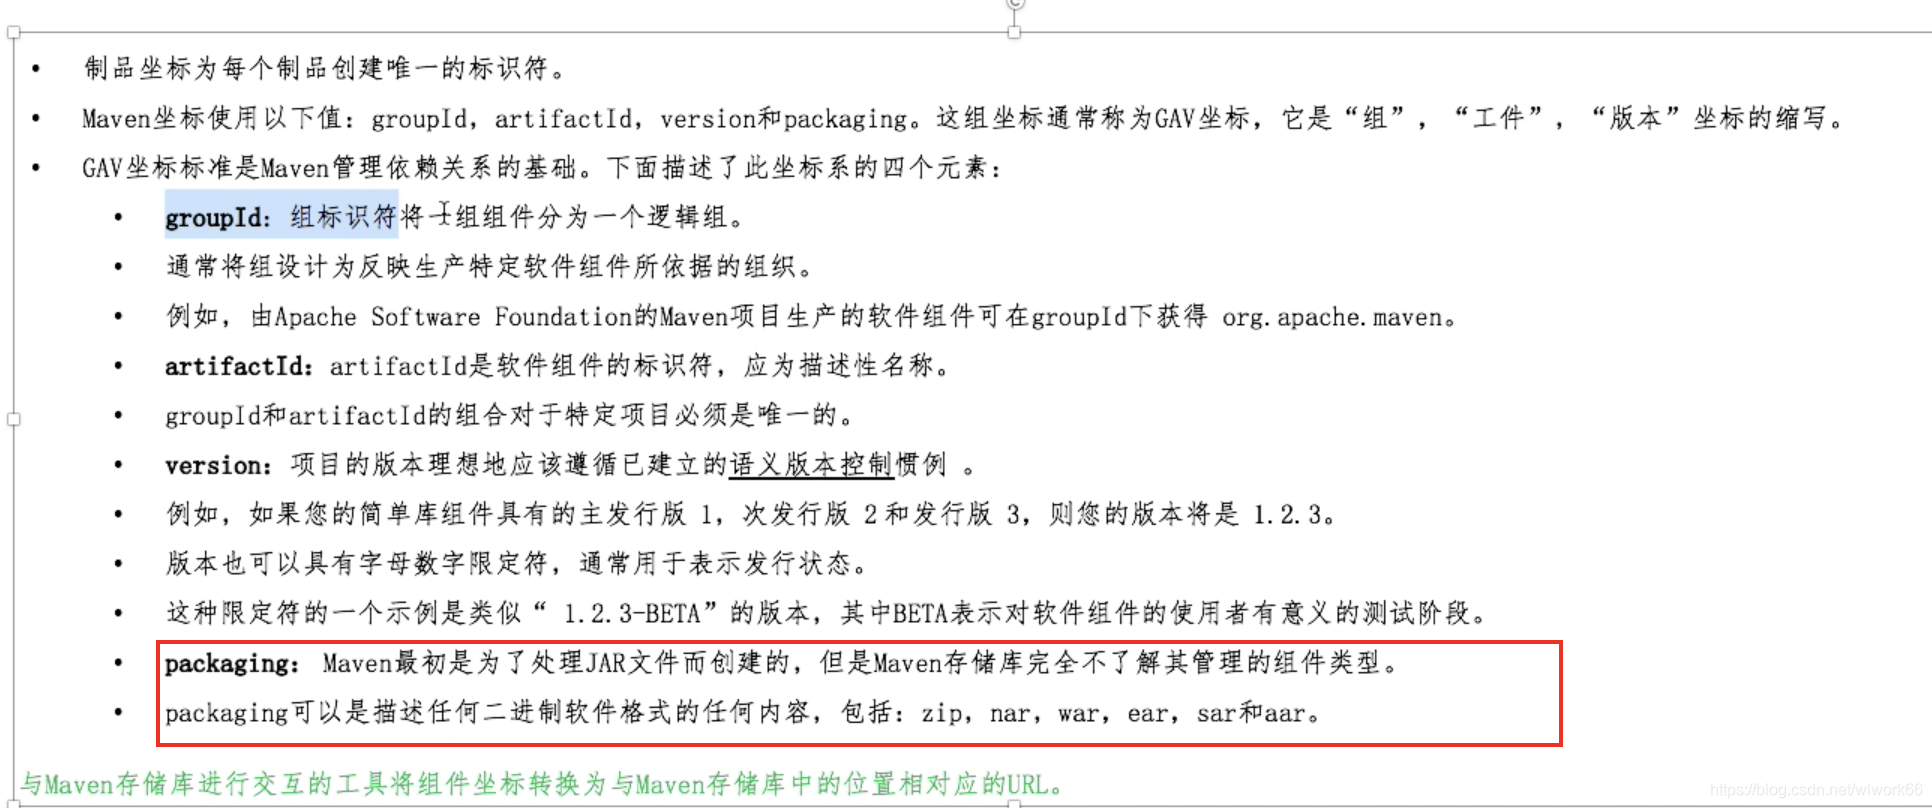
packaging
上传你的jar
如果是官方的jar,你要走ui面板
你自己的jar,在setting文件中配置好,再在你的pom中配置
<distributionManagement>
        <snapshotRepository>
            <!-- 这里的ID一定要在maven setting文件中存在于server下的ID -->
            <id>sona</id>
            <url>https://oss.sonatype.org/content/repositories/snapshots/</url>
        </snapshotRepository>
        <repository>
            <id>sona</id>
            <url>https://oss.sonatype.org/service/local/staging/deploy/maven2/</url>
        </repository>
    </distributionManagement>
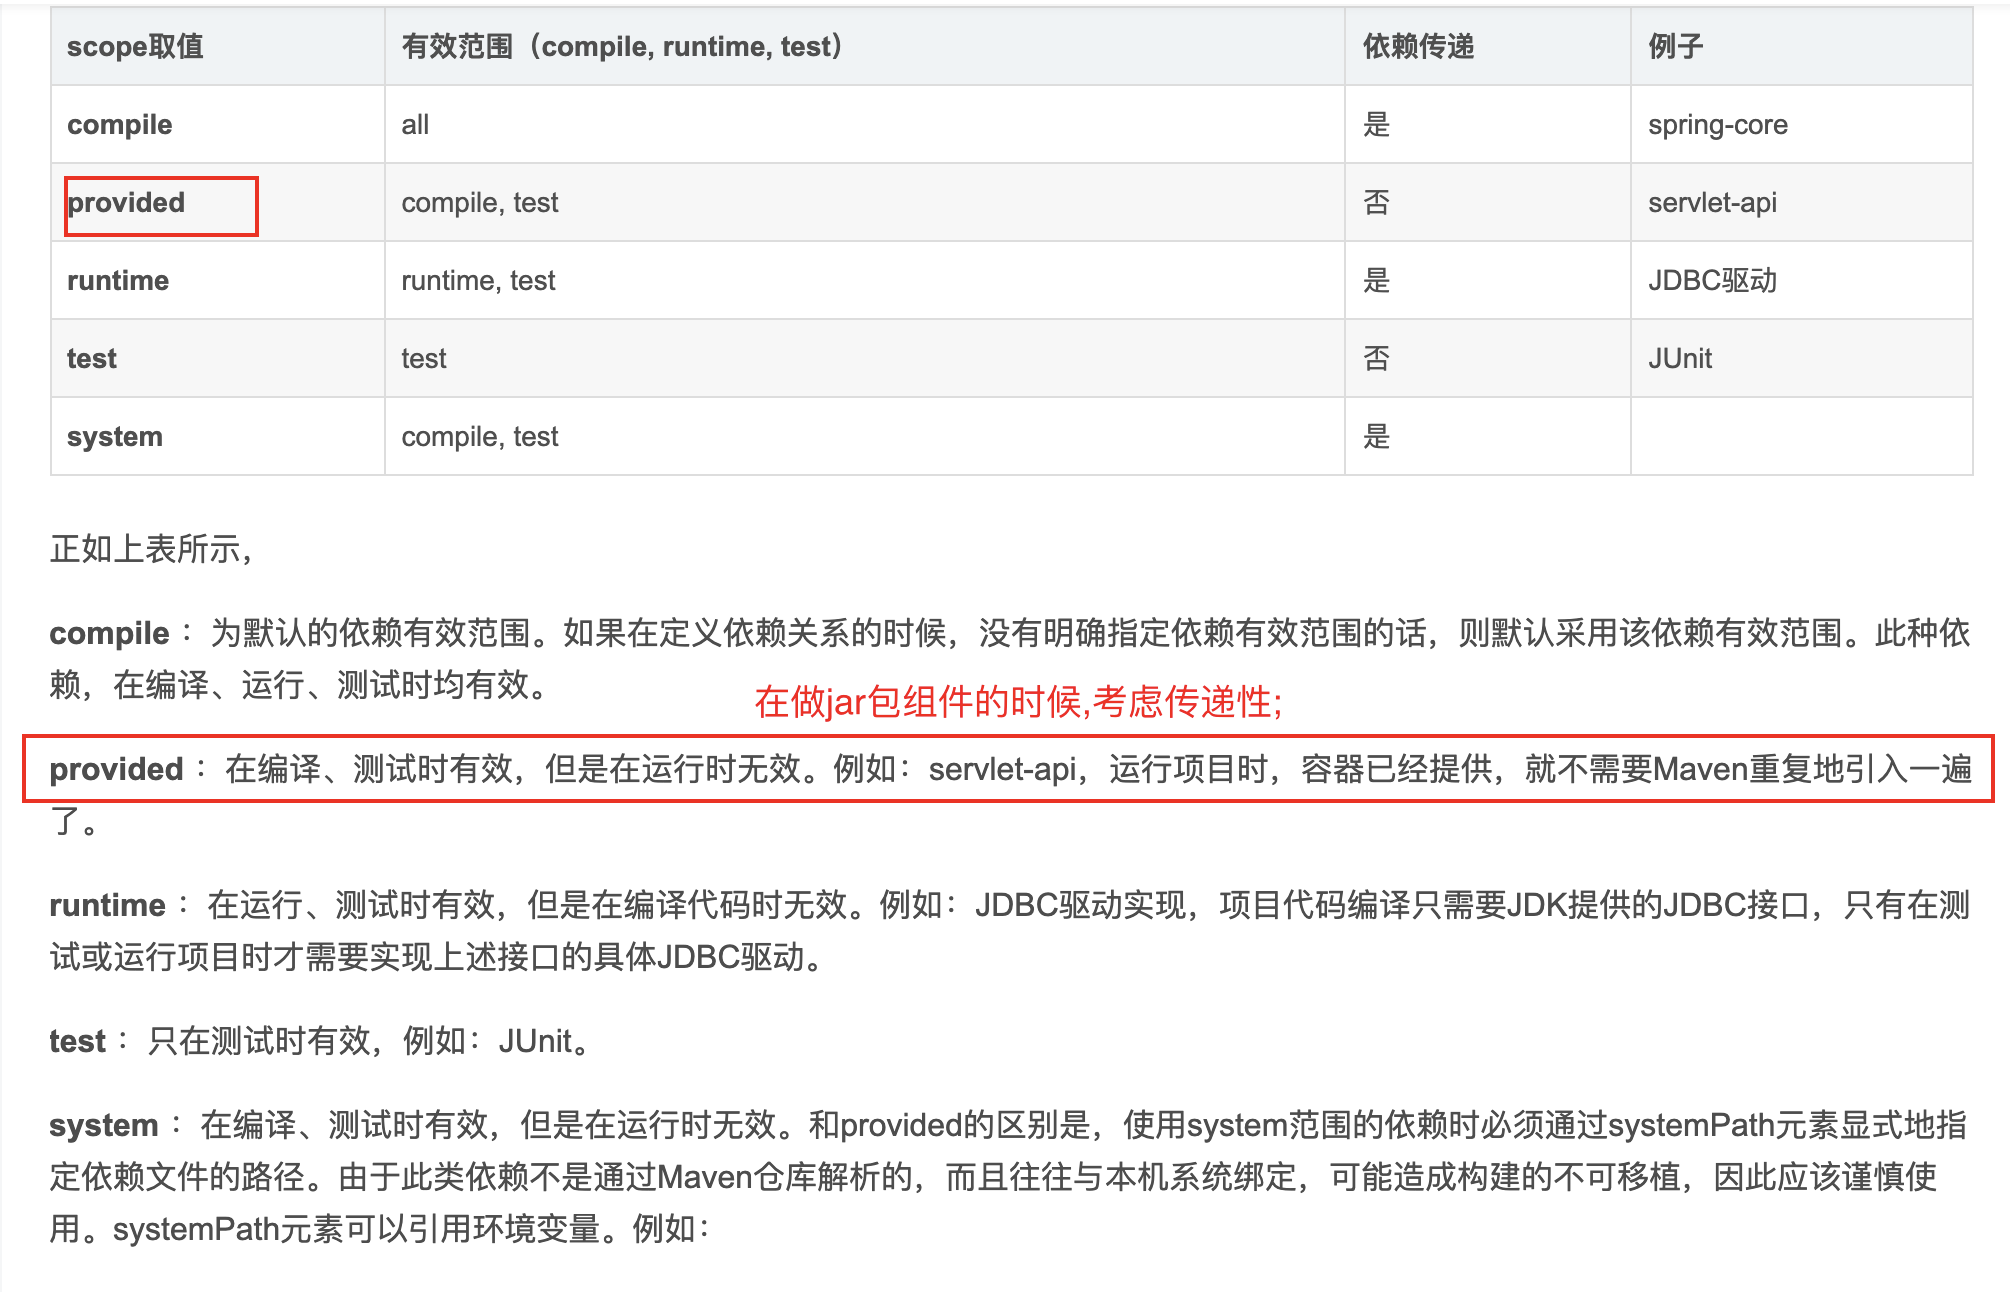
scope
【one】<dependencyManagement>
由于我们的模块很多,所以我们又抽象了一层,抽出一个itoo-base-parent来管理子项目的公共的依赖。为了项目的正确运行,必须让所有的子项目使用依赖项的统一版本,必须确保应用的各个项目的依赖项和版本一致,才能保证测试的和发布的是相同的结果。 在我们项目顶层的POM文件中,我们会看到dependencyManagement元素。通过它元素来管理jar包的版本,让子项目中引用一个依赖而不用显示的列出版本号。Maven会沿着父子层次向上走,直到找到一个拥有dependencyManagement元素的项目,然后它就会使用在这个dependencyManagement元素中指定的版本号。
- POM 的<dependencyManagement>元素包含可以被其他项目使用的<dependency>声明。
这样的POM 的子项目将会自动继承这些声明。其他项目可以通过使用<scope>元素的import 值来导入它们
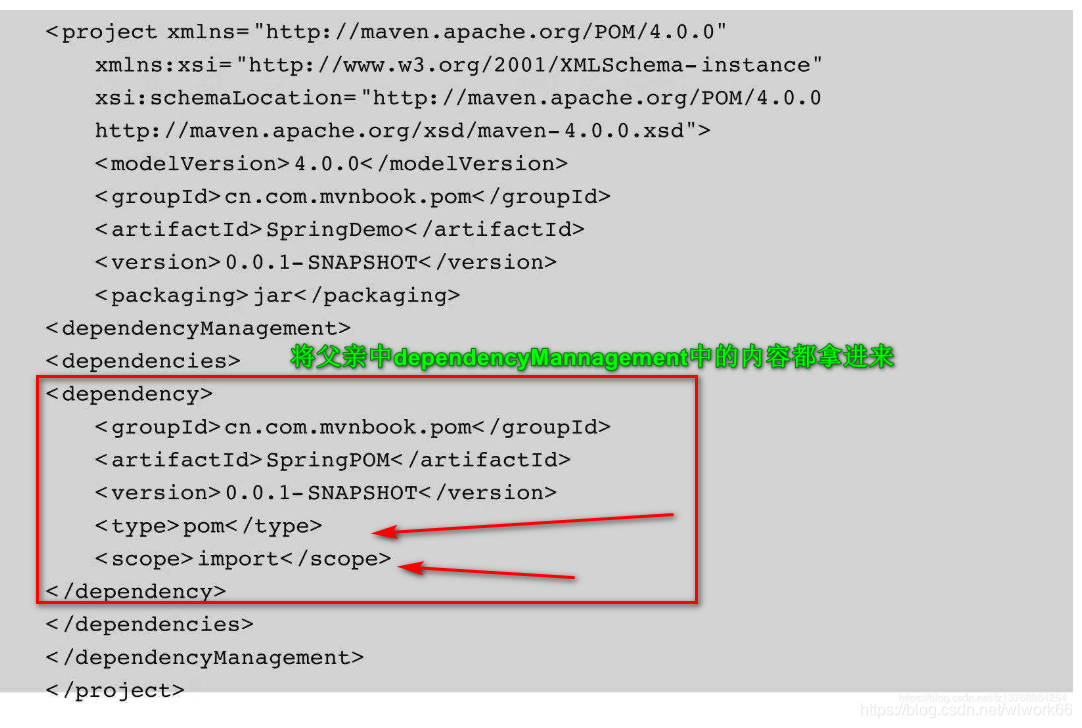
- 引用了<dependencyManagement>元素的项目可以使用它所声明的依赖,而不需要指定
它们的<version>坐标。如果<dependencyManagement>中的<version>在稍后有所改变,
则它将被所有引用它的POM 拾起。
【two】<pluginManagement>
如同<dependencyManagement>,<pluginManagement>声明了其他POM 可以使用的
信息,如下。
<build>
<pluginManagement>
<plugins>

<plugin>
<artifactId>maven-compiler-plugin</artifactId>
<version>3.2</version>
<configuration>
<source>1.7</source>
<target>1.7</target>
</configuration>
</plugin>

<plugin>
<groupId>org.codehaus.mojo</groupId>
<artifactId>exec-maven-plugin</artifactId>
<version>1.2.1</version>
</plugin>
</plugins>
</pluginManagement>
</build >
子模块使用
<build>
<plugins>
<plugin>
<artifactId>maven-compiler-plugin</artifactId>
</plugin>
<plugin>
<groupId>org.codehaus.mojo</groupId>
<artifactId>exec-maven-plugin</artifactId>
</plugin>
</plugins>
</build >
【three】构建 build
- validate——检查项目是否正确,所有必需的信息是否已经就绪。
- process-sources——处理源代码,如过滤任何值。
- compile——编译项目的源代码。
- process-test-resources——复制并处理资源到测试目标目录中。
- test-compile——将测试源代码编译到测试目标目录中。
- test——使用合适的单元测试框架测试编译的源代码。
- package——将编译的代码打包为它的可分发格式,如JAR。
- integration-test——处理并将软件包部署到一个可以运行集成测试的环境中。
- verify——运行任何的检查以验证软件包是否有效,并且符合质量标准。
- install——将软件包安装到本地存储库中,在那里其他本地构建项目可以将它引用
为依赖。 - deploy——将最终的构件上传到远程存储库,以与其他开发人员和项目共享。
执行这些阶段中的一个阶段将会调用所有前面的阶段 - 命令
mvn clean install
【four】<profiles> 配置文件
配置文件(在<profiles>中定义)是一组自定义的POM 元素,可以通过自动或者手动启
用(激活)来改变POM 的行为
配置多环境的细节
click
mvn clean package -P dev
【five】SNAPSHOT
远程存储库通常会为正在开发的构件,以及那些稳定发布或者生产发布的构件,定义不同的
区域。这些区域被分别称为快照存储库和发布存储库。
一个<version>值由-SNAPSHOT 结尾的构件将被认为是还没有发布的。这种构件可以重复
地使用相同的<version>值被上传到存储库。每次它都会被分配一个唯一的时间戳。当项目检
索构件时,下载的是最新实例。
一个<version>值不具有-SNAPSHOT 后缀的构件将会被认为是一个发布版本。通常,存储
库策略只允某一特定的发布版本上传一次。
当构建一个具有SNAPSHOT 依赖的项目时,Maven 将检查本地存储库中是否有对应的副本。
如果没有,它将尝试从指定的远程存储库中检索,在这种情况下,它将接收到具有最新时间戳的
构件。如果本地的确有这个构件,并且当前构建也是这一天中的第一个,那么Maven 将默认尝
试更新该本地副本。这个行为可以通过使用Maven 配置文件(settings.xml)中的配置或者命令行
标志来进行配置。
【six】<dependencies>
内部包含若干<dependency>
groupId, artifactId,version 三个基本属性
type :默认jar类型
scope: 当前包依赖类型
optional: false时, 继承这个项目所有的子项目。 true时, 该项目的子项目需要显式引入
exclusion :排除某项
exclusion 要注意,一般用来解决冲突
Resources
参考:点击
这个元素描述了项目相关的所有资源 路径列表,例如和项目相关的 属性文件,这些资源被包含在最终的打包文件里。
directory
描述存放资源的目录,该路径相对POM路径
<includes/>
包含的文件列表
<excludes/>
排除的模式列表
<targetPath/>
描述了资源的目标路径。该路径相对target/classes目录(例如${project.build.outputDirectory})。举个例子,如果你想资源在特定的包里(org.apache.maven.messages),你就必须该元素设置为org/apache/maven/messages。然而,如果你只是想把资源放到源码目录结构里,就不需要该配置。
<filtering/>
是否使用参数值代替参数名。参数值取自properties元素或者文件里配置的属性,文件在filters元素里列出。
<build>
        <resources>
            <!--设置filter,font文件不需要filter,因为经过maven的filter,
            会破坏font文件的二进制文件格式,到时前台解析出错-->
            <resource>
                <directory>${project.basedir}/src/main/resources</directory>
                <filtering>true</filtering>
                <excludes>
                    <exclude>static/**</exclude>
                </excludes>
            </resource>
            <resource>
                <directory>${project.basedir}/src/main/resources</directory>
                <filtering>false</filtering>
                <includes>
                    <include>static/**</include>
                </includes>
            </resource>
        </resources>
        <plugins>
            <plugin>
                <groupId>org.springframework.boot</groupId>
                <artifactId>spring-boot-maven-plugin</artifactId>
                <executions>
                    <execution>
                        <goals>
                            <goal>repackage</goal>
                        </goals>
                    </execution>
                </executions>
            </plugin>
            <plugin>
                <groupId>org.apache.maven.plugins</groupId>
                <artifactId>maven-resources-plugin</artifactId>
                <configuration>
                    <encoding>UTF-8</encoding>
                    <nonFilteredFileExtensions>
                        <nonFilteredFileExtension>xlsx</nonFilteredFileExtension>
                        <nonFilteredFileExtension>xls</nonFilteredFileExtension>
                    </nonFilteredFileExtensions>
                </configuration>
            </plugin>
        </plugins>
    </build>
dir
http://php-note.com/article/1724.html
b
a
s
e
d
i
r
项目的根目录
(
包含
p
o
m
.
x
m
l
文件的目录
)
,
{basedir}项目的根目录(包含pom.xml文件的目录),
basedir项目的根目录(包含pom.xml文件的目录),{version}项目版本
${project.basedir}和basedir等价
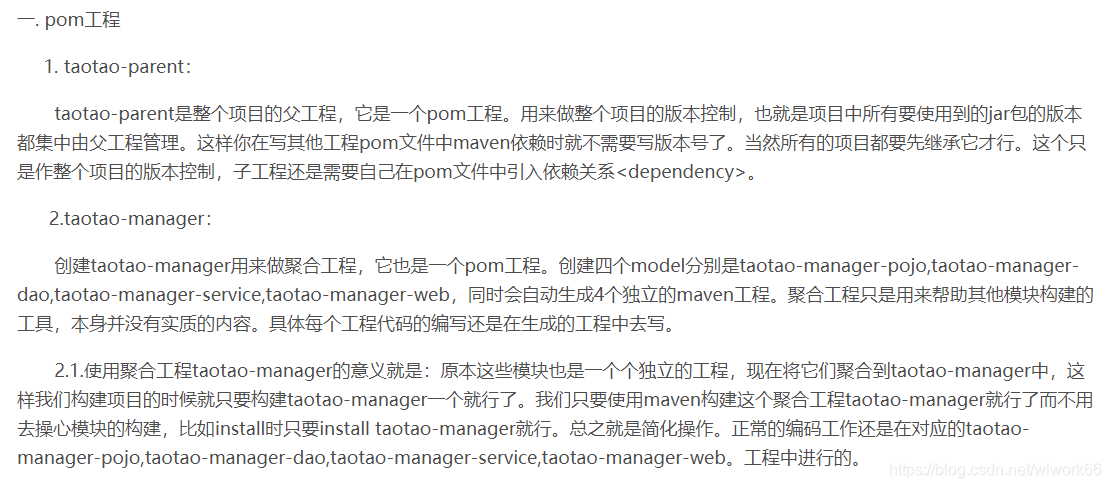
jar和war和pom的区别
pom:打出来可以作为其他项目的maven依赖,在工程A中添加工程B的pom,A就可以使用B中的类。用在父级工程或聚合工程中。用来做jar包的版本控制,也就是项目中所有要使用到的jar包的版本都集中由父工程管理。这样你在写其他工程pom文件中maven依赖时就不需要写版本号了 。当然所有的项目都要先继承它才行。这个只是作整个项目的版本控制,子工程还是需要自己在pom文件中引入依赖关系<dependency>
pom的作用
1 做聚合工程
2 用在父级工程,作为jar包的版本控制者,儿子项目需要继承pom项目。一般是做整个项目的版本控制
如果您觉得我的付出对您有帮助,还请关注+点赞哦,谢谢思密达
classifier
classifier 是 Maven 中一个非常重要但常被忽略的标签。让我详细解释它的意义和用法:
1. 基本概念
什么是 classifier?
classifier 是 Maven 坐标的第五个元素,用于区分同一个项目、同一版本下构建出的不同内容的构件。
完整 Maven 坐标:groupId:artifactId:version[:packaging][:classifier]
默认情况:
<!-- 没有 classifier -->
<dependency>
    <groupId>com.example</groupId>
    <artifactId>my-project</artifactId>
    <version>1.0.0</version>
    <!-- 默认:没有 classifier -->
</dependency>
<!-- 对应文件:my-project-1.0.0.jar -->
2. 常见使用场景
场景1:不同 JDK 版本
<!-- 为不同JDK版本提供不同的jar -->
<dependency>
    <groupId>com.example</groupId>
    <artifactId>my-project</artifactId>
    <version>1.0.0</version>
    <classifier>jdk8</classifier>
</dependency>
<!-- 文件:my-project-1.0.0-jdk8.jar -->

<dependency>
    <groupId>com.example</groupId>
    <artifactId>my-project</artifactId>
    <version>1.0.0</version>
    <classifier>jdk11</classifier>
</dependency>
<!-- 文件:my-project-1.0.0-jdk11.jar -->
场景2:源码和文档
<!-- 源码包 -->
<dependency>
    <groupId>com.example</groupId>
    <artifactId>my-project</artifactId>
    <version>1.0.0</version>
    <classifier>sources</classifier>
</dependency>
<!-- 文件:my-project-1.0.0-sources.jar -->

<!-- Javadoc包 -->
<dependency>
    <groupId>com.example</groupId>
    <artifactId>my-project</artifactId>
    <version>1.0.0</version>
    <classifier>javadoc</classifier>
</dependency>
<!-- 文件:my-project-1.0.0-javadoc.jar -->
场景3:不同平台/环境
<!-- Linux平台 -->
<dependency>
    <groupId>com.example</groupId>
    <artifactId>native-lib</artifactId>
    <version>1.0.0</version>
    <classifier>linux-x86_64</classifier>
</dependency>

<!-- Windows平台 -->
<dependency>
    <groupId>com.example</groupId>
    <artifactId>native-lib</artifactId>
    <version>1.0.0</version>
    <classifier>windows-x86_64</classifier>
</dependency>

<!-- macOS平台 -->
<dependency>
    <groupId>com.example</groupId>
    <artifactId>native-lib</artifactId>
    <version>1.0.0</version>
    <classifier>darwin-x86_64</classifier>
</dependency>
3. 实际项目示例
Netty 中的 classifier
<!-- Netty 对不同操作系统提供不同native传输实现 -->
<dependency>
    <groupId>io.netty</groupId>
    <artifactId>netty-transport-native-epoll</artifactId>
    <version>4.1.100.Final</version>
    <classifier>linux-x86_64</classifier>
</dependency>

<dependency>
    <groupId>io.netty</groupId>
    <artifactId>netty-transport-native-kqueue</artifactId>
    <version>4.1.100.Final</version>
    <classifier>osx-x86_64</classifier>
</dependency>
Spring Boot 的可执行jar
<!-- 可执行jar -->
<dependency>
    <groupId>org.springframework.boot</groupId>
    <artifactId>spring-boot-starter-web</artifactId>
    <version>2.7.0</version>
</dependency>
<!-- 生成的可执行jar:app-1.0.0.jar -->

<!-- 普通jar(用于依赖) -->
<dependency>
    <groupId>org.springframework.boot</groupId>
    <artifactId>spring-boot-starter-web</artifactId>
    <version>2.7.0</version>
    <classifier>plain</classifier>
</dependency>
<!-- 文件:app-1.0.0-plain.jar -->
4. 如何构建带 classifier 的构件
Maven 插件配置示例
<build>
    <plugins>
        <!-- 构建主jar -->
        <plugin>
            <groupId>org.apache.maven.plugins</groupId>
            <artifactId>maven-jar-plugin</artifactId>
            <version>3.3.0</version>
            <executions>
                <execution>
                    <id>default-jar</id>
                    <phase>package</phase>
                    <goals>
                        <goal>jar</goal>
                    </goals>
                    <configuration>
                        <!-- 主jar没有classifier -->
                    </configuration>
                </execution>

                <!-- 构建带classifier的jar -->
                <execution>
                    <id>build-with-classifier</id>
                    <phase>package</phase>
                    <goals>
                        <goal>jar</goal>
                    </goals>
                    <configuration>
                        <classifier>lite</classifier>
                        <!-- 排除一些文件 -->
                        <excludes>
                            <exclude>**/test/**</exclude>
                            <exclude>**/heavy-module/**</exclude>
                        </excludes>
                    </configuration>
                </execution>

                <!-- 构建源码jar -->
                <execution>
                    <id>sources-jar</id>
                    <phase>package</phase>
                    <goals>
                        <goal>jar</goal>
                    </goals>
                    <configuration>
                        <classifier>sources</classifier>
                        <includes>
                            <include>**/*.java</include>
                            <include>**/*.properties</include>
                        </includes>
                    </configuration>
                </execution>
            </executions>
        </plugin>

        <!-- 构建不同平台的native包 -->
        <plugin>
            <artifactId>maven-assembly-plugin</artifactId>
            <executions>
                <execution>
                    <id>linux-assembly</id>
                    <phase>package</phase>
                    <goals>
                        <goal>single</goal>
                    </goals>
                    <configuration>
                        <classifier>linux-x86_64</classifier>
                        <descriptors>
                            <descriptor>src/assembly/linux.xml</descriptor>
                        </descriptors>
                    </configuration>
                </execution>
                <execution>
                    <id>windows-assembly</id>
                    <phase>package</phase>
                    <goals>
                        <goal>single</goal>
                    </goals>
                    <configuration>
                        <classifier>windows-x86_64</classifier>
                        <descriptors>
                            <descriptor>src/assembly/windows.xml</descriptor>
                        </descriptors>
                    </configuration>
                </execution>
            </executions>
        </plugin>
    </plugins>
</build>
5. 依赖管理中的 classifier
使用 properties 动态选择
<properties>
    <!-- 根据平台动态设置classifier -->
    <os.detected.classifier>${os.detected.classifier}</os.detected.classifier>
</properties>

<dependencies>
    <dependency>
        <groupId>com.example</groupId>
        <artifactId>native-lib</artifactId>
        <version>1.0.0</version>
        <classifier>${os.detected.classifier}</classifier>
    </dependency>
</dependencies>

<build>
    <plugins>
        <!-- os-maven-plugin 用于检测操作系统 -->
        <plugin>
            <groupId>kr.motd.maven</groupId>
            <artifactId>os-maven-plugin</artifactId>
            <version>1.7.1</version>
            <executions>
                <execution>
                    <phase>initialize</phase>
                    <goals>
                        <goal>detect</goal>
                    </goals>
                </execution>
            </executions>
        </plugin>
    </plugins>
</build>
6. classifier 与 type 的区别
| 维度 | classifier | type (packaging) |
|---|---|---|
| 目的 | 区分同一类型的多个构件 | 指定构件的包装类型 |
| 示例 | jdk8, sources, javadoc | jar, war, pom, zip |
| 文件扩展名 | 不影响扩展名 | 决定扩展名 |
| 数量 | 可以有多个 | 每个artifact一个 |
| 依赖解析 | 可选 | 必需 |
<!-- type指定包装格式 -->
<dependency>
    <groupId>com.example</groupId>
    <artifactId>web-app</artifactId>
    <version>1.0.0</version>
    <type>war</type>  <!-- 文件:web-app-1.0.0.war -->
</dependency>

<!-- type + classifier -->
<dependency>
    <groupId>com.example</groupId>
    <artifactId>web-app</artifactId>
    <version>1.0.0</version>
    <type>war</type>
    <classifier>sources</classifier>  <!-- 文件:web-app-1.0.0-sources.war -->
</dependency>
7. 实战案例:发布多版本构件
项目配置
<!-- pom.xml -->
<project>
    <modelVersion>4.0.0</modelVersion>
    <groupId>com.example</groupId>
    <artifactId>my-library</artifactId>
    <version>2.0.0</version>

    <build>
        <plugins>
            <!-- 主jar -->
            <plugin>
                <artifactId>maven-jar-plugin</artifactId>
                <executions>
                    <execution>
                        <id>default-jar</id>
                        <goals><goal>jar</goal></goals>
                    </execution>
                    <!-- 精简版 -->
                    <execution>
                        <id>lite-jar</id>
                        <goals><goal>jar</goal></goals>
                        <configuration>
                            <classifier>lite</classifier>
                            <excludes>
                                <exclude>**/optional/**</exclude>
                            </excludes>
                        </configuration>
                    </execution>
                    <!-- 完整版 -->
                    <execution>
                        <id>full-jar</id>
                        <goals><goal>jar</goal></goals>
                        <configuration>
                            <classifier>full</classifier>
                            <includes>
                                <include>**/*</include>
                            </includes>
                        </configuration>
                    </execution>
                </executions>
            </plugin>

            <!-- 部署所有构件 -->
            <plugin>
                <artifactId>maven-deploy-plugin</artifactId>
                <configuration>
                    <skip>false</skip>
                </configuration>
            </plugin>
        </plugins>
    </build>
</project>
部署到仓库
# 执行部署,会生成:
# my-library-2.0.0.jar          (主构件)
# my-library-2.0.0-lite.jar     (精简版)
# my-library-2.0.0-full.jar     (完整版)
mvn clean deploy
8. 注意事项和最佳实践
注意事项:
- classifier 不是版本号:它不能替代版本管理
- 主构件唯一性:每个版本必须有且只有一个没有 classifier 的主构件
- 依赖解析:Maven 会优先选择没有 classifier 的构件,除非显式指定
最佳实践:
- 语义化 classifier:使用有意义的名称,如
jdk8、android、sources - 平台检测:使用
os-maven-plugin自动选择平台特定的构件 - 文档化:在 README 中说明各个 classifier 的区别
- 避免过度使用:只在真正需要时使用 classifier
9. 常见问题解答
Q:classifier 会影响依赖传递吗?
A:会。如果依赖 A 依赖于带 classifier 的 B,那么依赖传递时也会包含该 classifier。
Q:如何查看一个构件的所有 classifier?
A:在 Maven 仓库中查看:
http://repo.maven.apache.org/maven2/com/example/my-project/1.0.0/
# 列出:
# my-project-1.0.0.jar
# my-project-1.0.0-sources.jar
# my-project-1.0.0-javadoc.jar
# my-project-1.0.0-tests.jar
Q:classifier 能否包含点号(.)?
A:可以,但不推荐。最好使用连字符(-)。
Q:安装到本地仓库时的文件名?
A:使用 classifier 的构件安装时,文件名会包含 classifier:
# 安装命令
mvn install:install-file \
  -Dfile=my-app-1.0.0-linux.jar \
  -DgroupId=com.example \
  -DartifactId=my-app \
  -Dversion=1.0.0 \
  -Dclassifier=linux \
  -Dpackaging=jar

# 本地仓库路径:
~/.m2/repository/com/example/my-app/1.0.0/
  my-app-1.0.0-linux.jar
  my-app-1.0.0-linux.pom
总结
classifier 是一个非常强大的功能,主要用于:
- 发布同一项目的多个变体
- 处理跨平台兼容性
- 提供源码和文档
- 创建不同配置的构件
合理使用 classifier 可以减少项目数量,更优雅地管理多版本、多平台的支持。


 1026
1026

 被折叠的 条评论
为什么被折叠?
被折叠的 条评论
为什么被折叠?
 到【灌水乐园】发言


