


 本文详细介绍了如何在CentOS 7上配置内核调试工具kdump,包括修改GRUB配置文件添加crashkernel参数,启用kdump服务,设置核心转储路径,测试kdump功能,并使用crash工具分析崩溃转储文件。
一、部署
编辑文件 /etc/default/grub
添加参数 ‘crashkernel=<Reserved_size_of_RAM>‘ 在 ‘GRUB_CMDLINE_LINUX‘ 后面。
GRUB_CMDLINE_LINUX="crashkernel=auto crashkernel=128M"
执行:
grub2-mkconfig -o /boot/grub2/grub.cfgsystemctl enable kdump.service
shutdown -r now
重启生效
/etc/kdump.conf
path /var/crash
core_collector makedumpfile -l --message-level 1 -d 31
default reboot
二、验收
执行:systemctl is-active kdump.serviceservice kdump status确认服务启动
三、测试
echo c > /proc/sysrq-trigger。。。系统重启后。。。
ls -l /var/crash/
127.0.0.1-2016-04-07-22:07:03
成功会生成数据,例如:
[root@localhost 127.0.0.1-2016-04-07-22:07:03]# tail /var/crash/127.0.0.1-2016-04-07-22\:07\:03/vmcore-dmesg.txt
[ 77.675638] [<ffffffff813b9ed2>] __handle_sysrq+0xa2/0x170
[ 77.675668] [<ffffffff813ba3af>] write_sysrq_trigger+0x2f/0x40
[ 77.675701] [<ffffffff812492ad>] proc_reg_write+0x3d/0x80
[ 77.675829] [<ffffffff811de5cd>] vfs_write+0xbd/0x1e0
[ 77.675861] [<ffffffff811df06f>] SyS_write+0x7f/0xe0
[ 77.675911] [<ffffffff81645909>] system_call_fastpath+0x16/0x1b
[ 77.675928] Code: eb 9b 45 01 f4 45 39 65 34 75 e5 4c 89 ef e8 e2 f7 ff ff eb db 0f 1f 44 00 00 55 c7 05 80 e8 5b 00 01 00 00 00 48 89 e5 0f ae f8 <c6> 04 25 00 00 00 00 01 5d c3 0f 1f 44 00 00 55 31 c0 c7 05 fe
[ 77.676063] RIP [<ffffffff813b9716>] sysrq_handle_crash+0x16/0x20
[ 77.676088] RSP <ffff8800397a3e80>
[ 77.676099] CR2: 0000000000000000
四、调试
wget http://debuginfo.centos.org/7/x86_64/kernel-debug-debuginfo-3.10.0-327.el7.x86_64.rpm
wget http://debuginfo.centos.org/7/x86_64/kernel-debuginfo-common-x86_64-3.10.0-327.el7.x86_64.rpm
rpm -ivh kernel-debug-debuginfo-3.10.0-327.el7.x86_64.rpm kernel-debuginfo-common-x86_64-3.10.0-327.el7.x86_64.rpm
yum install crash
crash /usr/lib/debug/lib/modules/3.10.0-327.13.1.el7.x86_64/vmlinux /var/crash/127.0.0.1-2016-04-07-22\:07\:03/vmcorecrash>
开始调试
CentOS / RHEL 6 : How to configure kdump
kdump is an advanced crash dumping mechanism. When enabled, the system is booted from the context of another kernel. This second kernel reserves a small amount of memory, and its only purpose is to capture the core dump image in case the system crashes. Since being able to analyze the core dump helps significantly to determine the exact cause of the system failure, it is strongly recommended to have this feature enabled. This Note explains how to configure, test, and use the kdump service in CentOS/RHEL 6.
1. Install the kexec-tools package if not already installed
To use the kdump service, you must have the kexec-tools package installed.
# yum install kexec-tools2. Configuring Memory Usage in GRUB
To configure the amount of memory that is reserved for the kdump kernel, modify file /boot/grub/grub.conf and add the crashkernel=[size]M (or crashkernel=auto) parameter to the list of kernel options.And then reboot it to make it effect.
For example:
# vi /boot/grub/grub.conf
...
title Oracle Linux Server-uek (2.6.39-200.24.1.el6uek.x86_64)
    root (hd0,0)
    kernel /vmlinuz-2.6.39-200.24.1.el6uek.x86_64 ro root=/dev/mapper/vg_ol6desktop-lv_root crashkernel=128M
    initrd /initramfs-2.6.39-200.24.1.el6uek.x86_64.img
...
# reboot3. Configuring Dump Location
To configure kdump, we need to edit the configuration file /etc/kdump.conf. The default option is to store the vmcore file in the /var/crash/ directory of the local file system. To change the local directory in which the core dump is to be saved, remove the hash sign (“#”) from the beginning of the #path /var/crash line, and replace the value with a desired directory path.
For example:
path /usr/local/coresOptionally, you can also save the core dump directly to a raw partition.
For example:
raw /dev/sdb4To store the dump to a remote machine using the NFS protocol, remove the hash sign (“#”) from the beginning of the #net my.server.com:/export/tmp line, and replace the value with a valid hostname and directory path.
For example:
net my.server.com:/export/cores4. Configuring Core Collector
To reduce the size of the vmcore dump file, kdump allows you to specify an external application to compress the data, and optionally leave out all irrelevant information. Currently,the only fully supported core collector is makedumpfile.
To enable the core collector, modify configuration file /etc/kdump.conf , remove the hash sign (“#”) from the beginning of the #core_collector makedumpfile -c –message-level 1 -d 31 line, and edit the command line options as described below.
For example:
core_collector makedumpfile -c5. Changing Default Action
By default, when the kernel crash is captured, the root file system is mounted, and /sbin/init is run. To change this behavior, open the /etc/kdump.conf configuration file, remove the hash sign (“#”) from the beginning of the #default shell line, and replace the value with a desired action as described .
For example:
default halt6. Start kdump daemon
Check and make sure kernel command line includes the kdump config and memory was reserved for crash kernel:
# cat /proc/cmdline
ro root=/dev/mapper/vg_ol6desktop-lv_root crashkernel=128M
Set kdump service can be started when system rebooted.
# chkconfig kdump onTo start the service in the current session, use the following command:
# service kdump start
No kdump initial ramdisk found.                            [WARNING]
Rebuilding /boot/initrd-2.6.39-200.24.1.el6uek.x86_64kdump.img
Starting kdump:                                            [  OK  ]
7. Testing kdump
To test the configuration, reboot the system with kdump enabled, and make sure that the service is running.
For example:
# service kdump status
Kdump is operational
Then type the following commands at a shell prompt:
# echo 1 > /proc/sys/kernel/sysrq
# echo c > /proc/sysrq-trigger
This will force the Linux kernel to crash, and the address-YYYY-MM-DD-HH:MM:SS/vmcore file will be copied to the location you have selected in the configuration (that is, to /var/crash/ by default)
CentOS / RHEL 5 : How to Configure kdump
CentOS / RHEL 7 : How to configure kdump
How to enable Kdump on RHEL 7 and CentOS 7
Kdump is a kernel feature which is used to capture crash dumps when the system or kernel crash. For enabling kdump we have to reserve some portion of physical RAM which will be used to execute kdump kernel in the event of kernel panic or crash.
When a kernel crash or kernel panic occurs then running kernel runs ‘kexec(kdump kernel)‘ and it loads kdump kernel from reserve memory and then contents of RAM and Swap is copied to vmcore file either on local disk or on remote disk and finally reboot the box.
By analyzing the crash dumps we can find the reason or the root case of system failure. If you have OS support then you can share the crash dumps to the vendor for analysis.
In this article we will demonstrate how to enable kdump on RHEL 7 and CentOS 7
Step:1 Install ‘kexec-tools’ using yum command
Use the below yum command to install ‘kexec-tools’ package in case it is not installed.
[root@cloud ~]# yum install kexec-toolsStep:2 Update the GRUB2 file to Reserve Memory for Kdump kernel.
Edit the GRUB2 file (/etc/default/grub), add the parameter ‘crashkernel=<Reserved_size_of_RAM>‘ in the line beginning with ‘GRUB_CMDLINE_LINUX‘
GRUB_CMDLINE_LINUX="rd.lvm.lv=centos/swap vconsole.font=latarcyrheb-sun16 rd.lvm.lv=centos/root crashkernel=128M vconsole.keymap=us rhgb quiet"
 转存失败重新上传取消
转存失败重新上传取消
转存失败重新上传取消
Execute the below command to regenerate grub2 configuration.
[root@cloud ~]# grub2-mkconfig -o /boot/grub2/grub.cfgIn case of UEFI firmware, use the below command
[root@cloud ~]# grub2-mkconfig -o /boot/efi/EFI/redhat/grub.cfgAbove command will inform bootlaoder to reserve 128 MB RAM after reboot.
Reboot the box now using below command :
[root@cloud ~]# shutdown -r nowStep:3 Update the dump location & default action in the file (/etc/kdump.conf).
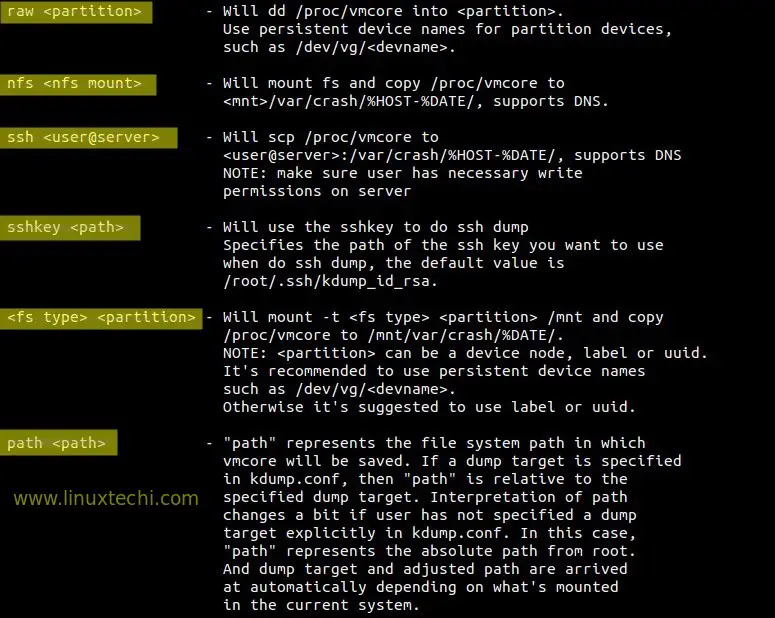
To store crash dump or vmcore file on a local file system, edit the file ‘/etc/kdump.conf‘ and specify the location as per your setup. In my case i am using a separate local file system ( /var/crash). It is recommended that size of file system should be equivalent to the size of your system’s RAM or file system should have free space equivalent to the size of RAM. Kdump allows to compress the dump data using ‘core collector’ option (core_collector makedumpfile -c ) where -c is used for compression.
In case if kdump fails to store the dump file to specified location then default action will be performed which is mention in the default directive. In my case default action is reboot.
Update the below three directives in kdump.conf file.
[root@cloud ~]# vi /etc/kdump.conf

path /var/crash
core_collector makedumpfile -c
default reboot
Different Options to store dump :
 转存失败重新上传取消
转存失败重新上传取消
转存失败重新上传取消
Step:4 Start and enable kdump service.
[root@cloud ~]# systemctl start kdump.service
[root@cloud ~]# systemctl enable kdump.service
[root@cloud ~]#
Step:5 Now Test Kdump by manually crashing the system.
Before crashing your system , please verify whether the kdump service is running or not using below command.
[root@cloud crash]# systemctl is-active kdump.service
[root@cloud crash]# service kdump status
To test our kdump configuration we will manually crash our system with below commands.
[root@cloud ~]# echo 1 > /proc/sys/kernel/sysrq ; echo c > /proc/sysrq-triggerThis will create a crash dump file (vmcore ) under ‘/var/crash‘ file system.
[root@cloud ~]# ls -lR /var/crash
/var/crash:
total 0
drwxr-xr-x. 2 root root 42 Mar 4 03:02 127.0.0.1-2016-03-04-03:02:17

/var/crash/127.0.0.1-2016-03-04-03:02:17:
total 135924
-rw-------. 1 root root 139147524 Mar 4 03:02 vmcore
-rw-r--r--. 1 root root 35640 Mar 4 03:02 vmcore-dmesg.txt
[root@cloud ~]#
Step:6 Use ‘crash’ command to analyze and debug crash dumps.
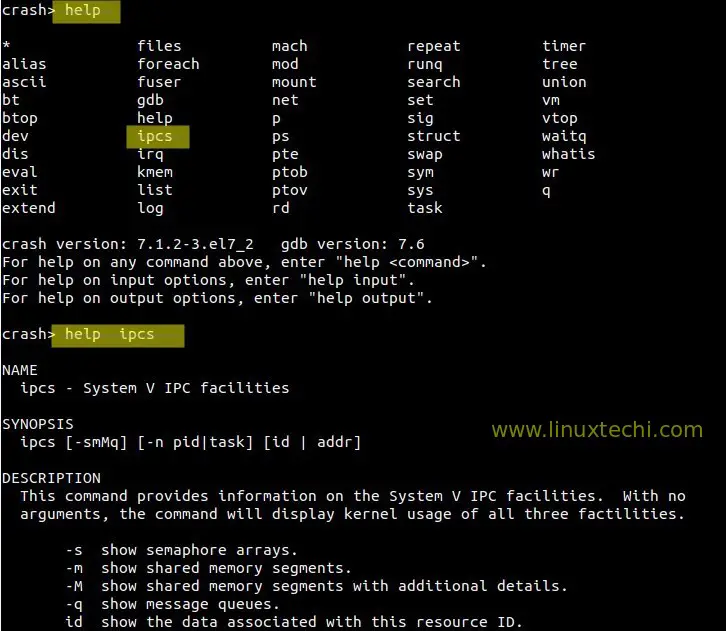
Crash is the utility or command to debug and analyze the crash dump or vmcore file.
To use the crash, make sure two packages are installed : ‘crash & kernel-debuginfo‘
[root@cloud ~]# yum install crashTo install ‘kernel-debuginfo’ package , first enable debug repo. Edit the repo file /etc/yum.repos.d/CentOS-Debuginfo.repo
change ‘enbled=0’ to ‘enabled=1’
[root@cloud ~]# yum install kernel-debuginfoOnce the kernel-debuginfo is installed , then try to execute below crash command, it will give us a crash prompt where we can run commands to find process info , list of open files when the system got crashed.
[root@cloud ~]# crash /var/crash/127.0.0.1-2016-03-04-14\:20\:06/vmcore /usr/lib/debug/lib/modules/`uname -r`/vmlinux

crash>
Type ‘ps‘ command to list the Process which were running when the system got crashed.
crash> ps
To view the files that were open when system got crashed , type ‘files’ command at crash prompt.
crash> files
PID: 5577 TASK: ffff88007b44f300 CPU: 0 COMMAND: "bash"
ROOT: / CWD: /root
 FD FILE DENTRY INODE TYPE PATH
 0 ffff880036b85000 ffff8800796fa540 ffff88007966f4d0 CHR /dev/pts/0
 1 ffff880036b73900 ffff880068c409c0 ffff8800794a8d10 REG /proc/sysrq-trigger
 2 ffff880036b85000 ffff8800796fa540 ffff88007966f4d0 CHR /dev/pts/0
 10 ffff880036b85000 ffff8800796fa540 ffff88007966f4d0 CHR /dev/pts/0
255 ffff880036b85000 ffff8800796fa540 ffff88007966f4d0 CHR /dev/pts/0
crash>
Type ‘sys’ command to list the system info when it got crashed.
crash> sys
 KERNEL: /usr/lib/debug/lib/modules/3.10.0-327.10.1.el7.x86_64/vmlinux
 DUMPFILE: /var/crash/127.0.0.1-2016-03-04-14:20:06/vmcore
 CPUS: 1
 DATE: Fri Mar 4 14:20:01 2016
 UPTIME: 00:02:00
LOAD AVERAGE: 0.75, 0.48, 0.19
 TASKS: 115
 NODENAME: cloud.linuxtechi.com
 RELEASE: 3.10.0-327.10.1.el7.x86_64
 VERSION: #1 SMP Tue Feb 16 17:03:50 UTC 2016
 MACHINE: x86_64 (2388 Mhz)
 MEMORY: 2 GB
 PANIC: "SysRq : Trigger a crash"
crash>
To get help of any command on crash prompt , type ‘help <command>‘ , example is shown below.
That’s conclude the article, Please don’t hesitate to share it if you have enjoyed.


 659
659

 被折叠的 条评论
为什么被折叠?
被折叠的 条评论
为什么被折叠?
 到【灌水乐园】发言


