


 本文介绍如何部署和配置CAS单点登录系统,包括CAS服务器和客户端应用的安装步骤、HTTPS连接配置、证书生成及导入过程,以及如何通过修改web.xml启用单点登录功能。
Background Information
Access Control
Access control systems provide the essential services of authorization, identification and authentication, access approval, and accountability:
· authorization specifies what a subject can do
· identification and authentication ensure that only legitimate subjects can log on to a system
· access approval grants access during operations, by association of users with the resources that they are allowed to access, based on the authorization policy
· accountability identifies what a subject (or all subjects associated with a user) did
Central Authentication Service (CAS) is a solution for Authentication Service.
Single Sign-On
Single sign-on (SSO) is a property of access control of multiple related, but independent software systems. With this property a user logs in once and gains access to all systems without being prompted to log in again at each of them. Conversely, single sign-off is the property whereby a single action of signing out terminates access to multiple software systems.
To implement a single sign-on system, the following two requirments must be considered:
· An unified authentication service
· Change all the web apps which need SSO service to make sure they use the unified authentication service.
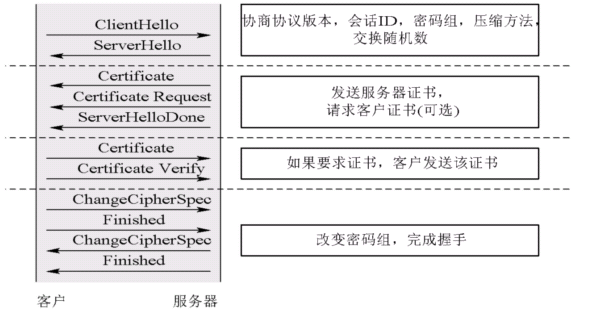
Transport Layer Security (TLS) and its predecessor Secure Sockets Layer (SSL)
JASIG Central Authentication Service (CAS)
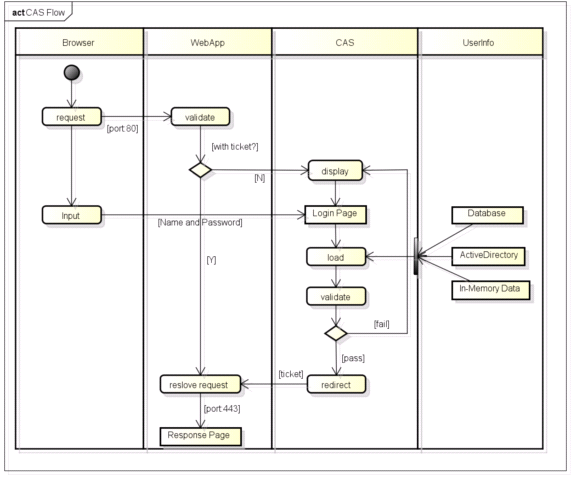
The CAS protocol involves at least three parties: a client web browser, the web application requesting authentication, and the CAS server. It may also involve a back-end service, such as a database server, that does not have its own HTTP interface but communicates with a web application.
When the client visits an application desiring to authenticate to it, the application redirects it to CAS. CAS validates the client's authenticity, usually by checking a username and password against a database (such as Kerberos or Active Directory).
If the authentication succeeds, CAS returns the client to the application, passing along a security ticket. The application then validates the ticket by contacting CAS over a secure connection and providing its own service identifier and the ticket. CAS then gives the application trusted information about whether a particular user has successfully authenticated.
CAS allows multi-tier authentication via proxy address. A cooperating back-end service, like a database or mail server, can participate in CAS, validating the authenticity of users via information it receives from web applications. Thus, a webmail client and a webmail server can all implement CAS.
Preparation Work
Download CAS server and client
Download CAS server and client from internet:
· cas-client-3.2.1
· cas-server-3.5.2
User Keytool to generate keystore file and import certificate file
It includes 3 steps:
· Delete the certificate and keystore file if they exist
· Create the .keystore file and export .crt file from keystore
· Import the created certificate into java trusted certficate repository
Before you run below batch script, you need to make sure:
· JDK is better not installed in default path: C:\program files\java because “program files” contains a blank character which could cause weird problems.
· Make sure the same JDK is used by tomcat server in eclipse.
· JAVA_HOME is set in system environment variable
· Java bin executables are included in PATH
The batch script is listed as below:
keytool -delete -alias tomcatsso -keystore %JAVA_HOME%/jre/lib/security/cacerts -storepass changeit
keytool -delete -alias tomcatsso -storepass changeit
keytool -genkey -keyalg RSA -keysize 1024 -alias tomcatsso -dname "CN=localhost" -storepass changeit
keytool -export -alias tomcatsso -file %java_home%/jre/lib/security/tomcatsso.crt -storepass changeit
keytool -import -alias tomcatsso -file %java_home%/jre/lib/security/tomcatsso.crt -keystore %java_home%/jre/lib/security/cacerts -storepass changeit
Keytool is provied by jdk.
The password for –storepass is used the access the jdk trusted certficate repository, and its default password is changeit.
-dname represents the certificat owners information. It has the following options:
CN=Computer Name, OU=Organization Unit Name, O=Organization Name, L=City or Region Name, ST=State Name, C=Country Name
CN should be the full computer name, but it can be localhost
CAS Server Deployment
Create the CasServer project
Click Eclipse->File->New->Dynamic Web Project to create the web project, select Target Runtime as Apache Tomcat v7.0, select Dynamic web module version as 3.0, select configuration as Default Configuration for Apache Tomcat v7.0
Unzip cas-server-3.5.2.zip file, in the extracted folder you can find cas-server-uber-webapp-3.5.2.war, unzip this file to the project folder: /CasServer/WebContent
Configure server.xml to enable HTTPS connection
If you have created a tomcat server for CasServer, the configuration file for this tomcat server should be under project Servers.
Open server.xml file in /Servers/Tomcat v7.0 Server at localhost-config/server.xml
Add/Replace the follow xml script to Tenable HTTPS connector:
<Connector SSLEnabled="true" clientAuth="false"
keystoreFile="C:/Documents and Settings/yourname/.keystore" keystorePass="changeit"
maxThreads="150" port="8443" protocol="HTTP/1.1" scheme="https"
secure="true" sslProtocol="TLS"
truststoreFile="C:/Java/jdk1.7.0_45/jre/lib/security/cacerts" />
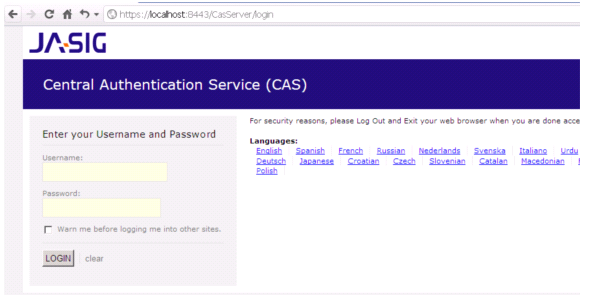
Login CasServer by using HTTPS connection
Add CasServer to tomcat for the deployment
Start tomcat server
Access CasServer web application by using url: https://localhost:8443/CasServer
If login successful, the following screen should be displayed:
CAS Application Deployment
Create the CasSample project
Click Eclipse->File->New->Dynamic Web Project to create the web project, select Target Runtime as Apache Tomcat v7.0, select Dynamic web module version as 3.0, select configuration as Default Configuration for Apache Tomcat v7.0
Unzip cas-client-3.2.1.zip file, in the extracted folder you can find all the lib jars under cas-client-3.2.1\modules, copy the following required jar to project folder: /CasSample/WebContent/WEB-INF/lib:
· cas-client-core-3.1.12.jar
· commons-codec-1.8.jar
· log4j-1.2.16.jar
· opensaml1-1.1.jar
· xmlsec-1.4.3.jar
Configure web.xml to enable SSO
Copy the follow script into web.xml,
serverName should be the same as CN value of created certificate(-dname "CN=localhost")
<filter>
<filter-name>CAS Authentication Filter</filter-name>
<filter-class>org.jasig.cas.client.authentication.Saml11AuthenticationFilter</filter-class>
<init-param>
<param-name>casServerLoginUrl</param-name>
<param-value>https://localhost:8443/CasServer/login</param-value>
</init-param>
<init-param>
<param-name>serverName</param-name>
<param-value>https://localhost:8443</param-value>
</init-param>
</filter>
<filter>
<filter-name>CAS Validation Filter</filter-name>
<filter-class>org.jasig.cas.client.validation.Saml11TicketValidationFilter</filter-class>
<init-param>
<param-name>casServerUrlPrefix</param-name>
<param-value>https://localhost:8443/CasServer</param-value>
</init-param>
<init-param>
<param-name>serverName</param-name>
<param-value>https://localhost:8443</param-value>
</init-param>
<init-param>
<param-name>redirectAfterValidation</param-name>
<param-value>true</param-value>
</init-param>
<init-param>
<param-name>useSession</param-name>
<param-value>true</param-value>
</init-param>
<init-param>
<param-name>acceptAnyProxy</param-name>
<param-value>true</param-value>
</init-param>
</filter>
<filter>
<filter-name>CAS HttpServletRequest Wrapper Filter</filter-name>
<filter-class>org.jasig.cas.client.util.HttpServletRequestWrapperFilter</filter-class>
</filter>
<filter-mapping>
<filter-name>CAS Validation Filter</filter-name>
<url-pattern>/*</url-pattern>
</filter-mapping>
<filter-mapping>
<filter-name>CAS Authentication Filter</filter-name>
<url-pattern>/*</url-pattern>
</filter-mapping>
<filter-mapping>
<filter-name>CAS HttpServletRequest Wrapper Filter</filter-name>
<url-pattern>/*</url-pattern>
</filter-mapping>
Login CasSample by using SSO
Add CasSample to tomcat for the deployment
Start tomcat server
Access CasServer web application by using url: http://localhost:8080/CasSample/
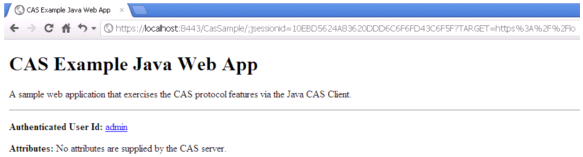
If login successful, the following screen should be displayed:
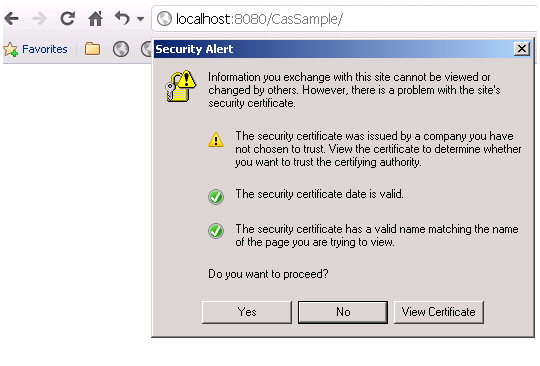
Click Yes and the CAS login screen is displayed, input any username and password as same string.
The index.jsp for CasSample is displayed, and Authenticated Usr Id is displayed correctly.


 836
836

 被折叠的 条评论
为什么被折叠?
被折叠的 条评论
为什么被折叠?
 到【灌水乐园】发言


