


 本文介绍了如何将SpringMVC与Thymeleaf模板引擎整合,从添加依赖、配置springmvc.xml、web.xml,到创建控制器和视图,详细展示了SpringMVC的简单应用。通过实例演示了控制器类的注解使用,以及Thymeleaf模板的配置和页面展示。最后,讨论了在前后端分离的场景下,视图解析器的可选性。
springmvc
MVC框架
MVC全名是Model View Controller,是模型(model)-视图(view)-控制器(controller)的缩写,一种软件设计典范
模型-视图-控制器(MVC)
一个简单的案例带我们走进springmvc(springmvc整合thymeleaf)
第一步:导入依赖
  <dependency>
      <groupId>org.springframework</groupId>
      <artifactId>spring-webmvc</artifactId>
      <version>5.2.8.RELEASE</version>
    </dependency>
    <dependency>
      <groupId>org.thymeleaf</groupId>
      <artifactId>thymeleaf</artifactId>
      <version>3.0.11.RELEASE</version>
    </dependency>
    <dependency>
      <groupId>org.thymeleaf</groupId>
      <artifactId>thymeleaf-spring5</artifactId>
      <version>3.0.11.RELEASE</version>
    </dependency>
步骤2:创建springMVC配置文件springmvc.xml
<?xml version="1.0" encoding="UTF-8"?>
<beans xmlns="http://www.springframework.org/schema/beans"
       xmlns:mvc="http://www.springframework.org/schema/mvc"
       xmlns:xsi="http://www.w3.org/2001/XMLSchema-instance"
       xmlns:context="http://www.springframework.org/schema/context"
       xsi:schemaLocation="
        http://www.springframework.org/schema/beans
        https://www.springframework.org/schema/beans/spring-beans.xsd
        http://www.springframework.org/schema/mvc
        https://www.springframework.org/schema/mvc/spring-mvc.xsd
        http://www.springframework.org/schema/context
        https://www.springframework.org/schema/context/spring-context.xsd">
    <!-- 配置spring MVC扫描的包,spring MVC只扫描@Controller -->
    <context:component-scan base-package="com.woniu.controller">

    <mvc:annotation-driven/>

    <!--thymeleaf模板解析器-->
    <bean id="templateResolver" class="org.thymeleaf.spring5.templateresolver.SpringResourceTemplateResolver">
        <!--前缀配置-->
        <property name="prefix" value="/page/"></property>
        <!--后缀配置-->
        <property name="suffix" value=".html"></property>
        <!--模板类型-->
        <property name="templateMode" value="HTML"></property>
        <!--不使用缓存-->
        <property name="cacheable" value="false"></property>
        <!--编码类型-->
        <property name="characterEncoding" value="UTF-8"></property>
    </bean>
    <!--模板引擎配置-->
    <bean id="templateEngine" class="org.thymeleaf.spring5.SpringTemplateEngine">
        <property name="templateResolver" ref="templateResolver"></property>
    </bean>
    <!--视图处理器-->
    <bean class="org.thymeleaf.spring5.view.ThymeleafViewResolver">
        <property name="templateEngine" ref="templateEngine"></property>
        <property name="characterEncoding" value="UTF-8"></property>
    </bean>
	<!--配置静态资源映射-->
    <mvc:resources mapping="/page/**" location="/page/"/>
    <mvc:resources mapping="/js/**" location="/js/"/>

</beans>
步骤3:在web.xml中配置web容器启动时创建DispatcherServlet,同时解析spring MVC配置文件生成spring MVC容器(该容器是spring容器的子容器,也就是说spring容器中的内容spring MVC容器都可以使用)
<?xml version="1.0" encoding="UTF-8"?>
<web-app xmlns="http://xmlns.jcp.org/xml/ns/javaee"
         xmlns:xsi="http://www.w3.org/2001/XMLSchema-instance"
         xsi:schemaLocation="http://xmlns.jcp.org/xml/ns/javaee http://xmlns.jcp.org/xml/ns/javaee/web-app_4_0.xsd"
         version="4.0">
    <!-- 配置字符编码过滤器 -->
 	<filter>
     <filter-name>characterEncodingFilter</filter-name>
     <filter-class>org.springframework.web.filter.CharacterEncodingFilter</filter-class>
     <init-param>
         <param-name>encoding</param-name>
         <param-value>UTF-8</param-value>
     </init-param>
	</filter>
 	<filter-mapping>
     <filter-name>characterEncodingFilter</filter-name>
     <url-pattern>/*</url-pattern>
 	</filter-mapping>

    <!-- 配置web容器启动时创建前端控制器DispatcherServlet -->
    <servlet>
        <servlet-name>dispatcher</servlet-name>
        <servlet-class>org.springframework.web.servlet.DispatcherServlet</servlet-class>
        <!-- 修改springmvc配置文件的路径和名称 -->
        <init-param>
            <param-name>contextConfigLocation</param-name>
            <param-value>classpath:springmvc.xml</param-value>
        </init-param>
        <!-- web容器启动即创建 -->
        <load-on-startup>1</load-on-startup>
    </servlet>
    <servlet-mapping>
        <servlet-name>dispatcher</servlet-name>
        <url-pattern>/</url-pattern>
    </servlet-mapping>

</web-app>
步骤4:创建控制器类TestController.java。
//注解配置本类为控制器
@Controller
public class TestController {
    //解析用户请求映射处理器
    @RequestMapping("/")
    public String index(){
        //返回逻辑视图
        return "index";
    }
}
注:@RequestMapping可以注解在类上,也可以注解在方法上,使用方式如下例:
localhost:8080/user/


@Controller
@RequestMapping("/user")
public class TestController {

//解析用户请求映射处理器
 @RequestMapping("/")
 public String index(){
     //返回逻辑视图
     return "index";
 }
}
当方法上配置的路径过长时,可以使用@RequestMapping将路径分为两段,公共的一级路径配置在控制器类上,独有的二级路径配置在方法上,可以减少路径配置代码。
步骤5:在webapp目录下创建static目录,在该目录下创建index.html。
<!DOCTYPE html>
<html lang="en" xmlns:th="http://www.thymeleaf.org">
<head>
    <meta charset="UTF-8">
    <title>index</title>
</head>
<body>
	这是首页!!!
</body>
</html>
步骤6:测试
部署项目到tomcat并运行,http://localhost:9080/,可正常访问登录页面。
<?xml version="1.0" encoding="UTF-8"?>
<beans xmlns="http://www.springframework.org/schema/beans"
    xmlns:mvc="http://www.springframework.org/schema/mvc"
    xmlns:xsi="http://www.w3.org/2001/XMLSchema-instance"
    xmlns:context="http://www.springframework.org/schema/context"
    xsi:schemaLocation="
     http://www.springframework.org/schema/beans
     https://www.springframework.org/schema/beans/spring-beans.xsd
     http://www.springframework.org/schema/mvc
     https://www.springframework.org/schema/mvc/spring-mvc.xsd
     http://www.springframework.org/schema/context
     https://www.springframework.org/schema/context/spring-context.xsd">
 <!-- 配置spring MVC扫描的包,spring MVC只扫描@Controller -->
 <context:component-scan base-package="com.woniu">
     <context:include-filter type="annotation"  expression="org.springframework.stereotype.Controller"/>
 </context:component-scan>

 <mvc:annotation-driven/>
 <!--配置视图解析器-->
 <bean id="viewResolver" class="org.springframework.web.servlet.view.InternalResourceViewResolver">
     <property name="prefix" value="/WEB-INF/page/"/>
     <property name="suffix" value=".jsp"/>
 </bean>
	<!--配置静态资源映射-->
 <mvc:resources mapping="/static/**" location="/static/"/>
 <mvc:resources mapping="/js/**" location="/js/"/>
</beans>
需要注意的是,如果前端全部使用ajax方式对后台发送请求,那么springmvc的视图解析器将不再是必要的。因为前后端会使用json进行数据交互,而不必使用视图进行数据渲染,所以无需使用视图解析器进行解析,从而可以不再配置视图解析器。
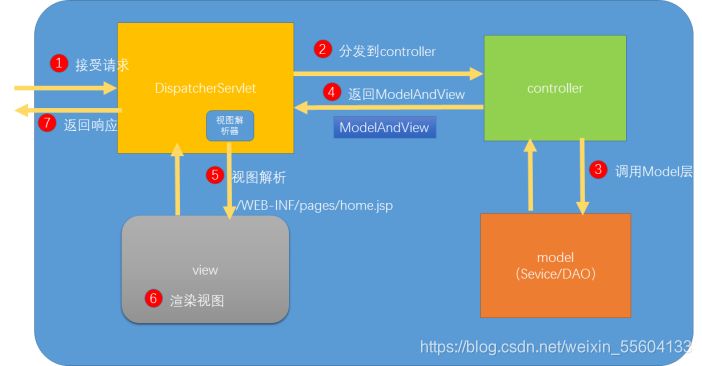
这个图很重要springmvc的执行流程
下一篇我们来了解springmvc的请求参数,响应返回值


 149
149

 被折叠的 条评论
为什么被折叠?
被折叠的 条评论
为什么被折叠?
 到【灌水乐园】发言


