


 本文详细介绍了如何在CentOS7系统上卸载旧版Mariadb,通过阿里云YUM库安装新版本Mariadb,进行安全初始化设置,包括设置root密码、移除匿名用户和test数据库,以及添加远程登录权限。此外,还提到了修改命令提示符的方法。
1.0项目目的
mysql 数据库的最佳替代产品,PostgreSQL 也非常不错。
2.0项目步骤
2.1卸载旧版本 Mariadb
查询系统内是否已安装 Mariadb 旧版本
[root@centos7 ~]#rpm -qa |grep mariadb删除旧版本 Mariadb
[root@centos7 ~]# yum -y remove mariadb-libs2.2安装新版本 Mariadb
查阅官方资料:https://mariadb.org
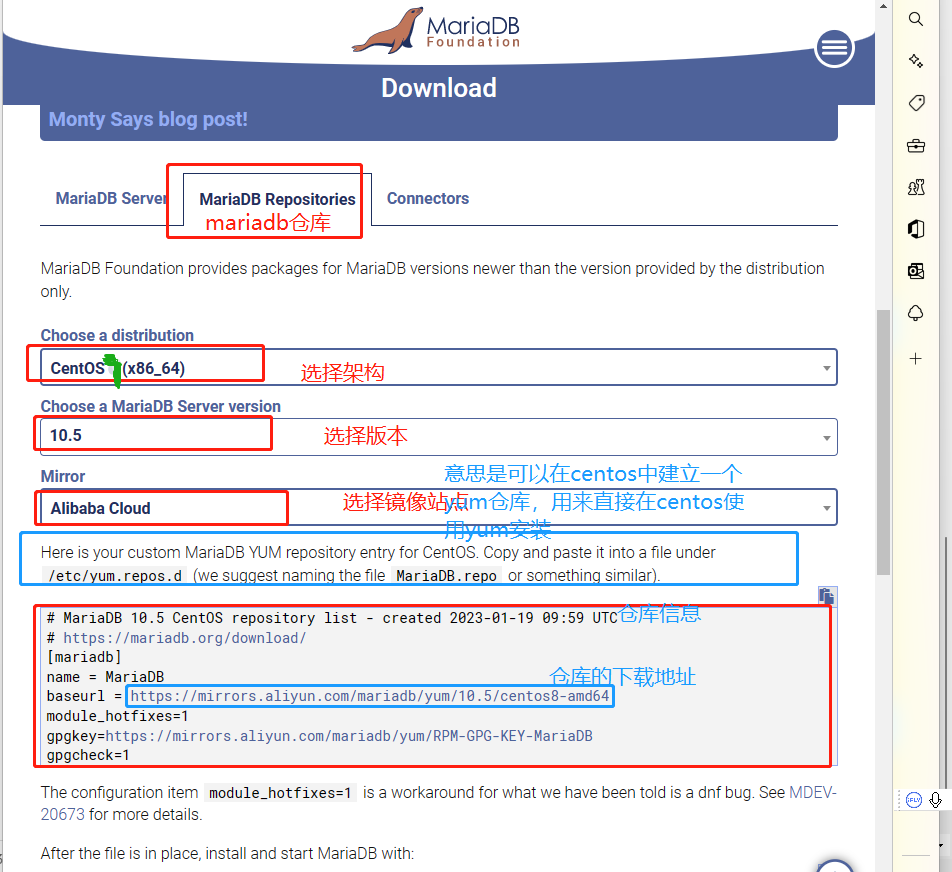
配置阿里云 Mariadb YUM 库
#查看一下位置
[root@centos7 ~]#pwd
 /root
#进入仓库目录
[root@centos7 ~]#cd /etc/yum.repos.d/
#新建一个MariaDB的  .repo文件
[root@centos7 /etc/yum.repos.d]#touch mariadb.repo
#编辑这个文件,注意   网站copy过来的把一些空格删除掉
[root@centos7 /etc/yum.repos.d]#vim mariadb.repo
#mariaDB 10.5 CentOS repository list - created 2023-01-19 10:10 UTC
#https://mariadb.org/download/
[mariadb]
name=MariaDB
baseurl=https://mirrors.aliyun.com/mariadb/yum/10.5/centos7-amd64
gpgkey=https://mirrors.aliyun.com/mariadb/yum/RPM-GPG-KEY-MariaDB
gpgcheck=1
#清理缓存
[root@centos7 /etc/yum.repos.d]#yum makecache
[root@centos7 /etc/yum.repos.d]#yum clean all
安装 Mariadb
[root@centos7 /etc/yum.repos.d]#yum -y install mariadb安装mariadb服务器
如果没有安装Mariadb服务器在启动mariadb会出现报错
[root@centos7 ~]#systemctl start mariadb.service
Failed to start mariadb.service: Unit not found.
[root@centos7 ~]#yum -y install mariadb-server2.3 启动 Mariadb 服务
#启动mariadb服务
 [root@centos7 /etc/yum.repos.d]#systemctl start mariadb.service
#设置mariadb服务开机自启
[root@centos7 /etc/yum.repos.d]#systemctl enable mariadb.service
Created symlink from /etc/systemd/system/multi-user.target.wants/mariadb.service to /usr/lib/systemd/system/mariadb.service.
#验证数据库3306端口是否开启
 [root@centos7 /etc/yum.repos.d]#ss -lntp |grep 3306
LISTEN     0      80          :::3306                    :::*                   users:(("mariadbd",pid=33461,fd=19))
 [root@centos7 /etc/yum.repos.d]#
2.4安全初始化 Mariadb
输入当前用户的口令 enter(回车)
更改初始化密码 Change the root password? [Y/n] y
移除匿名账号 Remove anonymous users? [Y/n] y
为了实验方便,允许root账号的远程访问 Disallow root login remotely? [Y/n] n
移除test数据库 Remove test database and access to it? [Y/n] y
移除test数据库 Reload privilege tables now? [Y/n] y
#b跑一下安全脚本
 [root@centos7 ~]# mariadb-secure-installation

NOTE: RUNNING ALL PARTS OF THIS SCRIPT IS RECOMMENDED FOR ALL MariaDB
      SERVERS IN PRODUCTION USE!  PLEASE READ EACH STEP CAREFULLY!

In order to log into MariaDB to secure it, we'll need the current
password for the root user. If you've just installed MariaDB, and
haven't set the root password yet, you should just press enter here.

#输入当前用户的口令         enter(回车)
Enter current password for root (enter for none):
OK, successfully used password, moving on...

Setting the root password or using the unix_socket ensures that nobody
can log into the MariaDB root user without the proper authorisation.

You already have your root account protected, so you can safely answer 'n'.

Switch to unix_socket authentication [Y/n] n
 ... skipping.

You already have your root account protected, so you can safely answer 'n'.
#更改初始化密码
Change the root password? [Y/n] y
New password:    #输入密码
Re-enter new password:    #再次输入密码
Password updated successfully!
Reloading privilege tables..
 ... Success!


By default, a MariaDB installation has an anonymous user, allowing anyone
to log into MariaDB without having to have a user account created for
them.  This is intended only for testing, and to make the installation
go a bit smoother.  You should remove them before moving into a
production environment.
#移除匿名账号
Remove anonymous users? [Y/n] y
 ... Success!

Normally, root should only be allowed to connect from 'localhost'.  This
ensures that someone cannot guess at the root password from the network.
#为了实验方便,允许root账号的远程访问
Disallow root login remotely? [Y/n] n
 ... skipping.

By default, MariaDB comes with a database named 'test' that anyone can
access.  This is also intended only for testing, and should be removed
before moving into a production environment.
#移除test数据库
Remove test database and access to it? [Y/n] y
 - Dropping test database...
 ... Success!
 - Removing privileges on test database...
 ... Success!

Reloading the privilege tables will ensure that all changes made so far
will take effect immediately.
#设置是否生效
Reload privilege tables now? [Y/n] y
 ... Success!

Cleaning up...

All done!  If you've completed all of the above steps, your MariaDB
installation should now be secure.

Thanks for using MariaDB!
2.5测试登录 Mariadb
修改密码后,使用centos非root账号登陆mysql需要输入密码。
mysql -uroot -pcentos
uroot | u 用户 | root 登陆的用户
pcentos | p密码 | centos 该用户设置的密码
[root@centos7 ~]#mysql -uroot -p
Enter password:
Welcome to the MariaDB monitor.  Commands end with ; or \g.
Your MariaDB connection id is 10
Server version: 10.5.18-MariaDB MariaDB Server

Copyright (c) 2000, 2018, Oracle, MariaDB Corporation Ab and others.

Type 'help;' or '\h' for help. Type '\c' to clear the current input statement.

MariaDB [(none)]> select user,host,plugin from mysql.user;
+-------------+-----------+-----------------------+
| User        | Host      | plugin                |
+-------------+-----------+-----------------------+
| mariadb.sys | localhost | mysql_native_password |
| root        | localhost | mysql_native_password |
| mysql       | localhost | mysql_native_password |
+-------------+-----------+-----------------------+
3 rows in set (0.003 sec)
root 账号没有远程登录权限
2.6 root 账号添加远程登录权限及操作所有数据库的权限
#创建账号
MariaDB [(none)]> create user 'root'@'%' identified by 'root';
Query OK, 0 rows affected (0.004 sec)
#账号赋权
MariaDB [(none)]> grant all privileges on *.* to 'root'@'%' ;
Query OK, 0 rows affected (0.001 sec)
2.7修改命令提示符
临时修改
prompt \u@[\D] \r:\m:\s->永久修改
[root@centos7 ~]#cd /etc/my.cnf.d/
 [root@centos7 ~]#ls
enable_encryption.preset  mysql-clients.cnf  server.cnf  spider.cnf
[root@centos7 /etc/my.cnf.d]#vim mysql-clients.cnf

These groups are read by MariaDB command-line tools

Use it for options that affect only one utility

[mysql]

# 填入 prompt=(\\u@\\h) [\\d]>\\_
 prompt=(\\u@\\h) [\\d]>\\_
[mysql_upgrade]

[mysqladmin]

[mysqlbinlog]

[mysqlcheck]

[mysqldump]


[mysql_upgrade]

[mysqladmin]

[mysqlbinlog]

[mysqlcheck]

[mysqldump]

#其他的格式
  prompt=(\\u@\\h) [\\d]>\\_
prompt="\\r:\\m:\\s> "
3.0借鉴资源
3.1文档
项目实训 4:Mariadb 数据库安装与部署 (qq.com)
3.2视频
【项目4:Mariadb数据库安装与部署-哔哩哔哩】 https://b23.tv/8aaZYAW


 3937
3937

 被折叠的 条评论
为什么被折叠?
被折叠的 条评论
为什么被折叠?
 到【灌水乐园】发言


