


基于springboot+vue+element UI+mybatis-plus的简单分页
@author chajintao
1.前端(vue+element)
1.1 工具(HBuilderX,node.js)
1.1.1 下载和安装
下载HBuilderX,官网地址为https://www.dcloud.io/hbuilderx.html
下载node.js,官网为http://nodejs.cn/
安装HBuilderX和node.js,傻瓜式安装,一路确认即可。
1.1.2 验证
首先WIN+R,输入CMD,打开命令行
输入node -v,成功则显示版本号
输入npm -v,同上
1.2 创建前端工程
1.2.1 项目创建
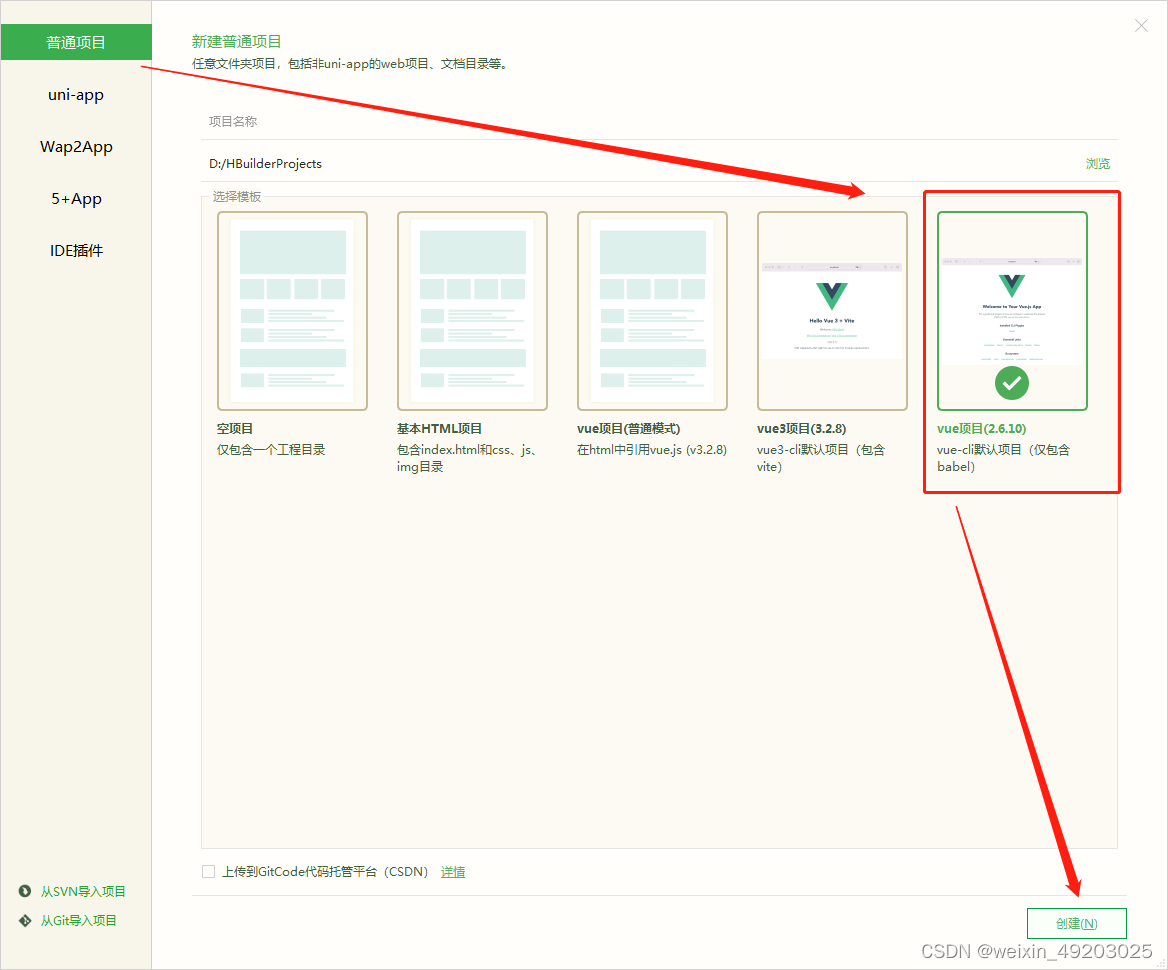
1.2.2 项目架构
项目创建完成,接下来就开始配置。
1.3 具体配置
1.3.1 插件
首先我们确认需要什么插件,axois,router,vuex,element-ui
接下来右键,点击使用命令行窗口打开所在目录,使用npm安装
安装成功后,结构如下:
{
  "name": "default",
  "version": "0.1.0",
  "private": true,
  "scripts": {
    "serve": "vue-cli-service serve",
    "build": "vue-cli-service build"
  },
  "dependencies": {
    "axios": "^0.26.1",
    "core-js": "^2.6.5",
    "element-ui": "^2.15.8",
    "vue": "^2.6.10",
    "vue-router": "^3.5.3",
    "vuex": "^3.6.2"
  },
  "devDependencies": {
    "@vue/cli-plugin-babel": "^3.8.0",
    "@vue/cli-service": "^3.8.0",
    "vue-template-compiler": "^2.6.10"
  }
}
1.3.2 vue.config.js
这边是连接spring boot 后台地址配置,直接网上拿来用
module.exports={
	devServer:{
		proxy:{
			"":{
				target:"http://localhost:8080",//访问的域名地址
				changeOrigin:true,
				//开启代理,在本地会创建一个虚拟服务端,然后发送请求的数据,
				//并同时接收请求的数据,这样服务端和服务端进行数据的交互就不会有跨域问题
			pathRewrite:{
				'^':''
				//用''代替target里的地址
			}
			}
		}
	}
}
1.3.3 main.js
安装了插件,就要声明使用
import Vue from 'vue'
import App from './App.vue'

//导入路由
import router from './router/router.js'


//导入element ui
import ElementUI from 'element-ui'
import 'element-ui/lib/theme-chalk/index.css'

//导入axios并实例化
import axios from 'axios'
Vue.prototype.$axios = axios

//引入全局数据控制


//声明使用ui
Vue.use(ElementUI);
Vue.config.productionTip = false

new Vue({
	el:'#app',
	//配置路由
	router:router,
	render: h => h(App),
	components:{App},
	template:'<App/>'
}).$mount('#app')
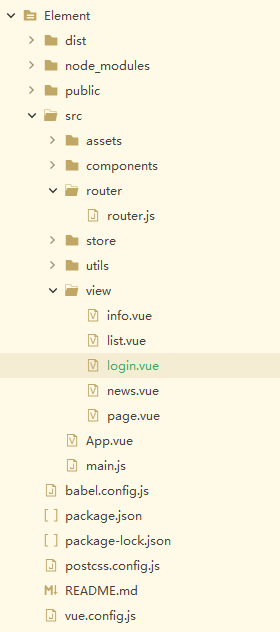
1.3.4 创建news.vue
该分页vue的实现是十分简单的,在中写前端格式,直接一个表格加分页,在
<div style="padding: 10px">
	    <el-table
	        v-loading="loading"
	        :data="tableData"
	        border
	        stripe
	        style="width: 100%">
	      <el-table-column
	          prop="id"
	          label="ID"
	          sortable
	      >
	      </el-table-column>
	      <el-table-column
	          prop="title"
	          label="标题">
	      </el-table-column>
	      <el-table-column
	          prop="author"
	          label="作者">
	      </el-table-column>
	      <el-table-column
	          prop="time"
	          label="时间">
	      </el-table-column>
	      <el-table-column label="操作">
	        <template #default="scope">
	          <el-button icon="el-icon-message" size="mini" @click="details(scope.row)" title="详情"></el-button>
	          <el-button icon="el-icon-edit" size="mini" @click="handleEdit(scope.row)" title="编辑"></el-button>

	          <el-button size="mini" icon="el-icon-delete" type="danger"></el-button>
	        </template>
	      </el-table-column>
	    </el-table>

	    <div style="margin: 10px 0">
	      <el-pagination
	          @size-change="handleSizeChange"
	          @current-change="handleCurrentChange"
	          :current-page="this.currentPage"
	          :page-sizes="[10, 20, 50, 100]"
	          :page-size="this.pageSize"
	          layout="total, sizes, prev, pager, next, jumper"
	          :total="total">
	      </el-pagination>
	    </div>
	  </div>
script如下:一个是load方法,是刷新获取数据,handleSizeChange是改变页数大小,handleCurrentChange是切换当前页
export default {
		name:"news",
		data(){
			return{
				loading:true,
				form:{},
				dialogVisible:false,
				currentPage:1,
				pageSize:10,
				total:0,
				tableData:[],
				vis:false,
				detail:{},
			}
		},
		created() {
			this.load()
		},
		methods:{
			//获取某行数据
			load(){
				this.loading = true
				this.$axios({
					url:'/vue/news',
					method:'get',
					params:{
						currentPage:this.currentPage,
						pageSize:this.pageSize,
					}
				})
				.then(res =>{
					console.log(res)
					this.loading = false
					this.$data.tableData = res.data.data.records
					this.total = res.data.data.total
				})
			},
			    handleSizeChange(pageSize) {   // 改变当前每页的个数触发
			      this.pageSize = pageSize
				  console.log("当前页大小:"+pageSize)
			      this.load()
			    },
			    handleCurrentChange(currentPage) {  // 改变当前页码触发
			      this.currentPage = currentPage
				  console.log("当前页:"+currentPage)
			      this.load()
			    }


		}
	}
created:就是一开始就获取方法,刷新数据
style样式暂不设置
1.3.5 router设置
前期准备完成了,接下来需要设置路由,新建文件夹>router>router.js
import Vue from 'vue'
import VueRouter from 'vue-router'

//导入news
import news from "../view/news.vue"

//安装路由
Vue.use(VueRouter)

//导出路由
export default new VueRouter({
	routes:[
		{
			path:'/news',
			component:news
		}
	]
})
1.3.6 展示路由App.vue
<template>
  <div id="app">
    <!-- <img alt="Vue logo" src="./assets/logo.png"> -->
    <!-- <Test msg="Welcome to Your Vue.js App"/> -->

	<!-- 展示路由 -->
	<router-view></router-view>

  </div>
</template>

<script>

export default {
  name: 'App',
}
</script>
1.3.7 测试
右键,选择npm run serve,即可运行。访问http://localhost:8082/X#/news,内部浏览器可显示简单样式,没有数据。
2.后端 spring boot
2.1 工具
本人使用的是idea,可以在线创建spring boot工程,有兴趣的可以自行下载安装。
创建spring boot可以参考:https://mp.youkuaiyun.com/mp_blog/creation/editor/123837496
2.2 依赖
首先是mybatis-plus
<!--mybatis plus-->
        <dependency>
            <groupId>com.baomidou</groupId>
            <artifactId>mybatis-plus-boot-starter</artifactId>
            <version>3.2.0</version>
        </dependency>
因为要链接数据库,需要mysql
<dependency>
            <groupId>mysql</groupId>
            <artifactId>mysql-connector-java</artifactId>
            <scope>runtime</scope>
        </dependency>
再使用一个lombok,对实体类进行操作
 <!-- https://mvnrepository.com/artifact/org.projectlombok/lombok -->
        <dependency>
            <groupId>org.projectlombok</groupId>
            <artifactId>lombok</artifactId>
            <version>1.18.22</version>
            <scope>provided</scope>
        </dependency>
2.3 application.xml
这个设置为调用dev
spring:
  profiles:
    active: dev
2.4 application-dev.xml
各种配置:
spring:
  datasource:
    url: jdbc:mysql://localhost:3306/store
    username: root
    password: mysql
    driver-class-name: com.mysql.cj.jdbc.Driver
  servlet:
    multipart:
      max-file-size: 10MB
      max-request-size: 15MB
  redis:
    host: 127.0.0.1
    port: 6379
  mvc:
    pathmatch:
      matching-strategy: ant_path_matcher
  main:
    allow-circular-references: true
mybatis:
  mapper-locations: mapper/*.xml
  type-aliases-package: com.hc.store.model

server:
  port: 8080

mybatis-plus:
  configuration:
    log-impl: org.apache.ibatis.logging.stdout.StdOutImpl
2.5 业务处理
本人是从controller–service–impl-mapper-xml一路过来。
2.5.1 controller
package com.hc.store.controller;

import com.baomidou.mybatisplus.core.metadata.IPage;
import com.baomidou.mybatisplus.core.toolkit.Wrappers;
import com.baomidou.mybatisplus.extension.plugins.pagination.Page;
import com.hc.store.model.News;
import com.hc.store.service.VueService;
import com.hc.store.sf.Result;
import org.springframework.beans.factory.annotation.Autowired;
import org.springframework.web.bind.annotation.*;

import java.util.ArrayList;
import java.util.List;
import java.util.UUID;

/**
 * @author chajintao
 * @date 2022/4/18 9:19
 */
@Api("vue交互")
@RestController
@RequestMapping("/vue")
public class VueController {

    @Autowired
    private VueService vueService;
    @RequestMapping(value = "/news")
    public Result<IPage<News>> vueFind(@RequestParam(value = "currentPage", defaultValue = "1") Integer currentPage, @RequestParam(value = "pageSize", defaultValue = "10") Integer pageSize){

        Page<News> page = new Page<>(currentPage,pageSize);
        IPage<News> iPage = vueService.selectPageVo(page);
        return Result.ok(iPage);
    }
}
2.5.2 service
**
 * 测试vue
 * @author chajintao
 * @date 2022/4/18 16:51
 */
public interface VueService extends IService<News> {

    IPage<News> selectPageVo(Page<News> page);
}
2.5.3 impl
impl主要是实现service接口,处理业务逻辑
@Service
public class VueServiceImpl extends ServiceImpl<VueMapper,News> implements VueService {
    @Autowired
    private VueMapper vueMapper;

    @Override
    public IPage<News> selectPageVo(Page<News> page) {
        return vueMapper.selectPageVo(page);
    }
}
2.5.4 mapper
/**
 * @author chajintao
 * @date 2022/4/18 18:23
 */
public interface VueMapper extends BaseMapper<News> {
    List<User> getAllUsers();

    @Select("select * from news")
    IPage<News> selectPageVo(Page<News> page);
}
2.5.5 model
最后是实体类
@Data
@TableName("news")
public class News {

    @TableId(type = IdType.AUTO)
    private Integer id;
    private String title;
    private String content;
    private String author;
    @JsonFormat(pattern = "yyyy-MM-dd HH:mm:ss", timezone = "GMT+8")
    private Date time;

}
2.6 测试
首先启动spring boot工程,再启动vue工程,跳转到news.vue,即可看到显示成功。
使用Postman测试工具,成功。
{
    "code": 200,
    "status": true,
    "data": {
        "records": [
            {
                "id": 1,
                "title": "324",
                "content": "234",
                "author": "325",
                "time": "2022-04-19 09:11:42"
            },
            {
                "id": 2,
                "title": "23234",
                "content": "253",
                "author": "46",
                "time": "2022-04-19 09:11:54"
            },
            {
                "id": 3,
                "title": "345",
                "content": "435",
                "author": "345",
                "time": "2022-04-19 09:12:03"
            },
            {
                "id": 4,
                "title": "34",
                "content": "354",
                "author": "345",
                "time": "2022-04-05 09:12:13"
            },
            {
                "id": 5,
                "title": "345",
                "content": "435",
                "author": "435",
                "time": "2022-04-19 09:12:25"
            },
            {
                "id": 6,
                "title": "53",
                "content": "435",
                "author": "345",
                "time": null
            },
            {
                "id": 7,
                "title": "354",
                "content": "345",
                "author": "35",
                "time": null
            },
            {
                "id": 8,
                "title": "gfd",
                "content": "dgf",
                "author": "dfg",
                "time": null
            },
            {
                "id": 9,
                "title": "dfg",
                "content": "dg",
                "author": "dgf",
                "time": null
            },
            {
                "id": 10,
                "title": "dfg",
                "content": "dfg",
                "author": "dfg",
                "time": null
            }
        ],
        "total": 12,
        "size": 10,
        "current": 1,
        "orders": [],
        "searchCount": true,
        "pages": 2
    },
    "msg": "请求成功"
}
3.总结
实现不难,难的是梳理,一定要理解。


 1991
1991

 被折叠的 条评论
为什么被折叠?
被折叠的 条评论
为什么被折叠?
 到【灌水乐园】发言


