


随着我国经济的不断发展,民生基础建设也在不断完善,社会保障服务也得到了很好的发展,表现最为突出的就是社区医疗,从根本上上解决了看病难的问题,为了更好的服务人们的生活,本文着力研究社区医疗信息管理系统的设计,在了解社区医疗管理系统的需求基础之上,并提出社区医疗信息管理系统的实现方案。
研发一套针对社区环境的医疗信息系统,实现社区医疗信息的网络化管理.方法 采用基于 WEB 的浏览器/服务器(browser/server,B/S)模式网络架构.以 Apache 为网络服务器,JAVA语言,MySQL 为数据库管理工具.所有代码都在 服务器端实现.为保护患者隐私和系统数据安全,系统采用严格的用户分级授权机制. 结果在实验室模拟环境下,测试结果表明系统安全可靠,设计能满足当前社区医疗信息化的基本要求.结论 以免费开源工具为基础构建的基于 WEB 的社区医疗信息系统可基本满足一般社区的医疗信息化需求。
关键字: 社区医疗;B/S模式;springboot;mysql
【695】基于springboot社区医疗服务管理系统源码和论文
1 项目介绍
1.1 项目背景
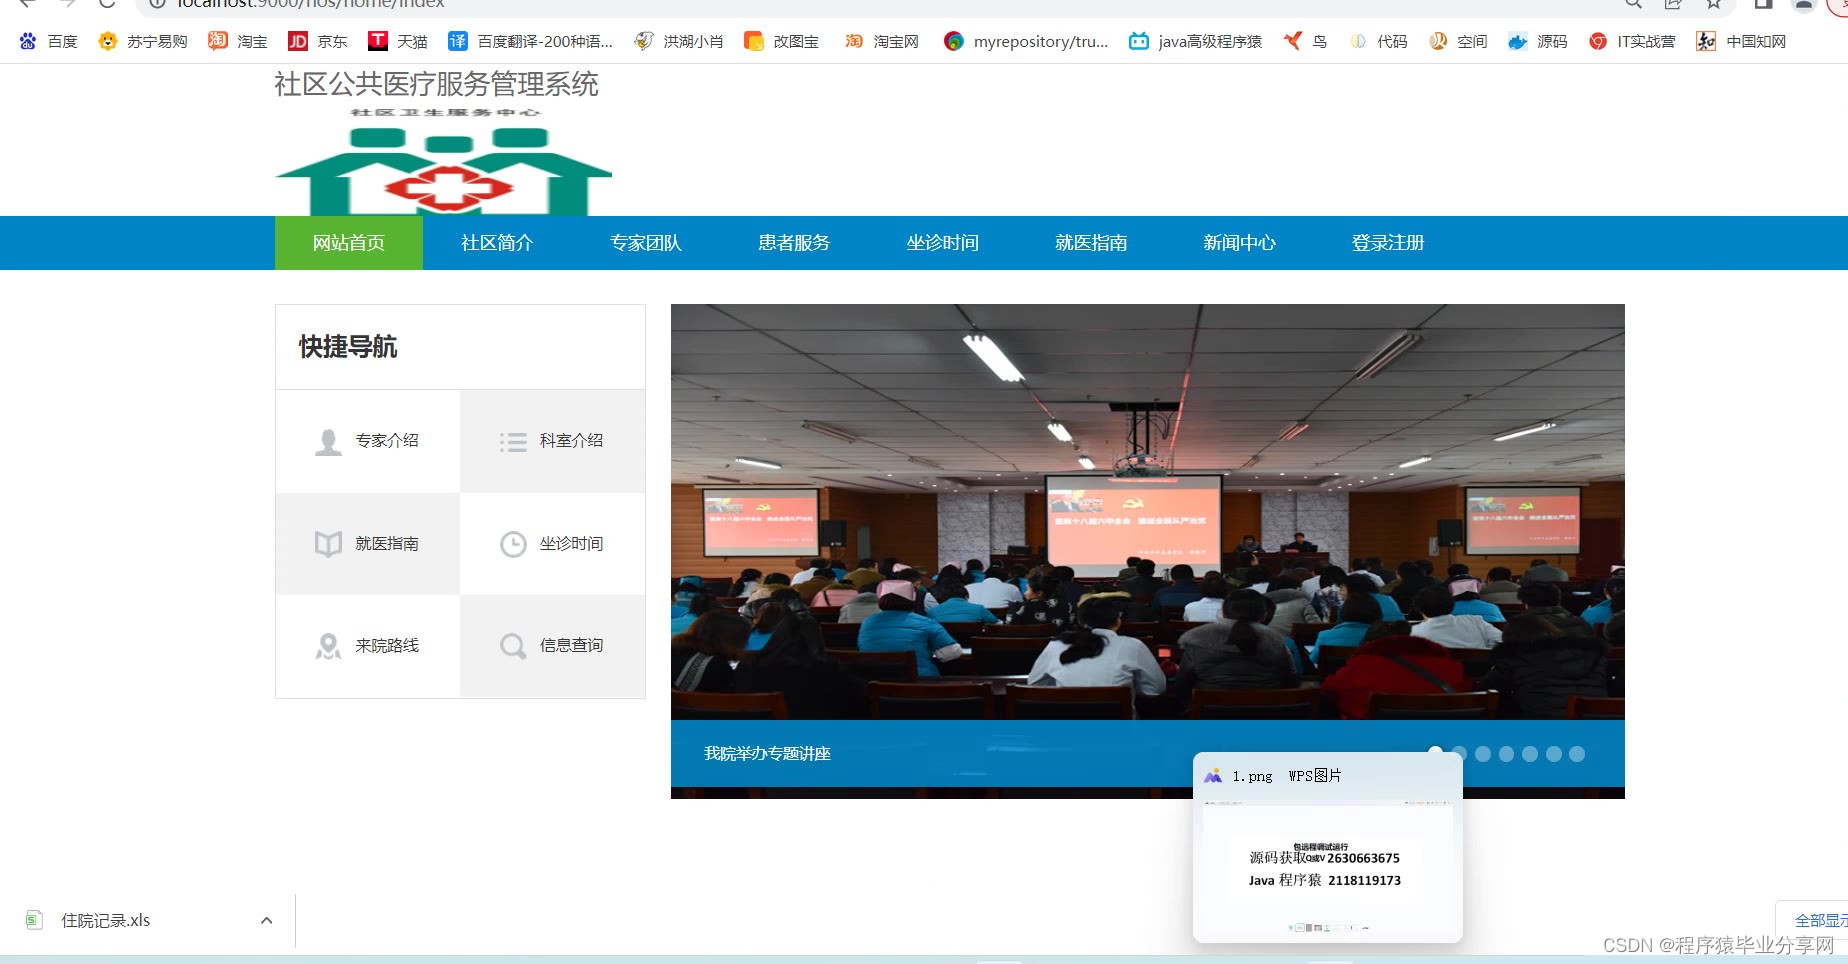
随着现代互联网的快速发展,人们的生活越来越离不开互联网带给我们的便捷。在这样的环境下,传统的医院医疗系统,现场挂号,就诊,取药等方式已经不能满足我们,所以线上预约挂号,看病的需求迫切要得到解决。在这样市场的要求下,我们的线上医疗系统应运而生。
1.2 业务模型

2 项目架构
2.1 框架技术
后台框架:Spring Boot
持久层框架: BeetlSQL
引擎模板:Beetl
前端框架:Layui
2.2 maven依赖
<dependencies>
<dependency>
<groupId>org.springframework.boot</groupId>
<artifactId>spring-boot-starter-web</artifactId>
</dependency>
<dependency>
<groupId>org.springframework.boot</groupId>
<artifactId>spring-boot-starter-jdbc</artifactId>
</dependency>
<!-- beetl-framework-starter -->
<dependency>
<groupId>com.ibeetl</groupId>
<artifactId>beetl-framework-starter</artifactId>
<version>1.2.24.RELEASE</version>
</dependency>
<dependency>
<groupId>mysql</groupId>
<artifactId>mysql-connector-java</artifactId>
<version>${mysql.driver.verion}</version>
<scope>runtime</scope>
</dependency>
<dependency>
<groupId>org.projectlombok</groupId>
<artifactId>lombok</artifactId>
<optional>true</optional>
</dependency>
<!--热部署-->
<dependency>
<groupId>org.springframework.boot</groupId>
<artifactId>spring-boot-devtools</artifactId>
<scope>runtime</scope>
<optional>true</optional>
</dependency>
<dependency>
<groupId>org.springframework.boot</groupId>
<artifactId>spring-boot-starter-test</artifactId>
<scope>test</scope>
<exclusions>
<exclusion>
<groupId>org.junit.vintage</groupId>
<artifactId>junit-vintage-engine</artifactId>
</exclusion>
</exclusions>
</dependency>
</dependencies>
2.4 yml文件配置
###### WEB 路径 端口 ######
server:
servlet:
context-path: /
port: 9000
################### beetsql配置 ########################
# 默认是true,即向控制台输出执行时候的sql,参数,执行时间,以及执行的位置,每次修改sql文件的时候,自动检测sql文件修改
beetl-beetlsql:
dev: true
beetlsql:
basePackage: com.lb.dao
# sql 文件的位置
sqlPath: /sql
daoSuffix: Dao
dbStyle: org.beetl.sql.core.db.MySqlStyle
################### mysql数据库连接配置 #################
spring:
datasource:
driver-class-name: com.mysql.cj.jdbc.Driver
url: jdbc:mysql://localhost:3306/hospital?useUnicode=true&characterEncoding=utf-8&useSSL=false&serverTimezone=CTT
username: root
password: 123456
2.5 beetlsql 配置类
public class DataSourceConfig {
/**
* BeetlSQL 官方推荐配置
* 使用的是 Hikari 连接池 springboot2.0 默认支持
*/
@Bean(name="datasource")
public DataSource datasource(Environment env) {
HikariDataSource ds = new HikariDataSource();
ds.setJdbcUrl(env.getProperty("spring.datasource.url"));
ds.setUsername(env.getProperty("spring.datasource.username"));
ds.setPassword(env.getProperty("spring.datasource.password"));
ds.setDriverClassName(env.getProperty("spring.datasource.driver-class-name"));
return ds;
}
}
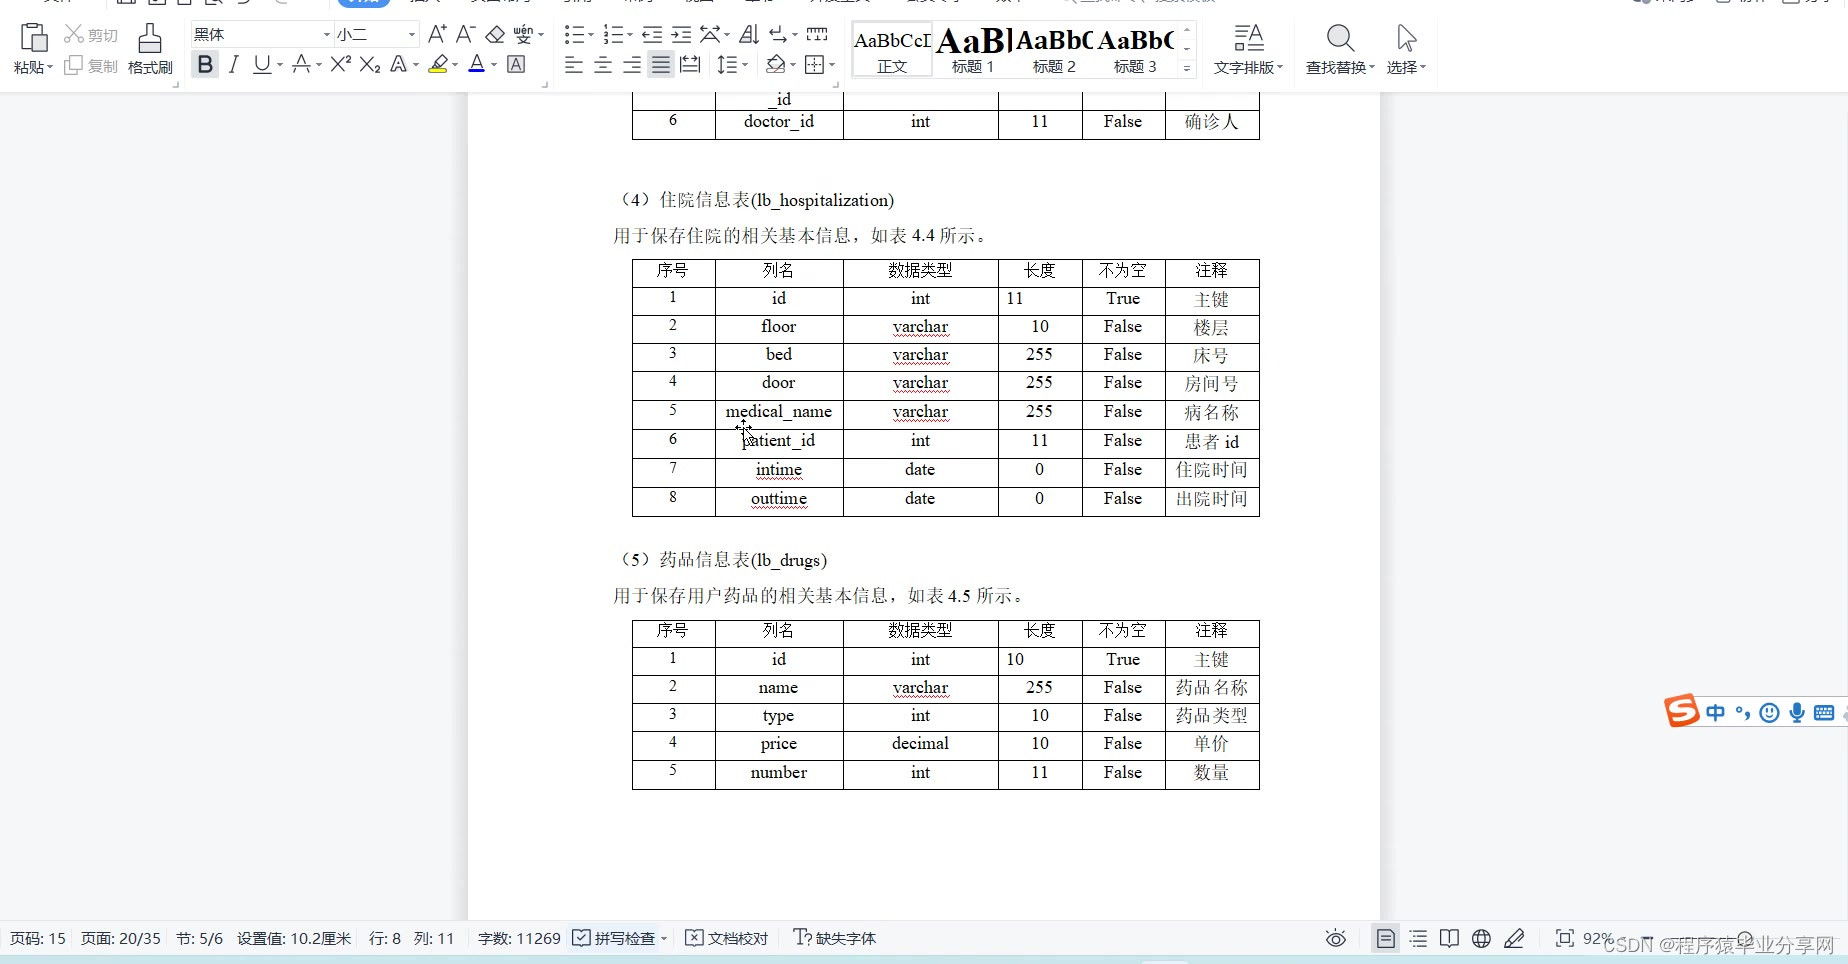
2.6 数据库设计
数据库版本:MySQL 5.7.22
表设计:


具体的SQL脚本参考项目素材包。
2.7 逆向工程
使用SQLManager对象帮我们将数据表逆向生成pojo、sql文件以及接口。
在这一步操作时,已提前准备好3个模板文件。
测试工具类:
public class BeetlSqlTest {
// ========数据库配置=========
private static String driver = "com.mysql.cj.jdbc.Driver";
private static String url = "jdbc:mysql://localhost:3306/hospital?useUnicode=true&characterEncoding=utf-8&useSSL=false&serverTimezone=CTT";
private static String userName = "root";
private static String password = "123456";
// ========模板的路径, 示例是spring boot的[src/main/resources/beetlsqlTemplate 文件夹]=========
private static String templatePath = "/beetlsqlTemplate";
// ========md生成路径 要提前创建=========
private static String mdPath = "/sql";
// ========生成实体类所在的包=========
private static String pojoPkg = "com.lb.entity";
// ========生成mapper类所在的包=========
private static String mapperPkg = "com.lb.dao";
/**
* 入口
*/
public static void main(String[] args) throws Exception {
genAll();
}
public static void genAll() throws Exception {
//准备工作
ConnectionSource source = ConnectionSourceHelper.getSimple(driver, url, userName, password);
DBStyle mysql = new MySqlStyle();
SQLLoader loader = new ClasspathLoader(mdPath);
UnderlinedNameConversion nc = new UnderlinedNameConversion();
SQLManager sqlManager = new SQLManager(mysql, loader, source, nc, null);
GenConfig config = new GenConfig();
config.setDisplay(false);
config.setPreferBigDecimal(true);
System.out.println("======生成代码======");
Set<String> tables = sqlManager.getMetaDataManager().allTable();
for (String table : tables) {
System.out.printf("%-20s %s\n",table , "生成完毕");
//默认生成实体类的实现
sqlManager.genPojoCode(table, pojoPkg, config);
//自定义实现
genMd(sqlManager, config, table);
//自定义实现
genMapper(sqlManager, config, table);
}
System.out.println("=====生成完毕=====");
}
/**
* 生成md文件
*/
public static void genMd(SQLManager sqlManager, GenConfig config, String table) throws IOException {
String fileName = StringKit.toLowerCaseFirstOne(sqlManager.getNc().getClassName(table));
if (config.getIgnorePrefix() != null && !config.getIgnorePrefix().trim().equals("")) {
fileName = fileName.replaceFirst(StringKit.toLowerCaseFirstOne(config.getIgnorePrefix()), "");
fileName = StringKit.toLowerCaseFirstOne(fileName);
}
String target = GenKit.getJavaResourcePath() + "/" + mdPath + "/" + fileName + ".md";
TableDesc desc = sqlManager.getMetaDataManager().getTable(table);
FileWriter writer = new FileWriter(new File(target));
MDCodeGen mdCodeGen = new MDCodeGen();
mdCodeGen.setMapperTemplate(config.getTemplate(templatePath + "/md.btl"));
mdCodeGen.genCode(sqlManager.getBeetl(), desc, sqlManager.getNc(), null, writer);
writer.close();
}
/**
* 生成mapper
*/
public static void genMapper(SQLManager sqlManager, GenConfig config, String table) {
MapperCodeGen mapperCodeGen = new MapperCodeGen(mapperPkg);
mapperCodeGen.setMapperTemplate(config.getTemplate(templatePath + "/mapper.btl"));
mapperCodeGen.genCode(pojoPkg, sqlManager.getNc().getClassName(table), sqlManager.getMetaDataManager().getTable(table), null, false);
}
}
3 后台管理员端
3.1 用户登录
3.1.1 添加beetl配置
此处使用配置类的方式实现
public class BeetlConf {
@Bean(name = "beetlConfig")
public BeetlGroupUtilConfiguration getBeetlGroupUtilConfiguration() {
BeetlGroupUtilConfiguration beetlGroupUtilConfiguration = new BeetlGroupUtilConfiguration();
ClasspathResourceLoader classpathResourceLoader = new ClasspathResourceLoader();
beetlGroupUtilConfiguration.setResourceLoader(classpathResourceLoader);
beetlGroupUtilConfiguration.init();
return beetlGroupUtilConfiguration;
}
@Bean(name = "beetlViewResolver")
public BeetlSpringViewResolver getBeetlSpringViewResolver(
@Qualifier("beetlConfig") BeetlGroupUtilConfiguration beetlGroupUtilConfiguration) {
BeetlSpringViewResolver beetlSpringViewResolver = new BeetlSpringViewResolver();
beetlSpringViewResolver.setPrefix("/templates/");
beetlSpringViewResolver.setSuffix(".html");
beetlSpringViewResolver.setContentType("text/html;charset=UTF-8");
beetlSpringViewResolver.setOrder(0);
beetlSpringViewResolver.setConfig(beetlGroupUtilConfiguration);
return beetlSpringViewResolver;
}
}
3.1.2 定义登录视图控制器
@Controller
@RequestMapping("/home")
public class LoginController {
/**
* 登录页面
*/
@RequestMapping("/loginRegiterPage")
public String loginRegiterPage() {
return "home/login®ist";
}
}
3.1.3 开发登录控制器
@ResponseBody
@RequestMapping("/login")
public ResponseResult login(@RequestBody LbUser user, HttpSession session) {
ResponseResult result = lbUserService.checkUser(user);
if (result.getCode().equals("202")) {
session.setAttribute("user",user);
}
return result;
}
3.1.3 开发service
public ResponseResult checkUser(LbUser user) {
//从数据库中查询用户
ResponseResult result = new ResponseResult();
LbUser sysUser = lbUserDao.findUserByUsername(user.getUsername());
if (sysUser == null) {
result.setCode("201");//用户不存在
result.setMessage("用户名或密码错误");
} else {
//校验密码
if (sysUser.getPassword().equals(user.getPassword())) {
result.setCode("202");
result.setMessage(String.valueOf(sysUser.getRole()));//绑定登录角色
} else {
result.setCode("203");//密码错误
result.setMessage("用户名或密码错误");
}
}
return result;
}
3.2 用户注册
3.2.1 注册流程图
3.2.2 开发业务层
public ResponseResult registUser(ActiveUser activeUser) {
ResponseResult result = new ResponseResult();
//查询用户(数据库)
LbUser sysUser = lbUserDao.findUserByUsername(activeUser.getUsername());
//查询医生
Query<LbDoctor> doctorQuery = lbDoctorDao.createQuery();
doctorQuery.andEq("cert_id",activeUser.getCertId());
LbDoctor lbDoctor = doctorQuery.single();
//查询病人
LambdaQuery<LbPatient> lambdaQuery = lbPatientDao.createLambdaQuery();
lambdaQuery.andEq(LbPatient::getCertId,activeUser.getCertId());
LbPatient lbPatient = lambdaQuery.single();
if (sysUser != null) {//用户已经存在
result.setCode("101");
result.setMessage("用户已存在!");
} else if (sysUser == null && activeUser.getCertId().isEmpty()) {//注册成管理员
sysUser = new LbUser();
sysUser.setRole(1);//管理员
sysUser.setUsername(activeUser.getUsername());
sysUser.setPassword(activeUser.getPassword());
lbUserDao.insert(sysUser);
result.setCode("102");
result.setMessage("管理员账号注册成功!");
} else if (lbDoctor != null) {//注册成医生
if (lbDoctor.getUserId() == null) {
sysUser = new LbUser();
sysUser.setRole(2);
sysUser.setUsername(activeUser.getUsername());
sysUser.setPassword(activeUser.getPassword());
lbUserDao.insert(sysUser);
//更新医生基本信息表
lbDoctor.setUserId(lbUserDao.findUserByUsername(activeUser.getUsername()).getId());
lbDoctorDao.updateById(lbDoctor);
result.setCode("103");
result.setMessage("医生账号注册成功!");
} else {
result.setCode("105");
result.setMessage("身份证被占用!");
}
} else if (lbPatient != null) { //注册成病人
if (lbPatient.getUserId() == null) {
sysUser = new LbUser();
sysUser.setRole(3);
sysUser.setUsername(activeUser.getUsername());
sysUser.setPassword(activeUser.getPassword());
lbUserDao.insert(sysUser);
lbPatient.setUserId(lbUserDao.findUserByUsername(activeUser.getUsername()).getId());
lbPatientDao.updateById(lbPatient);
result.setCode("104");
result.setMessage("患者账号注册成功!");
} else {
result.setCode("105");
result.setMessage("身份证被占用!");
}
}
return result;
}
3.2.3 应用路径
在beetl3.0以后的版本中,系统默认提供一个key以便让我们获取系统的应用路径。
查看源码 org.beetl.ext.web.WebRender 57行:
template.binding("ctxPath", request.getContextPath());
3.3 医生管理
3.3.1 列表展示
3.3.2 layui分页
layui.use('laypage', function(){
let layPage = layui.laypage;
//执行一个laypage实例
layPage.render({
elem: 'pagination' //注意,这里的 test1 是 ID,不用加 # 号
,count: ${count} //数据总数,从服务端得到
,limit:5 //设置每页显示记录数
,curr: ${currentPage} //定义当前页码
,jump: function(obj,first){
//obj包装当前分页的所有参数
//非第一次执行
if (!first) {
window.location.href = "/admin/appointmentManage?curr=" + obj.curr + "&size=" + obj.limit;
}
}
});
});
3.3.3 新增、修改、删除
新增和删除使用弹窗层作表单信息的展示。
注意引入layui和jQuery脚本库。
<script>
//JavaScript代码区域
layui.use('element', function(){
var element = layui.element;
});
function showAdd(url){
layer.open({
type: 2,
title: '添加页面',
closeBtn: 0,
area:['800px','600px'],
content: [url,'yes'],
btn: ['取消'],
yes: function(index){
//事件
layer.close(index);
}
});
}
function edit(url,id){
layer.open({
type: 2,
title: '修改页面',
closeBtn: 0,
area:['800px','600px'],
content: [url + "?id=" + id,'yes'],
btn: ['取消'],
yes: function(index){
//事件
layer.close(index);
}
});
}
function del(url,id) {
layer.confirm('确认要删除吗?', {
btn : [ '确定', '取消' ]//按钮
}, function(index) {
layer.close(index);
console.log(id);
$.ajax({
url:url+ "?id=" +id,
type:'post',
success:function(data){
layer.alert(data.message);
parent.location.reload();
},
error:function (data) {
layer.msg(data.message, {
time: 2000, //2s后自动关闭
});
}
});
});
}
</script>
3.3.4 保存表单
1)前台js
function save(url){
var d = {};
var t = $('form').serializeArray();
$.each(t, function() {
d[this.name] = this.value;
});
var json=JSON.stringify(d);
$.ajax({
url:url,
type:'post',
data:json,
contentType: "application/json;charset=utf-8",
success:function(data){
console.log(data.message);
if (data.code == '301'){
$("#message").text(data.message);
} else {
parent.location.reload();
}
},
error:function (data) {
layer.msg(data.message, {
time: 2000, //2s后自动关闭
});
}
});
return false
}
2)后台业务
后台需要先验证是否是更新记录,如果是新增记录需要验证身份证号是否被占用。
参考代码:
public ResponseResult saveDoctor(LbDoctor lbDoctor) {
ResponseResult result = new ResponseResult();
//更新还是插入
if (lbDoctor.getId() != null) {
lbDoctorDao.updateById(lbDoctor);
result.setCode("302");
result.setMessage("信息保存成功!");
} else {
//先教验该医生的信息是否已经添加
LambdaQuery<LbDoctor> query = lbDoctorDao.createLambdaQuery();
if (!StringUtils.isEmpty(lbDoctor.getCertId())) {
query.andEq(LbDoctor::getCertId,lbDoctor.getCertId());
}
LbDoctor sysDoctor = query.single();
if (sysDoctor != null) {
result.setCode("301");
result.setMessage("该身份证已被注册或使用!");
} else {
lbDoctorDao.insert(lbDoctor);
result.setCode("302");
result.setMessage("信息保存成功!");
}
}
return result;
}
3.4 使用REST重构请求地址
后台方法定义
/**
* 医生新增
*/
@RequestMapping("/")
public String doctorAddForm(LbDoctor lbDoctor,Model model) {
model.addAttribute("doctor",lbDoctor);
return "admin/doctorForm";
}
/**
* 医生编辑
* @param model
* @return
*/
@RequestMapping(value = "/{id}", method = RequestMethod.GET)
public String doctorEditForm(@PathVariable Integer id,Model model) {
model.addAttribute("doctor",lbDoctorService.findOne(id));
return "admin/doctorForm";
}
/**
* 异步插入记录
*/
@ResponseBody
@RequestMapping(value = "/", method = RequestMethod.POST)
public ResponseResult insert(@RequestBody LbDoctor lbDoctor) {
return lbDoctorService.insertDoctor(lbDoctor);
}
/**
* 异步更新记录
* @param lbDoctor
* @return
*/
@ResponseBody
@RequestMapping(value = "/", method = RequestMethod.PUT)
public ResponseResult update(@RequestBody LbDoctor lbDoctor) {
return lbDoctorService.updateDoctor(lbDoctor);
}
/**
* 异步删除
*/
@ResponseBody
@RequestMapping(value = "/{id}",method = RequestMethod.DELETE)
public ResponseResult delete(@PathVariable Integer id){
int rows = lbDoctorService.deleteDoctor(id);
ResponseResult result = new ResponseResult();
if (rows > 0) {
result.setCode("401");
result.setMessage("删除成功");
} else {
result.setCode("402");
result.setMessage("删除失败");
}
return result;
}
3.5 病人管理
病人管理模块列表展示涉及到多表联查。
3.5.1 定义SQL
selectList
===
SELECT
#page("p.*,d.name as doctorName")#
FROM
lb_patient p
LEFT JOIN lb_appointment a ON p.appointment_id = a.id
LEFT JOIN lb_doctor d ON a.doctor_id = d.id where 1=1
@if(!isEmpty(name)){
and p.name=#name#
@}
@if(!isEmpty(certId)){
and p.cert_id=#certId#
@}
注意使用page内置函数可以实现分页。
BeetlSQL内置函数:
- print println 输出,同js,如print("table1");
- has, 判断是否有此全局变量;
- isEmpty 判断表达式是否为空,不存在,空字符串,空集合都返回true;
- debug 将变量输出到控制台,如 debug(user);
- text 输出,但可用于占位符号里
- page 函数,用于在PageQuery翻页里,根据上下问决定输出count(1) 或者count(*),如果有参数,则按照参数输出
- join, 用逗号连接集合或者数组,并输出?
3.5.2 开发service
public PageQuery<LbPatient> findList(long pageNo, long pageSize, String name, String certId) {
PageQuery<LbPatient> query = new PageQuery(pageNo,pageSize);
if (!StringUtils.isEmpty(name)) {
query.setPara("name",name);
}
if (!StringUtils.isEmpty(certId)) {
query.setPara("certId",certId);
}
lbPatientDao.selectList(query);
return query;
}
3.5.3 实体类中添加额外属性
@Data
@Table(name="lb_patient")
public class LbPatient {
...
/*
姓名
*/
private String name ;
//映射医生的名称
private String doctorName ;
}
新增医生名称映射字段
3.6 抽离分页脚本
3.6.1 公共脚本
<script src="${ctxPath}/js/layui.all.js"></script>
<script>
//JavaScript代码区域
layui.use('element', function(){
var element = layui.element;
});
layui.use('laypage', function(){
var laypage = layui.laypage;
//执行一个laypage实例
laypage.render({
elem: 'pagination' //注意,这里的 test1 是 ID,不用加 # 号
,count: '${page.totalRow}' //数据总数,从服务端得到
,limit:5
,curr:'${pageNo}'
,jump: function(obj,first){
//非第一次执行
if (!first) {
window.location.href = "${ctxPath}${path}?pageNo=" + obj.curr + "&pageSize=" + obj.limit;
}
}
});
});
</script>
3.6.2 后台设置请求路径
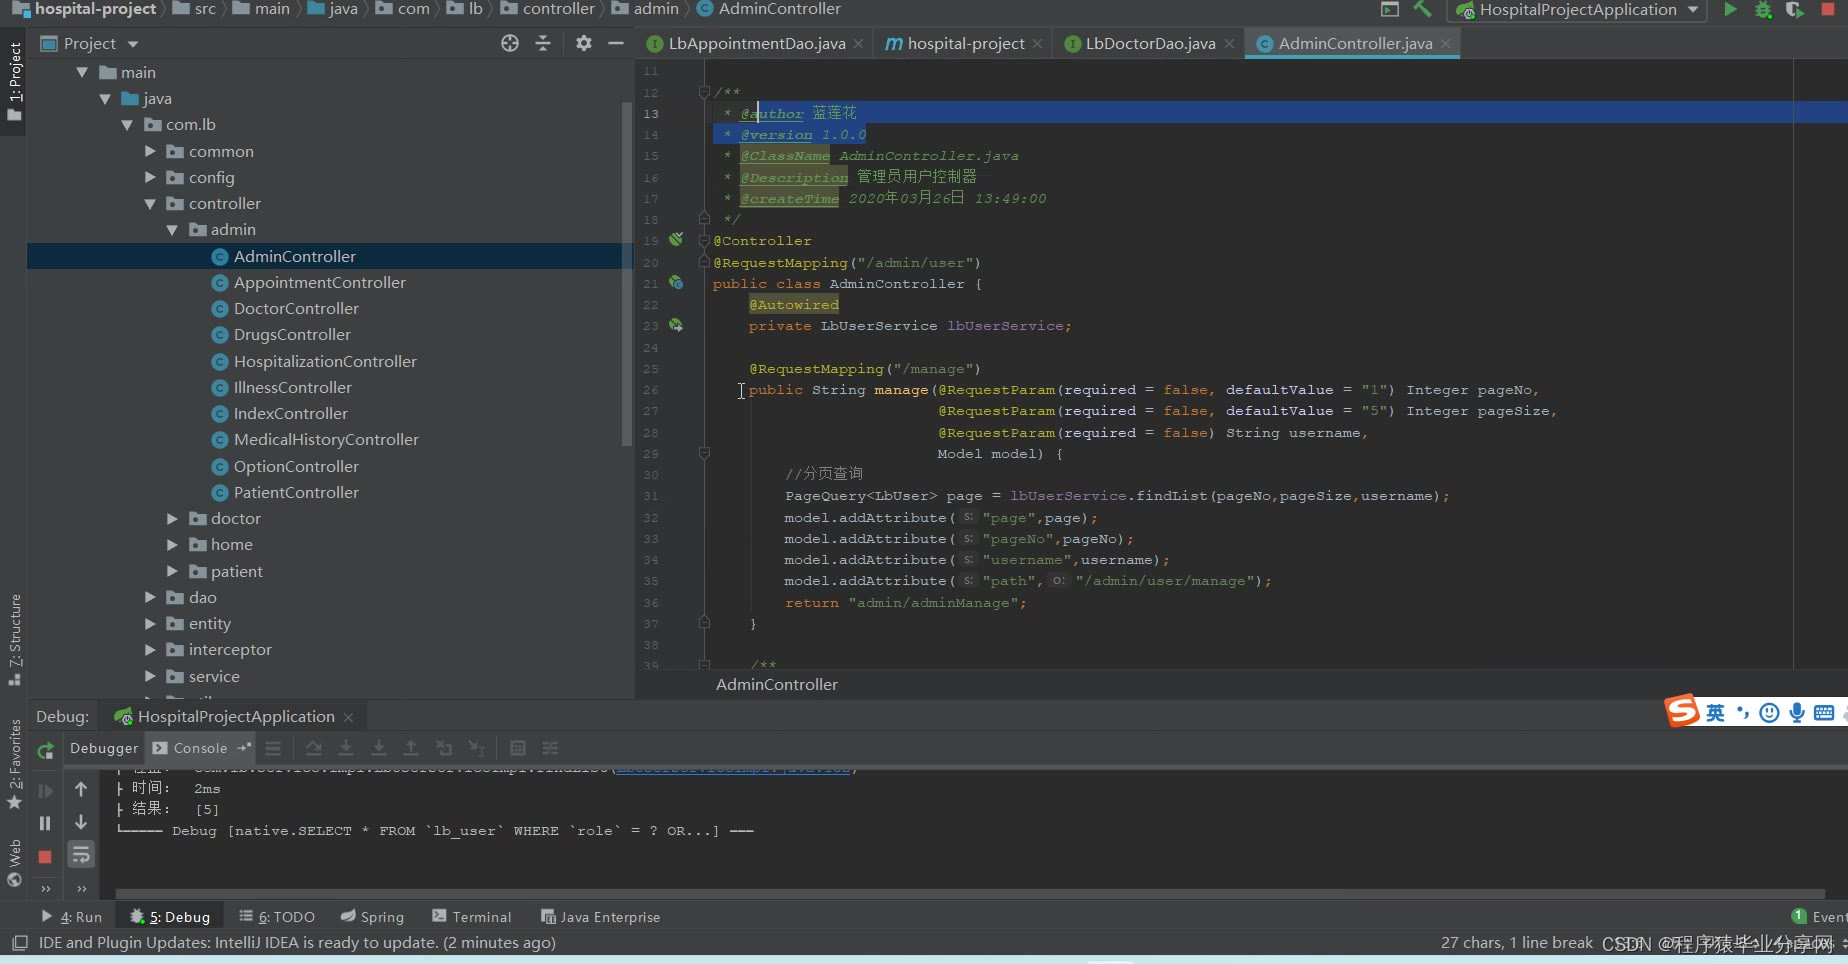
@RequestMapping("/manage")
public String manage(@RequestParam(required = false, defaultValue = "1") Integer pageNo,
@RequestParam(required = false, defaultValue = "5") Integer pageSize,
@RequestParam(required = false) String name,
@RequestParam(required = false) String certId,
Model model) {
//查询医生的集合数据
PageQuery<LbPatient> page = lbPatientService.findList(pageNo,pageSize,name,certId);
model.addAttribute("page",page);
model.addAttribute("pageNo",pageNo);
model.addAttribute("name",name);
model.addAttribute("certId",certId);
model.addAttribute("path","/admin/patient/manage");
return "admin/patientManage";
}
model.addAttribute("path","/admin/patient/manage");在model中添加当前方法的请求路径。
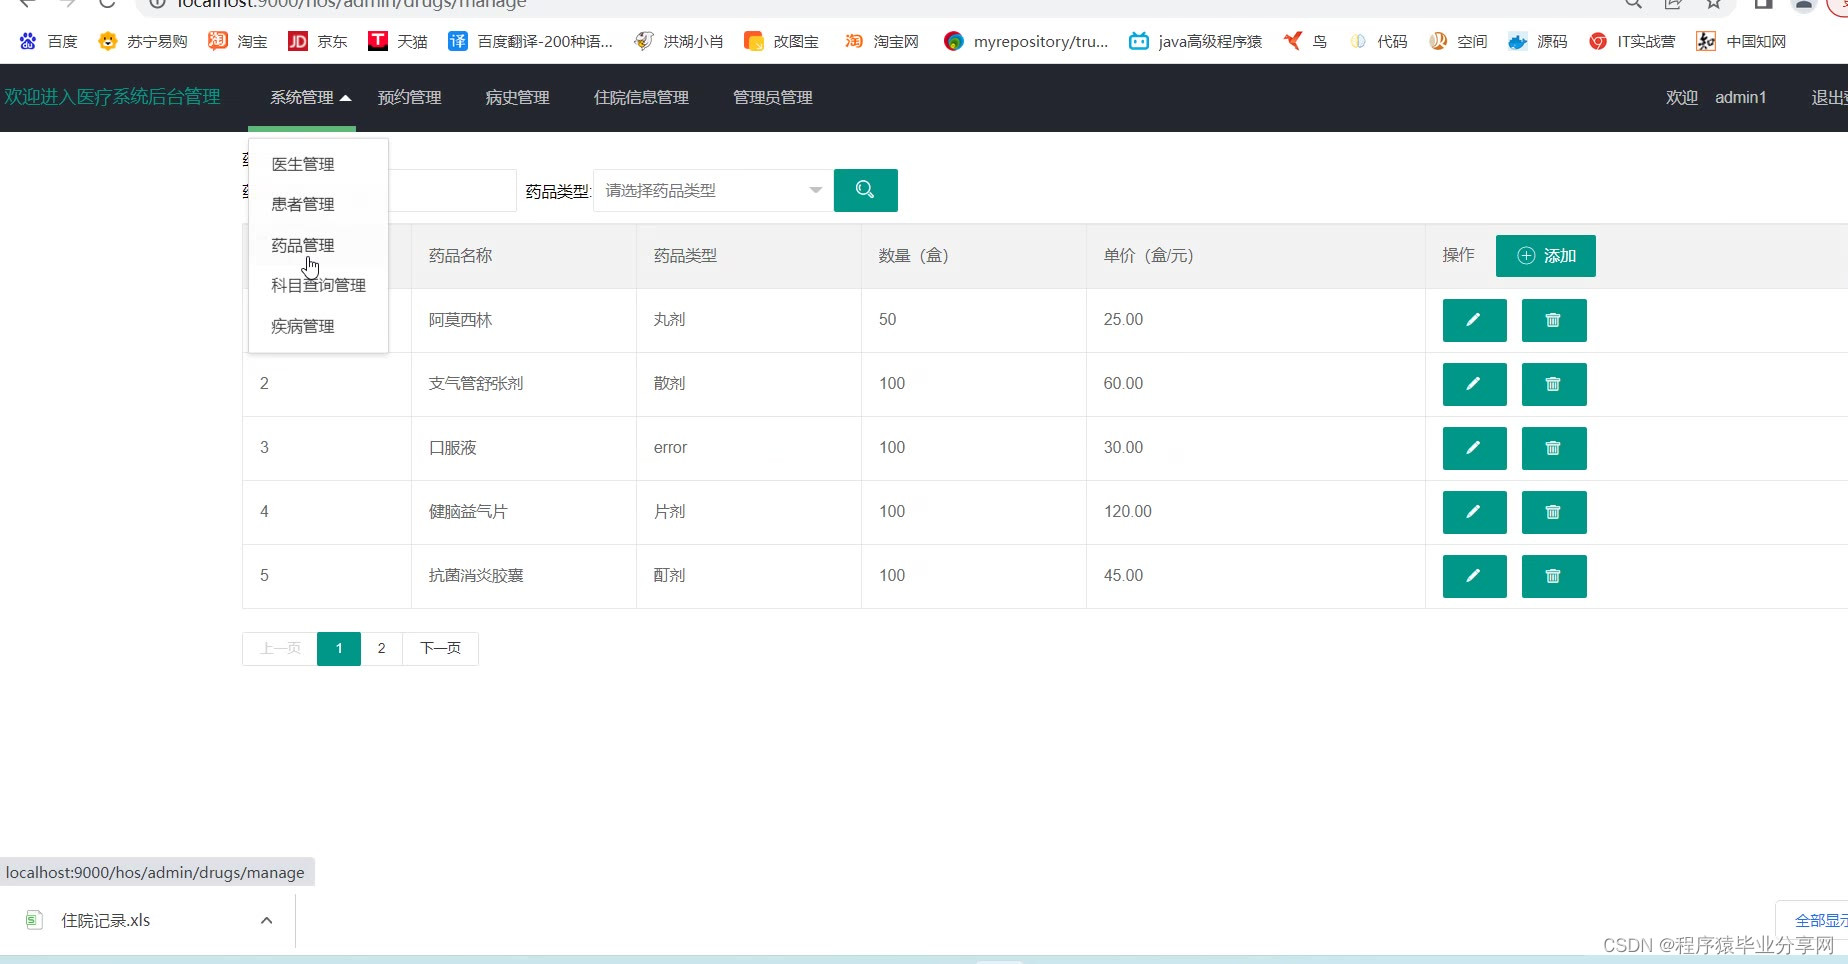
3.7 药品管理
参考【医生管理】模块开发。

3.8 科目管理
参考【医生管理】模块开发。

3.9 疾病管理
参考【医生管理】模块开发。

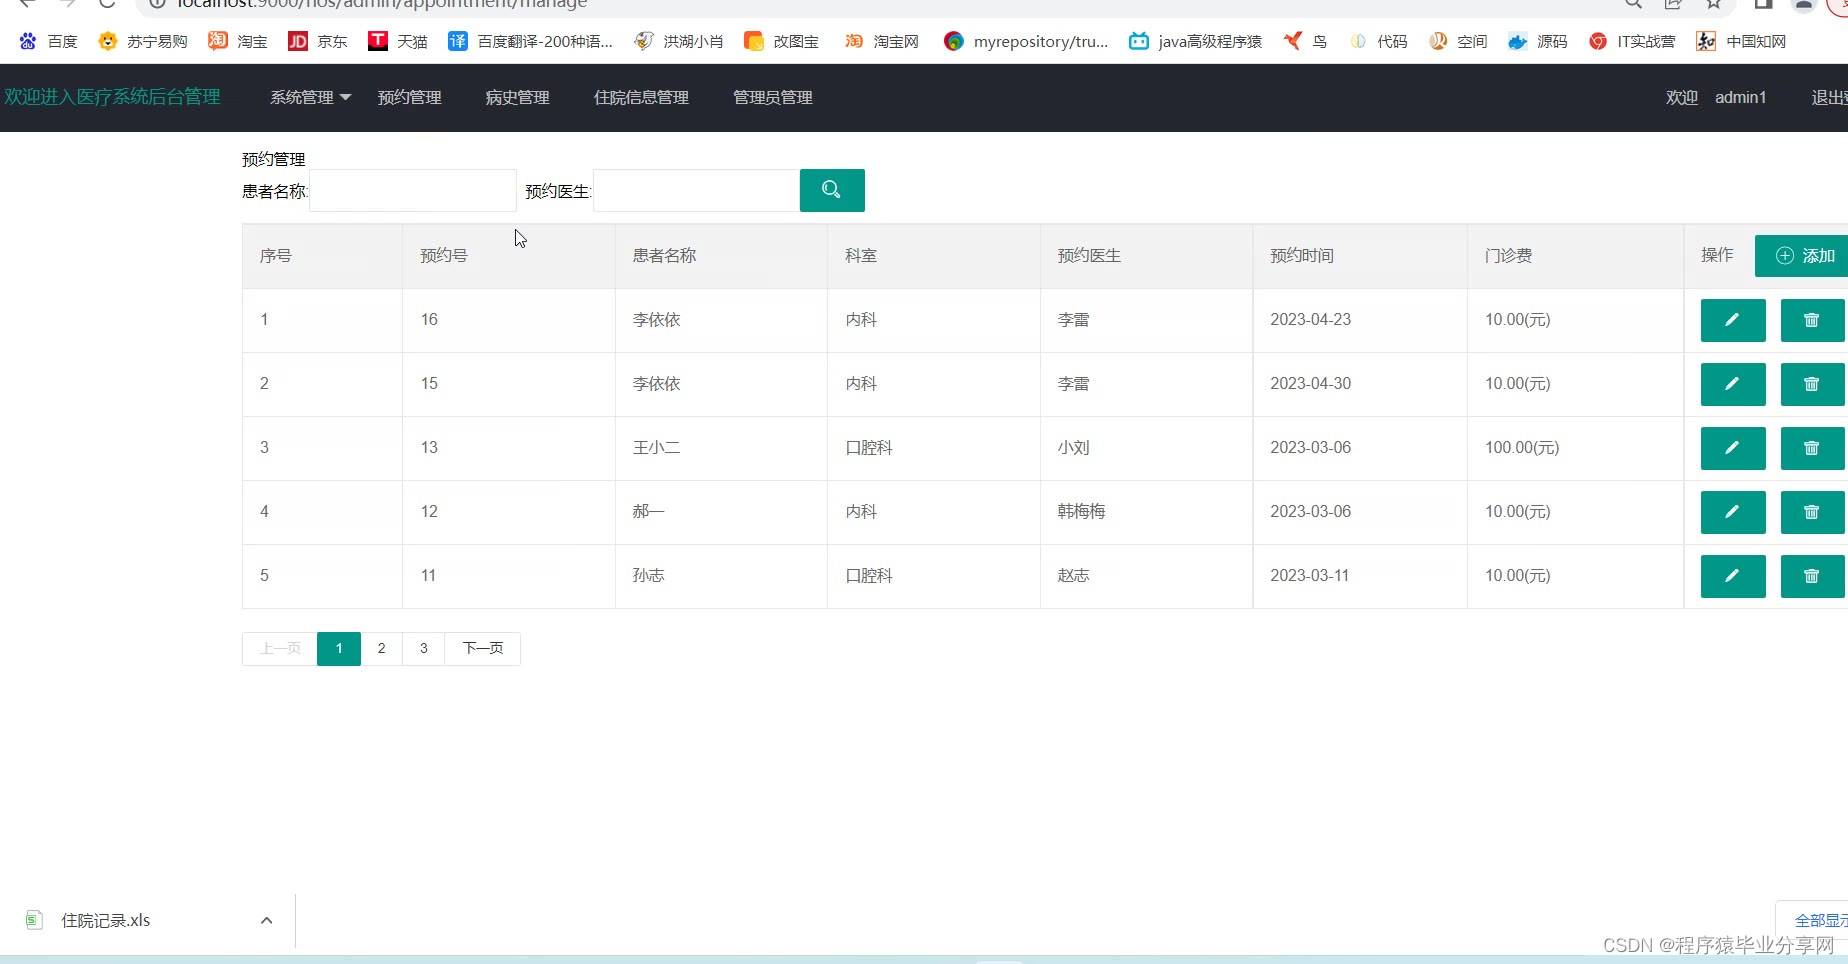
3.10 预约管理
参考【医生管理】模块开发。

3.11 病史管理
参考【病人管理】模块开发。

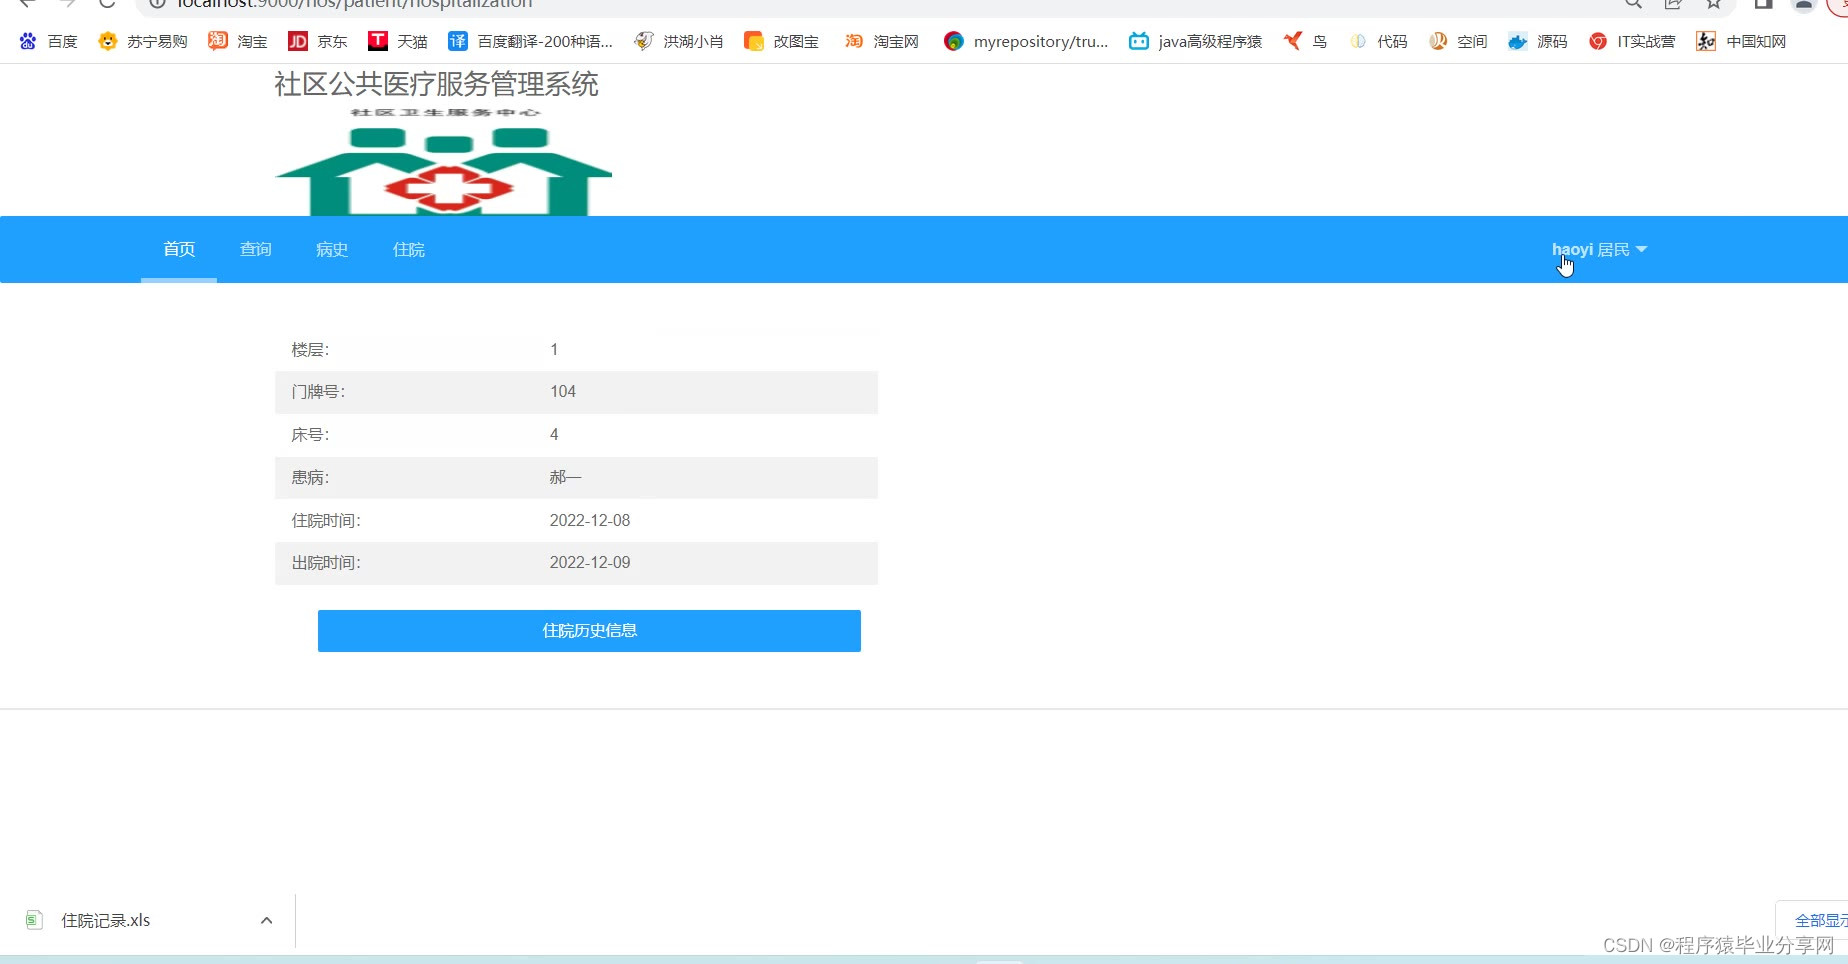
3.12 住院信息管理
参考【医生管理】模块开发。

3.12.1 导出功能
给住院信息列表添加导出功能。
1)导入依赖
<!-- easypoi简单导出所需要的jar包 start -->
<dependency>
<groupId>cn.afterturn</groupId>
<artifactId>easypoi-base</artifactId>
<version>3.2.0</version>
</dependency>
<dependency>
<groupId>cn.afterturn</groupId>
<artifactId>easypoi-annotation</artifactId>
<version>3.2.0</version>
</dependency>
<dependency>
<groupId>cn.afterturn</groupId>
<artifactId>easypoi-web</artifactId>
<version>3.2.0</version>
</dependency>
<!-- easypoi简单导出所需要的jar包 end-->
3.12.2 工具类
package com.lb.utils;
import cn.afterturn.easypoi.excel.ExcelExportUtil;
import cn.afterturn.easypoi.excel.ExcelImportUtil;
import cn.afterturn.easypoi.excel.entity.ExportParams;
import cn.afterturn.easypoi.excel.entity.ImportParams;
import cn.afterturn.easypoi.excel.entity.enmus.ExcelType;
import org.apache.commons.lang3.StringUtils;
import org.apache.poi.ss.usermodel.Workbook;
import org.springframework.web.multipart.MultipartFile;
import javax.servlet.http.HttpServletResponse;
import java.io.File;
import java.io.IOException;
import java.net.URLEncoder;
import java.util.List;
import java.util.Map;
import java.util.NoSuchElementException;
public class ExcelUtiles {
public static void exportExcel(List<?> list, String title, String sheetName, Class<?> pojoClass,
String fileName, boolean isCreateHeader, HttpServletResponse response){
ExportParams exportParams = new ExportParams(title, sheetName);
exportParams.setCreateHeadRows(isCreateHeader);
defaultExport(list, pojoClass, fileName, response, exportParams);
}
public static void exportExcel(List<?> list, String title, String sheetName, Class<?> pojoClass,String fileName,
HttpServletResponse response){
defaultExport(list, pojoClass, fileName, response, new ExportParams(title, sheetName));
}
public static void exportExcel(List<Map<String, Object>> list, String fileName, HttpServletResponse response){
defaultExport(list, fileName, response);
}
private static void defaultExport(List<?> list, Class<?> pojoClass, String fileName,
HttpServletResponse response, ExportParams exportParams) {
Workbook workbook = ExcelExportUtil.exportExcel(exportParams,pojoClass,list);
if (workbook != null); downLoadExcel(fileName, response, workbook);
}
private static void downLoadExcel(String fileName, HttpServletResponse response, Workbook workbook) {
try {
response.setCharacterEncoding("UTF-8");
response.setHeader("content-Type", "application/vnd.ms-excel");
response.setHeader("Content-Disposition", "attachment;filename=" + URLEncoder.encode(fileName, "UTF-8"));
workbook.write(response.getOutputStream());
} catch (IOException e) {
//throw new NormalException(e.getMessage());
}
}
private static void defaultExport(List<Map<String, Object>> list, String fileName, HttpServletResponse response) {
Workbook workbook = ExcelExportUtil.exportExcel(list, ExcelType.HSSF);
if (workbook != null);
downLoadExcel(fileName, response, workbook);
}
public static <T> List<T> importExcel(String filePath,Integer titleRows,Integer headerRows, Class<T> pojoClass){
if (StringUtils.isBlank(filePath)){
return null;
}
ImportParams params = new ImportParams();
params.setTitleRows(titleRows);
params.setHeadRows(headerRows);
List<T> list = null;
try {
list = ExcelImportUtil.importExcel(new File(filePath), pojoClass, params);
}catch (NoSuchElementException e){
//throw new NormalException("模板不能为空");
} catch (Exception e) {
e.printStackTrace();
//throw new NormalException(e.getMessage());
} return list;
}
public static <T> List<T> importExcel(MultipartFile file, Integer titleRows, Integer headerRows, Class<T> pojoClass){
if (file == null){ return null;
}
ImportParams params = new ImportParams();
params.setTitleRows(titleRows);
params.setHeadRows(headerRows);
List<T> list = null;
try {
list = ExcelImportUtil.importExcel(file.getInputStream(), pojoClass, params);
}catch (NoSuchElementException e){
// throw new NormalException("excel文件不能为空");
} catch (Exception e) {
//throw new NormalException(e.getMessage());
System.out.println(e.getMessage());
}
return list;
}
}
3.12.3 注解定义对象
public class StudentEntity implements java.io.Serializable {
/**
* id
*/
private String id;
/**
* 学生姓名
*/
@Excel(name = "学生姓名", height = 20, width = 30, isImportField = "true_st")
private String name;
/**
* 学生性别
*/
@Excel(name = "学生性别", replace = { "男_1", "女_2" }, suffix = "生", isImportField = "true_st")
private int sex;
@Excel(name = "出生日期", databaseFormat = "yyyyMMddHHmmss", format = "yyyy-MM-dd", isImportField = "true_st", width = 20)
private Date birthday;
@Excel(name = "进校日期", databaseFormat = "yyyyMMddHHmmss", format = "yyyy-MM-dd")
private Date registrationDate;
}
3.12.4 定义控制器方法
/**
* excel导出
*/
@GetMapping("/export")
public void export(HttpServletResponse response) {
List<LbHospitalization> list = lbHospitalizationService.findAll();
ExcelUtiles.exportExcel(list,"住院记录","住院记录",LbHospitalization.class,"住院记录.xls",response);
}
3.12.5 管理员管理
参考【医生管理】模块开发。
3.14 登录拦截控制
3.14.1 定义拦截器
自定义拦截器实现HandlerInterceptor接口,重写preHandle方法。
@Component
public class LoginInterceptor implements HandlerInterceptor {
@Override
public boolean preHandle(HttpServletRequest request, HttpServletResponse response, Object handler) throws Exception {
HttpSession session = request.getSession();
LbUser user = (LbUser) session.getAttribute("user");
if (user == null) {//重定向到登录视图
response.sendRedirect(request.getContextPath() + "/home/loginRegiterPage");
return false;
}
return true;
}
}
3.14.2 注册拦截器
实现WebMvcConfigurer接口自定义web的配置。
@Configuration
public class WebConfig implements WebMvcConfigurer {
@Autowired
private LoginInterceptor loginInterceptor;
//注册拦截器
@Override
public void addInterceptors(InterceptorRegistry registry) {
registry.addInterceptor(loginInterceptor).addPathPatterns("/admin/**");
}
}
4 前台患者端
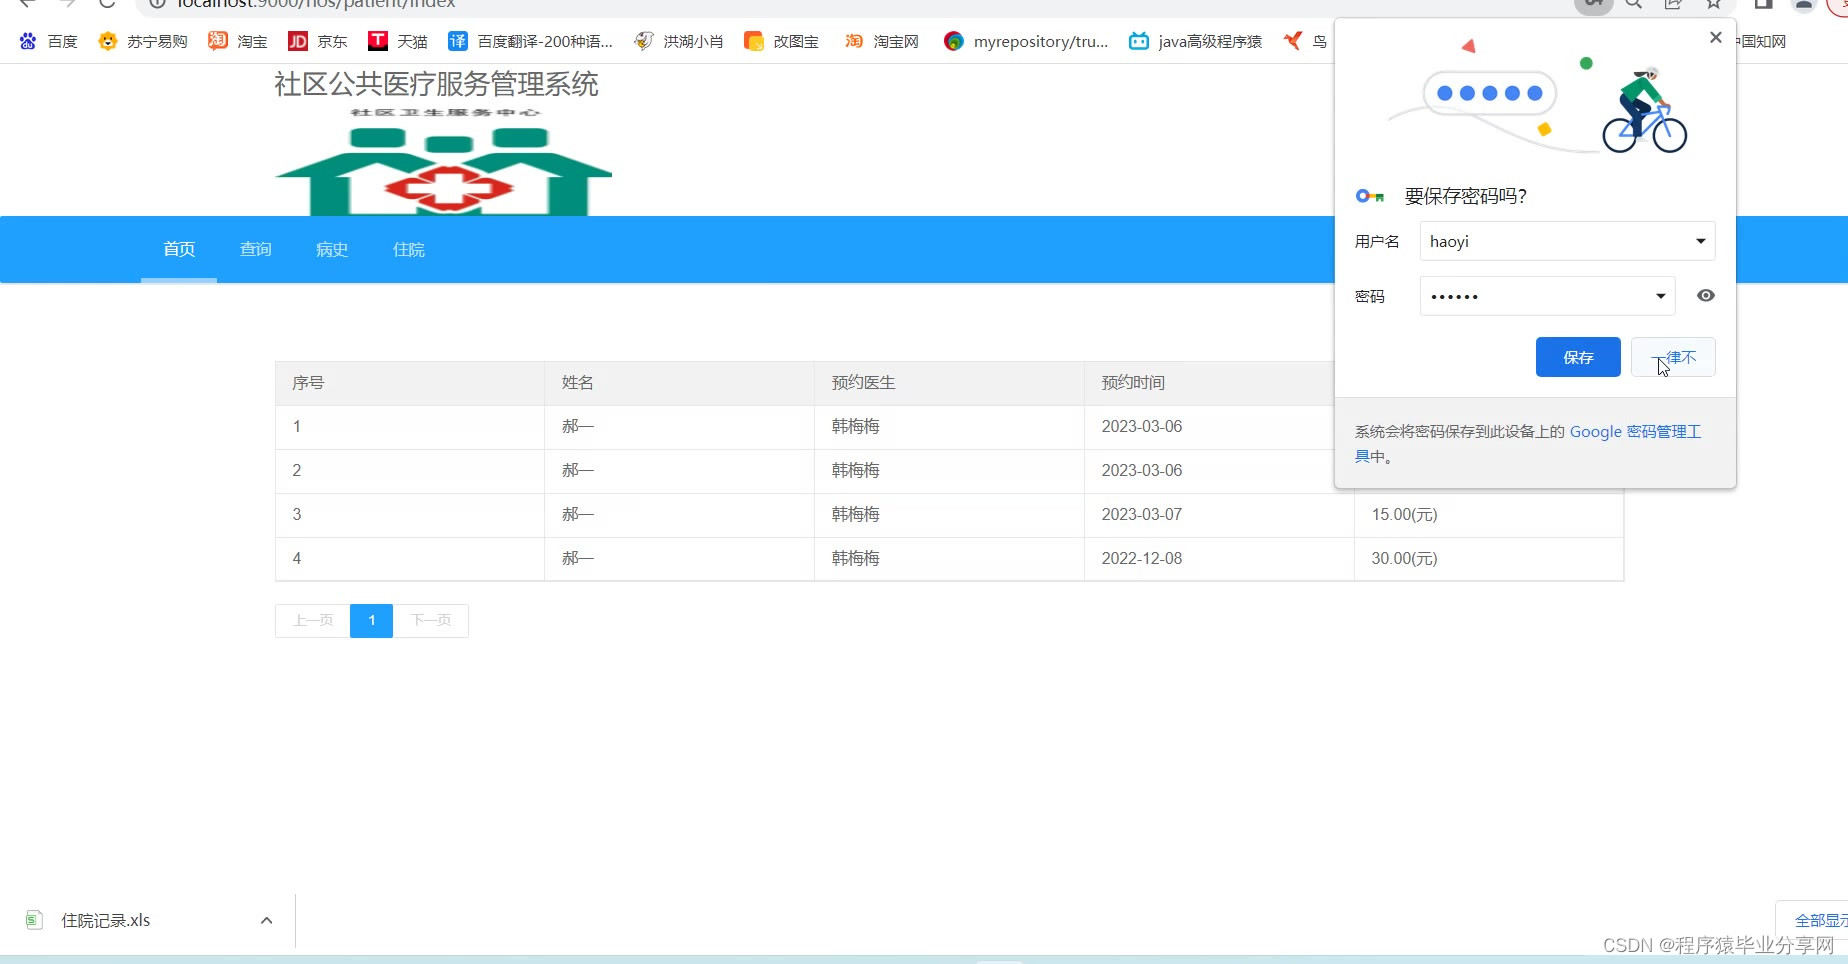
4.1 预约功能
4.1.1 预约记录
新增查询vo类重构预约查询功能。
@Data
public class QueryVo {
private long pageNo = 1;
private long pageSize = 5;
private String patientName;
private String doctorName;
private Integer userId;
}
Service接口方法修改为:
public interface LbAppointmentService {
//查集合
PageQuery<LbAppointment> findList(QueryVo queryVo);
...
}
4.1.2 预约看病
预约信息保存成功,返回插入记录的主键。在BaseMapper中使用insertReturnKey方法实现。
业务层添加方法:
public Integer insertReturnId(LbAppointment appointment) {
return lbAppointmentDao.insertReturnKey(appointment).getInt();
}
更新患者的预约记录id,修改业务层的更新方法:
public ResponseResult updatePatient(LbPatient lbPatient) {
ResponseResult result = new ResponseResult();
lbPatientDao.updateTemplateById(lbPatient);
result.setCode(Global.SAVE_CODE_SUCCESS);
result.setMessage(Global.SAVE_MSG_SUCCESS);
return result;
}
注意:updateTemplateById方法可以只针对不为null的值做更新。
控制层方法:
@ResponseBody
@RequestMapping(value = "/appointment", method = RequestMethod.POST)
public ResponseResult save(@RequestBody LbAppointment appointment) {
Integer appointmentId = lbAppointmentService.insertReturnId(appointment);
LbPatient patient = new LbPatient();
patient.setId(appointment.getPatientId());
patient.setAppointmentId(appointmentId);
lbPatientService.updatePatient(patient);
return new ResponseResult(Global.SAVE_CODE_SUCCESS,Global.SAVE_APPOINTMENT_SUCCESS);
}
4.1.3 生成预约挂号单
使用IText生成PDF。
1) 添加依赖
<dependency>
<groupId>com.itextpdf</groupId>
<artifactId>itextpdf</artifactId>
<version>5.5.13.1</version>
</dependency>
<dependency>
<groupId>com.itextpdf</groupId>
<artifactId>itext-asian</artifactId>
<version>5.2.0</version>
</dependency>
2)工具类
public static String createAppointment(LbAppointment appointment, String path) {
Document document = new Document();
try {
PdfWriter.getInstance(document, new FileOutputStream(path+appointment.getPatientName()+DateUtils.date2String(new Date())+"挂号单.pdf"));
document.open();
PdfPTable pdfPTable = new PdfPTable(4);
createCell("挂号单", 4, pdfPTable, font);
createCell("预约号码:", 2, pdfPTable, font);
createCell(appointment.getId() + "", 2, pdfPTable, font);
createCell("患者姓名:", 2, pdfPTable, font);
createCell(appointment.getPatientName(), 2, pdfPTable, font);
createCell("预约科室:", 2, pdfPTable, font);
createCell(appointment.getDepartment(), 2, pdfPTable, font);
createCell("预约医生:", 2, pdfPTable, font);
createCell(appointment.getDoctorName(), 2, pdfPTable, font);
createCell("门诊费:", 2, pdfPTable, font);
createCell(appointment.getExpenses() + " (元)", 2, pdfPTable, font);
createCell("预约时间:", 2, pdfPTable, font);
createCell(date2String(appointment.getTime()), 2, pdfPTable, font);
document.add(pdfPTable);
document.close();
return "已生成";
} catch (Exception e) {
e.printStackTrace();
return "系统内部错误,生成失败";
}
}
private static String date2String(Date date) {
SimpleDateFormat sdf = new SimpleDateFormat("YYYY年MM月dd日");
return sdf.format(date);
}
private static void createCell(String text, int colspan, PdfPTable pdfPTable, Font font) {
PdfPCell cell = new PdfPCell(new Paragraph(text, font));
cell.setColspan(colspan);
pdfPTable.addCell(cell);
}
4.2 信息查询
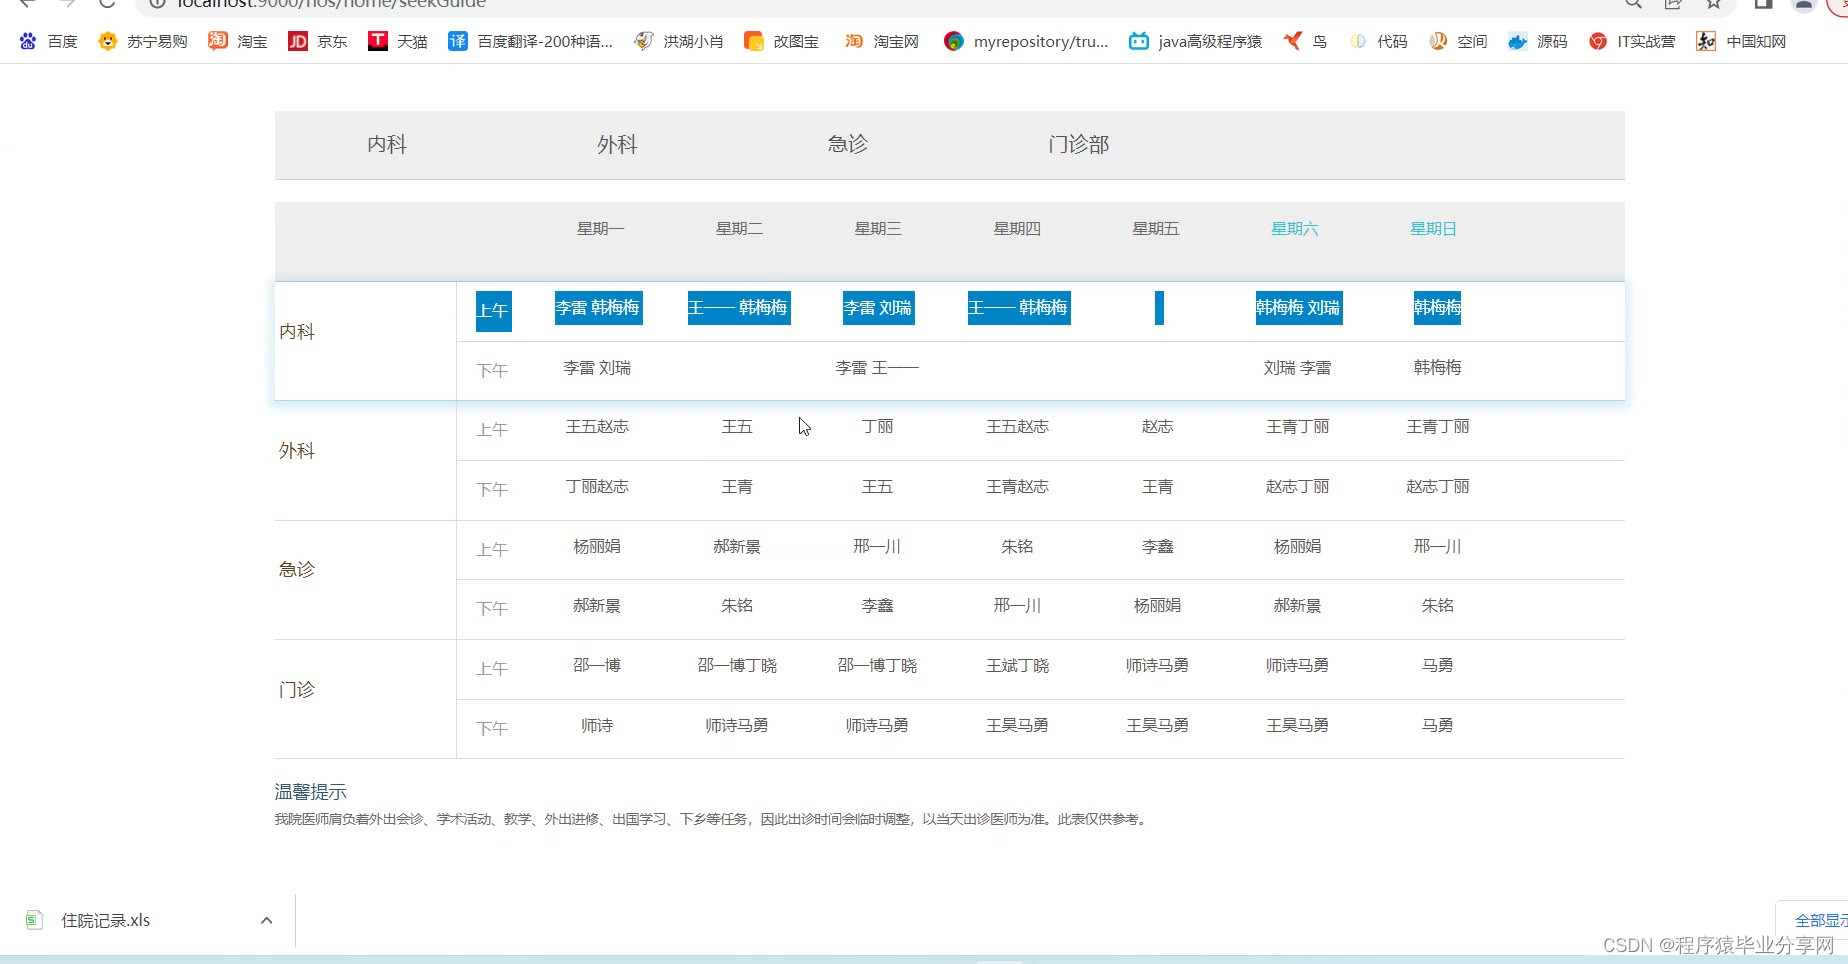
患者可以在该模块下查询疾病、医生、药品等信息。
界面原型:

5 前台医生端
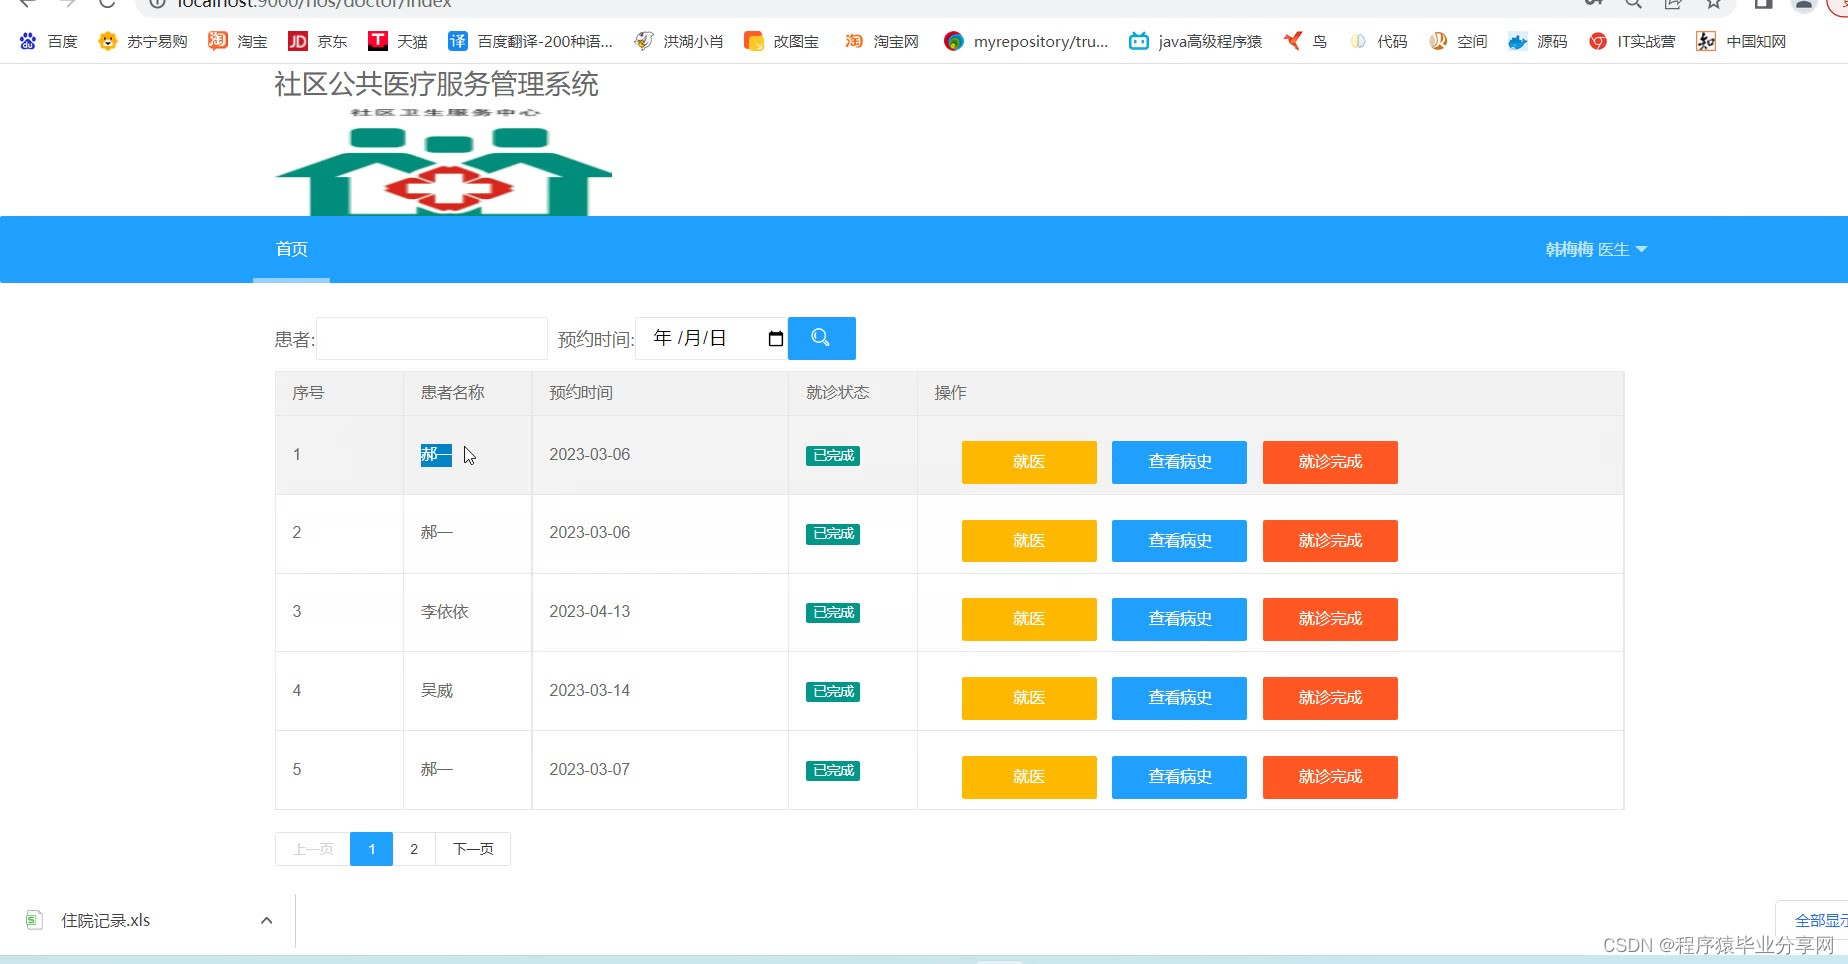
5.1 预约患者模块
实现参考其他模块
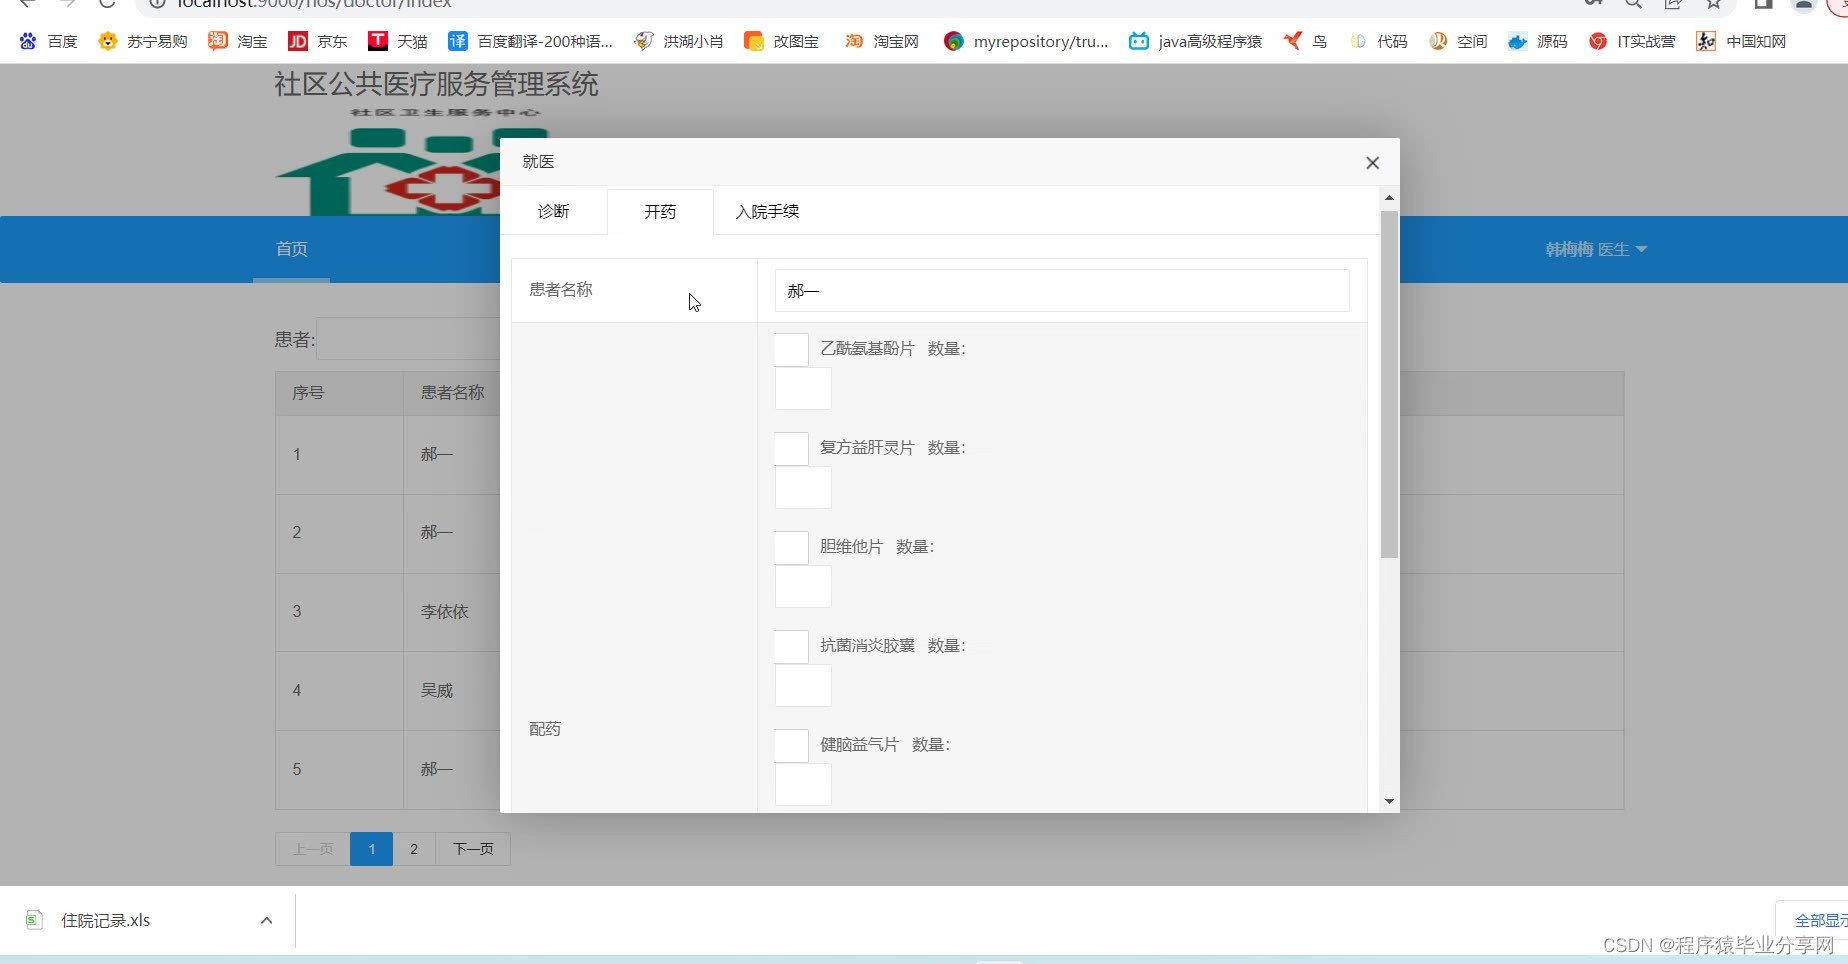
5.2 就诊功能模块
实现参考其他模块
5.3 查看患者病史
实现参考其他模块
5.4 打印就诊单
实现参考其他模块
5.5 重构患者预约记录列表
对于lb_seek表,添加预约记录主键以区别当前的预约是否已经被医生就诊,添加预约记录状态来确定患者就诊进度(未就诊、就诊正、已就诊)。
6 前台医院咨询平台
6.1 显示主页
将所有视图文件后缀.html修改为.btl。
6.2 配置默认访问页
在MVC的配置类中重写addViewControllers方法。
//默认跳转路径
@Override
public void addViewControllers(ViewControllerRegistry registry) {
registry.addRedirectViewController("/","/home/index");
}
6.3 主页导航高亮显示
在后台控制台设置指定标识,在页面导航头部判断。
后台方法:
//主页
@RequestMapping("/index")
public String index(Model model) {
model.addAttribute("cur","index");
return "home/index";
}
前台应用:
通过表达式在class中判断。
<li class="PMenu ${cur == 'index' ? 'current'}"><a href="${ctxPath}/home/index" class="PAMenu">网站首页</a></li>
ABSTRACT
With the continuous development of China's economy, the infrastructure of people's livelihood is also improving, and social security services have also been well developed. The most prominent is community medical care, which fundamentally solves the problem of difficulty in seeing a doctor. In order to better serve people's lives, this paper focuses on the design of community medical information management system. On the basis of understanding the needs of community medical management system, And put forward the implementation scheme of community medical information management system.
Develop a set of medical information system for the community environment to realize the network management of community medical information Methods Web browser/server (B/S) network architecture was adopted Apache is the network server, JAVA language, MySQL is the database management tool All codes are implemented on the server side. In order to protect patient privacy and system data security, the system adopts strict user hierarchical authorization mechanism Results In the laboratory simulation environment, the test results show that the system is safe and reliable, and the design can meet the basic requirements of current community medical information Conclusion The web-based community medical information system based on free open source tools can basically meet the medical information needs of general communities.
Keywords: community medical care; B/S mode; springboot; mysql
<?xml version="1.0" encoding="UTF-8"?>
<project xmlns="http://maven.apache.org/POM/4.0.0" xmlns:xsi="http://www.w3.org/2001/XMLSchema-instance"
         xsi:schemaLocation="http://maven.apache.org/POM/4.0.0 https://maven.apache.org/xsd/maven-4.0.0.xsd">
    <modelVersion>4.0.0</modelVersion>
    <parent>
        <groupId>org.springframework.boot</groupId>
        <artifactId>spring-boot-starter-parent</artifactId>
        <version>2.2.5.RELEASE</version>
        <relativePath/> <!-- lookup parent from repository -->
    </parent>
    <groupId>com.lb</groupId>
    <artifactId>hospital-project</artifactId>
    <version>1.0.0</version>
    <name>hospital-project</name>
    <description>hospital-project project for Spring Boot</description>

    <properties>
        <java.version>1.8</java.version>
        <mysql.driver.verion>8.0.19</mysql.driver.verion>
    </properties>

    <dependencies>
        <dependency>
            <groupId>org.springframework.boot</groupId>
            <artifactId>spring-boot-starter-web</artifactId>
        </dependency>
        <dependency>
            <groupId>org.springframework.boot</groupId>
            <artifactId>spring-boot-starter-jdbc</artifactId>
        </dependency>
        <!-- beetl-framework-starter -->
        <dependency>
            <groupId>com.ibeetl</groupId>
            <artifactId>beetl-framework-starter</artifactId>
            <version>1.2.24.RELEASE</version>
        </dependency>
        <dependency>
            <groupId>mysql</groupId>
            <artifactId>mysql-connector-java</artifactId>
            <version>${mysql.driver.verion}</version>
            <scope>runtime</scope>
        </dependency>
        <dependency>
            <groupId>org.projectlombok</groupId>
            <artifactId>lombok</artifactId>
            <optional>true</optional>
        </dependency>

        <!-- easypoi简单导出所需要的jar包 start -->
        <dependency>
            <groupId>cn.afterturn</groupId>
            <artifactId>easypoi-base</artifactId>
            <version>3.2.0</version>
        </dependency>
        <dependency>
            <groupId>cn.afterturn</groupId>
            <artifactId>easypoi-annotation</artifactId>
            <version>3.2.0</version>
        </dependency>
        <dependency>
            <groupId>cn.afterturn</groupId>
            <artifactId>easypoi-web</artifactId>
            <version>3.2.0</version>
        </dependency>
        <!-- easypoi简单导出所需要的jar包 end-->

        <!-- iText PDF导出依赖 start -->
        <dependency>
        <groupId>com.itextpdf</groupId>
        <artifactId>itextpdf</artifactId>
        <version>5.5.13.1</version>
    </dependency>
        <dependency>
            <groupId>com.itextpdf</groupId>
            <artifactId>itext-asian</artifactId>
            <version>5.2.0</version>
        </dependency>
        <!-- iText PDF导出依赖 end -->

        <!--热部署-->
        <dependency>
            <groupId>org.springframework.boot</groupId>
            <artifactId>spring-boot-devtools</artifactId>
            <scope>runtime</scope>
            <optional>true</optional>
        </dependency>
        <dependency>
            <groupId>org.springframework.boot</groupId>
            <artifactId>spring-boot-starter-test</artifactId>
            <scope>test</scope>
            <exclusions>
                <exclusion>
                    <groupId>org.junit.vintage</groupId>
                    <artifactId>junit-vintage-engine</artifactId>
                </exclusion>
            </exclusions>
        </dependency>
    </dependencies>

    <build>
        <plugins>
            <plugin>
                <groupId>org.springframework.boot</groupId>
                <artifactId>spring-boot-maven-plugin</artifactId>
            </plugin>
        </plugins>
    </build>
    <!--V 2630663675-->
    <repositories>
        <repository>
            <id>maven-ali</id>
            <url>http://maven.aliyun.com/nexus/content/groups/public//</url>
            <releases>
                <enabled>true</enabled>
            </releases>
            <snapshots>
                <enabled>true</enabled>
                <updatePolicy>always</updatePolicy>
                <checksumPolicy>fail</checksumPolicy>
            </snapshots>
        </repository>
    </repositories>
</project>


 1184
1184

 被折叠的 条评论
为什么被折叠?
被折叠的 条评论
为什么被折叠?
 到【灌水乐园】发言


