1. AOP的通俗理解
AOP(Aspect Oriented Programming),即面向切面编程。官方介绍如下:
通过预编译方式和运行期间动态代理实现程序功能的统一维护的一种技术。AOP是OOP的延续,是软件开发中的一个热点,也是Spring框架中的一个重要内容,是函数式编程的一种衍生范型。利用AOP可以对业务逻辑的各个部分进行隔离,从而使得业务逻辑各部分之间的耦合度降低,提高程序的可重用性,同时提高了开发的效率。
下面我用通俗的例子,讲一下我对AOP的理解。AOP的思想其实就想做汉堡,我们主要写的一些核心代码就是汉堡里的肉饼,但是只有肉饼还不行,只吃肉饼有风险(太腻了),为了降低风险,需要在肉饼的两侧加上生菜、沙拉酱、面包等,如下图所示。中间的肉饼代表核心代码,上面的面包代表前置增强,后面的生菜后置增强,沙拉酱代表异常增强,最后的面包代表最终增强。
java中的try...catch..finally就是个很好的例子,配合上述汉堡,看下面代码,代码从上往下执行,如果执行核心代码期间遇到了异常,就直接执行异常增强,不执行后置增强,最后再执行最终增强。
try{
// 前置增强,例如开启事务
// 核心代码,例如增删改查
// 后置增强,例如提交事务
}catch(Exception e){
// 异常增强,例如回滚事务
}finally{
// 最终增强,例如关闭事务
}
如果一个service中有很多要代码都要做事务管理,如果给每个方法都加上事务相关代码,那未免过于冗余,这时就要用到AOP的思想,将重复的事务代码抽取出来,单独写成一个增强类,我们只要写核心代码(增删改查),然后像做汉堡一样,将代码一层层的叠加起来。
2. AOP中的相关概念
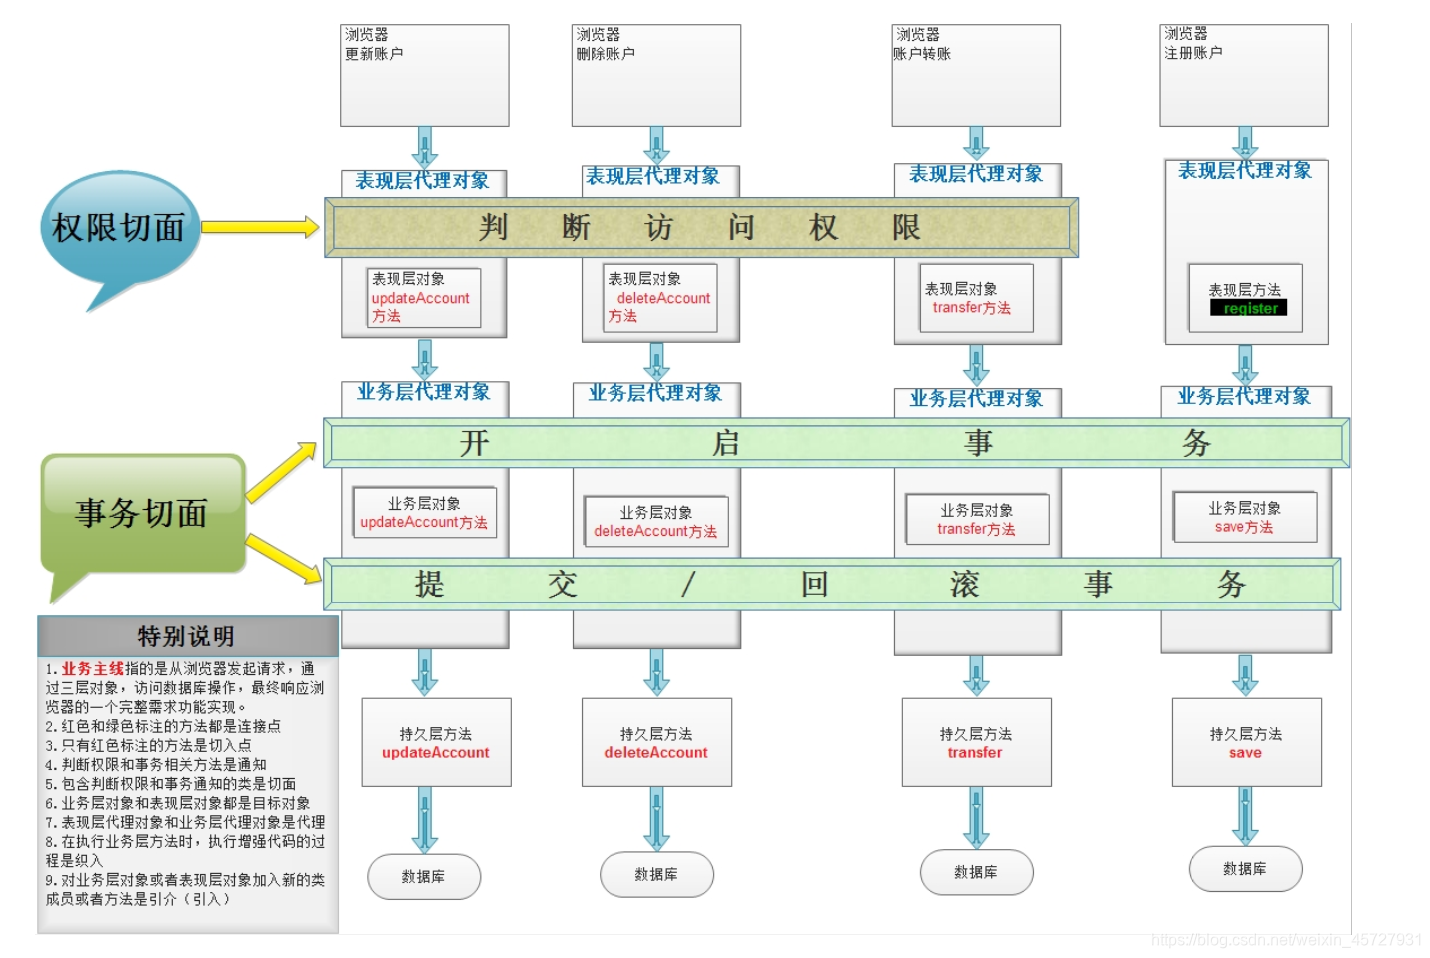
- Aspect(切面): 一个模块具有一组提供横切需求的 APIs。如下图所示的权限切面和是事务切面。应用程序可以拥有任意数量的切面。Aspect 声明类似于 Java 中的类声明,在 Aspect 中会包含着一些 Pointcut 以及相应的 Advice。
- Joint point(连接点):指哪些可以用于把增强代码加入到业务主线中的点,一般在程序中的所有方法都可以称为连接点,如下图所示,所有标红和标黑的方法都是连接点。
- Pointcut(切入点):指的是已经把增强代码加入到业务主线进来之后的连接点,如下图中标红的代码,而标黑的
transfer就不是,因为它没有被增强。 - Advice(增强):Advice 定义了在 Pointcut 里面定义的程序点具体要做的操作,它通过 before、after 和 around 来区别是在每个 joint point 之前、之后还是代替执行的代码。
- Target(目标对象):代理(Advice) 的目标对象,即被代理对象。
-
- Proxy(代理):指的是一个类被AOP织入增强后,长生的代理类,即代理对象
- Weaving(织入):将切面( Aspect) 和其他对象连接起来, 并创建新的代理对象(Adviced object) 的过程,Spring采用动态代理技术。

3. 通知的类型
Spring 方面可以使用下面提到的五种通知工作:
- 前置通知:在一个方法执行之前,执行通知。
- 后置通知:在一个方法执行之后,不考虑其结果,执行通知。
- 返回后通知:在一个方法执行之后,只有在方法成功完成时,才能执行通知。
- 抛出异常后通知:在一个方法执行之后,只有在方法退出抛出异常时,才能执行通知。
- 环绕通知:在建议方法调用之前和之后,执行通知。
4. 基于XML的AOP
4.1 pom文件的配置
主要导入如下jar包
 <dependencies>
        <dependency>
            <groupId>org.springframework</groupId>
            <artifactId>spring-aop</artifactId>
            <version>5.1.9.RELEASE</version>
        </dependency>
        <dependency>
            <groupId>org.springframework</groupId>
            <artifactId>spring-context</artifactId>
            <version>5.1.9.RELEASE</version>
        </dependency>
        <dependency>
            <groupId>org.aspectj</groupId>
            <artifactId>aspectjweaver</artifactId>
            <version>1.9.4</version>
        </dependency>
        <dependency>
            <groupId>junit</groupId>
            <artifactId>junit</artifactId>
            <version>4.13</version>
        </dependency>
        <dependency>
            <groupId>org.springframework</groupId>
            <artifactId>spring-test</artifactId>
            <version>5.1.9.RELEASE</version>
        </dependency>
        <dependency>
            <groupId>org.aspectj</groupId>
            <artifactId>aspectjweaver</artifactId>
            <version>1.9.4</version>
            <scope>compile</scope>
        </dependency>
4.2 Service及其实现类
本篇只为简单讲解AOP的基础使用,故使用非常简单的代码,定义Service及其实现类代码如下:
public interface AccountService {
    void save();
    void update(int i);
    int delete();
}
import com.szz.service.AccountService;

public class AccountServiceImpl implements AccountService {
    @Override
    public void save() {
        System.out.println("保存账户");
//        int i = 1/0;
    }
    @Override
    public void update(int i) {
        System.out.println("更新账户");

    }
    @Override
    public int delete() {
        System.out.println("删除账户");
        return 100;
    }
}
4.3 切面类
切面类中包含了:前置增强,后置增强,异常增强,最终增强,环绕增强。先不看环绕增强,切面类如下,这几个增强方法中包含了有参数,有返回值的情况,如何取出请看下面代码。
package com.szz.utils;

import org.aspectj.lang.JoinPoint;
import org.aspectj.lang.ProceedingJoinPoint;

import java.util.Arrays;
public class LogUtil {

    //配置前置增强,执行实现在切入点方法执行前执行
    public void beforePrintLog(JoinPoint joinPoint) throws Throwable {
        // 获取切入点方法的参数
        Object[] args = joinPoint.getArgs();

        System.out.println("前置增强beforePrintLog执行,参数为:"+ Arrays.toString(args));
    }

    //配置后置增强,执行实现在切入点方法执行后执行
    public void afterReturningPrintLog(JoinPoint joinPoint,Object rtValue) throws Throwable {
        System.out.println("后置增强afterReturningPrintLog执行,返回结果为:"+rtValue);

    }

    // 异常增强,抛出异常时执行
    public void afterThrowingPrintLog(JoinPoint joinPoint,Exception e) throws Throwable {
        System.out.println("异常增强afterThrowingPrintLog,异常信息为"+e);
    }

    // 最终增强
    public void afterPrintLog(JoinPoint joinPoint) throws Throwable {
        System.out.println("最终增强afterPrintLog");
    }

    // 环绕增强,包含了前置增强,后置增强,异常增强,最终增强
    public Object around(ProceedingJoinPoint proceedingJoinPoint) throws Throwable {

        Object rtValue = null;
        try {
            System.out.println("前置增强");
            // 获取方法执行时所需的实际参数
            Object[] args = proceedingJoinPoint.getArgs();
            // 原有方法执行
            rtValue = proceedingJoinPoint.proceed(args);
            System.out.println("后置增强,获取的参数:"+Arrays.toString(args));
        } catch (Throwable throwable) {
            throwable.printStackTrace();
            System.out.println("异常增强");
        } finally {
            System.out.println("最终增强");
        }
        return rtValue;
    }
}
4.4 基于XML文件进行织入
在resources中配置织入的xml文件ApplicationContext.xml,如下所示,其实会发现,这玩意就是叠汉堡,根据需求一层一层的叠就完事了。
切入点的表达式可参考博客,我在下面写的expression="execution(* com.szz.service..*.*(..))"代码要对com.szz.service包下的所有类中的所有方法。
以前置增强为例,具体讲一下织入过程,前置增强配置代码为:<aop:before method="beforePrintLog" pointcut-ref="pc"></aop:before>, pointcut-ref代表切入点的id,method代表在切入点之前(before)执行的增强方法。
<?xml version="1.0" encoding="UTF-8"?>
<beans xmlns="http://www.springframework.org/schema/beans"
       xmlns:xsi="http://www.w3.org/2001/XMLSchema-instance"
       xmlns:aop="http://www.springframework.org/schema/aop"
       xsi:schemaLocation="http://www.springframework.org/schema/beans
       http://www.springframework.org/schema/beans/spring-beans.xsd http://www.springframework.org/schema/aop https://www.springframework.org/schema/aop/spring-aop.xsd">

    <bean id="accountService" class="com.szz.service.impl.AccountServiceImpl"></bean>

    <!--配置切面类(增强)-->
    <bean id="logUtil" class="com.szz.utils.LogUtil"></bean>
    <!--配置AOP-->
    <aop:config>
        <!--配置通用的切入点表达式-->
        <aop:pointcut id="pc" expression="execution(* com.szz.service..*.*(..))"></aop:pointcut>
        <!--配置切面(织入)-->
        <aop:aspect id="" ref="logUtil">
            <!--配置前置增强,执行实现在切入点方法执行前执行-->
            <aop:before method="beforePrintLog" pointcut-ref="pc"></aop:before>
            <!--配置后置增强,执行实现在切入点方法执行后执行,若抛出异常则后置增强不执行-->
            <aop:after-returning method="afterReturningPrintLog" pointcut-ref="pc" returning="rtValue"></aop:after-returning>
            <!--配置异常增强,执行时机-->
            <aop:after-throwing method="afterThrowingPrintLog" pointcut-ref="pc" throwing="e"></aop:after-throwing>
            <!--配置最终增强,相当于finally中执行的-->
            <aop:after method="afterPrintLog" pointcut-ref="pc"></aop:after>

              <!--环绕通知,包含了前置增强,后置增强,异常增强,最终增强-->
           <!-- <aop:around method="around" pointcut-ref="pc"></aop:around>-->

        </aop:aspect>
    </aop:config>
</beans>
4.5 测试
package com.szz.service;

import org.junit.Test;
import org.junit.runner.RunWith;
import org.springframework.beans.factory.annotation.Autowired;
import org.springframework.test.context.ContextConfiguration;
import org.springframework.test.context.junit4.SpringJUnit4ClassRunner;
import static org.junit.Assert.*;
@RunWith(SpringJUnit4ClassRunner.class)
@ContextConfiguration("classpath:ApplicationContext.xml")
public class AccountServiceTest {

    // 注入依赖
    @Autowired
    private AccountService accountService;

    @Test
    public void save() {
        accountService.save();
        System.out.println("===========");
    }

    @Test
    public void update() {
        accountService.update(100);
        System.out.println("===========");
    }

    @Test
    public void delete() {
        int i = accountService.delete();
        System.out.println(i);
        System.out.println("===========");
    }
}
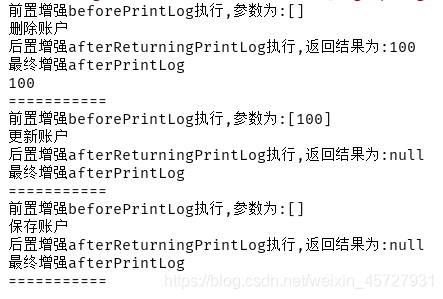
- 测试结果如下所示:

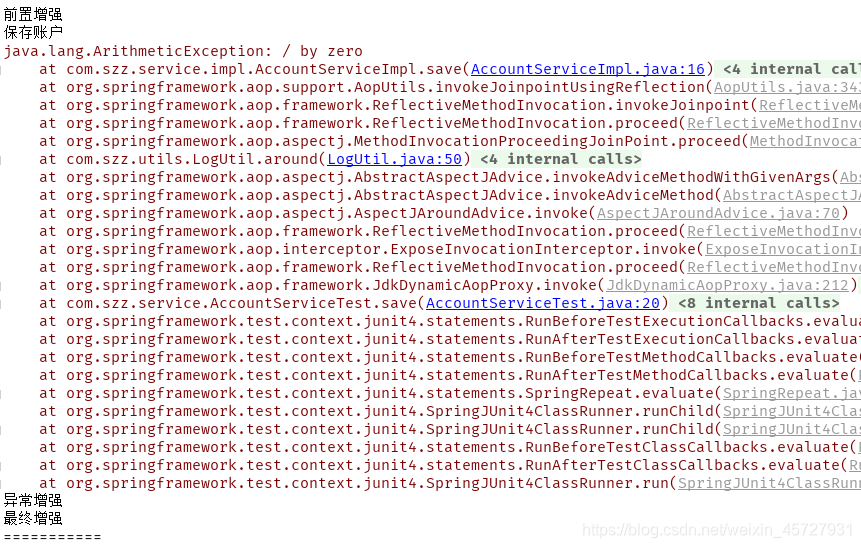
- 如果将4.2 Service实现类中的异常打开,
save方法测试结果如下:

4.6 环绕增强及其测试
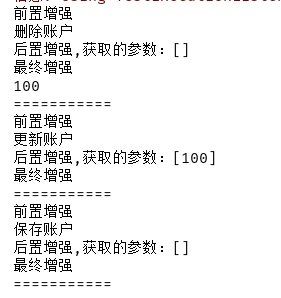
环绕增强的增强代码在4.3切面类中,环绕增强的配置文件只要将4.4 基于XML文件进行织入中的注释代码打开,将其余增强配置代码删除即可。
测试结果如下,若打开异常,结果与前文一致。

5. 基于注解的AOP
5.1 Service实现类
Service接口与前文一致,其实现类多了个@Service注解,如下所示:
package com.szz.service.impl;

import com.szz.service.AccountService;
import org.springframework.stereotype.Service;
@Service
public class AccountServiceImpl implements AccountService {
    @Override
    public void save() {
        System.out.println("保存账户");
//        int i = 1/0;
    }

    @Override
    public void update(int i) {
        System.out.println("更新账户");
    }

    @Override
    public int delete() {
        System.out.println("删除账户");
        return 100;
    }
}
5.2 切面类
给切面类添加注解,下面的代码中,将环绕通知注释掉了。若打开环绕通知,将其余几种增强的注解注释掉,结果是一样的。
package com.szz.utils;

import org.aspectj.lang.JoinPoint;
import org.aspectj.lang.ProceedingJoinPoint;
import org.aspectj.lang.annotation.*;
import org.springframework.stereotype.Component;

import java.util.Arrays;

@Component
//设置切面类
@Aspect
public class LogUtil {

    // 配置切入点表达式
    @Pointcut("execution(* com.szz.service..*.*(..))")
    public void pointcut(){}

    //配置前置增强,执行实现在切入点方法执行前执行
    @Before("pointcut()")
    public void beforePrintLog(JoinPoint joinPoint) throws Throwable {
        // 获取切入点方法的参数
        Object[] args = joinPoint.getArgs();

        System.out.println("前置增强beforePrintLog执行,参数为:"+ Arrays.toString(args));
    }

    //配置后置增强,执行实现在切入点方法执行后执行
    @AfterReturning("pointcut()")
    public void afterReturningPrintLog(JoinPoint joinPoint) throws Throwable {
        System.out.println("后置增强afterReturningPrintLog执行");

    }

    // 异常增强,抛出异常时执行
    @AfterThrowing("pointcut()")
    public void afterThrowingPrintLog(JoinPoint joinPoint) throws Throwable {
        System.out.println("异常增强afterThrowingPrintLog");
    }

    // 最终增强
    @After("pointcut()")
    public void afterPrintLog(JoinPoint joinPoint) throws Throwable {
        System.out.println("最终增强afterPrintLog");
    }

    // 环绕通知,包含了前置增强,后置增强,异常增强,最终增强
    //@Around("pointcut()")
    public Object around(ProceedingJoinPoint proceedingJoinPoint) throws Throwable {

        Object rtValue = null;
        try {
            System.out.println("前置增强");
            // 获取方法执行时所需的实际参数
            Object[] args = proceedingJoinPoint.getArgs();
            // 原有方法执行
            rtValue = proceedingJoinPoint.proceed(args);
            System.out.println("后置增强,获取的参数:"+Arrays.toString(args));
        } catch (Throwable throwable) {
            throwable.printStackTrace();
            System.out.println("异常增强");
        } finally {
            System.out.println("最终增强");
        }


        return rtValue;
    }
}
5.3 配置类
需要通过一个配置类开启SpringIOC扫描和SPringAOP的注解扫描,代码如下:
package com.szz.config;

import org.springframework.context.annotation.ComponentScan;
import org.springframework.context.annotation.Configuration;
import org.springframework.context.annotation.EnableAspectJAutoProxy;
import org.springframework.stereotype.Component;

@Configuration
//开启SpringIOC的注解扫描
@ComponentScan({"com.szz"})
//开启SPringAOP的注解扫描
@EnableAspectJAutoProxy
public class SpringConfig {
}
5.4 测试
测试类如下所示,测试结果与前文一致
package com.szz.service;

import com.szz.config.SpringConfig;
import org.junit.Test;
import org.junit.runner.RunWith;
import org.springframework.beans.factory.annotation.Autowired;
import org.springframework.test.context.ContextConfiguration;
import org.springframework.test.context.junit4.SpringJUnit4ClassRunner;

import static org.junit.Assert.*;
@RunWith(SpringJUnit4ClassRunner.class)
@ContextConfiguration(classes = {SpringConfig.class})
public class AccountServiceTest {

    // 注入依赖
    @Autowired
    private AccountService accountService;

    @Test
    public void save() {
        accountService.save();
    }

    @Test
    public void update() {
        accountService.update(100);
    }

    @Test
    public void delete() {
        int i = accountService.delete();
//        System.out.println(i);
    }
}
6. 基于半注解半XML的AOP
在5基于注解的AOP中,用一个配置类开启SpringIOC和SPringAOP的注解扫描,现在只需要用一个XML配置文件配置即可,该XML配置文件如下:
<?xml version="1.0" encoding="UTF-8"?>
<beans xmlns="http://www.springframework.org/schema/beans"
       xmlns:xsi="http://www.w3.org/2001/XMLSchema-instance" xmlns:aop="http://www.springframework.org/schema/aop"
       xmlns:context="http://www.springframework.org/schema/context"
       xsi:schemaLocation="http://www.springframework.org/schema/beans http://www.springframework.org/schema/beans/spring-beans.xsd http://www.springframework.org/schema/aop https://www.springframework.org/schema/aop/spring-aop.xsd http://www.springframework.org/schema/context https://www.springframework.org/schema/context/spring-context.xsd">

    <!--开启SpringIOC容器的注解扫描-->
    <context:component-scan base-package="com.szz"></context:component-scan>

    <!--开启SpringAOP的注解扫描-->
    <aop:aspectj-autoproxy></aop:aspectj-autoproxy>

</beans>
测试类读取注解的方式也有所不同,5中是读取配置类,这里要读取xml配置文件,具体代码如下,测试结果与前文一致。
import org.junit.Test;
import org.junit.runner.RunWith;
import org.springframework.beans.factory.annotation.Autowired;
import org.springframework.test.context.ContextConfiguration;
import org.springframework.test.context.junit4.SpringJUnit4ClassRunner;

import static org.junit.Assert.*;
@RunWith(SpringJUnit4ClassRunner.class)
@ContextConfiguration(locations = {"classpath:ApplicationContext.xml"})
public class AccountServiceTest {

    // 注入依赖
    @Autowired
    private AccountService accountService;

    @Test
    public void save() {
        accountService.save();
    }

    @Test
    public void update() {
        accountService.update(100);
    }

    @Test
    public void delete() {
        int i = accountService.delete();
//        System.out.println(i);
    }
}


 本文详细介绍了面向切面编程(AOP)的概念与应用场景,并通过Java Spring框架进行了基于XML配置、注解以及混合配置的AOP实例演示。


 4865
4865

 被折叠的 条评论
为什么被折叠?


