


理论基础
认证:
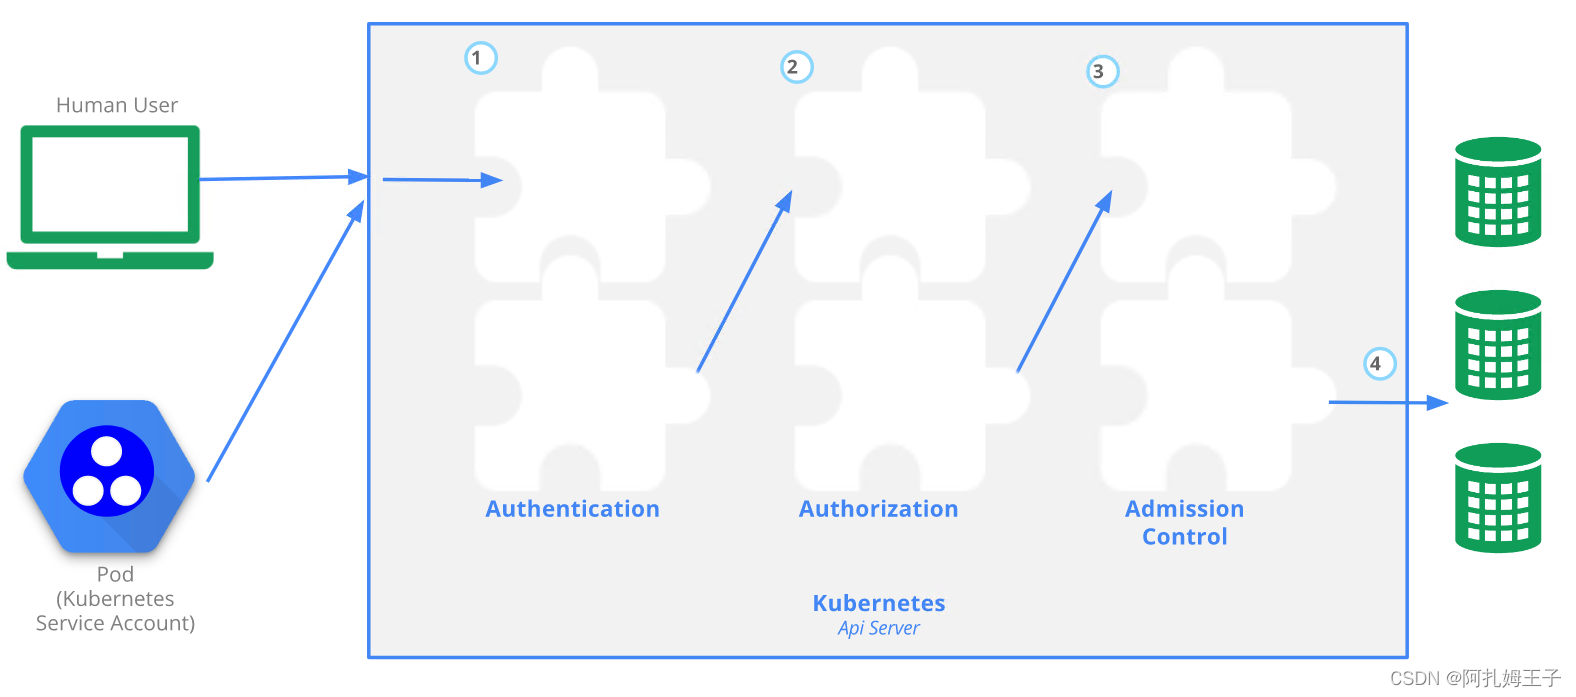
如上图步骤 1 所示,建立 TLS 后, HTTP 请求将进入认证(Authentication)步骤。认证模块包含客户端证书、密码、普通令牌、引导令牌等。可以指定多个认证模块,在这种情况下,服务器依次尝试每个验证模块,直到其中一个成功。
授权:
如上图的步骤 2 所示,将请求验证为来自特定的用户后,请求必须被鉴权。
请求必须包含请求者的用户名、请求的行为以及受该操作影响的对象。 如果现有策略声明用户有权完成请求的操作,那么该请求被鉴权通过。
准入控制:
如上图的步骤 3 所示,准入控制模块是可以修改或拒绝请求的软件模块。 除鉴权模块可用的属性外,准入控制模块还可以访问正在创建或修改的对象的内容。
Kubernetes中的账户
Kubernetes的账户类型有两种:User Account和Service Account
User Account
理论基础
User Account是给使用人员用的,用于与API Server交互进行集群操作与管理。
使用HTTP 请求kubernetes API:
[root@clientvm ~]# kubectl proxy --port=8080
Starting to serve on 127.0.0.1:8080

[root@clientvm ~]# curl http://localhost:8080/api/v1/namespaces
{
  "kind": "NamespaceList",
  "apiVersion": "v1",
  "metadata": {
    "selfLink": "/api/v1/namespaces",
    "resourceVersion": "3866057"
  },


[root@clientvm ~]# curl http://localhost:8080/apis/apps/v1/namespaces/kube-system/deployments
{
  "kind": "DeploymentList",
  "apiVersion": "apps/v1",
  "metadata": {
    "selfLink": "/apis/apps/v1/namespaces/kube-system/deployments",
    "resourceVersion": "3870674"
  },
  "items": [
    {
      "metadata": {
        "name": "coredns",
Kubernetes 使用身份认证插件利用客户端证书、持有者令牌(Bearer Token)、身份认证代理(Proxy) 或者 HTTP 基本认证机制来认证 API 请求的身份。
X509客户端证书认证
为了让普通用户能够通过认证并调用 API,需要执行一下几个步骤。
首先,该用户必须拥有 Kubernetes 集群签发的证书, 然后将该证书作为 API 调用的 Certificate 头或通过 kubectl 提供。
1) 创建私钥
[root@clientvm ~]# openssl genrsa -out user1.key 2048
2) 创建CSR
openssl req -new -key user1.key -out user1.csr -subj "/CN=user1/O=kubernetes"
注: 以下步骤为使用CA证书签名,如果无法访问CA证书,也可以替换为步骤3、4直接使用在集群中签名,任选其一
## SCP user1.csr到master节点
[root@clientvm ~]# scp user1.csr master:/etc/kubernetes/pki/

## 登录到master节点,签名证书
[root@master pki]# pwd
/etc/kubernetes/pki
[root@master pki]# openssl x509 -req -in user1.csr -CA ca.crt -CAkey ca.key -CAcreateserial -out user1.crt

## 将生成的crt证书 copy 回clientvm
[root@master pki]# scp user1.crt clientvm:/root/
3) 证书签名
[root@clientvm ~]# cat user1.csr | base64 | tr -d "\n"
替换入下文件中的request内容
[root@clientvm ~]# cat  user1-csr.yaml
apiVersion: certificates.k8s.io/v1
kind: CertificateSigningRequest
metadata:
  name: user1
spec:
  groups:
  - system:authenticated
  request: NEED TO REPLACE
  signerName: kubernetes.io/kube-apiserver-client
  usages:
  - client auth
4)签名,获取证书
[root@clientvm ~]# kubectl apply -f user1-csr.yaml
certificatesigningrequest.certificates.k8s.io/user1 created

[root@clientvm ~]# kubectl get csr
NAME    AGE   SIGNERNAME                            REQUESTOR          CONDITION
user1   18s   kubernetes.io/kube-apiserver-client   kubernetes-admin   Pending

[root@clientvm ~]# kubectl certificate approve user1
certificatesigningrequest.certificates.k8s.io/user1 approved
[root@clientvm ~]# kubectl get csr/user1 -o yaml
## 证书的内容使用 base64 编码,存放在字段 status.certificate
保存status.certificate内容到一个文件aaa,生成证书 crt
[root@clientvm ~]# cat aaa |base64 --decode >user1.crt
5) 添加user1到kubeconfig
[root@clientvm ~]# kubectl config set-credentials user1 --client-key=user1.key --client-certificate=user1.crt --embed-certs=true
User "user1" set.
- 添加上下文
[root@clientvm ~]# kubectl config get-contexts
CURRENT   NAME                          CLUSTER      AUTHINFO           NAMESPACE
*         kubernetes-admin@kubernetes   kubernetes   kubernetes-admin

[root@clientvm ~]# kubectl config set-context user1@kubernetes --cluster=kubernetes --user=user1
Context "user1@kubernetes" created.
7) 把上下文切换为user1
[root@clientvm ~]# kubectl config use-context user1@kubernetes
Switched to context "user1@kubernetes".


##此处报权限错误是因为只做了认证,还没有授权
[root@clientvm ~]# kubectl get pod
Error from server (Forbidden): pods is forbidden: User "user1" cannot list resource "pods" in API group "" in the namespace "default"
管理配置上下文
基本步骤
- 添加用户
kubectl config set-credentials -h
- 添加 cluster
kubectl config set-cluster -h
- 添加 context
kubectl config set-context
- 切换使用
[root@clientvm ~]# kubectl config current-context
kubernetes-admin@kubernetes

[root@clientvm ~]# kubectl config use-context kubernetes-admin@kubernetes
Switched to context "kubernetes-admin@kubernetes".

[root@clientvm ~]# kubectl config get-contexts
CURRENT   NAME                          CLUSTER      AUTHINFO           NAMESPACE
*         kubernetes-admin@kubernetes   kubernetes   kubernetes-admin
          user1@kubernetes              kubernetes   user1
Service Account
当你(自然人)访问集群时(例如,使用 kubectl),API 服务器将你的身份验证为 特定的用户帐户(当前这通常是 admin,除非你的集群管理员已经定制了你的集群配置)。 Pod 内的容器中的进程也可以与 api 服务器接触。 当它们进行身份验证时,它们被验证为特定的服务帐户(例如,default)
服务账号通常由 API 服务器自动创建并通过 ServiceAccount 准入控制器 关联到集群中运行的 Pod 上。 相关Token会挂载到 Pod 中可预知的位置,允许集群内进程与 API 服务器通信。
当你创建 Pod 时,如果没有指定服务账户,Pod 会被指定给命名空间中的 default 服务账户。 也可以在Pod中添加serviceAccountName明确指定SA。
[root@clientvm ~]# kubectl get pod nginx2 -o yaml | grep -i serviceaccount
    - mountPath: /var/run/secrets/kubernetes.io/serviceaccount
  serviceAccount: default
  serviceAccountName: default
创建SA:
[root@clientvm ~]# kubectl create serviceaccount -h
Create a service account with the specified name.

Aliases:
serviceaccount, sa

Examples:
  # Create a new service account named my-service-account
  kubectl create serviceaccount my-service-account
创建SA后,系统会自动创建一个token
[root@clientvm ~]# kubectl get sa,secret -n mytest
NAME                     SECRETS   AGE
serviceaccount/default   1         18d
serviceaccount/my-sa     1         15s

NAME                         TYPE                                  DATA   AGE
secret/default-token-64sch   kubernetes.io/service-account-token   3      18d
secret/my-sa-token-w6d7f     kubernetes.io/service-account-token   3      15s
[root@clientvm ~]# kubectl get serviceaccounts my-sa -n mytest  -o yaml
apiVersion: v1
kind: ServiceAccount
metadata:
  creationTimestamp: "2020-12-16T05:24:27Z"
  name: my-sa
  namespace: mytest
  resourceVersion: "4060881"
  selfLink: /api/v1/namespaces/mytest/serviceaccounts/my-sa
  uid: 85bd0753-5ebf-4c5f-8046-5dbd4391f739
secrets:
- name: my-sa-token-w6d7f
从私有镜像仓库获取镜像
Option 1) 在Pod中引 ImagePullSecrets
# pod.yaml
apiVersion: v1
kind: Pod
metadata:
  name: foo
  namespace: awesomeapps
spec:
  containers:
    - name: foo
      image: janedoe/awesomeapp:v1
  imagePullSecrets:
    - name: myregistryke
Option 2)添加 docker-registry 类似的secret到default SA
kubectl create secret docker-registry myregistrykey --docker-server=DUMMY_SERVER \
          --docker-username=DUMMY_USERNAME --docker-password=DUMMY_DOCKER_PASSWORD

kubectl patch serviceaccount default -p '{"imagePullSecrets": [{"name": "myregistrykey"}]}'
RBAC授权
基于角色(Role)的访问控制(RBAC)是一种基于组织中用户的角色来调节控制对 计算机或网络资源的访问的方法。
RBAC 鉴权机制使用 rbac.authorization.k8s.io API 组 来驱动鉴权决定,允许你通过 Kubernetes API 动态配置策略。
要启用 RBAC,在启动 API 服务器 时将 –authorization-mode 参数设置为一个逗号分隔的列表并确保其中包含 RBAC
RBAC API 声明了四种 Kubernetes 对象:Role、ClusterRole、RoleBinding 和 ClusterRoleBinding。
Role 和 ClusterRole
RBAC 的 Role 或 ClusterRole 中包含一组代表相关权限的规则。 这些权限是纯粹累加的(不存在拒绝某操作的规则)。
Role 总是用来在某个名字空间 内设置访问权限;在你创建 Role 时,你必须指定该 Role 所属的名字空间。
与之相对,ClusterRole 则是一个集群作用域的资源。这两种资源的名字不同(Role 和 ClusterRole)是因为 Kubernetes 对象要么是名字空间作用域的,要么是集群作用域的, 不可两者兼具。
如果你希望在名字空间内定义角色,应该使用 Role; 如果你希望定义集群范围的角色,应该使用 ClusterRole。
role可包含的操作有:
"get", "list", "watch", "create", "update", "patch", "delete"
role常用可操作资源有:Pods, ConfigMaps, Deploments, Nodes, Secrets, Namespaces
核心组件角色
| 默认 ClusterRole | 默认 ClusterRoleBinding | 描述 |
|---|---|---|
| cluster-admin | system:masters 组 | 允许超级用户在平台上的任何资源上执行所有操作。 当在 ClusterRoleBinding 中使用时,可以授权对集群中以及所有名字空间中的全部资源进行完全控制。 当在 RoleBinding 中使用时,可以授权控制 RoleBinding 所在名字空间中的所有资源,包括名字空间本身。 |
| admin | 无 | 允许管理员访问权限,旨在使用 RoleBinding 在名字空间内执行授权。 如果在 RoleBinding 中使用,则可授予对名字空间中的大多数资源的读/写权限, 包括创建角色和角色绑定的能力。 但是它不允许对资源配额或者名字空间本身进行写操作。 |
| edit | 无 | 允许对名字空间的大多数对象进行读/写操作。 它不允许查看或者修改角色或者角色绑定。 不过,此角色可以访问 Secret,以名字空间中任何 ServiceAccount 的身份运行 Pods, 所以可以用来了解名字空间内所有服务账号的 API 访问级别。 |
Role范例:
[root@clientvm ~]# kubectl create role -h
Usage:
  kubectl create role NAME --verb=verb --resource=resource.group/subresource [--resource-name=resourcename]
[--dry-run=server|client|none] [options]

Examples:
  # Create a Role named "pod-reader" that allows user to perform "get", "watch" and "list" on pods
  kubectl create role pod-reader --verb=get --verb=list --verb=watch --resource=pods

  # Create a Role named "pod-reader" with ResourceName specified
  kubectl create role pod-reader --verb=get --resource=pods --resource-name=readablepod --resource-name=anotherpod

  # Create a Role named "foo" with API Group specified
  kubectl create role foo --verb=get,list,watch --resource=rs.extensions

  # Create a Role named "foo" with SubResource specified
  kubectl create role foo --verb=get,list,watch --resource=pods,pods/status
[root@clientvm ~]# cat role-example.yaml
apiVersion: rbac.authorization.k8s.io/v1
kind: Role
metadata:
  namespace: mytest
  name: pod-reader
rules:
- apiGroups: [""] # "" 标明 core API 组
  resources: ["pods"]
  verbs: ["get", "watch", "list"]
[root@clientvm ~]# kubectl apply -f role-example.yaml
role.rbac.authorization.k8s.io/pod-reader created
ClusterRole范例
[root@clientvm ~]# kubectl create clusterrole -h
Usage:
  kubectl create clusterrole NAME --verb=verb --resource=resource.group [--resource-name=resourcename]
[--dry-run=server|client|none] [options]

Examples:
  # Create a ClusterRole named "pod-reader" that allows user to perform "get", "watch" and "list" on pods
  kubectl create clusterrole pod-reader --verb=get,list,watch --resource=pods

  # Create a ClusterRole named "pod-reader" with ResourceName specified
  kubectl create clusterrole pod-reader --verb=get --resource=pods --resource-name=readablepod
--resource-name=anotherpod

  # Create a ClusterRole named "foo" with API Group specified
  kubectl create clusterrole foo --verb=get,list,watch --resource=rs.extensions

  # Create a ClusterRole named "foo" with SubResource specified
  kubectl create clusterrole foo --verb=get,list,watch --resource=pods,pods/status

  # Create a ClusterRole name "foo" with NonResourceURL specified
  kubectl create clusterrole "foo" --verb=get --non-resource-url=/logs/*

  # Create a ClusterRole name "monitoring" with AggregationRule specified
  kubectl create clusterrole monitoring --aggregation-rule="rbac.example.com/aggregate-to-monitoring=true"
[root@clientvm ~]# cat clusterrole-example.yaml
apiVersion: rbac.authorization.k8s.io/v1
kind: ClusterRole
metadata:
  name: secret-reader
rules:
- apiGroups: [""]
  # 在 HTTP 层面,用来访问 Secret 对象的资源的名称为 "secrets"
  resources: ["secrets"]
  verbs: ["get", "watch", "list"]
[root@clientvm ~]# kubectl apply -f clusterrole-example.yaml
clusterrole.rbac.authorization.k8s.io/secret-reader created
[root@clientvm ~]# kubectl get role -n mytest
NAME         CREATED AT
pod-reader   2020-12-16T04:41:56Z
[root@clientvm ~]# kubectl get clusterrole | grep secret
secret-reader                                                          2020-12-16T04:44:26Z
RoleBinding 和 ClusterRoleBinding
角色绑定(Role Binding)是将角色中定义的权限赋予一个或者一组用户。RoleBinding 在指定的名字空间中执行授权,而 ClusterRoleBinding 在集群范围执行授权。
一个 RoleBinding 可以引用同一的名字空间中的任何 Role。 或者,一个 RoleBinding 可以引用某 ClusterRole 并将该 ClusterRole 绑定到 RoleBinding 所在的名字空间。 如果你希望将某 ClusterRole 绑定到集群中所有名字空间,你要使用 ClusterRoleBinding。
RoleBinding 范例
[root@clientvm ~]# kubectl create rolebinding -h
Usage:
  kubectl create rolebinding NAME --clusterrole=NAME|--role=NAME [--user=username] [--group=groupname]
[--serviceaccount=namespace:serviceaccountname] [--dry-run=server|client|none] [options]

Examples:
  # Create a RoleBinding for user1, user2, and group1 using the admin ClusterRole
  kubectl create rolebinding admin --clusterrole=admin --user=user1 --user=user2 --group=group1
将clusterrole admin 绑定到之前创建的user account user1
[root@clientvm ~]# kubectl create rolebinding admin-to-user1 --clusterrole=admin --user=user1
rolebinding.rbac.authorization.k8s.io/admin-to-user1 created

[root@clientvm ~]# kubectl --context=user1 get pod
NAME                     READY   STATUS      RESTARTS   AGE
nginx-taint              1/1     Running     0          37h
nginx2                   1/1     Running     0          4d20h
ClusterRoleBinding 范例
[root@clientvm ~]# kubectl create clusterrolebinding -h
Usage:
  kubectl create clusterrolebinding NAME --clusterrole=NAME [--user=username] [--group=groupname]
[--serviceaccount=namespace:serviceaccountname] [--dry-run=server|client|none] [options]

Examples:
  # Create a ClusterRoleBinding for user1, user2, and group1 using the cluster-admin ClusterRole
  kubectl create clusterrolebinding cluster-admin --clusterrole=cluster-admin --user=user1 --user=user2 --group=group1
准入控制(Admission Controllers)
英文:
https://kubernetes.io/docs/reference/access-authn-authz/admission-controllers/#what-does-each-admission-controller-do
中文:
https://kubernetes.io/zh/docs/reference/access-authn-authz/admission-controllers/
启用额外的准入控制器:
[root@master manifests]# grep admission ./kube-apiserver.yaml
    - --enable-admission-plugins=NodeRestriction
关闭准入控制器:
 ## 添加如下参数
 --disable-admission-plugins=PodNodeSelector,AlwaysDeny ...
默认启用的控制器:
NamespaceLifecycle, LimitRanger, ServiceAccount, TaintNodesByCondition, Priority, DefaultTolerationSeconds, DefaultStorageClass, StorageObjectInUseProtection, PersistentVolumeClaimResize, RuntimeClass, CertificateApproval, CertificateSigning, CertificateSubjectRestriction, DefaultIngressClass, MutatingAdmissionWebhook, ValidatingAdmissionWebhook, ResourceQuota
网络策略
理论基础
如果你希望在 IP 地址或端口层面(OSI 第 3 层或第 4 层)控制网络流量, 则你可以考虑为集群中特定应用使用 Kubernetes 网络策略(NetworkPolicy)。 NetworkPolicy 是一种以应用为中心的结构,允许你设置如何允许 Pod 与网络上的各类网络“实体” 通信。
Pod 可以通信的 Pod 是通过如下三个标识符的组合来辩识的:
- 其他被允许的 Pods(例外:Pod 无法阻塞对自身的访问)
- 被允许的名字空间
- IP 组块(例外:与 Pod 运行所在的节点的通信总是被允许的, 无论 Pod 或节点的 IP 地址)
在定义基于 Pod 或名字空间的 NetworkPolicy 时,你会使用 选择算符 来设定哪些流量 可以进入或离开与该算符匹配的 Pod。 当基于 IP 的 NetworkPolicy 被创建时,我们基于 IP 组块(CIDR 范围) 来定义策略。
网络策略通过网络插件 来实现。要使用网络策略,你必须使用支持 NetworkPolicy 的网络解决方案。
语法说明
apiVersion: networking.k8s.io/v1
kind: NetworkPolicy
metadata:
  name: test-network-policy
  namespace: default
spec:
  podSelector:
    matchLabels:
      role: db
##1)对default NameSpace中包含标签role=db的Pod做控制
  policyTypes:
  - Ingress
  - Egress
##2)控制出入流量,未明确指定都是拒绝
  ingress:
  - from:
    - ipBlock:
        cidr: 172.17.0.0/16
        except:
        - 172.17.1.0/24
##3)允许的网段,例外网段
    - namespaceSelector:
        matchLabels:
          project: myproject
##4)允许的NameSpace
    - podSelector:
        matchLabels:
          role: frontend
##5)允许的Pod
    ports:
    - protocol: TCP
      port: 6379
##6) 定义被访问的端口
  egress:
  - to:
    - ipBlock:
        cidr: 10.0.0.0/24
    ports:
    - protocol: TCP
      port: 5978
##7)允许要控制的Pod访问哪个  "网段:端口" 的流量
注意From和To的行为
1)表示交集,and 运算
  ...
  ingress:
  - from:
    - namespaceSelector:
        matchLabels:
          user: alice
      podSelector:
        matchLabels:
          role: client
  ...
2)表示并集,or 运算
  ...
  ingress:
  - from:
    - namespaceSelector:
        matchLabels:
          user: alice
    - podSelector:
        matchLabels:
          role: client
  ...
默认策略:拒绝所有进入流量
apiVersion: networking.k8s.io/v1
kind: NetworkPolicy
metadata:
  name: default-deny-ingress
spec:
  podSelector: {}
  policyTypes:
  - Ingress
默认策略:允许所有进入流量
apiVersion: networking.k8s.io/v1
kind: NetworkPolicy
metadata:
  name: allow-all-ingress
spec:
  podSelector: {}
  ingress:
  - {}
  policyTypes:
  - Ingress
范例1: 允许指定网段的入站流量
[root@clientvm ~]# cat deny-all-except.yaml
apiVersion: networking.k8s.io/v1
kind: NetworkPolicy
metadata:
  name: deny-ingress-except
spec:
  podSelector:
    matchLabels:
      run: nginx1
  policyTypes:
  - Ingress
  ingress:
  - from:
    - ipBlock:
        cidr: 10.244.0.0/16
        except:
        - 10.244.102.0/24
    - ipBlock:
        cidr: 192.168.241.0/24
[root@clientvm ~]#
[root@clientvm ~]# kubectl get pod --show-labels -o wide
NAME             READY   STATUS    RESTARTS   AGE     IP               NODE                  NOMINATED NODE   READINESS GATES   LABELS
busybox          1/1     Running   0          5m23s   10.244.102.144   worker1.example.com   <none>           <none>            run=busybox
nginx1           1/1     Running   0          10h     10.244.71.195    worker2.example.com   <none>           <none>            run=nginx1
nginx2           1/1     Running   0          10h     10.244.71.196    worker2.example.com   <none>           <none>            run=nginx2
nginx3-default   1/1     Running   0          8h      10.244.102.133   worker1.example.com   <none>           <none>            run=nginx3-
[root@master ~]# ip a | grep 192
    inet 192.168.241.129/24 brd 192.168.241.255 scope global eth0
[root@master ~]# ping 10.244.71.195
PING 10.244.71.195 (10.244.71.195) 56(84) bytes of data.
64 bytes from 10.244.71.195: icmp_seq=1 ttl=63 time=0.484 ms
64 bytes from 10.244.71.195: icmp_seq=2 ttl=63 time=0.276 ms
64 bytes from 10.244.71.195: icmp_seq=3 ttl=63 time=0.217 ms
^C
--- 10.244.71.195 ping statistics ---
[root@clientvm ~]# kubectl run busybox --image=busybox --image-pull-policy=IfNotPresent -- sleep 10000
pod/busybox created
[root@clientvm ~]#
[root@clientvm ~]# kubectl get pod -o wide
NAME             READY   STATUS    RESTARTS   AGE   IP               NODE                  NOMINATED NODE   READINESS GATES
busybox          1/1     Running   0          10s   10.244.102.144   worker1.example.com   <none>           <none>
nginx1           1/1     Running   0          10h   10.244.71.195    worker2.example.com   <none>           <none>
nginx2           1/1     Running   0          10h   10.244.71.196    worker2.example.com   <none>           <none>
nginx3-default   1/1     Running   0          8h    10.244.102.133   worker1.example.com   <none>           <none>

[root@clientvm ~]# kubectl exec busybox -it -- sh
/ # ping 10.244.71.195
PING 10.244.71.195 (10.244.71.195): 56 data bytes
^C
--- 10.244.71.195 ping statistics ---
5 packets transmitted, 0 packets received, 100% packet loss
/ # ping 10.244.71.196
PING 10.244.71.196 (10.244.71.196): 56 data bytes
64 bytes from 10.244.71.196: seq=0 ttl=62 time=0.547 ms
64 bytes from 10.244.71.196: seq=1 ttl=62 time=0.341 ms
^C
--- 10.244.71.196 ping statistics ---
范例2: 允许到指定端口的出站流量
目的:Pod Nginx1可以访问namespace内的Pod的80端口,不允许访问其他
[root@clientvm ~]# cat allow-egress-to-port.yaml
apiVersion: networking.k8s.io/v1
kind: NetworkPolicy
metadata:
  name: deny-ingress-except
spec:
  podSelector:
    matchLabels:
      run: nginx1
  policyTypes:
  - Egress
  egress:
  - to:
    - namespaceSelector:
        matchLabels:
          app: myapp
    ports:
    - protocol: TCP
      port: 80
验证:
[root@clientvm ~]# kubectl get pod -o wide -n mytest
NAME      READY   STATUS    RESTARTS   AGE   IP              NODE                  NOMINATED NODE   READINESS GATES
nginxaa   1/1     Running   0          10m   10.244.71.200   worker2.example.com   <none>           <none>
[root@clientvm ~]# kubectl get pod -o wide
NAME             READY   STATUS    RESTARTS   AGE   IP               NODE                  NOMINATED NODE   READINESS GATES
busybox          1/1     Running   0          33m   10.244.102.144   worker1.example.com   <none>           <none>
nginx1           1/1     Running   0          10h   10.244.71.195    worker2.example.com   <none>           <none>
[root@clientvm ~]# kubectl exec nginx1 -it -- bash
root@nginx1:/#
root@nginx1:/# curl 10.244.71.200
^C
root@nginx1:/# curl 10.244.71.195
AAAAAA
root@nginx1:/# exit


 被折叠的 条评论
为什么被折叠?
被折叠的 条评论
为什么被折叠?
 到【灌水乐园】发言


