


 本文深入探讨了SpringBoot如何使用Tomcat作为默认的嵌入式Servlet容器,包括如何通过配置修改Servlet容器参数,使用EmbeddedServletContainerCustomizer进行定制,以及注册Servlet、Filter和Listener。同时,介绍了如何切换到Jetty或Undertow容器,并解析了SpringBoot自动配置Servlet容器的原理。此外,还讲解了外置Servlet容器的设置和启动流程。
1. SpringBoot默认(嵌入式)容器
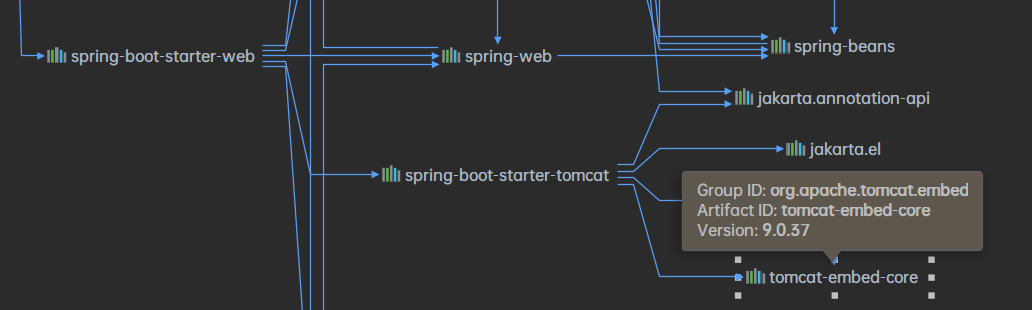
相对以前我们开发web(如ssm)时,需要在外部配置tomcat,SpringBoot默认使用Tomcat作为嵌入式的Servlet容器,而spring boot就帮我们简化了,直接内嵌
我们可以通过pom文件来看所依赖的servlet容器
2. 如何定制和修改Servlet容器的相关配置
2.1 修改和server有关的配置(ServerProperties【本质也是EmbeddedServletContainerCustomizer】)
server.port=8081
server.context-path=/crud

server.tomcat.uri-encoding=UTF-8

//通用的Servlet容器设置
server.xxx
//Tomcat的设置
server.tomcat.xxx
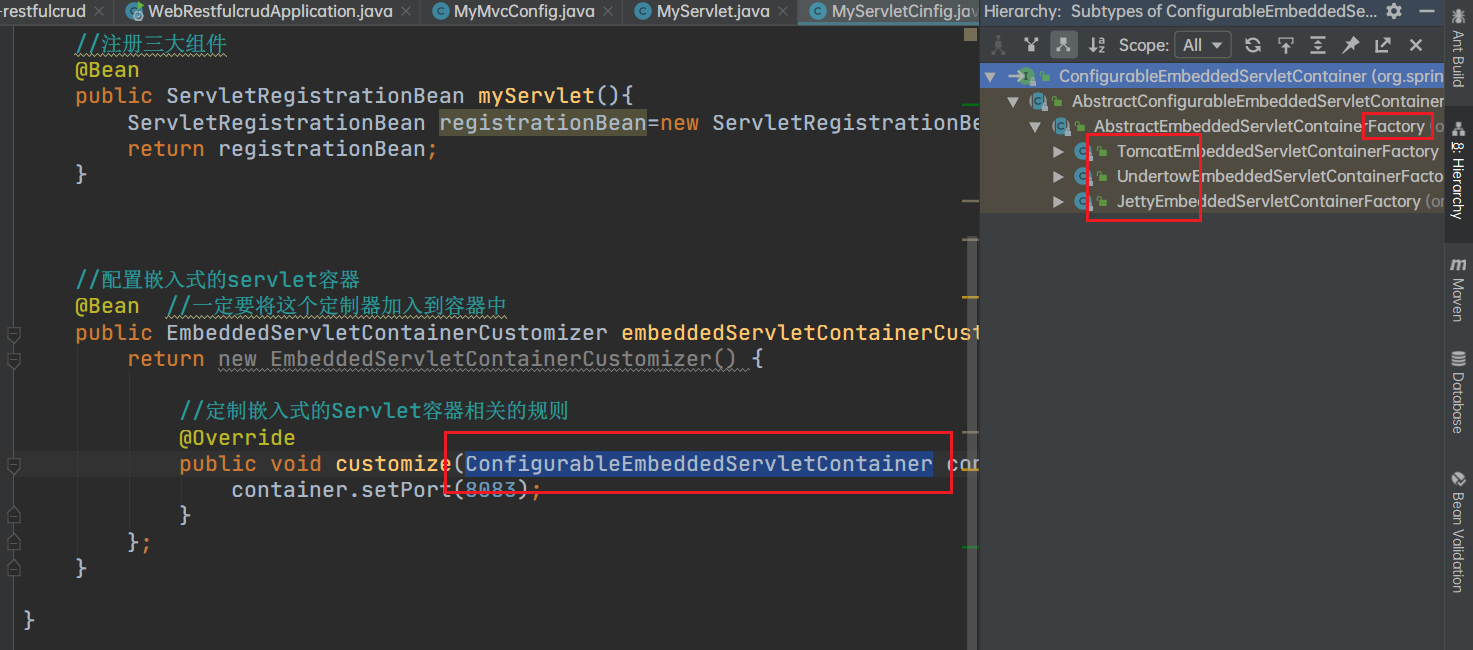
2.2 编写一个EmbeddedServletContainerCustomizer(嵌入式的Servlet容器的定制器)来修改Servlet容器的配置
MyMvcConfig
	@Bean  //一定要将这个定制器加入到容器中
    public EmbeddedServletContainerCustomizer embeddedServletContainerCustomizer(){
        return new EmbeddedServletContainerCustomizer() {

            //定制嵌入式的Servlet容器相关的规则
            @Override
            public void customize(ConfigurableEmbeddedServletContainer container) {
                container.setPort(8083);
            }
        };
    }
注意:EmbeddedServletContainerFactory找不到,之前以为是jar包的版本低了,结果发现是springboot2.X之后改了写法。将EmbeddedServletContainerFactory改为TomcatServletWebServerFactory就好了,具体可以看这篇博客,这个点害我搞了好久,一直启动不了项目。。。
3. 注册servlet三大组件
以前永ssm写web项目时,我们去注册Servlet、Filter和Listener需要在
webapp/WEB-INF/web.xml进行注册,在springboot中则不用这种方法
而SpringBoot默认是以jar包的方式启动嵌入式的Servlet容器来启动SpringBoot的web应用,没有web.xml文件
3.1 注册三大组件用的方式
1、ServletRegistrationBean
先在servlet包中写一个MyServlet类
public class MyServlet extends HttpServlet {

    //处理get请求
    @Override
    protected void doGet(HttpServletRequest req, HttpServletResponse resp) throws ServletException, IOException {
        doGet(req,resp);
    }

    @Override
    protected void doPost(HttpServletRequest req, HttpServletResponse resp) throws ServletException, IOException {
        resp.getWriter().write("Hello MyServlet");
    }
}
然后在config中写一个专门用来注册这三个组件的类MyServletCinfig
//注册三大组件
@Bean
public ServletRegistrationBean myServlet(){
    ServletRegistrationBean registrationBean = new ServletRegistrationBean(new MyServlet(),"/myServlet");
    return registrationBean;
}
2、FilterRegistrationBean
同上,先写一个filter类然后在注册类中注册
@Bean
public FilterRegistrationBean myFilter(){
    FilterRegistrationBean registrationBean = new FilterRegistrationBean();
    registrationBean.setFilter(new MyFilter());
    registrationBean.setUrlPatterns(Arrays.asList("/hello","/myServlet"));
    return registrationBean;
}
3、ServletListenerRegistrationBean
@Bean
public ServletListenerRegistrationBean myListener(){
    ServletListenerRegistrationBean<MyListener> registrationBean = new ServletListenerRegistrationBean<>(new MyListener());
    return registrationBean;
}
SpringBoot帮我们自动SpringMVC的时候,自动的注册SpringMVC的前端控制器;DIspatcherServlet
DispatcherServletAutoConfiguration中
@Bean(name = DEFAULT_DISPATCHER_SERVLET_REGISTRATION_BEAN_NAME)
@ConditionalOnBean(value = DispatcherServlet.class, name = DEFAULT_DISPATCHER_SERVLET_BEAN_NAME)
public ServletRegistrationBean dispatcherServletRegistration(
      DispatcherServlet dispatcherServlet) {
   ServletRegistrationBean registration = new ServletRegistrationBean(
         dispatcherServlet, this.serverProperties.getServletMapping());
    //默认拦截: /-->所有请求;      包静态资源,但是不拦截jsp请求;   /*会拦截jsp
    //可以通过server.servletPath来修改SpringMVC前端控制器默认拦截的请求路径
   registration.setName(DEFAULT_DISPATCHER_SERVLET_BEAN_NAME);
   registration.setLoadOnStartup(
         this.webMvcProperties.getServlet().getLoadOnStartup());
   if (this.multipartConfig != null) {
      registration.setMultipartConfig(this.multipartConfig);
   }
   return registration;
}
4. 替换为其他嵌入式Servlet容器
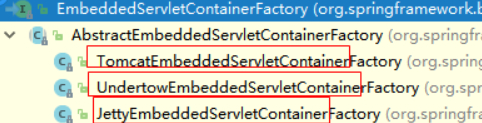
springboot默认支持tomcat,也支持Jetty(适用于需要长连接)和Undertow(不支持jsp),我们可以通过ConfigurableEmbeddedServletContainer的继承树来看到支持这三种容器(选中后ctrl+h)
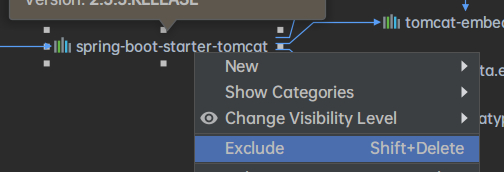
4.1 先排除tomcat
先排除tomcat的依赖
<dependency>
   <groupId>org.springframework.boot</groupId>
   <artifactId>spring-boot-starter-web</artifactId>
   引入web模块默认就是使用嵌入式的Tomcat作为Servlet容器;
</dependency>
4.2 配置Jetty
<!-- 引入web模块 -->
<dependency>
   <groupId>org.springframework.boot</groupId>
   <artifactId>spring-boot-starter-web</artifactId>
   <exclusions>
      <exclusion>
         <artifactId>spring-boot-starter-tomcat</artifactId>
         <groupId>org.springframework.boot</groupId>
      </exclusion>
   </exclusions>
</dependency>

<!--引入其他的Servlet容器-->
<dependency>
   <artifactId>spring-boot-starter-jetty</artifactId>
   <groupId>org.springframework.boot</groupId>
</dependency>
4.3 配置Undertow
<!-- 引入web模块 -->
<dependency>
   <groupId>org.springframework.boot</groupId>
   <artifactId>spring-boot-starter-web</artifactId>
   <exclusions>
      <exclusion>
         <artifactId>spring-boot-starter-tomcat</artifactId>
         <groupId>org.springframework.boot</groupId>
      </exclusion>
   </exclusions>
</dependency>

<!--引入其他的Servlet容器-->
<dependency>
   <artifactId>spring-boot-starter-undertow</artifactId>
   <groupId>org.springframework.boot</groupId>
</dependency>
5. 嵌入式Servlet容器自动配置原理
5.1 嵌入式的Servlet容器自动配置(EmbeddedServletContainerAutoConfiguration)
@AutoConfigureOrder(Ordered.HIGHEST_PRECEDENCE)
@Configuration
@ConditionalOnWebApplication
@Import(BeanPostProcessorsRegistrar.class)
//导入BeanPostProcessorsRegistrar:Spring注解版;给容器中导入一些组件
//导入了EmbeddedServletContainerCustomizerBeanPostProcessor:
//后置处理器:bean初始化前后(创建完对象,还没属性赋值)执行初始化工作
public class EmbeddedServletContainerAutoConfiguration {

    @Configuration
	@ConditionalOnClass({ Servlet.class, Tomcat.class })//判断当前是否引入了Tomcat依赖;
	@ConditionalOnMissingBean(value = EmbeddedServletContainerFactory.class, search = SearchStrategy.CURRENT)//判断当前容器没有用户自己定义EmbeddedServletContainerFactory:嵌入式的Servlet容器工厂;作用:创建嵌入式的Servlet容器
	public static class EmbeddedTomcat {

		@Bean
		public TomcatEmbeddedServletContainerFactory tomcatEmbeddedServletContainerFactory() {
			return new TomcatEmbeddedServletContainerFactory();
		}

	}

    /**
	 * Nested configuration if Jetty is being used.
	 */
	@Configuration
	@ConditionalOnClass({ Servlet.class, Server.class, Loader.class,
			WebAppContext.class })
	@ConditionalOnMissingBean(value = EmbeddedServletContainerFactory.class, search = SearchStrategy.CURRENT)
	public static class EmbeddedJetty {

		@Bean
		public JettyEmbeddedServletContainerFactory jettyEmbeddedServletContainerFactory() {
			return new JettyEmbeddedServletContainerFactory();
		}

	}

	/**
	 * Nested configuration if Undertow is being used.
	 */
	@Configuration
	@ConditionalOnClass({ Servlet.class, Undertow.class, SslClientAuthMode.class })
	@ConditionalOnMissingBean(value = EmbeddedServletContainerFactory.class, search = SearchStrategy.CURRENT)
	public static class EmbeddedUndertow {

		@Bean
		public UndertowEmbeddedServletContainerFactory undertowEmbeddedServletContainerFactory() {
			return new UndertowEmbeddedServletContainerFactory();
		}

	}
- 嵌入式Servlet容器工厂(
EmbeddedServletContainerFactory)
public interface EmbeddedServletContainerFactory {

   //获取嵌入式的Servlet容器
   EmbeddedServletContainer getEmbeddedServletContainer(
         ServletContextInitializer... initializers);

}
- 嵌入式的Servlet容器(
EmbeddedServletContainer)

- 以
TomcatEmbeddedServletContainerFactory为例
@Override
public EmbeddedServletContainer getEmbeddedServletContainer(
      ServletContextInitializer... initializers) {
    //创建一个Tomcat
   Tomcat tomcat = new Tomcat();

    //配置Tomcat的基本环境
   File baseDir = (this.baseDirectory != null ? this.baseDirectory
         : createTempDir("tomcat"));
   tomcat.setBaseDir(baseDir.getAbsolutePath());
   Connector connector = new Connector(this.protocol);
   tomcat.getService().addConnector(connector);
   customizeConnector(connector);
   tomcat.setConnector(connector);
   tomcat.getHost().setAutoDeploy(false);
   configureEngine(tomcat.getEngine());
   for (Connector additionalConnector : this.additionalTomcatConnectors) {
      tomcat.getService().addConnector(additionalConnector);
   }
   prepareContext(tomcat.getHost(), initializers);

    //将配置好的Tomcat传入进去,返回一个EmbeddedServletContainer;并且启动Tomcat服务器
   return getTomcatEmbeddedServletContainer(tomcat);
}
- 我们对嵌入式容器配置的修改如何生效?
通过1、
ServerProperties2、EmbeddedServletContainerCustomizer即定制器(**EmbeddedServletContainerCustomizer**)帮我们修改了Servlet容器的配置
修改的原理:上面的@Import(BeanPostProcessorsRegistrar.class)
- 容器中导入了
EmbeddedServletContainerCustomizerBeanPostProcessor
//初始化之前
@Override
public Object postProcessBeforeInitialization(Object bean, String beanName)
      throws BeansException {
    //如果当前初始化的是一个ConfigurableEmbeddedServletContainer类型的组件
   if (bean instanceof ConfigurableEmbeddedServletContainer) {
       //
      postProcessBeforeInitialization((ConfigurableEmbeddedServletContainer) bean);
   }
   return bean;
}

===================================================================================

private void postProcessBeforeInitialization(
			ConfigurableEmbeddedServletContainer bean) {
    //获取所有的定制器,调用每一个定制器的customize方法来给Servlet容器进行属性赋值;
    for (EmbeddedServletContainerCustomizer customizer : getCustomizers()) {
        customizer.customize(bean);
    }
}

===================================================================================

private Collection<EmbeddedServletContainerCustomizer> getCustomizers() {
    if (this.customizers == null) {
        // Look up does not include the parent context
        this.customizers = new ArrayList<EmbeddedServletContainerCustomizer>(
            this.beanFactory
            //从容器中获取所有这个类型的组件:EmbeddedServletContainerCustomizer
            //定制Servlet容器,给容器中可以添加一个EmbeddedServletContainerCustomizer类型的组件
            .getBeansOfType(EmbeddedServletContainerCustomizer.class,
                            false, false)
            .values());
        Collections.sort(this.customizers, AnnotationAwareOrderComparator.INSTANCE);
        this.customizers = Collections.unmodifiableList(this.customizers);
    }
    return this.customizers;
}

//ServerProperties也是定制器
6. 原理总结
6.1 步骤
- springboot根据导入的依赖情况,给容器中添加相应的
EmbeddedServletContainerFactory(如TomcatEmbeddedServletContainerFactory) - 容器中某个组件要创建对象就会触发后置处理器(
EmbeddedServletContainerCustomizerBeanPostProcessor),只要时嵌入式的Servlet容器工厂,后置处理器就会工作 - 后置处理器从容器中获取所有的
EmbeddedServletContainerCustomizer,调用定制器的定制方法
6.2 嵌入式Servlet容器启动原理
什么时候创建嵌入式servlet容器工厂?什么时候获取嵌入式的servlet容器并启动tomcat?
- springboot应用启动运行
run方法 - springboot刷新ioc容器(
refreshContext(context),创建ioc容器对象并初始化容器,创建容器中每一个组件)- 如果是web应用,则创建
AnnotationConfigEmbeddedWebApplicationContext - 反之创建
AnnotationConfigApplicationContext
- 如果是web应用,则创建
- 刷新刚创建好的ioc容器(
refresh(context))
public void refresh() throws BeansException, IllegalStateException {
   synchronized (this.startupShutdownMonitor) {
      // Prepare this context for refreshing.
      prepareRefresh();

      // Tell the subclass to refresh the internal bean factory.
      ConfigurableListableBeanFactory beanFactory = obtainFreshBeanFactory();

      // Prepare the bean factory for use in this context.
      prepareBeanFactory(beanFactory);

      try {
         // Allows post-processing of the bean factory in context subclasses.
         postProcessBeanFactory(beanFactory);

         // Invoke factory processors registered as beans in the context.
         invokeBeanFactoryPostProcessors(beanFactory);

         // Register bean processors that intercept bean creation.
         registerBeanPostProcessors(beanFactory);

         // Initialize message source for this context.
         initMessageSource();

         // Initialize event multicaster for this context.
         initApplicationEventMulticaster();

         // Initialize other special beans in specific context subclasses.
         onRefresh();

         // Check for listener beans and register them.
         registerListeners();

         // Instantiate all remaining (non-lazy-init) singletons.
         finishBeanFactoryInitialization(beanFactory);

         // Last step: publish corresponding event.
         finishRefresh();
      }

      catch (BeansException ex) {
         if (logger.isWarnEnabled()) {
            logger.warn("Exception encountered during context initialization - " +
                  "cancelling refresh attempt: " + ex);
         }

         // Destroy already created singletons to avoid dangling resources.
         destroyBeans();

         // Reset 'active' flag.
         cancelRefresh(ex);

         // Propagate exception to caller.
         throw ex;
      }

      finally {
         // Reset common introspection caches in Spring's core, since we
         // might not ever need metadata for singleton beans anymore...
         resetCommonCaches();
      }
   }
}
- web的ioc容器重写了
onRefresh() - web的ioc容器回创建嵌入式servlet容器(
createEmbeddedServletContainer()) - 获取嵌入式servlet容器工厂
EmbeddedServletContainerFactory containerFactory = getEmbeddedServletContainerFactory();
从ioc容器中获取EmbeddedServletContainerFactory组件,TomcatEmbeddedServletContainerFactory创建对象,后置处理器一看是这个对象,就获取所有的定制器来先定制servlet容器相关配置 - 用容器工厂获取嵌入式servlet容器(
this.embeddedServletContainer = containerFactory .getEmbeddedServletContainer(getSelfInitializer())) - 嵌入式servlet容器创建对象并启动servlet容器
先启动嵌入式的servlet容器,再将ioc容器中未创建的对象获取出来,IOC容器启动创建嵌入式的Servlet容器
7. 使用外置的Servlet容器
我们先对比一下嵌入式servlet容器和外置servlet容器
嵌入式servlet容器:有点是可以将应用打成可执行的jar,相对简单和便携;缺点是默认不支持jsp,优化定制较复杂(如上面所说的,使用定制器【ServerProperties、自定义EmbeddedServletContainerCustomizer】,自己编写嵌入式Servlet容器的创建工厂【EmbeddedServletContainerFactory】)
外置servlet容器:可从外部安装tomcat,可将应用用war包方式进行打包
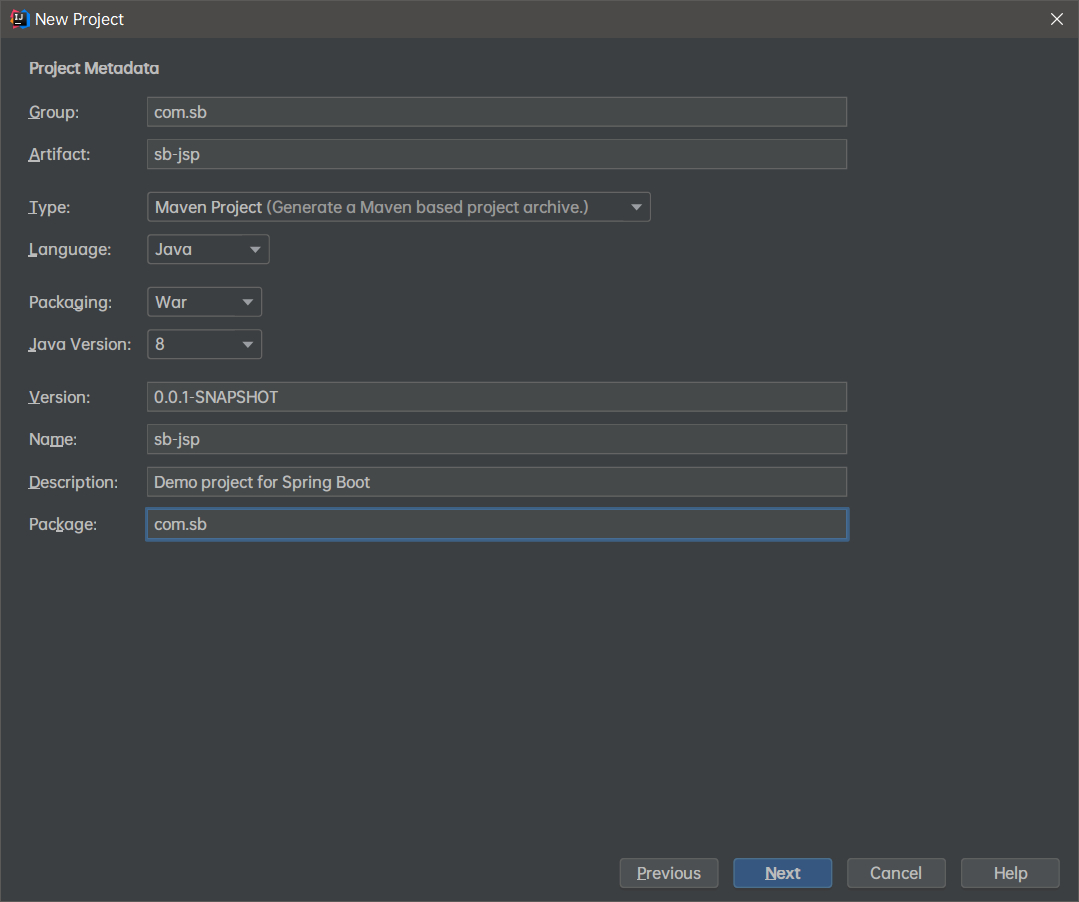
7.1 创建新项目
-
创建新得springboot项目(记得打包方式选war,并且后面要勾选spring web选项)
-
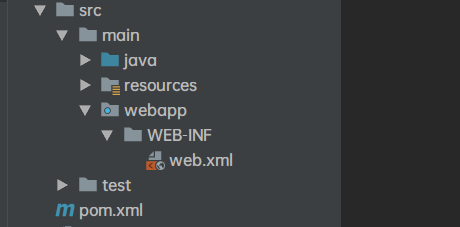
新建webapp文件夹
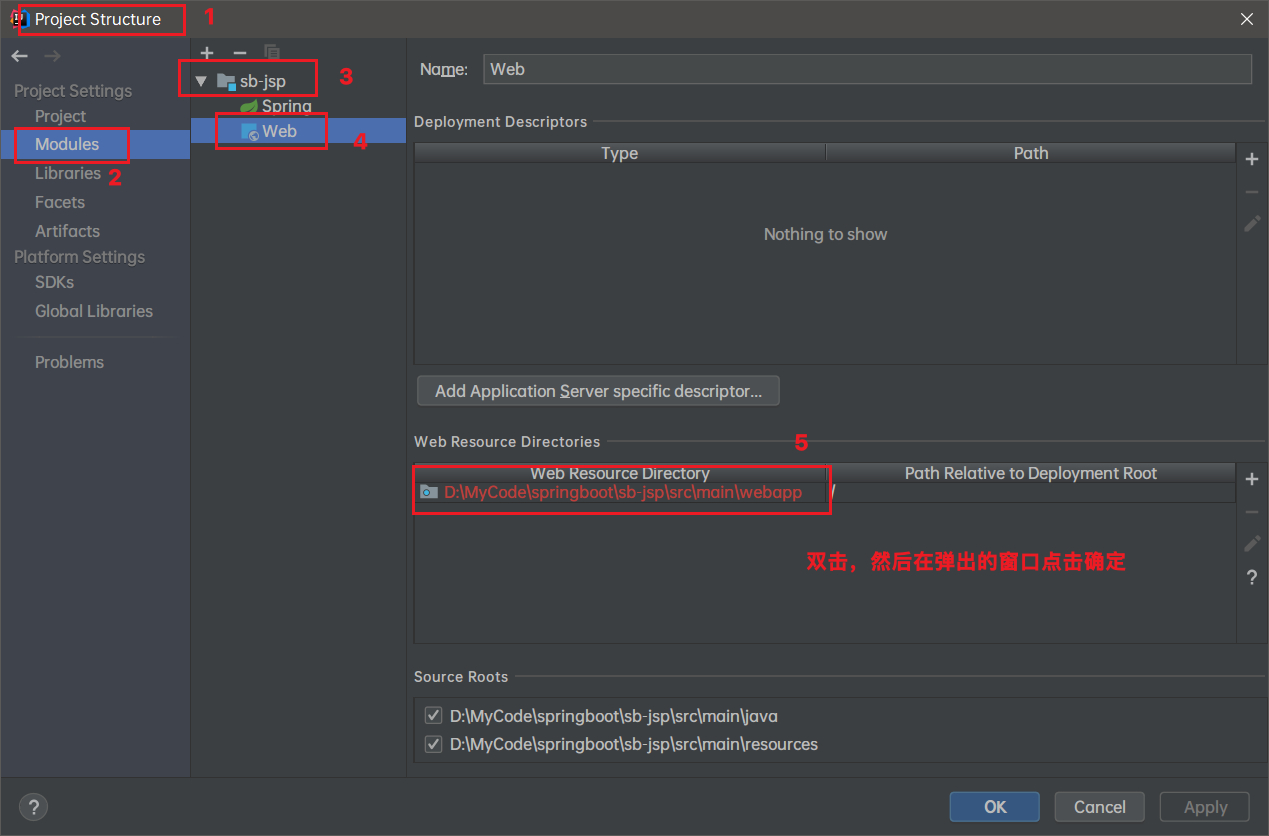
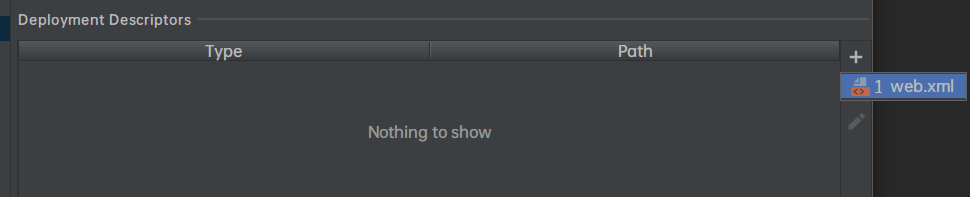
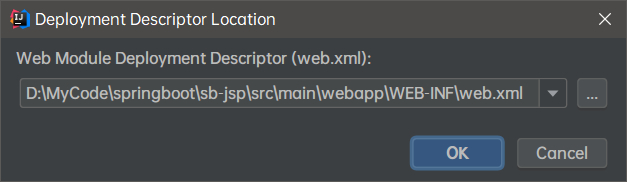
然后在部署描述对web.xml进行添加
然后在路径中的\WEB-INF\web.xml前加上\src\main\webapp
点击apply,我们就可以看到项目中有了新的webapp啦
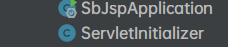
注意java.com.sb下有个ServletInitializer(后面会介绍)
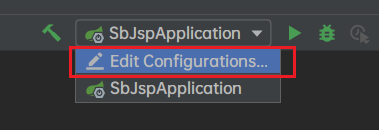
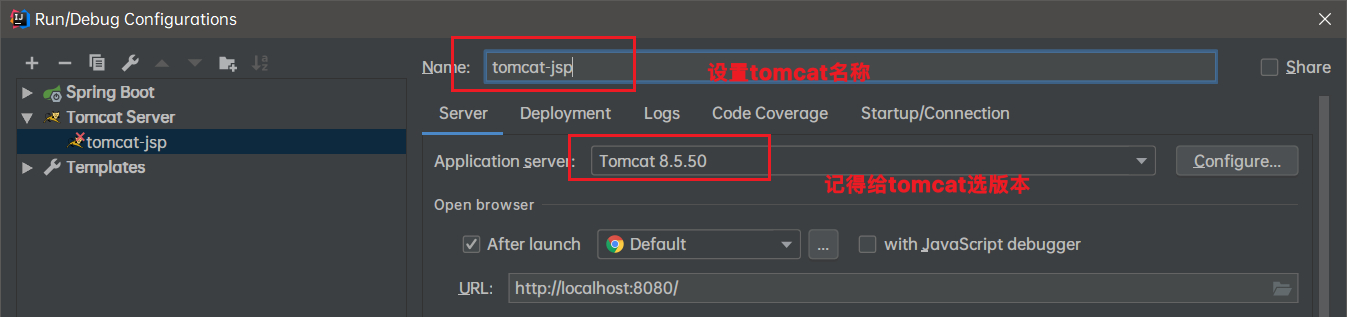
3.把服务其整合进idea
- 进入服务器配置
- 选中tomcat作为服务器
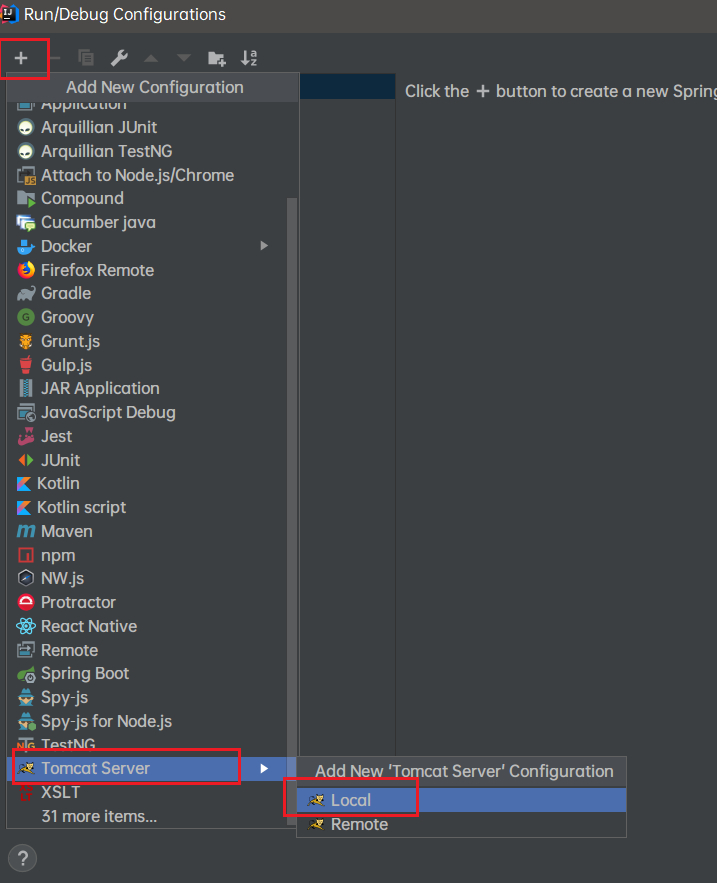
- 设置tomcat
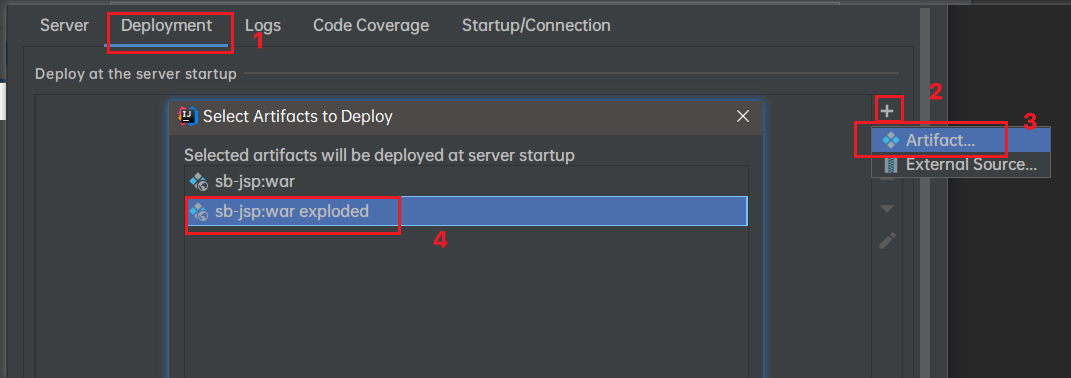
- 部署(Deployment)
-
测试(设置首页,按下首页按钮实现跳转到新页面)
- 创建首页,在webapp下创建
hello.jsp(外置servlet容器没有默认首页)
<%@ page contentType="text/html;charset=UTF-8" language="java" %> <html> <head> <title>Hello</title> </head> <body> <h1>Hello</h1> <a href="abc">跳转</a> </body> </html>- 在application.properties中配置前后缀
spring.mvc.view.prefix=/WEB-INF/ spring.mvc.view.suffix=.jsp- 创建控制器
controller.HelloController
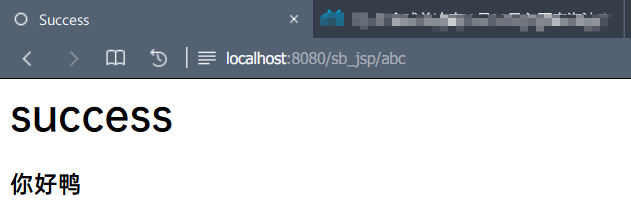
@Controller public class HelloController { @GetMapping("/abc") public String hello(Model model){ model.addAttribute("msg","你好鸭"); return "success"; } }- 创建要跳转的新页面(在WEB-INF下创建success.jsp)
<%@ page contentType="text/html;charset=UTF-8" language="java" %> <html> <head> <title>Success</title> </head> <body> <h1>success</h1> <h3>${msg}</h3> </body> </html> - 创建首页,在webapp下创建
-
运行
首页hello.jsp

跳转成功
7.2 创建外置servlet容器步骤
-
必须创建一个war项目(利用idea创建好目录结构)
-
将嵌入式的Tomcat指定为provided
<dependency> <groupId>org.springframework.boot</groupId> <artifactId>spring-boot-starter-tomcat</artifactId> <scope>provided</scope> </dependency> -
必须编写一个
SpringBootServletInitializer的子类,并调用configure方法public class ServletInitializer extends SpringBootServletInitializer { @Override protected SpringApplicationBuilder configure(SpringApplicationBuilder application) { //传入SpringBoot应用的主程序 return application.sources(SpringBoot04WebJspApplication.class); } } -
启动服务器
7.3 原理
我们来对比一下jar包和war包启动服务器的过程
jar包:先执行springboot主类的main方法,再启动ioc容器,然后创建嵌入式servlet容器
war包:先启动服务器,服务器启动springboot应用(SpringBootServletInitializer),再启动ioc容器
规则
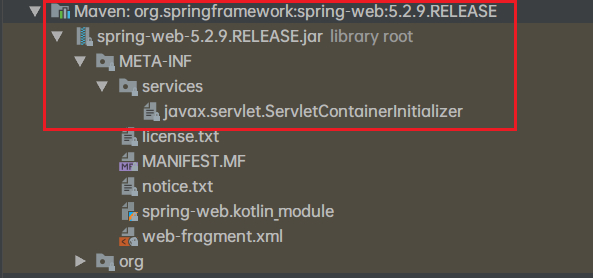
- 服务器启动(web应用启动)会创建当前web应用中每个jar包中
ServletContainerInitializer实例 ServletContainerInitializer的实现放在jar包中META-INF/services文件夹中,其中有一个叫javax.servlet.ServletContainerInitializer的文件,内容为ServletContainerInitializer的实现类的全类名- 我们还可以用
@HandlesTypes在应用启动时加载我们感兴趣的类
流程
-
启动tomcat
-
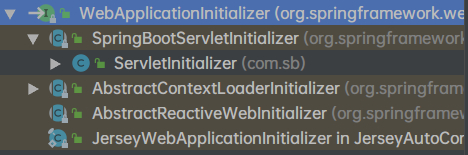
找到
ServletContainerInitializer的实现
点进去可以看到

-
SpringServletContainerInitializer将@HandlesTypes(WebApplicationInitializer.class)标注的所有这个类型的类都传入到onStartup方法的Set<Class<?>>;为这些WebApplicationInitializer类型的类创建实例 -
每一个
WebApplicationInitializer都调用自己的onStartup
-
相当于我们的
SpringBootServletInitializer的类会被创建对象,并执行onStartup方法 -
SpringBootServletInitializer实例执行onStartup时会用createRootApplicationContext来创建容器protected WebApplicationContext createRootApplicationContext( ServletContext servletContext) { //1、创建SpringApplicationBuilder SpringApplicationBuilder builder = createSpringApplicationBuilder(); StandardServletEnvironment environment = new StandardServletEnvironment(); environment.initPropertySources(servletContext, null); builder.environment(environment); builder.main(getClass()); ApplicationContext parent = getExistingRootWebApplicationContext(servletContext); if (parent != null) { this.logger.info("Root context already created (using as parent)."); servletContext.setAttribute( WebApplicationContext.ROOT_WEB_APPLICATION_CONTEXT_ATTRIBUTE, null); builder.initializers(new ParentContextApplicationContextInitializer(parent)); } builder.initializers( new ServletContextApplicationContextInitializer(servletContext)); builder.contextClass(AnnotationConfigEmbeddedWebApplicationContext.class); //调用configure方法,子类重写了这个方法,将SpringBoot的主程序类传入了进来 builder = configure(builder); //使用builder创建一个Spring应用 SpringApplication application = builder.build(); if (application.getSources().isEmpty() && AnnotationUtils .findAnnotation(getClass(), Configuration.class) != null) { application.getSources().add(getClass()); } Assert.state(!application.getSources().isEmpty(), "No SpringApplication sources have been defined. Either override the " + "configure method or add an @Configuration annotation"); // Ensure error pages are registered if (this.registerErrorPageFilter) { application.getSources().add(ErrorPageFilterConfiguration.class); } //启动Spring应用 return run(application); } -
Spring应用便启动并且创建IOC容器
public ConfigurableApplicationContext run(String... args) {
StopWatch stopWatch = new StopWatch();
stopWatch.start();
ConfigurableApplicationContext context = null;
FailureAnalyzers analyzers = null;
configureHeadlessProperty();
SpringApplicationRunListeners listeners = getRunListeners(args);
listeners.starting();
try {
  ApplicationArguments applicationArguments = new DefaultApplicationArguments(
        args);
  ConfigurableEnvironment environment = prepareEnvironment(listeners,
        applicationArguments);
  Banner printedBanner = printBanner(environment);
  context = createApplicationContext();
  analyzers = new FailureAnalyzers(context);
  prepareContext(context, environment, listeners, applicationArguments,
        printedBanner);

   //刷新IOC容器
  refreshContext(context);
  afterRefresh(context, applicationArguments);
  listeners.finished(context, null);
  stopWatch.stop();
  if (this.logStartupInfo) {
     new StartupInfoLogger(this.mainApplicationClass)
           .logStarted(getApplicationLog(), stopWatch);
  }
  return context;
}
catch (Throwable ex) {
  handleRunFailure(context, listeners, analyzers, ex);
  throw new IllegalStateException(ex);
}
}
即先启动Servlet容器,再启动SpringBoot应用
该SpringBoot学习笔记学习自雷神前辈,是对知识点的整理和自我认识的梳理,如有不当之处,欢迎指出


 被折叠的 条评论
为什么被折叠?
被折叠的 条评论
为什么被折叠?
 到【灌水乐园】发言


