


SpringBoot2之web开发(上)——之静态资源和请求参数处理
环境:SpringBoot 2.5.2
一、SpringMVC自动配置概览
Spring Boot provides auto-configuration for Spring MVC that works well with most applications.(大多场景我们都无需自定义配置)
The auto-configuration adds the following features on top of Spring’s defaults:
-
Inclusion of
ContentNegotiatingViewResolverandBeanNameViewResolverbeans.- 内容协商视图解析器和BeanName视图解析器
-
Support for serving static resources, including support for WebJars (covered later in this document)).
- 静态资源(包括webjars)
-
Automatic registration of
Converter,GenericConverter, andFormatterbeans.- 自动注册
Converter,GenericConverter,Formatter
- 自动注册
-
Support for
HttpMessageConverters(covered later in this document).- 支持
HttpMessageConverters(后来我们配合内容协商理解原理)
- 支持
-
Automatic registration of
MessageCodesResolver(covered later in this document).- 自动注册
MessageCodesResolver(国际化用)
- 自动注册
-
Static
index.htmlsupport.- 静态index.html 页支持
-
Automatic use of a
ConfigurableWebBindingInitializerbean (covered later in this document).- 自动使用
ConfigurableWebBindingInitializer,(DataBinder负责将请求数据绑定到JavaBean上)
- 自动使用
If you want to keep those Spring Boot MVC customizations and make more MVC customizations (interceptors, formatters, view controllers, and other features), you can add your own
@Configurationclass of typeWebMvcConfigurerbut without@EnableWebMvc.
不用@EnableWebMvc注解。使用@Configuration+WebMvcConfigurer自定义规则
If you want to provide custom instances of
RequestMappingHandlerMapping,RequestMappingHandlerAdapter, orExceptionHandlerExceptionResolver, and still keep the Spring Boot MVC customizations, you can declare a bean of typeWebMvcRegistrationsand use it to provide custom instances of those components.
声明WebMvcRegistrations改变默认底层组件
If you want to take complete control of Spring MVC, you can add your own
@Configurationannotated with@EnableWebMvc, or alternatively add your own@Configuration-annotatedDelegatingWebMvcConfigurationas described in the Javadoc of@EnableWebMvc.
使用@EnableWebMvc+@Configuration+DelegatingWebMvcConfiguration 全面接管SpringMVC
二、简单功能分析
2.1 静态资源访问
-
静态资源目录:
默认情况下,我们只需要将静态资源放在一下几个目录中就可以直接通过url在浏览器中访问了。
/META-INF/resources//resources//static//public/
静态资源的映射为:
/**,当请求进来,先去找Controller看能不能处理。不能处理的所有请求又都交给静态资源处理器。静态资源也找不到则响应404页面访问 :当前项目根路径/ + 静态资源名
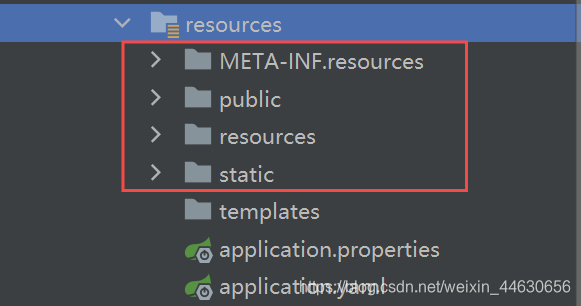
静态资源的默认访问优先级:/META-INF/resources/>/resources/>/static/>/public/
-
更改默认的静态资源路径和静态资源访问前缀:
spring: mvc: static-path-pattern: /res/** #修改静态资源访问前缀 # 此时,当前项目 + static-path-pattern + 静态资源名 = 静态资源文件夹下找 web: resources: static-locations: classpath:/haha/ #更改默认的静态资源路径 -
webjar
- 所有
/webjars/**,都去classpath:/META-INF/resources/webjars/找资源 - webjars:以jar包的方式引入静态资源;可用jar方式添加css,js等资源文件,将自动映射
/webjars/** - webjars官网
例如:添加jquery
 <dependency>
     <groupId>org.webjars</groupId>
     <artifactId>jquery</artifactId>
     <version>3.5.1</version>
 </dependency>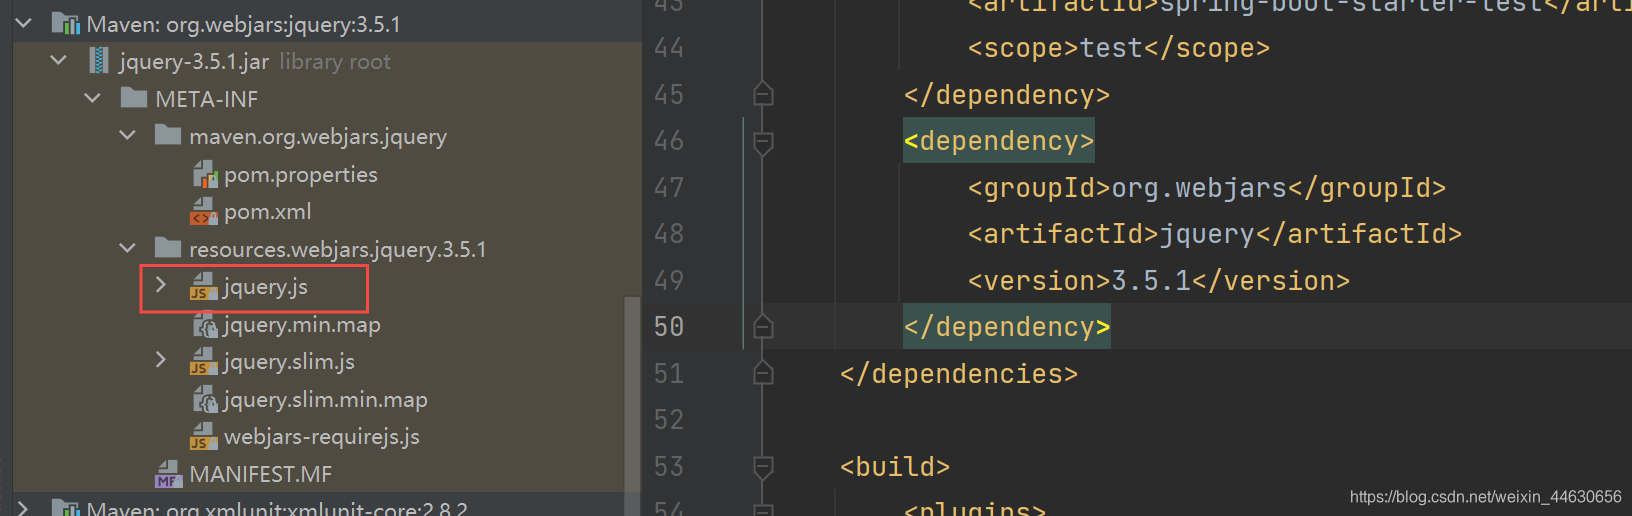
访问:只要是静态资源,SpringBoot就会去对应的路径寻找资源,我们这里访问地址对应就是:
http://localhost:8080/webjars/jquery/3.5.1/jquery.js - 所有
2.2 欢迎页支持
- 欢迎页,静态资源文件夹下的所有 index.html 页面;被
/**映射。 - 比如我访问
http://localhost:8080/,就会找静态资源文件夹下的index.html
欢迎页支持注意:
-
可以配置静态资源路径
-
但是不可以配置静态资源的访问前缀。否则导致 index.html不能被默认访问
spring:
#  mvc:
#    static-path-pattern: /res/** # 这个会导致welcom page功能失效

  web:
    resources:
      static-locations: classpath:/haha/
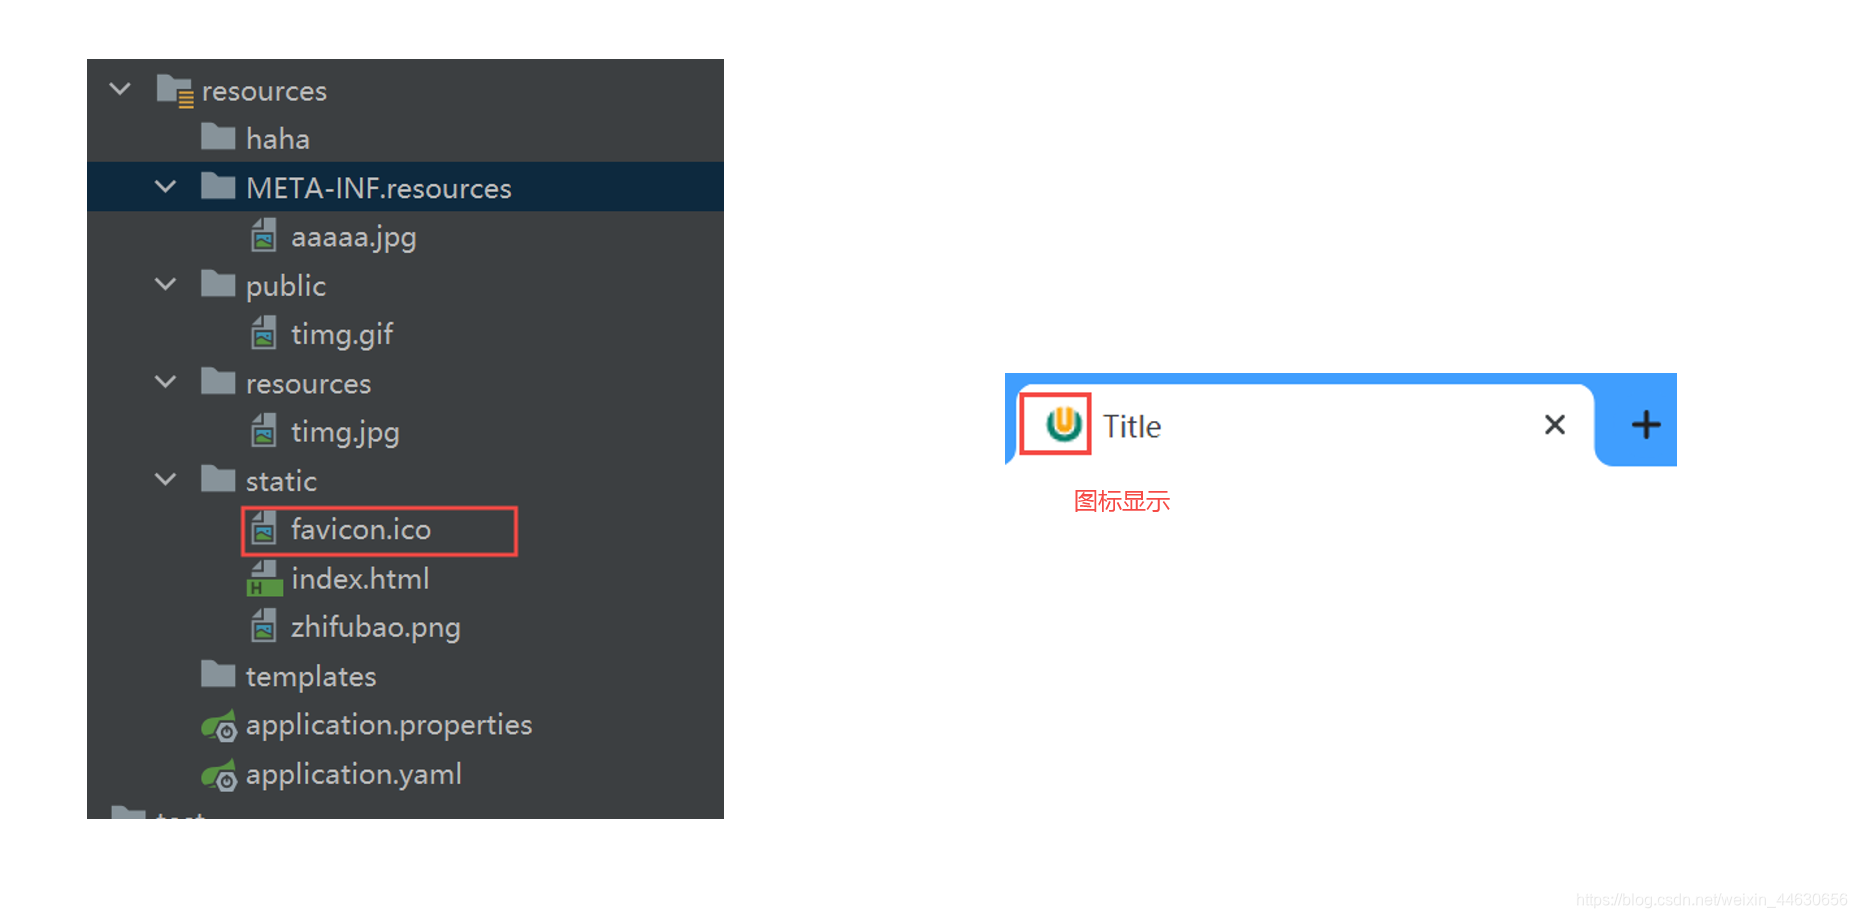
2.3 自定义Favicon
- 与其他静态资源一样,Spring Boot在配置的静态内容位置中查找 favicon.ico。如果存在这样的文件,它将自动用作应用程序的favicon。
- 所有的
favicon.ico都是在静态资源文件下找;
使用自定义Favicon注意:
spring:
#  mvc:
#    static-path-pattern: /res/**   这个会导致 Favicon 功能失效
2.4 静态资源配置原理(源码分析)
好的博客:SpringBoot静态资源配置原理(源码一步步分析,详细易懂)
-
SpringMVC功能的自动配置类
WebMvcAutoConfiguration,生效@Configuration(proxyBeanMethods = false) @ConditionalOnWebApplication(type = Type.SERVLET) @ConditionalOnClass({Servlet.class, DispatcherServlet.class, WebMvcConfigurer.class}) @ConditionalOnMissingBean({WebMvcConfigurationSupport.class}) @AutoConfigureOrder(-2147483638) @AutoConfigureAfter({DispatcherServletAutoConfiguration.class, TaskExecutionAutoConfiguration.class, ValidationAutoConfiguration.class}) public class WebMvcAutoConfiguration { } -
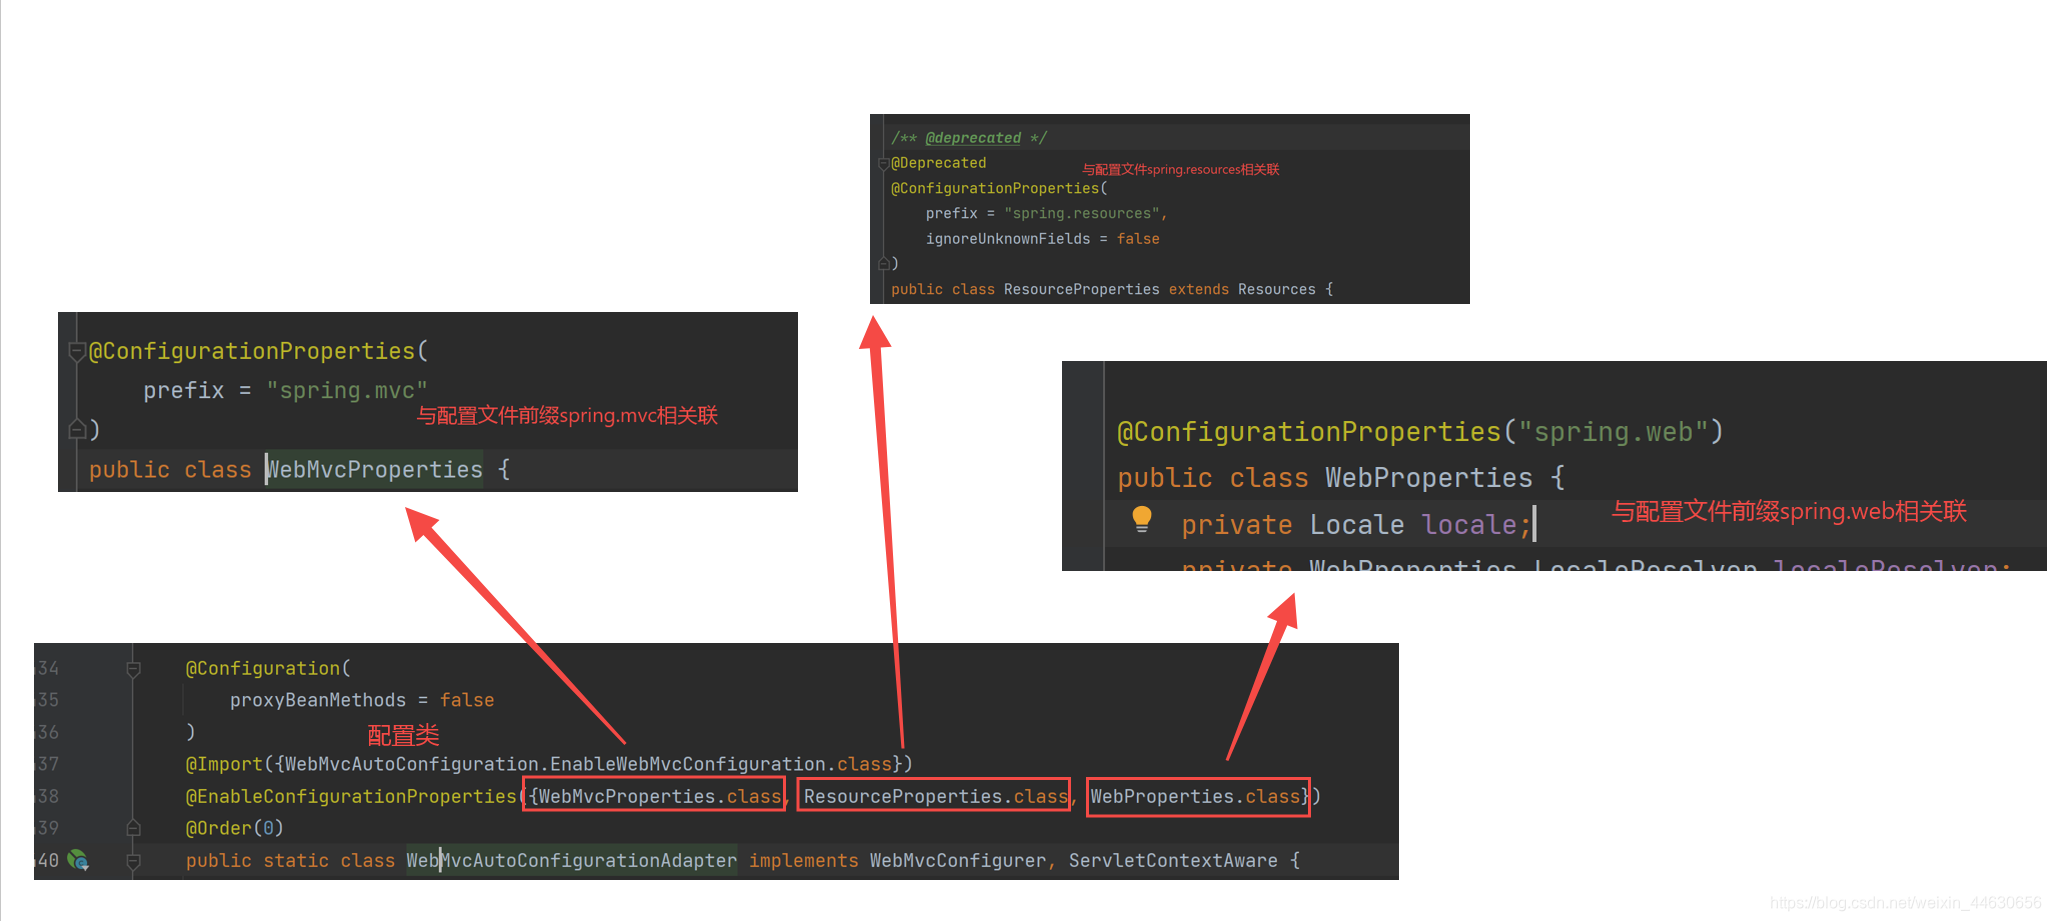
WebMvcAutoConfiguration类中的
WebMvcAutoConfigurationAdapter静态内部类该类为配置类,配置文件的相关属性和xxx进行了绑定
-
WebMvcAutoConfigurationAdapter只有一个有参构造器当配置类
只有一个有参数的构造器,它的有参构造器中所有参数的值都会从容器中确定。public WebMvcAutoConfigurationAdapter(ResourceProperties resourceProperties, WebProperties webProperties, WebMvcProperties mvcProperties, ListableBeanFactory beanFactory, ObjectProvider<HttpMessageConverters> messageConvertersProvider, ObjectProvider<WebMvcAutoConfiguration.ResourceHandlerRegistrationCustomizer> resourceHandlerRegistrationCustomizerProvider, ObjectProvider<DispatcherServletPath> dispatcherServletPath, ObjectProvider<ServletRegistrationBean<?>> servletRegistrations) { this.resourceProperties = (Resources)(resourceProperties.hasBeenCustomized() ? resourceProperties : webProperties.getResources()); this.mvcProperties = mvcProperties; this.beanFactory = beanFactory; this.messageConvertersProvider = messageConvertersProvider; this.resourceHandlerRegistrationCustomizer = (WebMvcAutoConfiguration.ResourceHandlerRegistrationCustomizer)resourceHandlerRegistrationCustomizerProvider.getIfAvailable(); this.dispatcherServletPath = dispatcherServletPath; this.servletRegistrations = servletRegistrations; this.mvcProperties.checkConfiguration(); }它的参数:
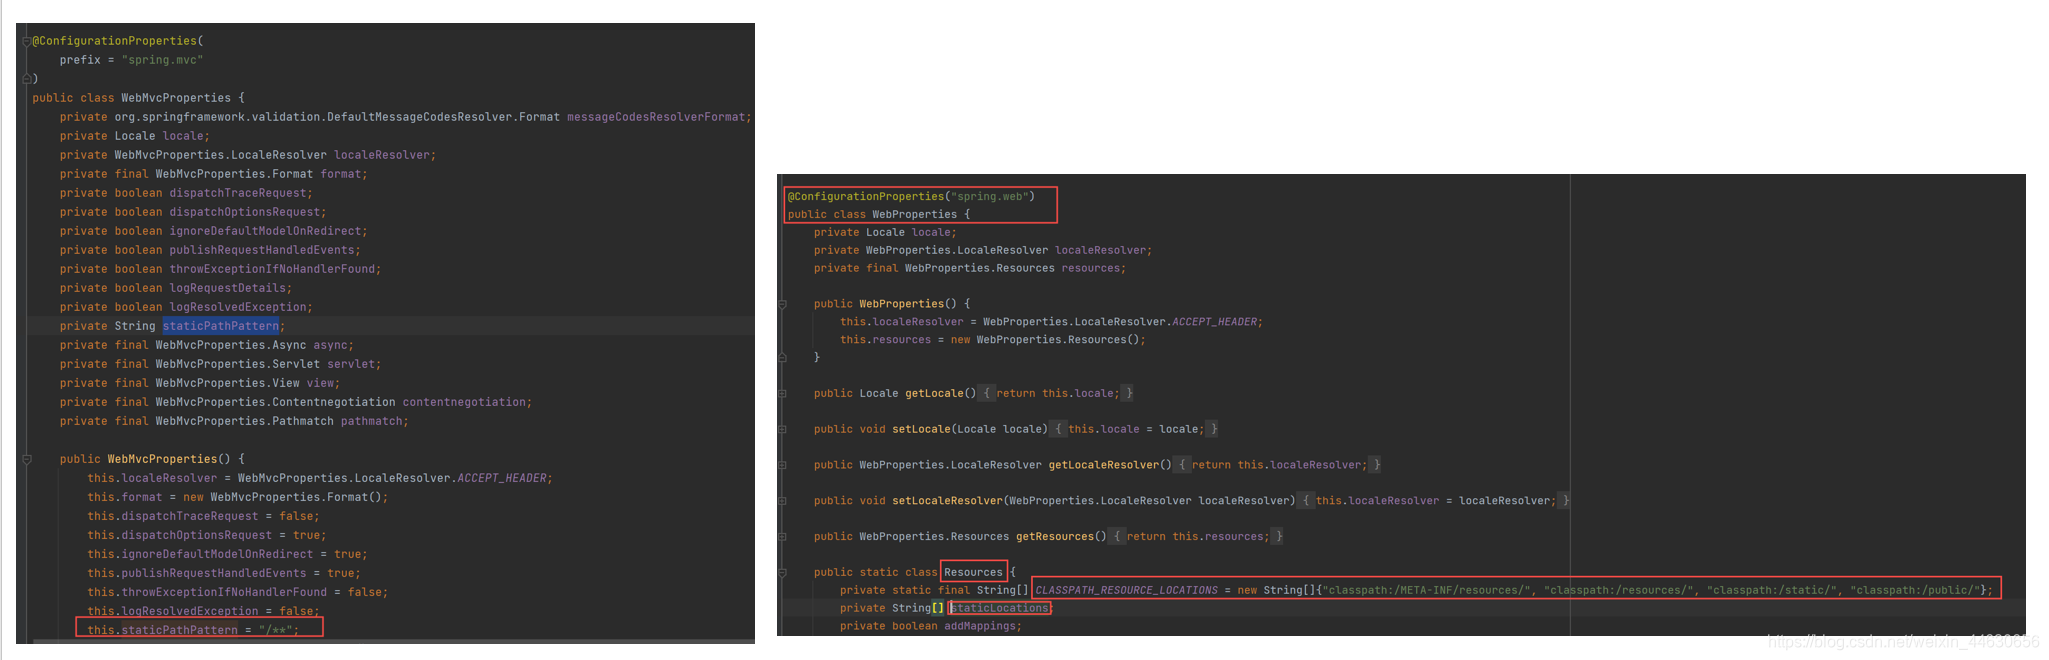
- 第一个参数是ResourceProperties resourceProperties ,获取和spring.resources绑定的所有的值的对象
- 第二个参数是WebProperties webProperties ,获取和spring.web绑定的所有的值的对象
- 第三个参数是WebMvcProperties mvcProperties,获取和spring.mvc绑定的所有的值的对象
- 第四个参数是ListableBeanFactory beanFactory ,这个是Spring的beanFactory,也就是我们的容器。
- 第五个参数是ObjectProvider messageConvertersProvider,找到所有的HttpMessageConverters
- 第六个参数是ObjectProvider<WebMvcAutoConfiguration.ResourceHandlerRegistrationCustomizer> resourceHandlerRegistrationCustomizerProvider,找到资源处理器的自定义器
- 第七个参数是ObjectProvider dispatcherServletPath,相当与找dispatcherServlet能处理的路径
- 第八个参数是ObjectProvider<ServletRegistrationBean<?>> servletRegistrations ,给应用注册原生的Servlet、Filter等等
2.4.1 addResourceHandlers方法(静态资源处理默认规则)
所有的静态资源处理默认规则都在addResourceHandlers方法中
public void addResourceHandlers(ResourceHandlerRegistry registry) {
    if (!this.resourceProperties.isAddMappings()) {//当isAddMappings()方法返回false,禁用掉静态资源的路径映射
        logger.debug("Default resource handling disabled");
    } else {
        //1、添加webjars资源映射规则
        this.addResourceHandler(registry, "/webjars/**", "classpath:/META-INF/resources/webjars/");
        //2、添加静态资源映射规则**/
        //this.mvcProperties.getStaticPathPattern() =====> '/**',spring.mvc.static-path-pattern设置静态资源的访问前缀
        //this.resourceProperties.getStaticLocations() =====> new String[]{"classpath:/META-INF/resources/", "classpath:/resources/", "classpath:/static/", "classpath:/public/"}
        //spring.web.resources.static-locations,设置静态资源的存放目录
        this.addResourceHandler(registry, this.mvcProperties.getStaticPathPattern(), (registration) -> {
            registration.addResourceLocations(this.resourceProperties.getStaticLocations());
            if (this.servletContext != null) {
                ServletContextResource resource = new ServletContextResource(this.servletContext, "/");
                registration.addResourceLocations(new Resource[]{resource});
            }

        });
    }
}

private void addResourceHandler(ResourceHandlerRegistry registry, String pattern, String... locations) {
    this.addResourceHandler(registry, pattern, (registration) -> {
        registration.addResourceLocations(locations);
    });
}

private void addResourceHandler(ResourceHandlerRegistry registry, String pattern, Consumer<ResourceHandlerRegistration> customizer) {
    if (!registry.hasMappingForPattern(pattern)) {
        ResourceHandlerRegistration registration = registry.addResourceHandler(new String[]{pattern});
        customizer.accept(registration);
        //spring.web.resources.cache.period,设置静态资源的缓存时间
        registration.setCachePeriod(this.getSeconds(this.resourceProperties.getCache().getPeriod()));
        registration.setCacheControl(this.resourceProperties.getCache().getCachecontrol().toHttpCacheControl());
        registration.setUseLastModified(this.resourceProperties.getCache().isUseLastModified());
        this.customizeResourceHandlerRegistration(registration);
    }
}
首先调用resourcePropertoes的isAddMappings()方法,当isAddMappings()方法返回false,禁用掉静态资源的路径映射
spring:
  resources:
    add-mappings: false   禁用所有静态资源规则
静态资源映射默认路径和静态资源默认存放目录:
2.4.2 欢迎页处理规则
HandlerMapping:处理器映射。保存了每一个Handler能处理哪些请求
@Bean
public WelcomePageHandlerMapping welcomePageHandlerMapping(ApplicationContext applicationContext, FormattingConversionService mvcConversionService, ResourceUrlProvider mvcResourceUrlProvider) {
    WelcomePageHandlerMapping welcomePageHandlerMapping = new WelcomePageHandlerMapping(new TemplateAvailabilityProviders(applicationContext), applicationContext, this.getWelcomePage(), this.mvcProperties.getStaticPathPattern());
    welcomePageHandlerMapping.setInterceptors(this.getInterceptors(mvcConversionService, mvcResourceUrlProvider));
    welcomePageHandlerMapping.setCorsConfigurations(this.getCorsConfigurations());
    return welcomePageHandlerMapping;
}
WelcomePageHandlerMapping方法:
WelcomePageHandlerMapping(TemplateAvailabilityProviders templateAvailabilityProviders, ApplicationContext applicationContext, Resource welcomePage, String staticPathPattern) {
    if (welcomePage != null && "/**".equals(staticPathPattern)) {
    	//要用欢迎页功能,必须是/**
        logger.info("Adding welcome page: " + welcomePage);
        this.setRootViewName("forward:index.html");
    } else if (this.welcomeTemplateExists(templateAvailabilityProviders, applicationContext)) {
    	//调用Controller
        logger.info("Adding welcome page template: index");
        this.setRootViewName("index");
    }
}
三、请求参数处理
3.1 请求映射
3.1.1 rest使用与原理
传统CRUD请求方式:
/getUser?id=1   	查询用户
/deleteUser?id=1	删除1号用户
/updateUser?id=1	更新1号用户
/addUser     		添加用户

REST风格请求方式:
/user/1          	GET-----查询1号用户
/user/1          	PUT------更新1号用户
/user/1          	DELETE-----删除1号用户
/user               POST-----添加用户
rest使用:
-
开启页面表单的Rest功能
spring: mvc: hiddenmethod: filter: enabled: true #开启页面表单的Rest功能 -
页面 form的属性method=post,隐藏域 _method=put、delete等(如果直接get或post,无需隐藏域)
-
编写Controller请求映射,使用
@GetMapping、@PostMapping、@PutMapping、@DeleteMapping或者使用@RequestMapping指定method属性
代码示例:
测试REST风格:
<form action="/user" method="get">
    <input value="REST-GET 提交" type="submit"/>
</form>

<form action="/user" method="post">
    <input value="REST-POST 提交" type="submit"/>
</form>

<form action="/user" method="post">
    <input name="_method" type="hidden" value="delete"/>
    <input value="REST-DELETE 提交" type="submit"/>
</form>

<form action="/user" method="post">
    <input name="_method" type="hidden" value="PUT"/>
    <input value="REST-PUT 提交" type="submit"/>
</form>
@RestController
public class HelloController {

    @GetMapping("/user")
    //@RequestMapping(value = "/user",method = RequestMethod.GET)
    public String getUser(){
        return "GET-张三";
    }

    @PostMapping("/user")
    //@RequestMapping(value = "/user",method = RequestMethod.POST)
    public String saveUser(){
        return "POST-张三";
    }

    @PutMapping("/user")
    //@RequestMapping(value = "/user",method = RequestMethod.PUT)
    public String putUser(){
        return "PUT-张三";
    }

    @DeleteMapping("/user")
    //@RequestMapping(value = "/user",method = RequestMethod.DELETE)
    public String deleteUser(){
        return "DELETE-张三";
    }
}
rest原理(源码分析):
表单如何发出delete和put请求?
因为我们的表单提交的请求方式中只支持
GET和POST方式的请求,它不支持DELETE和 PUT 方式的请求。
然而我们以前用SpringMVC来完成这些事情,我们需要配置一个叫
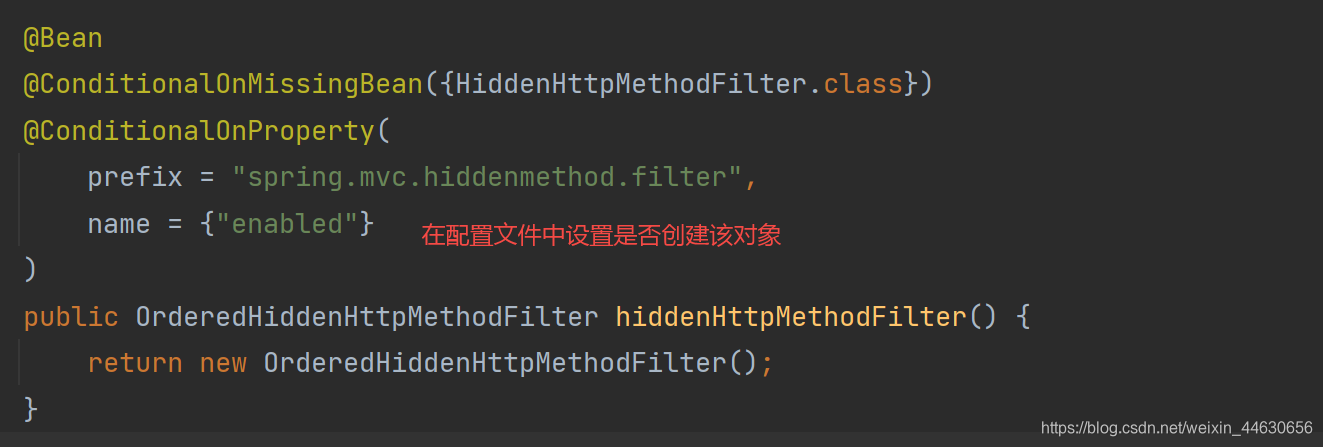
HiddenHttpMethodFilter的Filter;但现在Spring Boot已经帮我们配置好了,我们只需要设置是否开启。
在WebMvcAutoConfiguration中,可以看到它已经配置了一个HiddenHttpMethodFilter,如下:
设置开启表单的rest风格:
spring:
  mvc:
    hiddenmethod:
      filter:
        enabled: true #开启页面表单的Rest功能
开启之后所有的请求都要经过HiddenHttpMethodFilter类的doFilterInternal方法

Rest原理总结:(表单提交要使用REST的时候)
- 表单提交会带上 _method=PUT
- 请求过来被
HiddenHttpMethodFilter拦截-
请求是否正常,并且是POST
-
获取到 _method的值。
-
兼容以下请求;PUT.DELETE.PATCH
-
原生request(post),包装模式requestWrapper重写了getMethod方法,返回的是传入的值。
-
过滤器链放行的时候用包裹过的请求。以后的方法调用getMethod是调用requestWrapper的。
-
3.1.2 请求映射原理(源码分析)
好的博客:SpringMVC请求映射原理
3.1.2.1 DispatcherServlet
SpringBoot底层还是使用的SpringMVC,所以请求过来时,都会到达DispatcherServlet.
DispatcherServlet的继承树
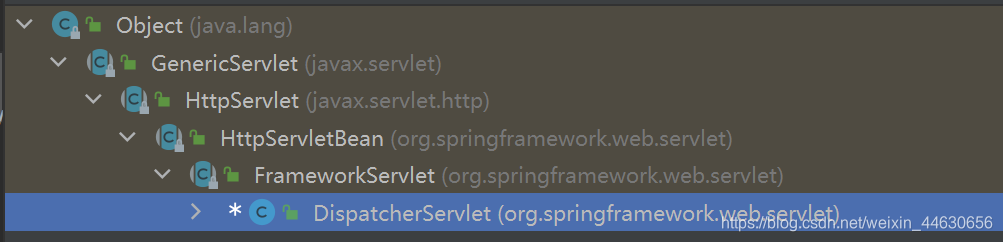
DispatcherServlet间接继承了HttpServlet,那么一定会重写doGet()和doPost()方法,而DispatcherServlet类中没有重写doGet()和doPost()方法。当FrameworkServlet类中是否重写了。
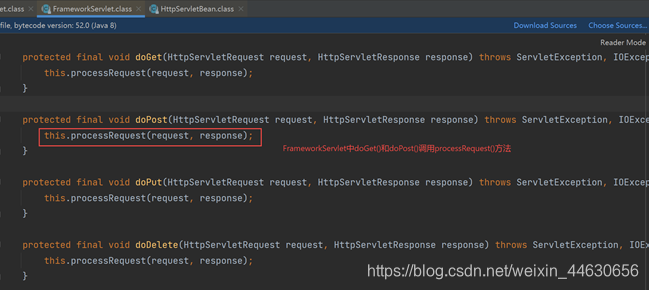
四个方法都调用了processRequest()方法
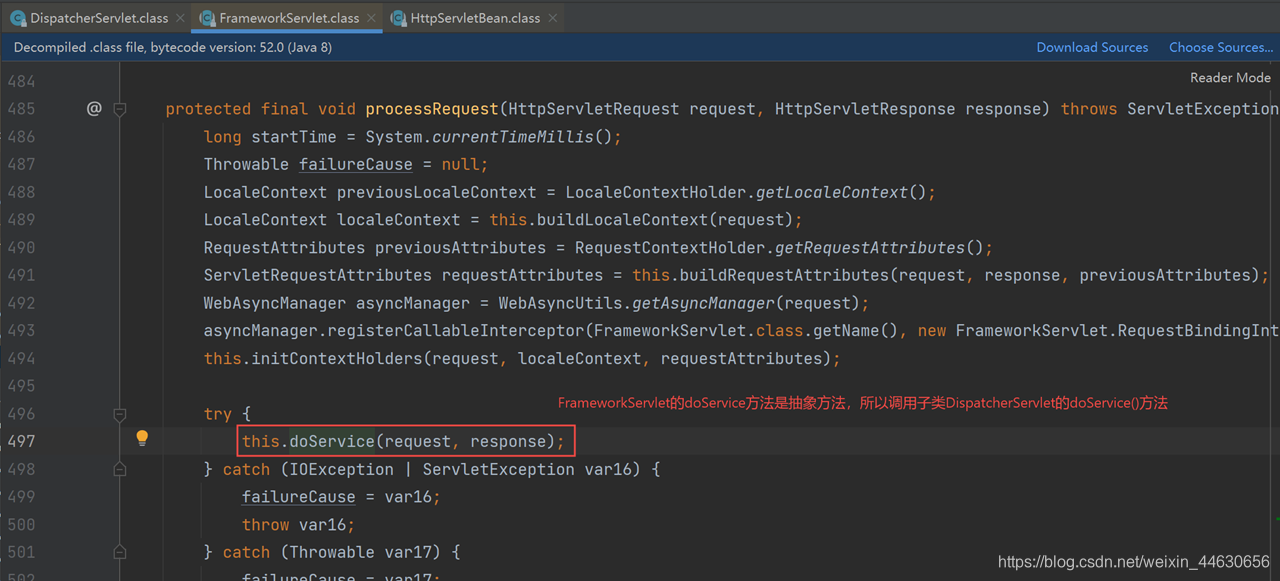
processRequest()方法调用了父类DispatcherServlet的doService()方法
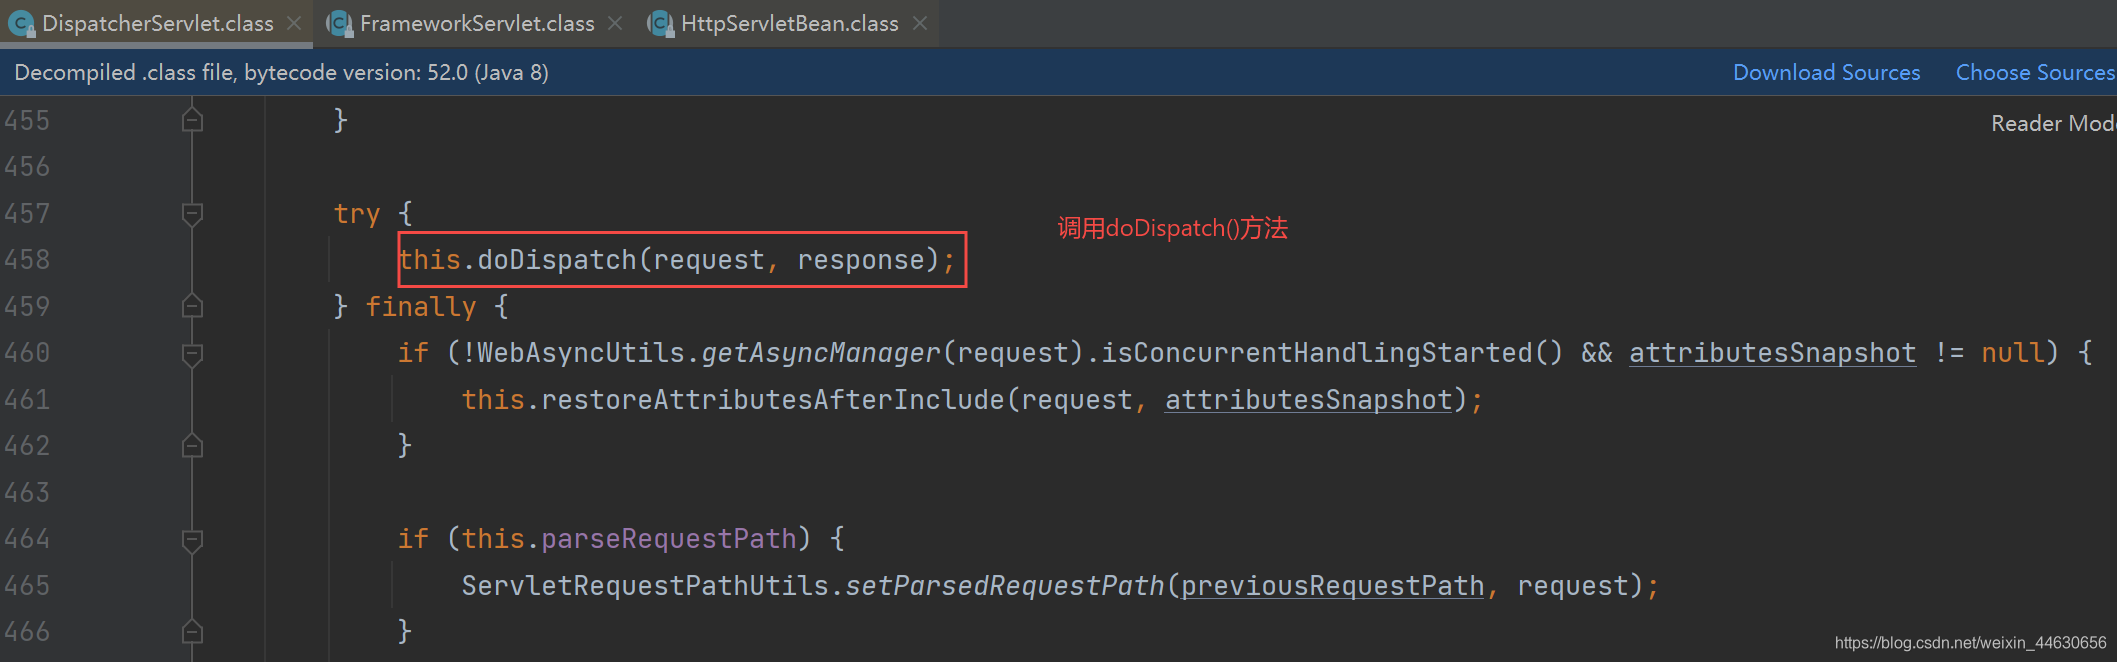
doService()方法中又调用了doDispatch()方法,所以,对于每个请求进来,都会调用org.springframework.web.servlet.DispatcherServlet的doDispatch()这个方法来处理请求
3.1.2.2 doDispatch()方法
在doDispatch方法处加上断点,开启debug
发送一个原生的get请求,在idea中可以看到发送请求的路径为/user
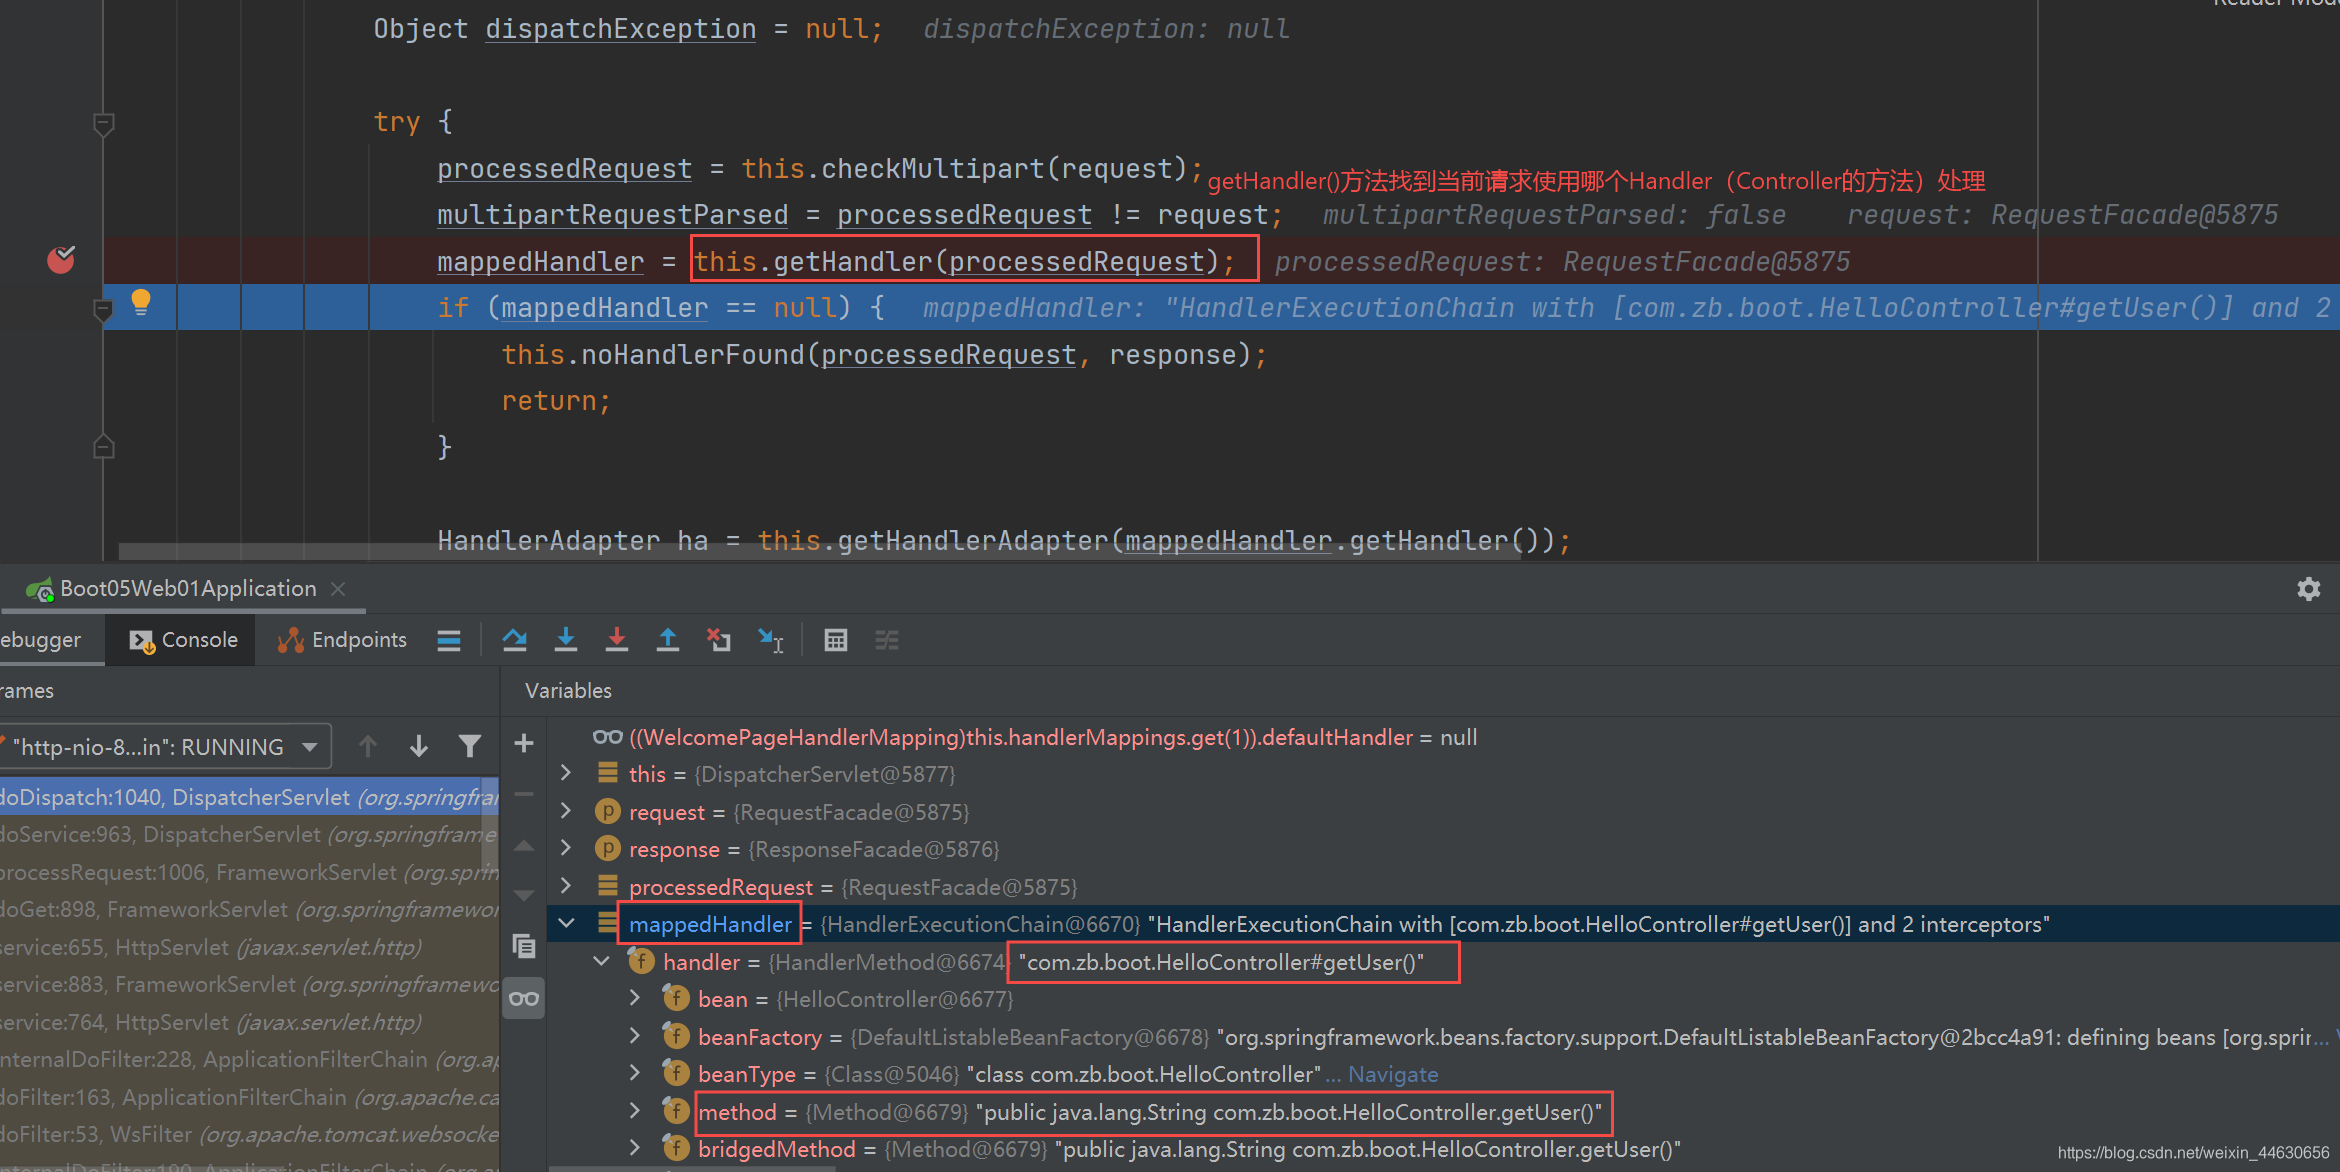
3.1.2.3 HandlerMapping处理器映射
进入getHandler(processedRequest)方法,获取了handlerMappings,这是处理器映射。其中又5个HandlerMapping
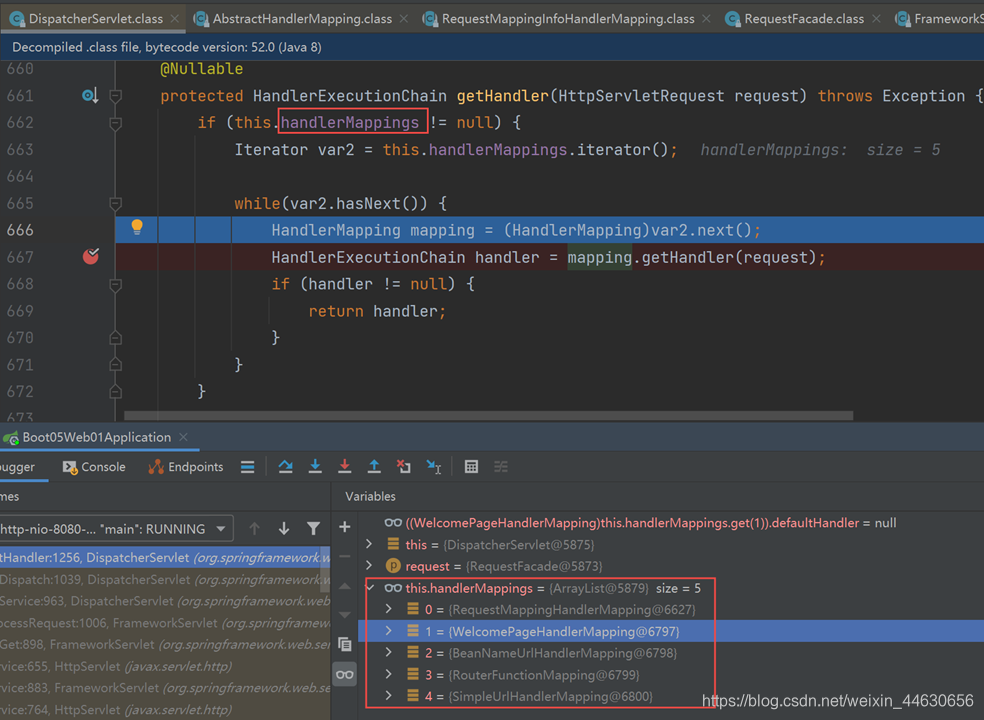
WelcomePageHandlerMapping,欢迎页的处理器映射
RequestMappingHandlerMapping,这其中保存了所有@RequestMapping注解和handler的映射规则,在SpringBoot启动时,SpringMVC会自动扫描Controller并解析注解,将注解信息和处理方法保存在这个映射处理器中。可以将这个HandlerMapping理解为一个Map,其中key为请求路径,value为handler的处理方法

3.1.2.4 HandlerMapping的getHandler()方法
进入getHandler()方法,直到进入org.springframework.web.servlet.handler.AbstractHandlerMethodMapping的lookupHandlerMethod()方法。该方法获得目标HandlerMethod对象。
@Nullable
protected HandlerMethod lookupHandlerMethod(String lookupPath, HttpServletRequest request) throws Exception {
    List<Match> matches = new ArrayList<>();  // 存储匹配到的结果
    List<T> directPathMatches = this.mappingRegistry.getMappingsByDirectPath(lookupPath);  // 关键:根据请求路径找到直接匹配的结果(只根据路径名匹配)
    if (directPathMatches != null) {
	addMatchingMappings(directPathMatches, matches, request);  // 关键:从直接匹配的结果中寻找并将最终结果存入matches中(根据请求方法匹配)
    }
    if (matches.isEmpty()) {
	addMatchingMappings(this.mappingRegistry.getRegistrations().keySet(), matches, request);
    }
    if (!matches.isEmpty()) {
	Match bestMatch = matches.get(0);  // 获取结果集中的第1个值作为最佳匹配
	if (matches.size() > 1) {  // 如果找到了多个匹配的值
	    Comparator<Match> comparator = new MatchComparator(getMappingComparator(request));
            matches.sort(comparator);
	    bestMatch = matches.get(0);
	    if (logger.isTraceEnabled()) {
		logger.trace(matches.size() + " matching mappings: " + matches);
	    }
	    if (CorsUtils.isPreFlightRequest(request)) {
		return PREFLIGHT_AMBIGUOUS_MATCH;
       	    }
	    Match secondBestMatch = matches.get(1);  // 获得第二最佳匹配
	    if (comparator.compare(bestMatch, secondBestMatch) == 0) {  // 如果最佳匹配和第二最佳匹配相同,则抛出异常,说明有两个相同的匹配路径
		Method m1 = bestMatch.handlerMethod.getMethod();
		Method m2 = secondBestMatch.handlerMethod.getMethod();
		String uri = request.getRequestURI();
		throw new IllegalStateException(
		    "Ambiguous handler methods mapped for '" + uri + "': {" + m1 + ", " + m2 + "}");
	    }
	}
	request.setAttribute(BEST_MATCHING_HANDLER_ATTRIBUTE, bestMatch.handlerMethod);
	handleMatch(bestMatch.mapping, lookupPath, request);
	return bestMatch.handlerMethod;
    }
    else {
        return handleNoMatch(this.mappingRegistry.getRegistrations().keySet(), lookupPath, request);
    }
}

private void addMatchingMappings(Collection<T> mappings, List<Match> matches, HttpServletRequest request) {
    for (T mapping : mappings) {
	T match = getMatchingMapping(mapping, request);
	if (match != null) {
	    matches.add(new Match(match, this.mappingRegistry.getRegistrations().get(mapping).getHandlerMethod()));
	}
    }
}
总结:
- 所有的请求映射都保存在
HandlerMapping中,在项目启动时,SpringMVC会自动扫描Controller并解析注解,将注解信息和处理方法保存在HandlerMapping映射处理器中 - SpringBoot为我们默认定义并配置了5个HandlerMapping,当一个请求进来时,系统会遍历这5个HandlerMapping,找到匹配的handler处理方法
- 我们也可以将自定义的HandlerMapping放入容器中,使用自定义的映射处理器
3.2 请求参数处理常见注解(PathVariable、RequestParam、RequestBody等)
| 注解 | 作用 |
|---|---|
@PathVariable | 路径变量 |
@RequestParam | 获取请求参数 |
@RequestHeader | 获取请求头 |
@CookieValue | 获取cookie值 |
@RequestBody | 获取请求体 |
@RequestAttribute | 获取request域属性 |
@MatrixVariable | 矩阵变量 |
-
@PathVariable获取路径变量// car/2/owner/zhangsan @GetMapping("/car/{id}/owner/{username}") //@PathVariable获取路径上的路径变量,可以有多个 public Map<String,Object> getCar(@PathVariable("id") Integer id, @PathVariable("username") String name, @PathVariable Map<String,String> pv){ //把所有变量的值封装到Map中,注意Map的key和value都是String类型 HashMap<String, Object> map = new HashMap<>(); map.put("id",id); map.put("name",name); map.put("pv",pv); return map; }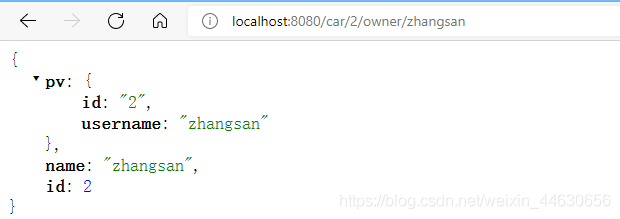
-
@RequestParam用来获取请求参数三个属性:
 value:参数名
 required:是否必须。默认为 true, 表示请求参数中必须包含对应的参数,若不存在,将抛出异常
 defaultValue: 默认值,当没有传递参数时使用该值
/** * @RequestParam 注解用于映射请求参数 * value 用于映射请求参数名称 * required 用于设置请求参数是否必须的,默认为 true表示请求参数中必须包含对应的参数, * 若不存在,将抛出异常Required String parameter 'username' is not present * defaultValue 设置默认值,当没有传递参数时使用该值 */ @RequestMapping("/params") public Map<String, Object> testParams(@RequestParam(value = "username") String username, @RequestParam(value = "password",required = false,defaultValue="你没带") String password, @RequestParam Map<String, String> allParams ){ //获取所有params Map<String, Object> map = new HashMap<>(); map.put("username", username); map.put("password", password); map.put("allParams", allParams); return map; }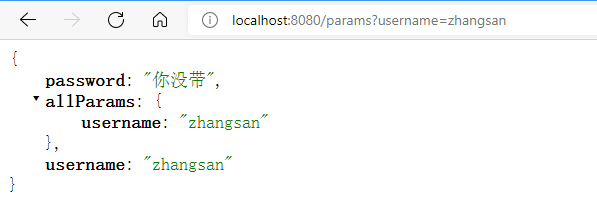
-
@RequestHeader用来获取请求头相关的信息/** * @RequestHeader:获取请求头中某个key的值; * 以前获取请求头中某个key的值:request.getHeader("User-Agent"); * @RequestHeader("User-Agent")String userAgent ,如果请求头中没有这个值就会报错; * 等同于:userAgent = request.getHeader("User-Agent") * * 同样可以设置value、required、defaultValue参数 */ @GetMapping("/headers") public Map<String,Object> getCar(@RequestHeader("User-Agent") String userAgent, //获取哪个属性就写哪个名字 @RequestHeader Map<String,String> headers){ 把所有请求头相关信息封装到Map中 Map<String, Object> map = new HashMap<>(); map.put("User-Agent", userAgent); map.put("headers", headers); return map; }
-
@CookieValue可让处理方法入参绑定某个 Cookie 值/** * @CookieValue:获取某个cookie的值; 以前的操作获取某个cookie; * Cookie[] cookies = request.getCookies(); * for(Cookie c:cookies){ * if(c.getName().equals("JSESSIONID")){ * String cv = c.getValue(); * } * } * 同样可以设置value、required、defaultValue参数 */ @RequestMapping("/cookie") public Map<String, Object> handle05(@CookieValue(value="JSESSIONID",required=false)String jid, @CookieValue Cookie cookie){ //获取所有cookie的值 Map<String, Object> map = new HashMap<>(); map.put("cookie", cookie); return map; } -
@RequestBody表单提交内容放在请求体中//测试@RequestBody,表单提交内容放在请求体中 @PostMapping("/save") public Map postMethod(@RequestBody String content){ Map<String, Object> map = new HashMap<>(); map.put("content", content); return map; }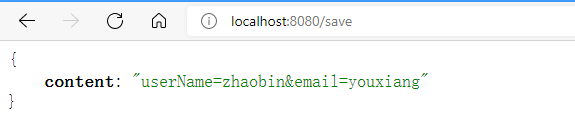
-
@RequestAttribute用来获取request域属性。等同于request.getAtribute(“xxx”);,常用于页面转发时。@Controller public class RequestController { @GetMapping("/goto") public String goToPage(HttpServletRequest request) { request.setAttribute("msg","成功了..."); request.setAttribute("code",200); return "forward:/success"; //转发到 /success请求 } @ResponseBody @GetMapping("/success") public Map success(@RequestAttribute(value = "msg",required = false) String msg, //获取request请求域中的值 @RequestAttribute(value = "code",required = false)Integer code, HttpServletRequest request){ Object msg1 = request.getAttribute("msg"); Map<String,Object> map = new HashMap<>(); map.put("reqMethod_msg",msg1); map.put("annotation_msg",msg); return map; } }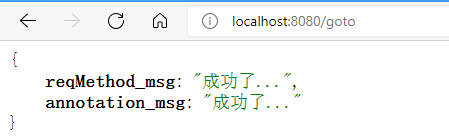
-
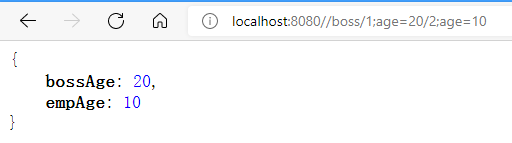
@MatrixVariable获取矩阵变量(矩阵变量注解必须绑定在路径变量中才能被解析)(了解)//1、语法: 请求路径:http://localhost:8080/cars/sell;low=34;brand=byd,audi,yd //2、SpringBoot默认是禁用了矩阵变量的功能 // 手动开启:原理。对于路径的处理。UrlPathHelper进行解析。 // removeSemicolonContent(移除分号内容)支持矩阵变量的 //3、矩阵变量必须有url路径变量才能被解析 @GetMapping("/cars/{sell}") public Map carSell(@MatrixVariable("low") Integer low, @MatrixVariable("brand") String brand, @PathVariable("sell") String path){ Map<String, Object> map = new HashMap<>(); map.put("low", low); map.put("brand", brand); map.put("path", path); return map; } //访问地址:http://localhost:8080/boss/1;age=20/2;age=10 @GetMapping("/boss/{bossId}/{empId}") public Map boss(@MatrixVariable(value = "age",pathVar = "bossId") Integer bossAge, @MatrixVariable(value = "age",pathVar = "empId") Integer empAge){ Map<String,Object> map = new HashMap<>(); map.put("bossAge",bossAge); map.put("empAge",empAge); return map; }矩阵变量功能默认关闭,需要自己创建Bean修改配置来开启:
@Bean
public WebMvcConfigurer configurePathMatch() {
    return new WebMvcConfigurer() {
        @Override
        public void configurePathMatch(PathMatchConfigurer configurer) {
            UrlPathHelper urlPathHelper = new UrlPathHelper();
            //设置位false表示不移除;后面的内容,矩阵变量功能就可以生效
            urlPathHelper.setRemoveSemicolonContent(false);
            configurer.setUrlPathHelper(urlPathHelper);
        }
    };
}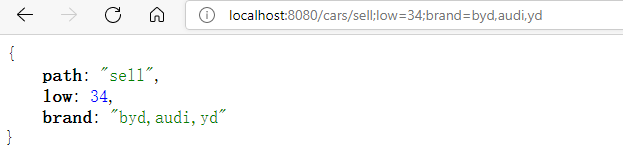
3.3 Servlet API参数解析
SpringBoot可以接受这些Servlet原生API 类型的参数
HttpServletRequest
HttpServletResponse
HttpSession
java.security.Principal
Locale
InputStream
OutputStream
Reader
Writer
/**
 * SpringMVC可以直接在参数上写原生API;
 *
 * HttpServletRequest
 * HttpServletResponse
 * HttpSession
 *
 * java.security.Principal
 * Locale:国际化有关的区域信息对象
 * InputStream:
 * 		ServletInputStream inputStream = request.getInputStream();
 * OutputStream:
 * 		ServletOutputStream outputStream = response.getOutputStream();
 * Reader:
 * 		BufferedReader reader = request.getReader();
 * Writer:
 * 		PrintWriter writer = response.getWriter();
 *
 * @throws IOException
 */
@RequestMapping("/handle06")
public String handle06(HttpSession session,HttpServletRequest req){
	//可以再请求转发的页面获取request域和session域中的数据
	req.setAttribute("reqParam","我是requset域中的值");
	session.setAttribute("sessionParam", "我是session域中的值");
	return "success";
}
3.4 请求方法参数为复杂参数
Map、Model(map、model里面的数据会被放在request的请求域 request.setAttribute)、Errors/BindingResult、RedirectAttributes( 重定向携带数据)、ServletResponse(response)、SessionStatus、UriComponentsBuilder、ServletUriComponentsBuilde也可以作为请求参数
代码示例:
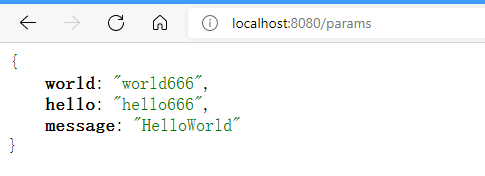
@GetMapping("params")
public String testParam(Map<String,String> map,
                        Model model,
                        HttpServletRequest request,
                        HttpServletResponse response) {
    map.put("hello","hello666");
    model.addAttribute("world","world666");
    request.setAttribute("message","HelloWorld");

    Cookie cookie = new Cookie("c1","v1");
    response.addCookie(cookie);
    return "forward:/success";
}


@ResponseBody
@GetMapping("/success")
public Map success(HttpServletRequest request){
    Map<String,Object> map = new HashMap<>();
    Object hello = request.getAttribute("hello"); //从请求域中获取数据
    Object world = request.getAttribute("world");
    Object message = request.getAttribute("message");

    map.put("hello",hello);
    map.put("world",world);
    map.put("message",message);

    return map;
}
执行结果:
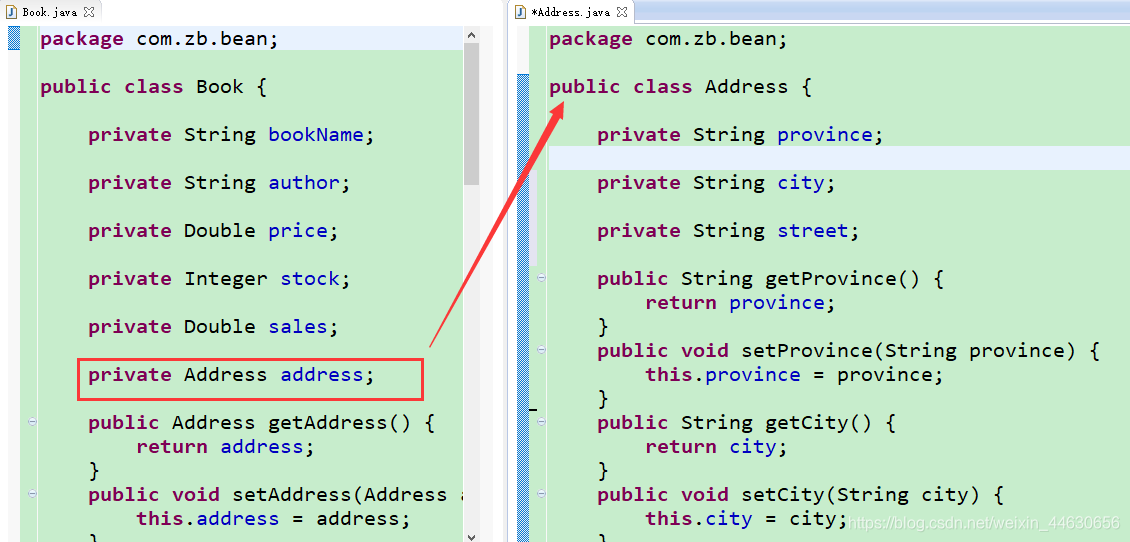
3.4 POJO封装过程
- 使用 POJO 对象绑定请求参数值
- Spring Boot 会按请求参数名和 POJO 属性名进行自动匹配,自动为该对象填充属性值。 支持级联属性。如:dept.deptId、dept.address.tel 等
控制器方法:
/**
 * 如果我们的请求参数是一个POJO;
 * SpringMVC会自动的为这个POJO进行赋值?
 * 1)、将POJO中的每一个属性,从request参数中尝试获取出来,并封装即可;(通过set方法安赋值)
 * 2)、还可以级联封装;属性的属性
 * 3)、请求参数的参数名和对象中的属性名一一对应就行
 */
@RequestMapping("/book")
public String addBook(Book book,String bookName){
	System.out.println("图书的信息是:"+book);//将对象中属性名跟请求参数的参数名对应的直接赋值
	return "success";
}
实体类:
form表单:
<form action="book" method="post"><br/>
	书名:<input type="text" name="bookName"/><br/>
	作者:<input type="text" name="author"/><br/>
	价格:<input type="text" name="price"/><br/>
	库存:<input type="text" name="stock"/><br/>
	销量:<input type="text" name="sales"/><br/>
	省:<input type="text" name="address.province"/><br/><!-- 级联属性 -->
	市:<input type="text" name="address.city"/><br/>
	街道:<input type="text" name="address.street"/><br/>
	<input type="submit" value="提交"/>
</form>
3.5 自定义类型转换器
-
POJO类:
@Data public class Person { private String userName; private Integer age; private Date birth; private Pet pet; } @Data public class Pet { private String name; private String age; } -
form表单,不使用级联属性,而是直接用逗号隔开配置
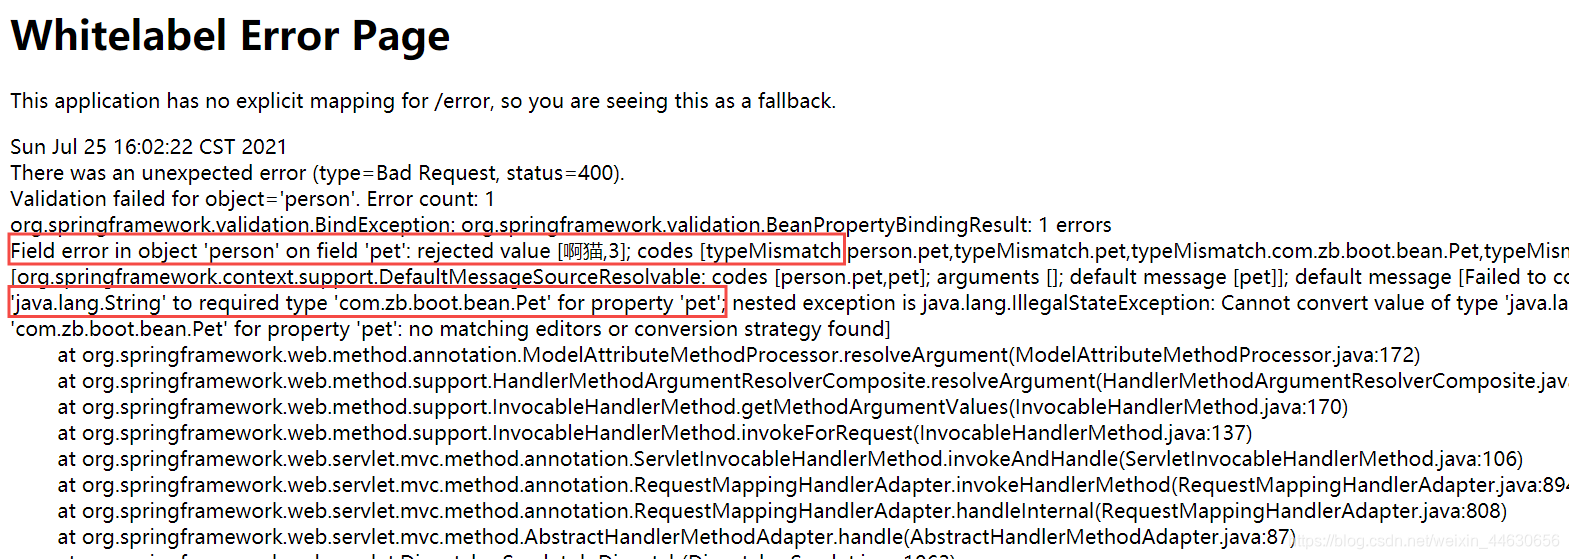
<form action="/saveUser" method="post"> 姓名: <input name="userName" value="zhangsan"/> <br/> 年龄: <input name="age" value="18"/> <br/> 生日: <input name="birth" value="2019/12/10"/> <br/> 宠物: <input name="pet" value="啊猫,3"/> <input type="submit" value="保存"/> </form> -
Controller层方法
@PostMapping("/saveUser")
public Person saveUser(Person person){
    return person;
}
如果不自定义convert,执行报错
-
注册converter:
-
方法一:
@Configuration(proxyBeanMethods = false) public class WebConfig { @Bean public WebMvcConfigurer configurePathMatch() { return new WebMvcConfigurer() { @Override public void addFormatters(FormatterRegistry registry) { registry.addConverter(new StringToPetConverter()); } }; } class StringToPetConverter implements Converter<String,Pet>{ @Override public Pet convert(String s) { //s的值为 "啊猫,3" if(!StringUtils.isEmpty(s)){ Pet pet = new Pet(); String[] split = s.split(","); pet.setAge(split[0]); pet.setName(split[1]); return pet; } return null; } } } -
方法二:将转换器注册为容器bean后,可自动注册
@Component public class StringToPetConverter implements Converter<String, Pet> { @Override public Pet convert(String s) { //s的值为 "啊猫,3" if(!StringUtils.isEmpty(s)){ Pet pet = new Pet(); String[] split = s.split(","); pet.setAge(split[0]); pet.setName(split[1]); return pet; } return null; } } -
方法三:自定义MyWebConfig 实现WebMvcConfigurer ,在addFormatters方法中进行配置:
@Configuration(proxyBeanMethods = false)
public class MyWebConfig implements WebMvcConfigurer {

    @Override
    public void addFormatters(FormatterRegistry registry) {
        registry.addConverter(new StringToPetConverter());
    }

    class StringToPetConverter implements Converter<String, Pet> {

        @Override
        public Pet convert(String s) {
            //s的值为  "啊猫,3"
            if(!StringUtils.isEmpty(s)){
                Pet pet = new Pet();
                String[] split = s.split(",");
                pet.setAge(split[0]);
                pet.setName(split[1]);
                return pet;
            }
            return null;
        }
    }
}
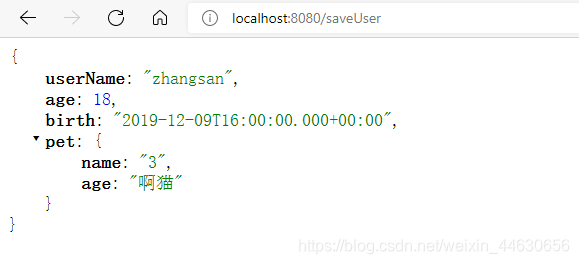
-
测试执行结果:


 被折叠的 条评论
为什么被折叠?
被折叠的 条评论
为什么被折叠?
 到【灌水乐园】发言


