


文章目录
基本组成
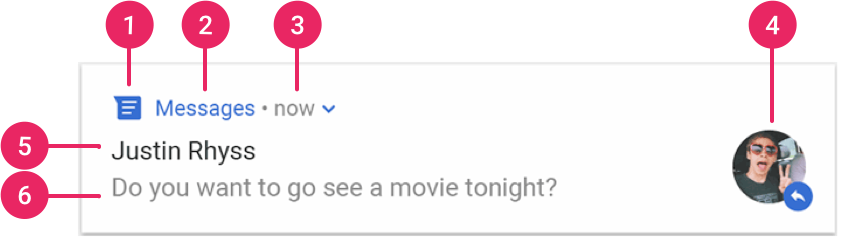
- 小图标:必须提供;使用 setSmallIcon() 进行设置。
- 应用名称:由系统提供。
- 时间戳:由系统提供,但您可以使用 setWhen() 替换它或者使用 setShowWhen(false) 隐藏它。
- 大图标:可选;通常仅用于联系人照片。 请勿将其用于应用图标。使用 setLargeIcon() 设置。
- 标题:可选;使用 setContentTitle() 进行设置。
- 文本:可选;使用 setContentText() 进行设置。
创建通知
1. 声明运行时权限
Android 13(API 级别 33)及更高版本支持一项运行时权限,用于应用发布非豁免通知(包括前台服务 [FGS] 通知)。
需要在应用的清单文件中声明的权限如以下代码段所示:
<manifest ...>
    <uses-permission android:name="android.permission.POST_NOTIFICATIONS"/>
    <application ...>
        ...
    </application>
</manifest>
2. 设置通知内容
使用 NotificationCompat.Builder 对象设置通知内容和渠道:
- 小图标,通过 setSmallIcon() 设置。
- 标题,通过 setContentTitle() 设置。
- 正文文本,通过 setContentText() 设置。
- 通知优先级,通过 setPriority() 设置。 优先级决定了通知在 Android 7.1 及更低版本上的干扰程度。对于 Android 8.0 及更高版本,改为设置渠道重要性。
var builder = NotificationCompat.Builder(this, CHANNEL_ID)
        .setSmallIcon(R.drawable.notification_icon)
        .setContentTitle(textTitle)
        .setContentText(textContent)
        .setPriority(NotificationCompat.PRIORITY_DEFAULT)
NotificationCompat.Builder 构造函数要求提供渠道 ID。这是兼容 Android 8.0(API 级别 26)及更高版本所必需的,但会被较旧版本忽略。
默认情况下,通知的文字内容会被截断以适应单行显示。可以通过创建展开式通知来显示更多信息。

(可选)添加大图片
如需在通知中添加大图片,将 NotificationCompat.BigPictureStyle 的一个实例传递给 setStyle()。折叠时无图片,展开后展示大图。
val notification = NotificationCompat.Builder(context, CHANNEL_ID)
        .setSmallIcon(R.drawable.new_post)
        .setContentTitle(imageTitle)
        .setContentText(imageDescription)
        .setStyle(NotificationCompat.BigPictureStyle()
                .bigPicture(myBitmap))
        .build()
如需使该图片仅在通知收起时显示为缩略图(如下图所示),调用 setLargeIcon() 并向其传递图片。然后,调用 BigPictureStyle.bigLargeIcon() 并向其传递 null,以便大图标在通知展开时消失:
val notification = NotificationCompat.Builder(context, CHANNEL_ID)
        .setSmallIcon(R.drawable.new_post)
        .setContentTitle(imageTitle)
        .setContentText(imageDescription)
        .setLargeIcon(myBitmap)
        .setStyle(NotificationCompat.BigPictureStyle()
                .bigPicture(myBitmap)
                .bigLargeIcon(null))
        .build()

(可选)添加一大段文本
应用 NotificationCompat.BigTextStyle,以在通知的展开内容区域显示文本:
val notification = NotificationCompat.Builder(context, CHANNEL_ID)
        .setSmallIcon(R.drawable.new_mail)
        .setContentTitle(emailObject.getSenderName())
        .setContentText(emailObject.getSubject())
        .setLargeIcon(emailObject.getSenderAvatar())
        .setStyle(NotificationCompat.BigTextStyle()
                .bigText(emailObject.getSubjectAndSnippet()))
        .build()

(可选)创建收件箱样式的通知
如果想添加多个简短摘要行(例如收到的电子邮件中的摘要),请对通知应用 NotificationCompat.InboxStyle。这样,您就可以添加多条内容文本,并且每条文本均截断为一行,而不是显示为 NotificationCompat.BigTextStyle 提供的一个连续文本行。如需添加新行,最多可调用 addLine() 6 次,如以下示例所示。如果添加的行超过 6 行,则系统只会显示前 6 行。
val notification = NotificationCompat.Builder(context, CHANNEL_ID)
        .setSmallIcon(R.drawable.baseline_email_24)
        .setContentTitle("5 New mails from Frank")
        .setContentText("Check them out")
        .setLargeIcon(BitmapFactory.decodeResource(resources, R.drawable.logo))
        .setStyle(
                NotificationCompat.InboxStyle()
                .addLine("Re: Planning")
                .addLine("Delivery on its way")
                .addLine("Follow-up")
        )
        .build()

(可选)在通知中显示对话
应用 NotificationCompat.MessagingStyle 可显示任意人数之间依序发送的消息。这是即时通讯应用的理想之选,因为它通过单独处理发送人姓名和消息文本为每条消息提供一致的布局,而且每条消息可以在多行中显示。
如需添加新消息,请调用 addMessage(),并传入消息文本、接收时间和发送人姓名。您也可以将这些信息作为 NotificationCompat.MessagingStyle.Message 对象传递,如以下示例所示:
val message1 = NotificationCompat.MessagingStyle.Message(
        messages[0].getText(),
        messages[0].getTime(),
        messages[0].getSender())
val message2 = NotificationCompat.MessagingStyle.Message(
        messages[1].getText(),
        messages[1].getTime(),
        messages[1].getSender())
val notification = NotificationCompat.Builder(context, CHANNEL_ID)
        .setSmallIcon(R.drawable.new_message)
        .setStyle(
                NotificationCompat.MessagingStyle(resources.getString(R.string.reply_name))
                .addMessage(message1)
                .addMessage(message2))
        .build()

使用 NotificationCompat.MessagingStyle 时,setContentTitle() 和 setContentText() 会被忽略。
调用 setConversationTitle() 来添加显示在会话上方的标题。这可能是用户创建的群组名称,也可能是会话参与者的列表(如果没有具体名称)。请勿为一对一聊天设置会话标题,因为如果有此字段,系统会将其当做表明会话是群组的提示。
此样式仅适用于搭载 Android 7.0(API 级别 24)及更高版本的设备。如前所示,使用兼容性库 (NotificationCompat) 时,采用 MessagingStyle 的通知会自动回退到支持的展开式通知样式。
在为聊天会话创建此类通知时,请添加直接回复操作,详见下方。
(可选)使用媒体控件创建通知
应用 MediaStyleNotificationHelper.MediaStyle 可显示媒体播放控件和曲目信息。
在构造函数中指定关联的 MediaSession。最多可调用 addAction() 5 次,以显示最多 5 个图标按钮。调用 setLargeIcon() 可设置专辑封面。
与其他通知样式不同,MediaStyle 还允许通过指定三个操作按钮(这些操作按钮也应在收起的视图中显示)修改收起尺寸的内容视图。为此,请向 setShowActionsInCompactView() 提供操作按钮索引。
以下示例展示了如何创建包含媒体控件的通知:
val notification = NotificationCompat.Builder(context, CHANNEL_ID)
        // Show controls on lock screen even when user hides sensitive content.
        .setVisibility(NotificationCompat.VISIBILITY_PUBLIC)
        .setSmallIcon(R.drawable.ic_stat_player)
        // Add media control buttons that invoke intents in your media service
        .addAction(R.drawable.ic_prev, "Previous", prevPendingIntent) // #0
        .addAction(R.drawable.ic_pause, "Pause", pausePendingIntent) // #1
        .addAction(R.drawable.ic_next, "Next", nextPendingIntent) // #2
        // Apply the media style template.
        .setStyle(MediaStyleNotificationHelper.MediaStyle(mediaSession)
                .setShowActionsInCompactView(1 /* #1: pause button \*/))
        .setContentTitle("Wonderful music")
        .setContentText("My Awesome Band")
        .setLargeIcon(albumArtBitmap)
        .build()

3. 创建渠道并设置重要性
从 Android 8.0(API 26)开始,所有通知都必须分配到相应的渠道。对于每个渠道,可以设置应用于其中的所有通知的视觉和听觉行为。用户可以更改这些设置,并确定哪些通知渠道可见。由于必须先创建通知渠道,然后才能在 Android 8.0 及更高版本上发布任何通知,因此应在应用启动时立即执行这段代码。
创建通知渠道
- 构建一个具有唯一渠道 ID、用户可见名称和重要性级别的 NotificationChannel 对象
- (可选)使用 setDescription() 指定用户在系统设置中看到的说明。
- 注册通知渠道,方法是将该渠道传递给 createNotificationChannel(),调用 createNotificationChannels() 在一次操作中创建多个通知渠道
if (Build.VERSION.SDK_INT >= Build.VERSION_CODES.O) {
    // Create the NotificationChannel.
    val name = getString(R.string.channel_name)
    val descriptionText = getString(R.string.channel_description)
    val importance = NotificationManager.IMPORTANCE_DEFAULT
    val mChannel = NotificationChannel(CHANNEL_ID, name, importance)
    mChannel.description = descriptionText
    // Register the channel with the system. You can't change the importance
    // or other notification behaviors after this.
    val notificationManager = getSystemService(NOTIFICATION_SERVICE) as NotificationManager
    notificationManager.createNotificationChannel(mChannel)
}
设置重要性
- Android 8.0以上(API 26),在 NotificationChannel 构造函数中指定
- Android 7.1以下(API 25),使用 NotificationCompat 类中的优先级常量针对每条通知调用 setPriority()
将渠道提交至 NotificationManager 后,便无法更改重要性级别。
| 用户可见的重要性级别 | 重要性(Android 8.0 及更高版本) | 优先级(Android 7.1 及更低版本) |
|---|---|---|
| 紧急:发出提示音,并以浮动通知的形式显示。 | IMPORTANCE_HIGH | PRIORITY_HIGH 或 PRIORITY_MAX |
| 高:发出提示音。 | IMPORTANCE_DEFAULT | PRIORITY_DEFAULT |
| 中:不发出提示音。 | IMPORTANCE_LOW | PRIORITY_LOW |
| 低:不发出提示音,且不会在状态栏中显示。 | IMPORTANCE_MIN | PRIORITY_MIN |
| 无:不发出提示音,也不会在状态栏或通知栏中显示。 | IMPORTANCE_NONE | N/A |
读取通知渠道设置
用户可以修改通知渠道的设置,其中包括振动和提醒提示音等行为。读取通知渠道设置步骤:
- 通过调用 getNotificationChannel() 或 getNotificationChannels() 来获取 NotificationChannel 对象。
- 查询特定的渠道设置,例如 getVibrationPattern()、getSound() 和 getImportance()
如果检测到某项渠道的设置与预期行为不符,可以建议用户更改该设置,并提供一项用于打开渠道设置的操作,如下所示。
打开通知渠道设置
通过使用 ACTION_CHANNEL_NOTIFICATION_SETTINGS 操作的 Intent 打开通知渠道的系统设置。Intent 中必须包括应用包名和要修改的渠道
val intent = Intent(Settings.ACTION_CHANNEL_NOTIFICATION_SETTINGS).apply {
    putExtra(Settings.EXTRA_APP_PACKAGE, packageName)
    putExtra(Settings.EXTRA_CHANNEL_ID, myNotificationChannel.getId())
}
startActivity(intent)
删除通知渠道
// The id of the channel.
val notificationManager = getSystemService(Context.NOTIFICATION_SERVICE) as NotificationManager
val id: String = "my_channel_01"
notificationManager.deleteNotificationChannel(id)
创建通知渠道分组
如果想要在设置界面更好地展示渠道,可以创建渠道分组,特别是当app支持多个账号时

每个通知渠道分组都需要一个 ID(app内唯一)以及一个用户可见名称
// The id of the group.
val groupId = "my_group_01"
// The user-visible name of the group.
val groupName = getString(R.string.group_name)
val notificationManager = getSystemService(Context.NOTIFICATION_SERVICE) as NotificationManager
notificationManager.createNotificationChannelGroup(NotificationChannelGroup(groupId, groupName))
创建新群组后,调用 setGroup() 将新的 NotificationChannel 对象与该群组相关联。将渠道提交至通知管理器后无法更改通知渠道和分组之间的关联。
3. 设置点击通知
点击通知时应该打开相应应用的activity,通过setContentIntent()设置PendingIntent并指定intent
// Create an explicit intent for an Activity in your app.
val intent = Intent(this, AlertDetails::class.java).apply {
    flags = Intent.FLAG_ACTIVITY_NEW_TASK or Intent.FLAG_ACTIVITY_CLEAR_TASK
}
val pendingIntent: PendingIntent = PendingIntent.getActivity(this, 0, intent, PendingIntent.FLAG_IMMUTABLE)

val builder = NotificationCompat.Builder(this, CHANNEL_ID)
        .setSmallIcon(R.drawable.notification_icon)
        .setContentTitle("My notification")
        .setContentText("Hello World!")
        .setPriority(NotificationCompat.PRIORITY_DEFAULT)
        // Set the intent that fires when the user taps the notification.
        .setContentIntent(pendingIntent)
        .setAutoCancel(true)
此代码会调用 setAutoCancel(),它会在用户点按通知后自动移除通知。
点击通知跳转的 Activity 分为两类:
- 常规 Activity:用户正常使用 app 能到达的 Activity,因此用户通过通知到达该 Activity 时,必须包含完整的返回堆栈,用户点击返回时能到达上层
- 特殊 Activity:只有点击通知能到达此类 Activity,不需要返回堆栈
包含返回堆栈的PendingIntent
为每个 <activity> 添加 android:parentActivityName
<activity
    android:name=".MainActivity"
    android:label="@string/app_name" >
    <intent-filter>
        <action android:name="android.intent.action.MAIN" />
        <category android:name="android.intent.category.LAUNCHER" />
    </intent-filter>
</activity>
<!-- MainActivity is the parent for ResultActivity. -->
<activity
    android:name=".ResultActivity"
    android:parentActivityName=".MainActivity" />
    ...
</activity>
如需启动包含返回堆栈的 activity,创建一个 TaskStackBuilder 的实例并调用 addNextIntentWithParentStack(), 将 Intent 传递给想要启动的 activity。
只要按照说明为每个 activity 定义父 activity ,就可以调用 getPendingIntent() 以接收包含整个返回堆栈的 PendingIntent。
// Create an Intent for the activity you want to start.
val resultIntent = Intent(this, ResultActivity::class.java)
// Create the TaskStackBuilder.
val resultPendingIntent: PendingIntent? = TaskStackBuilder.create(this).run {
    // Add the intent, which inflates the back stack.
    addNextIntentWithParentStack(resultIntent)
    // Get the PendingIntent containing the entire back stack.
    getPendingIntent(0,
            PendingIntent.FLAG_UPDATE_CURRENT or PendingIntent.FLAG_IMMUTABLE)
}

val builder = NotificationCompat.Builder(this, CHANNEL_ID).apply {
    setContentIntent(resultPendingIntent)
    ...
}
with(NotificationManagerCompat.from(this)) {
    notify(NOTIFICATION_ID, builder.build())
}
特殊 Activity PendingIntent
因为从通知启动的特殊 activity 不需要返回堆栈,调用 PendingIntent 来创建 getActivity()。 需要在清单中定义适当的任务选项。
- 在清单中,将以下属性添加到 元素。
- android:taskAffinity=“”,与 FLAG_ACTIVITY_NEW_TASK 组合使用,以确保此 activity 不会进入应用的默认task。app 的其他 task 也不受影响
- android:excludeFromRecents=“true”,将新任务从最近使用应用程序列表中删除,以免用户意外返回该 task
<activity
    android:name=".ResultActivity"
    android:launchMode="singleTask"
    android:taskAffinity=""
    android:excludeFromRecents="true">
</activity>
- 构建并发出通知
- 创建一个 Intent,用于启动 Activity。
- 将 Activity 设置为在新的空 task 中启动,调用 setFlags() 设置 FLAG:FLAG_ACTIVITY_NEW_TASK和 FLAG_ACTIVITY_CLEAR_TASK。
- 通过调用 getActivity()来创建 PendingIntent。
val notifyIntent = Intent(this, ResultActivity::class.java).apply {
    flags = Intent.FLAG_ACTIVITY_NEW_TASK or Intent.FLAG_ACTIVITY_CLEAR_TASK
}
val notifyPendingIntent = PendingIntent.getActivity(
        this, 0, notifyIntent,
        PendingIntent.FLAG_UPDATE_CURRENT or PendingIntent.FLAG_IMMUTABLE
)
- 将 PendingIntent 传递给通知
val builder = NotificationCompat.Builder(this, CHANNEL_ID).apply {
    setContentIntent(notifyPendingIntent)
    ...
}
with(NotificationManagerCompat.from(this)) {
    notify(NOTIFICATION_ID, builder.build())
}
4. 显示通知
with(NotificationManagerCompat.from(this)) {
    if (ActivityCompat.checkSelfPermission(
            this@MainActivity,
            Manifest.permission.POST_NOTIFICATIONS
        ) != PackageManager.PERMISSION_GRANTED
    ) {
        // TODO: Consider calling
        // ActivityCompat#requestPermissions
        // here to request the missing permissions, and then overriding
        // public fun onRequestPermissionsResult(requestCode: Int, permissions: Array<out String>,
        //                                        grantResults: IntArray)
        // to handle the case where the user grants the permission. See the documentation
        // for ActivityCompat#requestPermissions for more details.

        return@with
    }
    // notificationId is a unique int for each notification that you must define.
    notify(NOTIFICATION_ID, builder.build())
}
参考
https://developer.android.google.cn/develop/ui/views/notifications?hl=zh_cn#appearances


 684
684

 被折叠的 条评论
为什么被折叠?
被折叠的 条评论
为什么被折叠?
 到【灌水乐园】发言


