


 本文介绍了一种使用jQuery实现的窗体拖拽功能,通过onmousedown、onmousemove和onmouseup事件,配合CSS样式,实现了窗体的拖拽与交互。文章详细解释了代码实现过程及效果。
jQuery 拖拽窗体事件
今天给大家分享一个简单拖拽事件,可以通过拖拽事件实现数据的传递,已达到良好的交互,可以实现更为可观的效果。
具体来说,只有三部基本的操作:
第一:当鼠标按下时触发的事件(onmousedown)。
第二:鼠标移动时事件(onmousemove)。
第三:鼠标松开时停止移动事件(onmouseup)。
首先,我们先设置样式。
// 样式
     <style>
            #XiaLa {
                background-image: url('../../Content/img/small.png');
                float: right;
                width: 18px;
                height: 18px;
                background-size: 100%;
                background-repeat: no-repeat;
                position: absolute;
                top: 3px;
                right: 18px;
            }

            #close_T {
                background-image: url('../../Content/img/close.PNG');
                width: 18px;
                height: 18px;
                background-size: 100%;
                background-repeat: no-repeat;
                position: absolute;
                top: 3px;
                right: 0px;
            }
            #Ha {
                width: 256px;
                position: absolute;
                top: 0%;
                left: 5%;
                background: #FFF;
                z-index: 2;
                border: 1px solid #3586D7;
                border-radius: 2px;
                display: none;
            }
            #Ha2 {
                width: 100%;
                height: 25px;
                line-height: 25px;
                text-align: center;
                background-color: #3586D7;
                position: relative;
           }
            .titleStyle{
                font-style: normal;
                color: #fff;
                font-size: 12px;
                font-weight: bold;
                font-family: "宋体";
                line-height: 22px !important;
            }
        </style>
然后下面是body里面的代码:
//
<button class="btn btn-primary" type="button"onclick="fff()">点击</button>
<div style="position: absolute;width:300px;width:220px;" id="Ha">
<div id="Ha2"style="cursor: move;" >
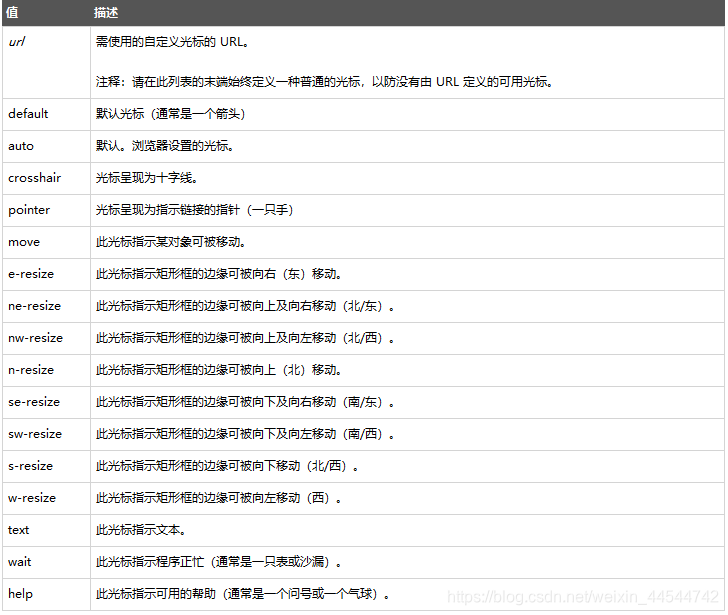
//cursor:定义了鼠标指针放在一个元素边界范围内时所用的光标形状
//move:此光标指示某对象可被移动。
//pointer:光标呈现为指示链接的指针(一只手)
<i class="titleStyle">魔鬼</i>
<i style="cursor: pointer;" id="XiaLa" ></i>
<i style="cursor: pointer;" id="close_T" onclick="closeDialog_T()" ></i>
</div>
<div id="NeiRong">
</div>
</div>
这是css里面的属性值,方便大家参考:
接下来就是要写方法,然后触发拖拽事件:
 <script>
        TuoZ();//调用方法
        function TuoZ() {
        //可以设置初始值的位置
            //$('#Ha').css("top", '200px');
            //$('#Ha').css("left", '1563px;');
            var ifmove = false;//开始判断是否移动
            var x1, y1;//鼠标离控件左上角的相对位置
            //mousedown当鼠标指针移动到元素上方,并按下鼠标按键时,发生 mousedown 事件。
            $("#Ha2").mousedown(function (e) {
                ifmove = true;
                //pageX返回相对于文档左边缘的鼠标位置
                //pageY返回相对于文档上边缘的鼠标位置
                //parseInt解析一个字符串并返回一个整数。
                x1 = e.pageX - parseInt($("#Ha").css("left"));
                y1 = e.pageY - parseInt($("#Ha").css("top"));
                //fadeTo:把被选元素逐渐改变至给定的不透明度
                $("#Ha2").fadeTo(20, 0.5);//点击开始拖动并透明显示
              //  参考:
              //$(selector).fadeTo(speed,opacity,callback);
              //必需的 speed 参数规定效果的时长。它可以取以下值:"slow"、"fast" 或毫秒。
             //fadeTo() 方法中必需的 opacity 参数将淡入淡出效果设置为给定的不透明度(值介于 0 与 1 间)。
                //可选的 callback 参数是该函数完成后所执行的函数名称。
            });

            //mousemove 鼠标离开事件
            $(document).mousemove(function (e) {
                if (ifmove) {
                    var x = e.pageX - x1;//移动时鼠标位置计算控件左上角的绝对位置
                    var y = e.pageY - y1;
                    var width = parseInt($("#content").css("width"));
                    var width1 = parseInt($("#Ha").css("width"));
                    var height = parseInt($("#content").css("height"));
                    var height1 = parseInt($("#Ha").css("height"));
                    //判断值是否 小于0,小于0就让等于0
                    if (x < 0) {
                        x = 0;
                    }
                    if (y < 0) {
                        y = 0;
                    }
                    //判断值是否 大于0,大于0就让等于0
                    if (y > height - height1) {
                        y = height - height1;
                    }
                    if (x > width - width1) {
                        x = width - width1;
                    }
                    $("#Ha").css({ top: y, left: x });//得到控件的新位置
                }
            }).mouseup(function () {
                //mouseup当在元素上松开鼠标按钮时,会发生 mouseup 事件。
                ifmove = false;
                $("#Ha2").fadeTo("fast", 1);//松开鼠标后停止移动并恢复成不透明
            });
        }
所上代码所示,也有注释分析,一个简单的拖拽就这样完成了。
//这里是窗体向下与向上点击事件的判断
var TF = true;
        $("#XiaLa").click(function () {
            if (TF) {
                $("#NeiRong").attr("style", "display:block;width:214px;height:212px;border:3px solid #3586D;");
                TF = false;
            } else {
                $("#NeiRong").attr("style", "display:none");
                TF = true;
            }
        });
实现的效果图如下,图中的蓝色导航部分当鼠标选中并进行拖拽时,改变背景颜色,背景颜色透明显示,点击:


 1234
1234

 被折叠的 条评论
为什么被折叠?
被折叠的 条评论
为什么被折叠?
 到【灌水乐园】发言


