


 本文通过一个简洁的案例介绍了如何在Java Spring框架中使用注解实现AOP操作,包括Maven配置、接口及实现类的创建,以及Logger日志增强类的设置。由于注解配置可能导致通知调用的不确定性,文章建议使用环绕通知进行手动控制。
避免代码过于混乱,我又写了个小案例,代码很简单。
Maven配置
<dependencies>
        <dependency>
            <groupId>org.springframework</groupId>
            <artifactId>spring-context</artifactId>
            <version>5.0.2.RELEASE</version>
        </dependency>

        <dependency>
            <groupId>org.aspectj</groupId>
            <artifactId>aspectjweaver</artifactId>
            <version>1.8.7</version>
        </dependency>
    </dependencies>
新建IAccountService接口类
package com.service;

//账户的业务层接口
public interface IAccountService {
    //模拟保存账户
    void saveAccount();
    //模拟更新账户
    void updateAccount(int i);
    //模拟删除账户
    int deleteAccount();
}
新建AccountService实现类
package com.service.impl;

import com.service.IAccountService;
import org.springframework.stereotype.Service;

//账户的业务层实现类
@Service("accountService")
public class AccountService implements IAccountService {
    public void saveAccount() {
        System.out.println("执行了保存账户");
    }

    public void updateAccount(int i) {
        System.out.println("执行了更新账户" + i);
    }

    public int deleteAccount() {
        System.out.println("执行了删除账户");
        return 0;
    }
}
Logger日志增强类
package com.itheima.utils;

import org.aspectj.lang.ProceedingJoinPoint;
import org.aspectj.lang.annotation.*;
import org.springframework.stereotype.Component;

//用于记录日志的工具类,它里面提供了公共的代码
@Component("logger")
@EnableAspectJAutoProxy
@Aspect
public class Logger {
    @Pointcut("execution( * *..*.*(..))")
    private void pointcut(){
    }

    //用于打印日志,计划让其在切入点方法执行之前执行(切入点方法就是业务层的方法)前置通知
    @Before("pointcut()")
    public void beforePrintLog(){
        System.out.println("前置通知Logger中的beforePrintLog方法开始记录日志");
    }

    //后置通知
    @AfterReturning("pointcut()")
    public void afterPrintLog(){
        System.out.println("后置通知Logger中的afterPrintLog方法开始记录日志");
    }

    //异常通知
    @AfterThrowing("pointcut()")
    public void afterThrowPrintLog(){
        System.out.println("异常通知Logger中的afterThrowPrintLog方法开始记录日志");
    }

    //最终通知
    @After("pointcut()")
    public void finallyPrintLog(){
        System.out.println("最终通知Logger中的finallyPrintLog方法开始记录日志");
    }
}
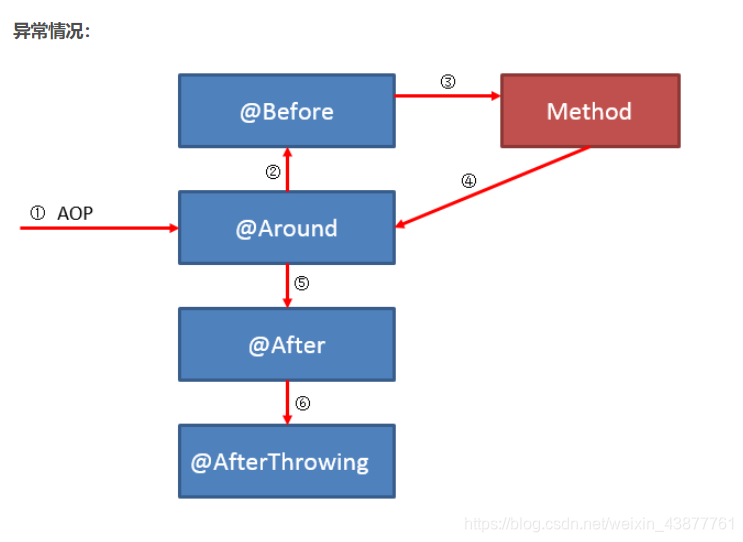
而其中各个通知的运行顺序如图所示:
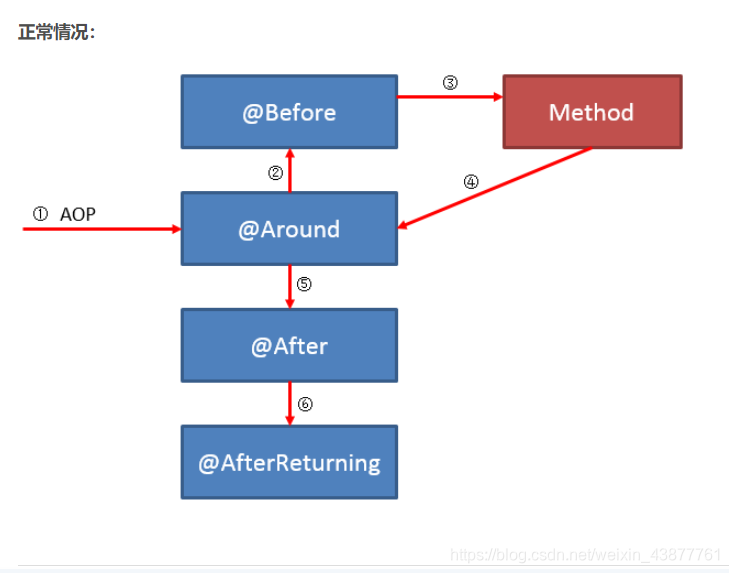
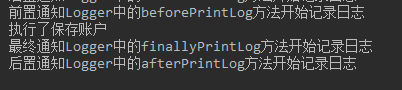
所以正常状态下运行,输出的结果:
那么我们就通过注解将AOP实现了。那么我们来看看我们使用到了哪些注解:
@EnableAspectJAutoProxy
此注解作用为打开AOP注解识别功能
@Aspect
此注解作用为指定切面方法类
@Pointcut
此注解作用为指定切入表达式。一般写于一个定义的类方法上,使用的时候需要将方法名以及括号带上。
@Before
此注解作用为指定前置通知方法,value值为切入表达式
@AfterReturning
此注解作用为指定后置通知方法,value值为切入表达式
@AfterThrowing
此注解作用为指定异常通知方法,value值为切入表达式
@After
此注解作用为指定最终通知方法,value值为切入表达式
注意:因为注解配置AOP会造成通知方法的调用的不确定性,那么我们可以使用环绕通知去手动控制注解调用。
环绕通知
@Around("pointcut()")
    public Object aroundPrintLog(ProceedingJoinPoint proceedingJoinPoint){
        Object object = null;
        try {
            //得到方法执行所需的参数
            Object args[] = proceedingJoinPoint.getArgs();
            System.out.println("环绕通知Logger中的aroundPrintLog方法开始记录日志 , 前置");
            //明确调用业务层的方法(切入点方法)
            object = proceedingJoinPoint.proceed(args);
            System.out.println("环绕通知Logger中的aroundPrintLog方法开始记录日志 , 后置");
            return object;
        }catch (Throwable e){
            System.out.println("环绕通知Logger中的aroundPrintLog方法开始记录日志 , 异常");
            throw new RuntimeException(e);
        }finally{
            System.out.println("环绕通知Logger中的aroundPrintLog方法开始记录日志 , 最终");
        }
    }
}
@Around
此注解作用为定义环绕通知。value值也为切入点表达式引用。
至此,就完成了简单的注解实现AOP操作。


 1031
1031

 被折叠的 条评论
为什么被折叠?
被折叠的 条评论
为什么被折叠?
 到【灌水乐园】发言


